A desk organizer should do more than hide clutter. It should keep the small tools you use every day visible, upright and easy to reach.
This beginner-friendly crochet desk organizer pattern creates a sturdy round container with two internal compartments. Use one side for pens and pencils and the other for scissors, crochet hooks, sticky notes, rulers or charging cables. Because the divider is made from two layers of crochet fabric, it is much firmer than a thin pocket sewn inside an ordinary basket.
The organizer is worked from the bottom upward. You will crochet a flat circular base, create a defined turning ridge, build straight sides and then add a reinforced divider. Most of the project uses single crochet, so it is suitable for a confident beginner who can already make a chain and basic stitch.
The instructions use US crochet terminology.
What You’ll Learn
- How to begin a three-dimensional crochet project with a magic ring
- How to increase a flat circle without creating waves
- How to mark and count continuous rounds
- How to use back loop only stitches to form a sharp base ridge
- How to crochet firm cylindrical walls
- How to make two matching divider panels
- How to attach a divider securely without distorting the organizer
- How to create a clean slip-stitch rim and weave in cord ends
Project Details
Skill level: Easy beginner
Finished size: Approximately 5½ inches across and 4½ inches tall
Compartments: Two
Construction: Base and sides worked in continuous rounds; divider worked in rows
Estimated time: 3–5 hours
Gauge: Approximately 11 single crochet stitches and 12 rounds per 4 inches
Yarn requirement: Approximately 150–180 yards total, depending on the cord or yarn used
The exact finished measurements may change with your cord thickness and tension. For a desk organizer, matching the published gauge is less important than creating a dense fabric that stands upright.
Materials You’ll Need
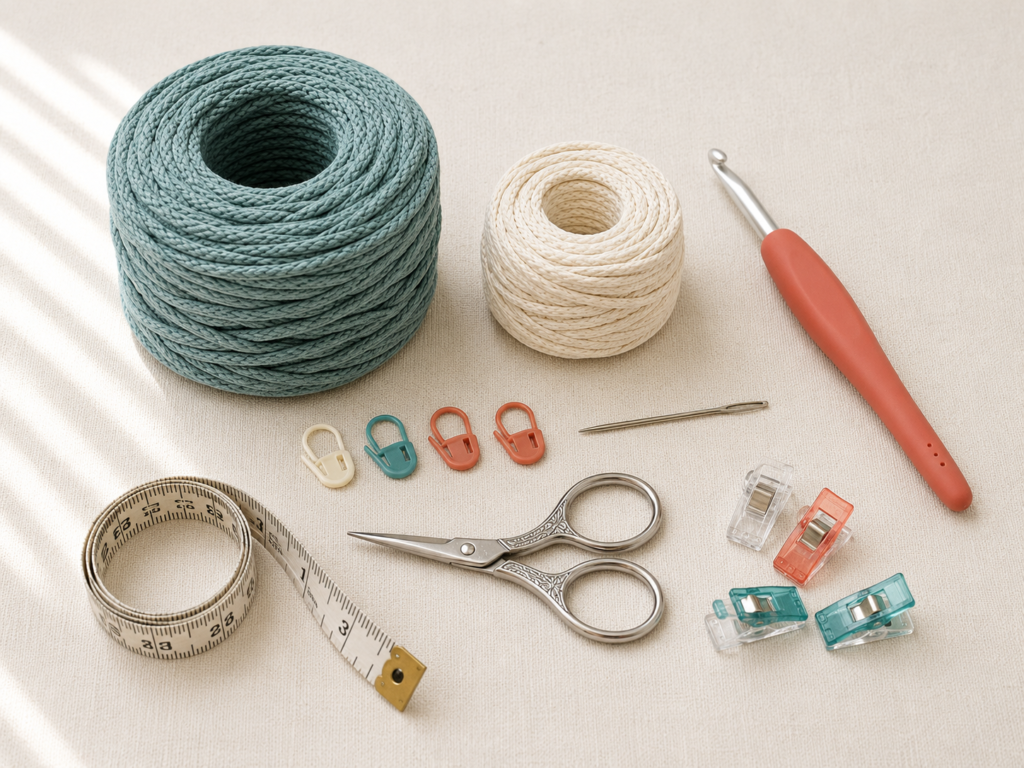
- Approximately 150 yards of dusty teal 3 mm braided cotton cord for the main color
- Approximately 20–30 yards of warm cream cord for the stripe and divider edging
- 5.5 mm crochet hook
- Four locking stitch markers
- Large-eye tapestry needle
- Small scissors
- Measuring tape
- Four sewing clips or removable stitch markers for positioning the divider
- Optional plastic canvas circle for an extra-firm base
- Optional nonslip felt circle for the underside
Cotton cord is recommended because it produces a structured fabric with limited stretch. Two strands of medium-weight cotton yarn held together can also work, but the organizer may be softer.
Crochet Abbreviations Used
- BLO = back loop only
- ch = chain
- inc = increase; work 2 single crochet stitches in the same stitch
- rep = repeat
- rnd/rnds = round/rounds
- RS = right side
- sc = single crochet
- sl st = slip stitch
- st/sts = stitch/stitches
- WS = wrong side
The Craft Yarn Council’s master list uses these standard US crochet abbreviations and also explains the differences between US and UK terms.
US and UK Terminology Note
This tutorial is written in US terms.
The stitch called single crochet in the US is called double crochet in the UK. A UK crocheter following this tutorial should substitute UK double crochet whenever the instructions say single crochet.
Before You Start
Check your fabric
Crochet a small single crochet swatch with your chosen cord. The fabric should feel dense and supportive. If you can easily see large spaces between the stitches, move down to a 5 mm hook. If the cord is difficult to pull through the loops and your hands become uncomfortable, try a 6 mm hook.
How to count continuous rounds
The organizer body is worked in a spiral. You will not join most rounds with a slip stitch.
Place a locking marker in the first stitch of every round. When you return to the marker:
- Count the stitches in the completed round.
- Remove the marker.
- Work the first stitch of the next round.
- Replace the marker in that new stitch.
Do not place the marker around the active loop on your hook. It must go through the completed stitch.
How to keep the base flat
A circular base needs evenly distributed increases. Too few increases create a bowl. Too many create ripples.
After every increase round, place the base on the table:
- A slight upward curve can usually be flattened by hand.
- Strong cupping means your tension may be too tight.
- Large waves mean your tension may be loose or the base has too many stitches.
How to keep the organizer sides straight
Once the BLO turning round is complete, stop increasing. Every side round should contain exactly 48 stitches.
Count every two or three rounds. Correcting one round is much easier than unraveling half the organizer.
How to choose colors
A medium or dark main color hides everyday marks better than pure white. A narrow contrasting stripe adds interest without making the desk organizer visually busy.
This sample uses:
- Color A: Dusty teal
- Color B: Warm cream
Use two colors with enough contrast for the stripe and divider edge to remain visible.
Step-by-Step Crochet Tutorial
Step 1: Make the Magic Ring and First Round
With Color A, make a magic ring.
Work 6 sc into the ring. Pull the yarn tail firmly until the center closes. Do not join the round.
Place a stitch marker in the first single crochet.
Round 1 stitch count: 6 sc
A magic ring gives the organizer a tightly closed center. This is useful because pens and small tools should not catch in an open hole at the bottom.
Beginner tip: Hold the base of the stitches between your thumb and finger while pulling the yarn tail. This prevents the stitches from twisting around the ring.
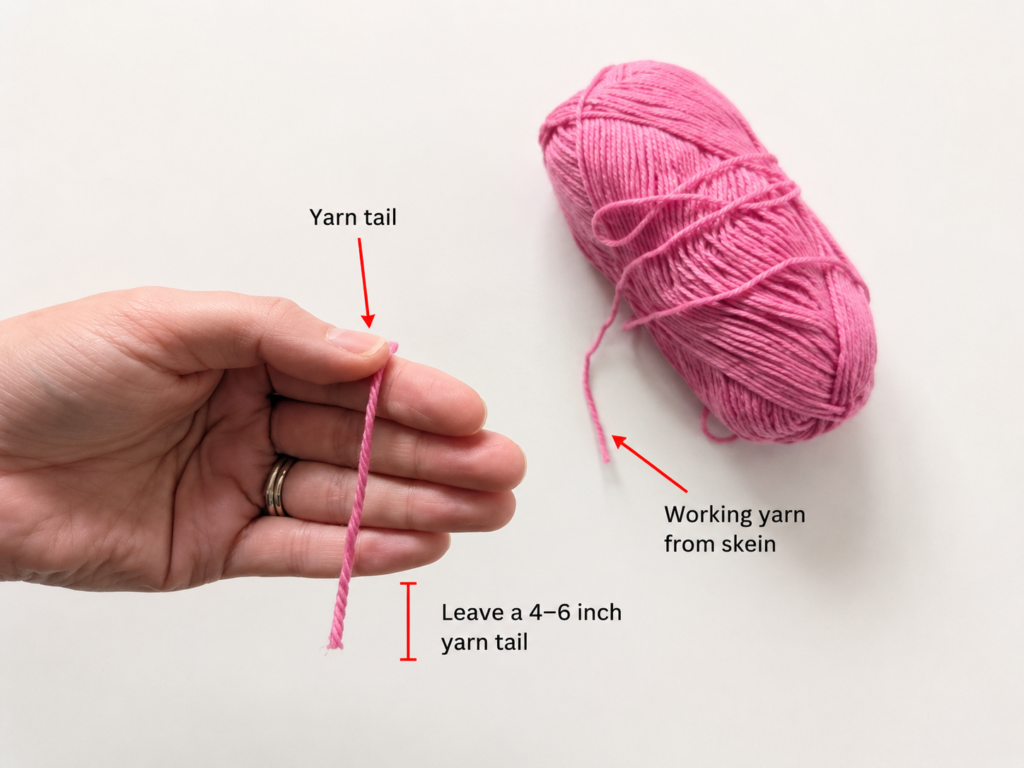
Common mistake to avoid: Do not cut the magic-ring tail short. Leave at least 6 inches so it can be woven securely through several stitches later.
Step 2: Increase the Circular Base
Continue in continuous rounds.
Round 2: Inc in every stitch around. 12 sts
Round 3: *(Sc in next st, inc in next st); rep from * around. 18 sts
Round 4: *(Sc in next 2 sts, inc in next st); rep from * around. 24 sts
Round 5: *(Sc in next 3 sts, inc in next st); rep from * around. 30 sts
Round 6: *(Sc in next 4 sts, inc in next st); rep from * around. 36 sts
Round 7: *(Sc in next 5 sts, inc in next st); rep from * around. 42 sts
Round 8: *(Sc in next 6 sts, inc in next st); rep from * around. 48 sts
Place the base flat on the table. It should measure approximately 5–5½ inches across.
The increases shift naturally because each round begins with a longer section of single crochet before the increase. If your base begins to look slightly hexagonal, stagger the increases in later rounds instead of stacking them directly above one another. The total stitch count must remain 48.
Beginner tip: Use six temporary markers to divide the round into six sections. Each section should gain one stitch per increase round.
Common mistake to avoid: Do not crochet into the stitch marker. Remove it, work into the marked stitch only when it is the next real stitch, and replace the marker in the first stitch of the new round.
Step 3: Create the Base Ridge
Round 9: Sc in the back loop only of every stitch around. 48 sts
Working through the back loop leaves each front loop unworked. Those front loops form a visible ridge around the base. More importantly, this round encourages the following stitches to rise vertically instead of continuing outward.
At the end of the round, place the base on the table and gently press the side stitches upward with your fingers.
Beginner tip: Look at the top of the stitch. It resembles a letter V. The back loop is the strand of the V farthest from you.
Common mistake to avoid: If the hook passes under both loops, that section will not form the same sharp ridge. Remove the stitch and insert the hook under only the back strand.
Step 4: Crochet the Organizer Walls
Return to working under both loops.
Rounds 10–12: Sc in every stitch around with Color A. 48 sts per round
At the end of Round 12, change to Color B in the last stitch:
- Insert the hook into the stitch.
- Yarn over with Color A and pull up a loop.
- Drop Color A.
- Yarn over with Color B.
- Pull Color B through both loops to finish the stitch.
Round 13: Sc in every stitch around with Color B. 48 sts
Change back to Color A in the final stitch.
Rounds 14–21: Sc in every stitch around with Color A. 48 sts per round
The organizer should now measure approximately 4¼ inches from the base ridge to the upper edge.
Do not cut the unused color immediately when making a one-round stripe. Carrying it up by one round can be neater than weaving two additional ends. Keep the carried strand loose enough that it does not pull the side inward.
Beginner tip: Stop after every third round and count all 48 stitches. Use a second marker to record the number of completed side rounds.
Common mistake to avoid: Accidentally adding a stitch at the round transition causes the organizer to widen. The marked stitch is the first stitch of the round, not an extra stitch.
Step 5: Finish the Upper Edge
Round 22: Sl st loosely in every stitch around. 48 sl sts
At the end of the round, cut Color A, leaving a 6-inch tail. Pull the tail completely through the active loop.
For a smoother finish:
- Thread the tail through a tapestry needle.
- Skip the first slip stitch.
- Insert the needle under both loops of the next slip stitch from front to back.
- Insert the needle down through the back loop of the final slip stitch.
- Adjust the new loop until it resembles the surrounding stitches.
- Weave the tail down through the inside of the organizer.
Beginner tip: Slip stitches should be relaxed. Tight slip stitches can pull the rim inward.
Common mistake to avoid: Do not work a decorative crab-stitch rim unless your cord is flexible. Reverse single crochet in firm cord can become very tight and uncomfortable to make.
Step 6: Crochet Two Divider Panels
The internal divider is double layered. Making two panels instead of one gives the compartments enough support to separate pens from heavier tools.
With Color A:
Foundation: Ch 15.
Row 1: Sc in second ch from hook and in each ch across. 14 sc
Rows 2–11: Ch 1, turn. Sc in each stitch across. 14 sc
Fasten off.
Make a second identical panel, but leave the yarn attached after Row 11.
Each panel should measure approximately:
- 4¾–5 inches wide
- 3½–3¾ inches tall
Compare the panels before joining them. If one is wider, count the stitches. If one is taller, count the rows.
Beginner tip: Mark the first and last stitch of every row. This prevents the rectangle from narrowing.
Common mistake to avoid: The chain 1 does not count as a stitch. Work the first single crochet into the first real stitch at the edge.
Step 7: Join the Divider Panels
Place the two divider panels together with their wrong sides touching.
Switch to Color B.
Beginning at one lower corner, single crochet through both layers:
- Work evenly across the first side.
- Place 2 sc in the upper corner.
- Work across the top.
- Place 2 sc in the next corner.
- Work down the second side.
- Leave the lower edge unjoined for now.
Fasten off and weave the cream ends between the two layers.
The unjoined lower edge allows you to open the divider slightly while sewing it to the organizer base. This creates a broader attachment area and helps the divider stand vertically.
Beginner tip: Insert the hook through corresponding spaces in both panels. Check the back frequently to make sure you have not missed one layer.
Common mistake to avoid: Too many edging stitches make the divider ripple. Aim for approximately one single crochet per row end along each vertical side.
Step 8: Position and Sew the Divider
Place the organizer upright.
Insert the divider so that it runs across the center of the circular base. Check the fit before sewing:
- The divider should touch both inner walls.
- Its upper edge should sit approximately ½ inch below the organizer rim.
- It should stand vertically without bowing.
- Both compartments should be usable.
Use sewing clips or locking markers to hold each side edge against the inner wall.
Open the unjoined bottom of the divider slightly. Position one panel on each side of the imaginary center line. This creates a narrow inverted V at the bottom.
Thread the tapestry needle with a long strand of Color A.
Sew the bottom
Use small whipstitches to attach the first lower edge to the organizer base. Sew through the divider edge and into the base stitches without passing completely through to the outside.
Repeat with the second lower edge.
Sew the sides
Sew one vertical divider edge to the inner wall using small mattress or whip stitches. Repeat on the opposite side.
Knot the ends inside the divider layers and weave them in securely.
Beginner tip: Sew four or five stitches, then check the organizer from above. Adjust the divider before completing the seam.
Common mistake to avoid: Pulling the sewing yarn too tightly can create dents on the outside. The seam should be firm, not puckered.
Pattern Notes or Stitch Notes
Turning chain rule
The chain 1 used for the divider rows does not count as a stitch. Always place the first single crochet in the first actual stitch.
Stitch counts
- Base begins with 6 stitches.
- Every increase round adds 6 stitches.
- Final base count is 48 stitches.
- Every side round remains at 48 stitches.
- Each divider panel contains 14 stitches and 11 rows.
Continuous-round rule
The main organizer is worked in a spiral. Do not join rounds unless explicitly instructed.
Right side and wrong side
The outside of the cylindrical organizer is considered the right side. The divider panels are reversible, but place any less tidy woven ends between the two layers before joining.
Adjusting the organizer size
To make the organizer wider, add more increase rounds:
- Next round: *(Sc in next 7 sts, inc); repeat around. 54 sts
- Following round: *(Sc in next 8 sts, inc); repeat around. 60 sts
Each extra increase round adds six stitches.
Measure the base before beginning the BLO round. The base diameter determines the organizer width.
To make it taller, add more straight rounds after Round 21. Allow extra yarn for every added round.
Adjusting the divider
Measure the organizer’s inside diameter after the walls are complete. The divider panel should be approximately ¼ inch narrower than that measurement before edging.
For example:
- Inner width: 5 inches
- Divider before edging: approximately 4¾ inches
This prevents the divider from forcing the walls outward.
Common Beginner Mistakes
1. The circular base becomes wavy
Cause: Loose tension, excess increases or a hook that is too large.
Fix: Try a smaller hook. If the waves are minor, work the next round without increases and check the base again. Do not remove increases randomly unless you recalculate the final stitch count.
2. The base begins to form a bowl too early
Cause: Tight tension, missed increases or a hook that is too small.
Fix: Count the round and confirm that all six increases were made. Move up one hook size if the count is correct but the base still cups strongly.
3. The walls flare outward
Cause: Additional stitches were added after the base was complete.
Fix: Count 48 stitches. Mark the first stitch clearly and avoid working an extra stitch into the round transition.
4. The walls lean inward
Cause: Missed stitches or very tight slip stitches around the rim.
Fix: Check the side-round counts. If the body is correct but only the upper edge narrows, remove the slip-stitch round and remake it more loosely.
5. The BLO ridge is incomplete
Cause: Some stitches were worked through both loops.
Fix: Examine the V-shaped top of each stitch before inserting the hook. Leave the front strand untouched around the entire round.
6. The divider panels have different sizes
Cause: A missed edge stitch or inconsistent row count.
Fix: Mark both edge stitches in every row and count the rows before fastening off.
7. The divider bends or collapses
Cause: Only one thin panel was used, the yarn is too soft or the divider is not attached along the bottom.
Fix: Use both divider layers, edge them together and sew both lower edges to the base.
8. The organizer feels floppy
Cause: The fiber is too elastic or the gauge is too loose.
Fix: Use braided cotton cord, hold two strands together, move down a hook size or insert a carefully trimmed plastic-canvas circle in the bottom.
How to Customize This Crochet Project
Change the yarn
For the firmest organizer, use cotton cord, recycled cotton tube yarn or a low-stretch cotton blend.
Medium acrylic yarn can be used, but hold two strands together and choose a slightly smaller hook. Acrylic has more bounce and may not stand as firmly.
The Craft Yarn Council classifies yarn by thickness from category 0 through category 7 and provides general hook-size guidance for each weight. These ranges are guidelines, so the dense fabric required by this organizer may need a smaller hook than an ordinary garment.
Create color blocks
Instead of one narrow stripe, divide the walls into three color sections:
- Lower third: dark color
- Middle third: medium color
- Upper third: light color
Change colors in the final yarn-over of the stitch before the new section begins.
Make three compartments
Make two narrower dividers. Install them parallel to one another to form three sections.
Leave enough room for your intended supplies. A compartment for sticky notes should be wider than one intended for pens.
Add an outside pocket
Crochet a rectangle approximately 3 inches wide and 2½ inches tall. Sew its lower and side edges to the outside of the organizer. Use it for paper clips, erasers or small stitch markers.
Avoid loading the pocket with heavy metal scissors because it may pull the organizer wall outward.
Add a nonslip base
Cut a felt circle slightly smaller than the organizer base and hand-sew it to the underside. Choose felt in a matching or contrasting color.
Add handles
For a portable craft organizer, crochet two short straps:
- Ch 12.
- Sc in the second chain and across.
- Work one additional row.
- Sew one strap to each side.
Attach handles through several rows so the weight is distributed.
Gift ideas and uses
This desk organizer can be filled and given as:
- A teacher appreciation gift
- A back-to-school desk accessory
- A crochet-hook organizer
- A home-office gift
- A dorm-room storage container
- A makeup-brush holder
- A remote-control basket
- A craft-table organizer
- A child’s colored-pencil holder
Finishing Instructions
Fasten off securely
Cord ends can be more difficult to hide than ordinary yarn. Leave long tails and use a large-eye needle.
Weave each tail:
- Horizontally through four or five stitches.
- Back in the opposite direction through a different path.
- Vertically through two rounds when possible.
- Trim only after the tail feels secure.
Shape the organizer
Fill both compartments loosely with clean towels or rolled fabric. Adjust the base and rim with your hands.
Allow the organizer to rest overnight. This helps the divider and walls settle into their final positions.
Blocking
Heavy wet blocking is usually unnecessary for braided cord.
For cotton yarn:
- Lightly mist the organizer with water.
- Shape it around a round container of the correct size.
- Keep the divider straight.
- Allow it to air-dry completely.
Do not use strong steam directly on synthetic cord because heat can flatten or damage the fiber.
Washing and care
Follow the yarn manufacturer’s label. When gifting the organizer, save the yarn label or include written care instructions. The Craft Yarn Council recommends retaining yarn-label care information because washing, drying and heat tolerance depend on the fiber.
For an organizer made from cotton cord:
- Spot clean when possible.
- Hand wash gently in cool water if necessary.
- Do not wring.
- Reshape while damp.
- Air-dry over an upside-down container.
- Avoid tumble drying unless the cord label specifically allows it
Quick Printable-Style Summary
Skill level: Easy beginner
Finished size: Approximately 5½ inches across and 4½ inches tall
Materials:
3 mm cotton cord, 5.5 mm hook, stitch markers, scissors, tapestry needle and sewing clips
Stitches:
Chain, single crochet, increase, slip stitch and back loop only single crochet
Starting method:
Magic ring with 6 single crochet stitches
Base:
Increase by 6 stitches per round until 48 stitches
Turning round:
Work one round of 48 single crochet stitches in the back loop only
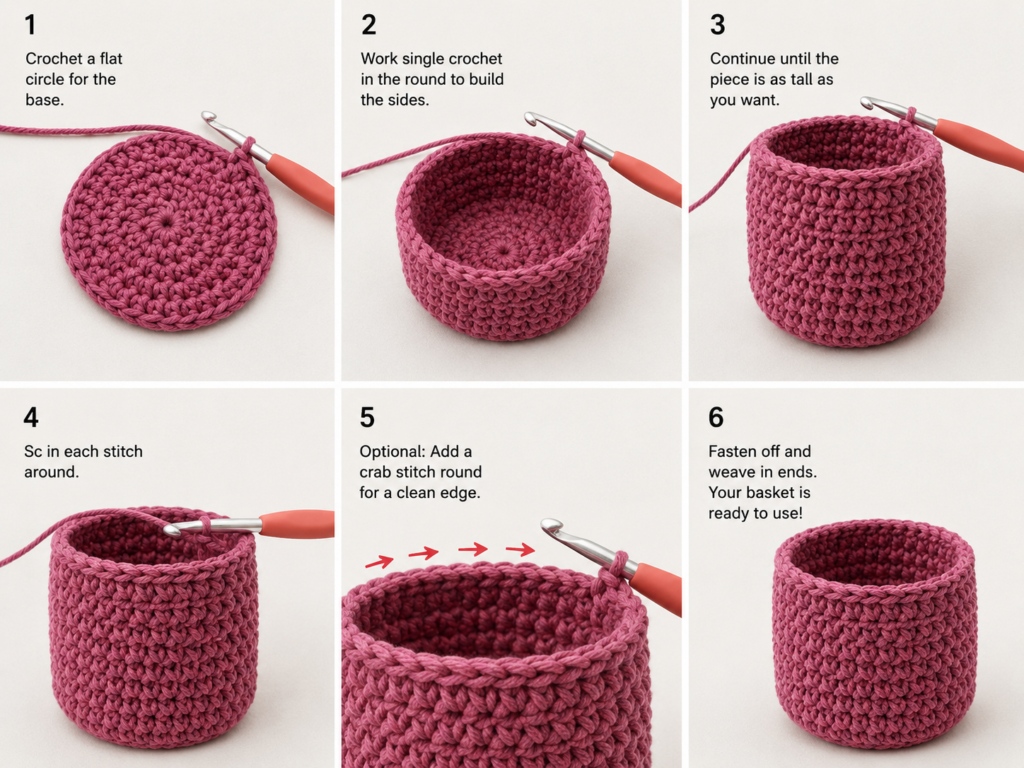
Sides:
Work 12 straight single crochet rounds, including one contrast-color round
Rim:
One loose slip-stitch round
Divider:
Make two 14-stitch by 11-row single crochet panels, edge them together and sew them across the center of the organizer
Finishing:
Weave in all ends, shape the organizer and spot clean or wash according to the yarn label
FAQ
Can a beginner make this crochet desk organizer?
Yes. The project mainly uses single crochet. The most important skills are counting stitches, moving a stitch marker and recognizing the back loop. A beginner should practice the magic ring and single crochet before beginning.
What yarn makes a crochet organizer stand up?
Braided cotton cord, cotton tube yarn and multiple strands of medium cotton yarn create the firmest fabric. Avoid very soft, drapey yarn unless you plan to add plastic canvas or a rigid insert.
Can I use ordinary worsted-weight yarn?
Yes. Hold two strands of worsted-weight cotton together and test the fabric with a 5–5.5 mm hook. The finished organizer may be lighter and softer than one made from cord.
Why is my crochet organizer curling?
A small amount of curling after the BLO round is expected because the fabric is changing direction. Strong curling during the base rounds usually means the stitch count, increase placement or hook size needs adjustment.
How do I make the organizer larger?
Continue the circular increase sequence before beginning the BLO round. Add six stitches in every additional increase round. Measure the base regularly and adjust the divider width to match the finished inside diameter.
Can I put a jar or can inside the organizer?
A round container can be inserted for extra support, but the internal divider will need to be omitted or redesigned. Check that any recycled can has a completely smooth, protected rim.
Can this organizer be machine washed?
That depends on the fiber and cord construction. Follow the yarn label. A divided organizer is less likely to lose its shape when gently hand washed and air-dried around a form.
Conclusion
This crochet desk organizer uses simple stitches, but the finished project is much more useful than an ordinary practice swatch. The circular base teaches controlled increases, the BLO round introduces three-dimensional shaping, and the double-layer divider turns a basic container into practical desktop storage.
Use the two compartments for office supplies, crochet hooks, art tools or small personal items. Once you understand the construction, the same method can be adapted into smaller pencil cups, wider craft baskets or multi-section organizers.
Save the pattern with your beginner crochet projects so you can return to the sizing and divider instructions when your desk needs another handmade storage solution.





