A handmade crochet parandi can turn a simple braid into something special. With delicate flowers, little green leaves, and soft yarn tassels, this decorative hair accessory adds color and movement without requiring complicated crochet techniques.
A parandi, also spelled paranda, is a traditional decorative hair-braid accessory associated particularly with Punjabi culture. Many styles feature long strands or cords woven into the hair and finished with tassels. Modern crochet versions can also include floral motifs, leaves, and other handmade details.
For this beginner-friendly project, we’re making a floral crochet parandi with two slim hanging cords, small pink flowers, green leaves, and matching tassels.
The best part? You don’t need to know advanced crochet stitches.
You’ll practice basic chains, single crochet, half double crochet, and double crochet. Then you’ll combine several small pieces into one accessory.
This tutorial includes clear written instructions, stitch counts, beginner tips, and twelve planned photo placements so you can follow each part of the process.
What You’ll Learn
By the end of this crochet parandi tutorial, you’ll know how to:
- Make a narrow crocheted attachment for your hair.
- Crochet flexible cords that hang neatly.
- Create small pointed leaves using basic stitches.
- Crochet a simple five-petal flower.
- Attach flowers and leaves without visible bulky knots.
- Prepare matching yarn tassels.
- Adjust the accessory’s length to suit your hairstyle.
- Finish and care for your handmade parandi.
We’ll work on the pieces separately and assemble everything at the end. This makes the project easier to manage, particularly if you’ve never crocheted a decorative hair accessory before.
Crochet Parandi Pattern at a Glance
| Detail | Pattern specification |
|---|---|
| Skill level | Confident beginner |
| Project type | Floral hair accessory |
| Yarn | DK/light (#3) cotton |
| Crochet hook | 3.5 mm |
| Finished drop | Approximately 30 cm (12 in) for the sample |
| Attachment tab | Approximately 8–10 cm (3–4 in) |
| Hanging cords | 2, approximately 25 cm (10 in) each |
| Flowers | 6 five-petal flowers |
| Leaves | 6 pointed leaves |
| Tassels | 2, approximately 5–7 cm (2–3 in) long |
| Estimated time | 3–5 hours |
| Terminology | US crochet terms |
The measurements are suggested sample dimensions, not a fixed gauge-tested size. The finished dimensions will depend on your tension and materials.
For longer hair, simply make longer cords.
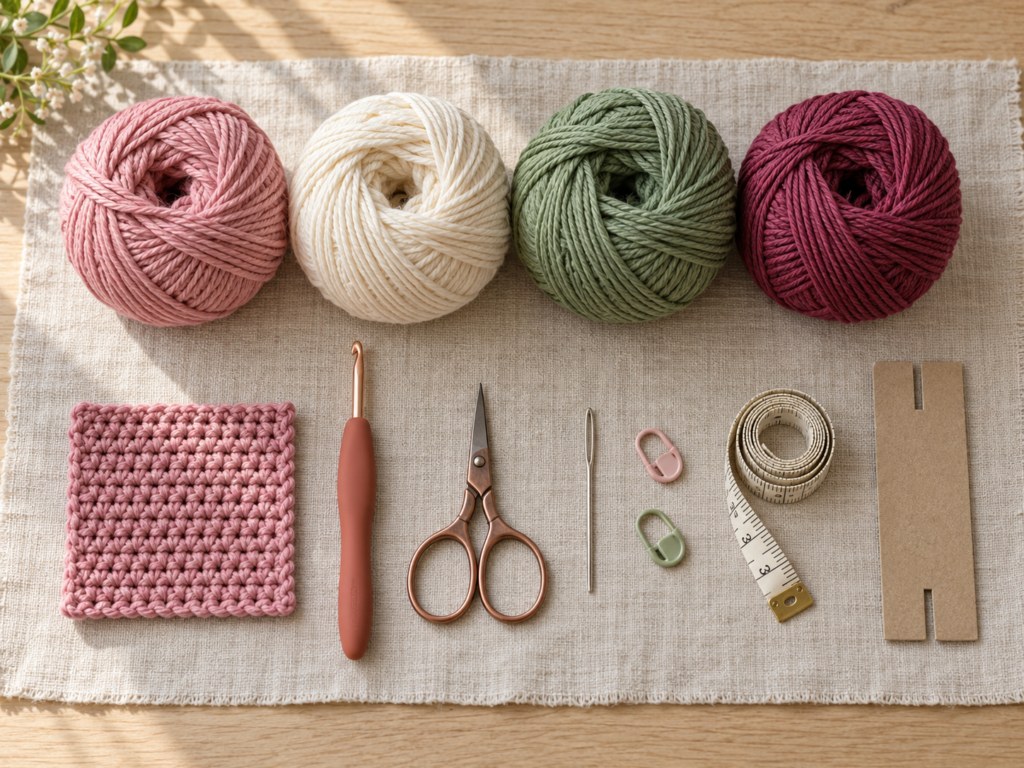
Materials You’ll Need
This pattern uses ordinary craft supplies and small amounts of yarn.
Yarn
Choose DK/light (#3) cotton or a cotton blend in the following shades:
- Muted sage green — approximately 20–30 g for the tab, cords, and leaves.
- Dusty rose — approximately 10–15 g for the flowers.
- Warm cream — a small amount for flower centers.
- Deep berry — approximately 10–15 g for tassel accents.
These quantities are approximate and allow for some extra yarn. A longer or fuller parandi may require more.
Tools
- 3.5 mm crochet hook.
- Sharp scissors.
- Blunt yarn or tapestry needle.
- Measuring tape.
- Two stitch markers.
- Small cardboard rectangle for making tassels.
- Optional hair elastic for styling.
Choose a hook that produces defined stitches without making the finished cords stiff.
Crochet Abbreviations Used
All instructions are written in US crochet terminology.
| Abbreviation | Meaning |
|---|---|
| ch | Chain |
| sc | Single crochet |
| hdc | Half double crochet |
| dc | Double crochet |
| sl st | Slip stitch |
| st / sts | Stitch / stitches |
| rep | Repeat |
| FO | Fasten off |
In UK crochet terminology, US single crochet is called double crochet, and US double crochet is called treble crochet. Follow the US definitions here to avoid changing the shape of the flowers or leaves.
Before You Start
Choose a Yarn That Feels Comfortable Against Hair
Cotton yarn is a good choice for a beginner because the stitches are easy to see, and the finished motifs keep their shape reasonably well.
Very fuzzy yarn can catch on hair. Thick yarn can make the top of the parandi bulky.
If you’re making your first accessory, choose smooth yarn and a manageable hook size.
Understand the Construction
This crochet parandi contains five main components.
The attachment tab is a narrow, flexible crocheted strip used to secure the accessory.
The two hanging cords form the base for the decorative elements.
The crochet leaves provide small green accents.
The crochet flowers introduce color and make the accessory look fuller.
Finally, the yarn tassels finish the lower ends and create movement.
You’ll crochet these components separately before joining them together.
Make a Small Tension Sample
Crochet a short chain of ten stitches and work two rows of single crochet.
Your stitches should sit next to one another without large holes, but the fabric should still bend easily.
If it feels stiff, try a slightly larger hook.
If the stitches look very loose, try a slightly smaller hook.
There is no strict gauge for this project. Consistent tension matters more than matching an exact number of stitches per inch.
Keep Your Edges Straight
Count your stitches after each short row.
When you work single crochet in rows, make one turning chain unless otherwise instructed. This turning chain does not count as a stitch.
Pay particular attention to the first and final stitch of each row.
Plan the Length Before Crocheting
For this sample, the decorative hanging section measures approximately 30 cm, including tassels.
If you want a longer accessory, measure from the point where the parandi will be secured to the desired tassel position.
Use this measurement as a guide rather than assuming every hairstyle requires the same length.
Leave enough undecorated cord or tab at the top to make the accessory easy to attach.
Step-by-Step Crochet Parandi Tutorial
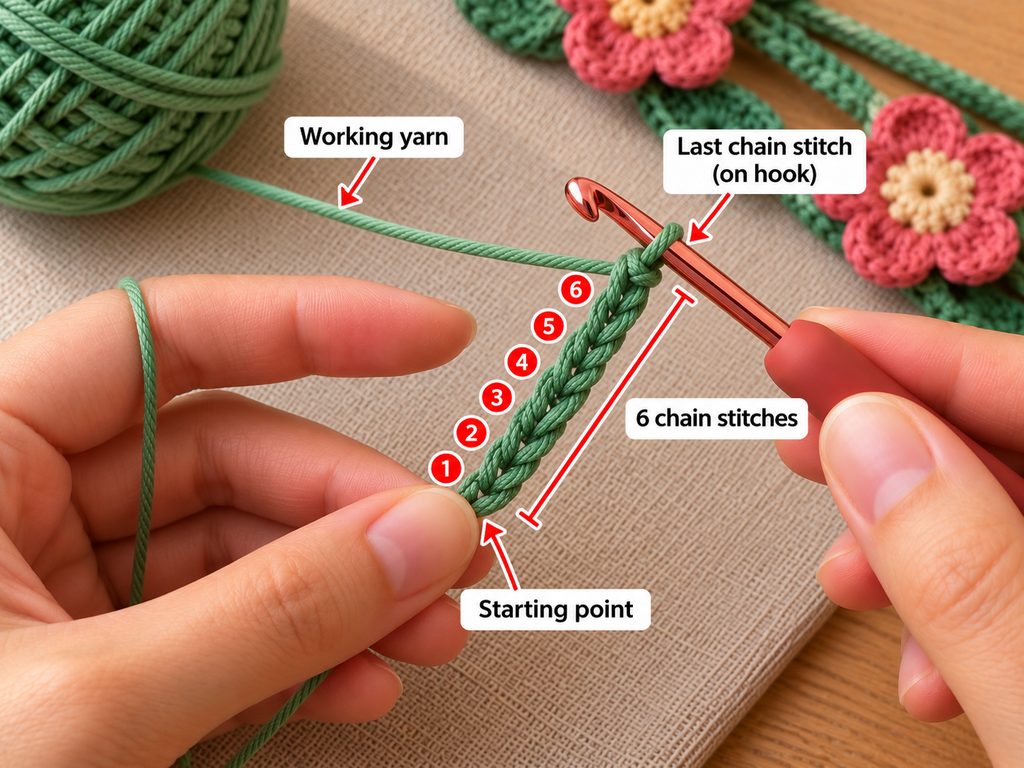
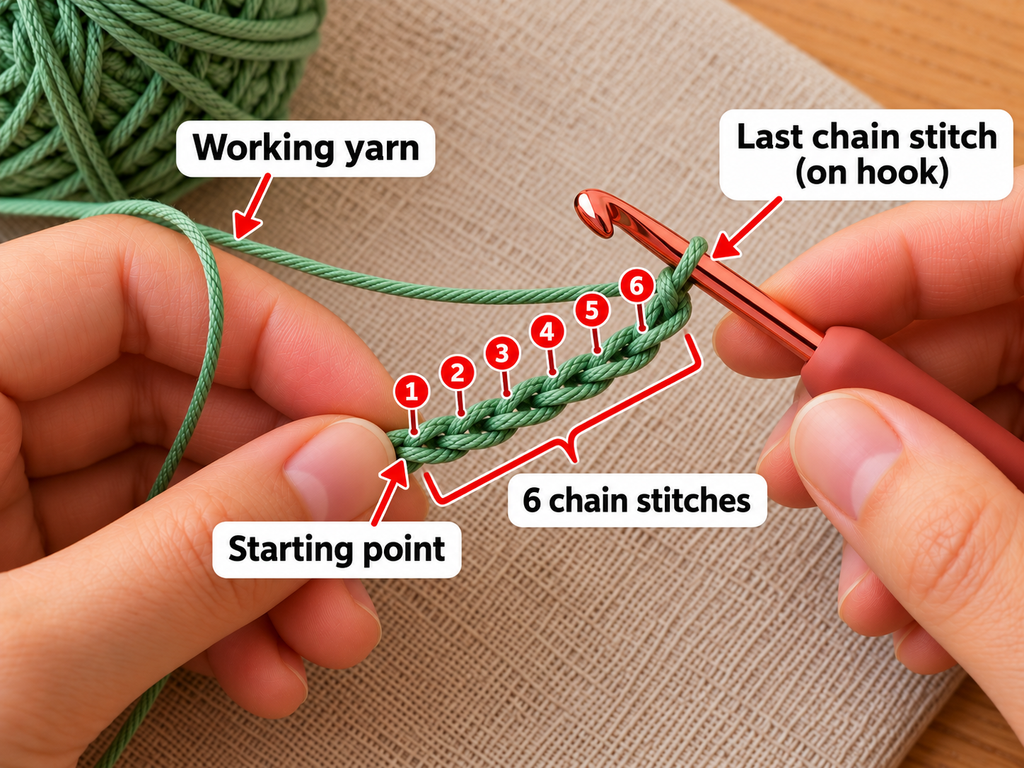
Step 1: Make the Foundation Chain
Start with the muted sage green yarn.
Make a slip knot and place it on your 3.5 mm crochet hook.
Chain seven stitches.
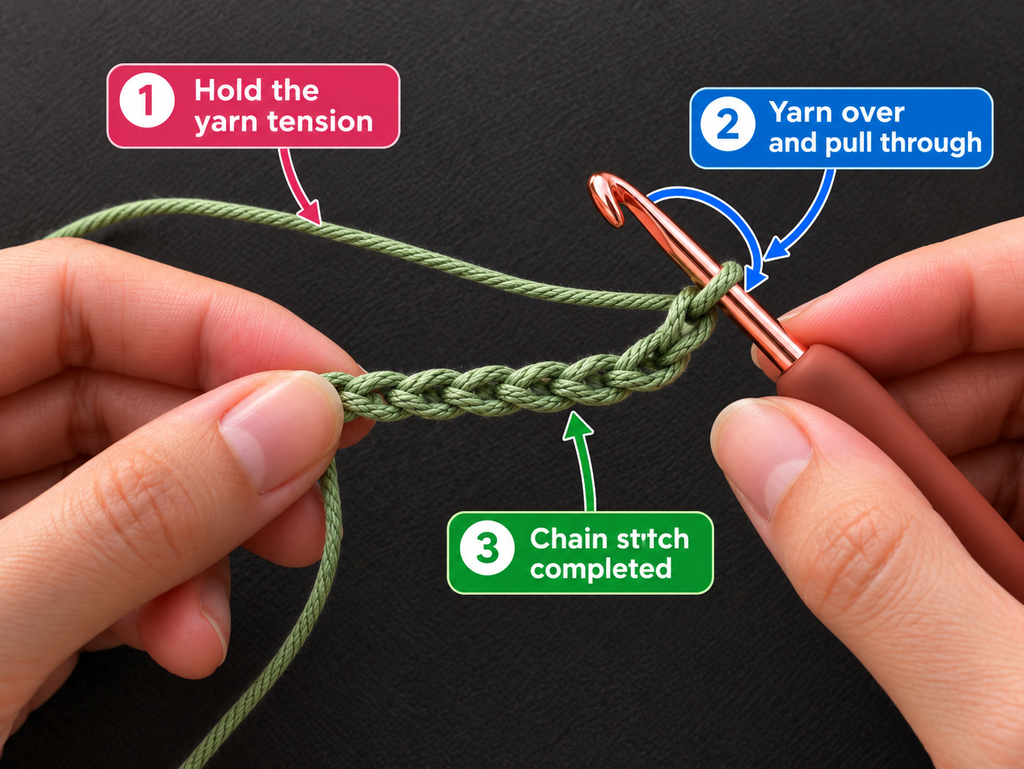
To make one chain:
- Hold the working yarn behind the hook.
- Wrap the yarn over the hook.
- Pull that yarn through the loop already on the hook.
You now have one new chain stitch.
Repeat until you have seven chains.
Don’t count the loop currently sitting on your hook as a chain stitch.
Place your chain on the tabletop and look at the small V-shaped stitches along its front.
These are the stitches you’ll work into during the next step.
Beginner tip: Leave your foundation chain relaxed. Tight starting chains make it difficult to insert your hook into the next row.
Common mistake to avoid: Accidentally counting the slip knot as your first chain. Count the completed V-shaped chains instead.
Step 2: Crochet the Attachment Tab
This small strip will help you secure the parandi near the beginning of your braid.
Starting in the second chain from your hook, work one single crochet into each chain across.
You should have six single crochet stitches.
Row 1: Sc in second ch from hook and in each remaining ch. (6 sc)
Row 2: Ch 1, turn, sc in each st across. (6 sc)
Rows 3 onward: Repeat Row 2 until your strip measures approximately 8–10 cm.
After your final row, fasten off and weave the tail through the fabric securely.
The tab should look like a narrow rectangle. It shouldn’t be wide enough to cover a large part of your braid.
Hold the strip between your fingers and bend it gently. If it feels comfortable and flexible, you’re ready to continue.
If the edges are noticeably wider or narrower in some places, check your stitch counts before proceeding.
Beginner tip: Place a stitch marker in the first stitch of each row if you frequently lose track of the edges.
Common mistake to avoid: Working into the turning chain at the end of a row. Doing this can accidentally increase your stitch count.
Step 3: Begin Your First Crochet Leaf
The pointed leaves are small motifs that will be sewn onto the hanging cords later.
Use the same muted sage yarn.
Make a slip knot and chain seven.
You’ll work along one side of this foundation chain, then turn around the end and work along the opposite side.
Starting in the second chain from the hook, work:
- 1 sc in the second chain.
- 1 hdc in the next chain.
- 1 dc in each of the next two chains.
- 1 hdc in the next chain.
- 1 sc in the final chain.
You should now have six stitches along the first side of your foundation chain.
Notice how the stitches become taller toward the middle of the leaf and shorter near the ends.
That’s what creates the gently pointed shape.
Beginner tip: Keep the foundation chain flat while you work. If it twists, you may accidentally crochet into the wrong loop.
Common mistake to avoid: Putting both double crochets into one chain instead of working one into each of two consecutive chains.
Step 4: Complete the Pointed Leaf
Once you reach the final foundation chain, chain one to help turn around the tip.
Rotate your work and crochet along the unworked side of the same foundation chain.
Work the following stitches into the remaining free loops, starting at the end nearest your hook:
- 1 sc in the first available foundation chain.
- 1 hdc in the next chain.
- 1 dc in each of the next two chains.
- 1 hdc in the next chain.
- 1 sc in the final chain.
Slip stitch to the first single crochet on the opposite side to close the shape.
Fasten off, leaving a yarn tail approximately 15 cm long.
This tail will be useful when attaching the leaf to your parandi.
Make six leaves in total.
Don’t worry if every leaf looks slightly different. Small variations in tension can make handmade leaves look more natural.
Lay the leaves flat and gently smooth them between your fingers.
Beginner tip: Don’t pull the slip stitch too tightly. It should close the shape without bunching the top of the leaf.
Common mistake to avoid: Working into the same upper loops used for the first side. Follow the free loops on the opposite side of the starting chain.
Step 5: Crochet Two Long Hanging Cords
The cords form the main body of your floral parandi.
For this version, we’ll use a simple chain reinforced with slip stitches. The result is slim, flexible, and suitable for attaching small flowers.
With sage-green yarn, make a foundation chain measuring approximately 25 cm.
Count the chains and write down your total.
Your chain count will depend on your yarn and tension, so measure the actual length rather than relying on a fixed number.
Starting in the second chain from your hook, work one slip stitch into each chain across.
To make a slip stitch:
- Insert your hook into the indicated chain.
- Yarn over.
- Pull the yarn through the chain and the loop on your hook in one movement.
Keep your slip stitches relaxed.
When you reach the end, fasten off, leaving approximately 20 cm of yarn for attachment.
Make a second cord using the same number of starting chains and the same stitch method.
Lay the cords side by side.
They should be approximately the same length when resting naturally without being stretched.
If one looks significantly shorter, check whether your slip stitches were tighter.
Use a gentle tug to relax the stitches, but don’t pull hard enough to stretch the yarn permanently.
If the difference remains large, remake the shorter cord with more relaxed tension.
Sew one end of each cord securely to the lower end of the attachment tab.
Position the cords evenly across the width of the tab, leaving some space between their starting points.
Beginner tip: Let each cord hang freely before deciding whether its length matches the other. Long, narrow crochet pieces can appear different when coiled on a table.
Common mistake to avoid: Making slip stitches too tight. Very tight stitches can cause a cord to become stiff or curl.

Step 6: Start a Small Five-Petal Crochet Flower
Now it’s time to add the floral details.
Switch to dusty rose cotton yarn.
We’ll make a simple five-petal flower using a magic ring.
If you’re new to the magic ring, practice opening and tightening it a few times before beginning your flower.
Flower Round 1:
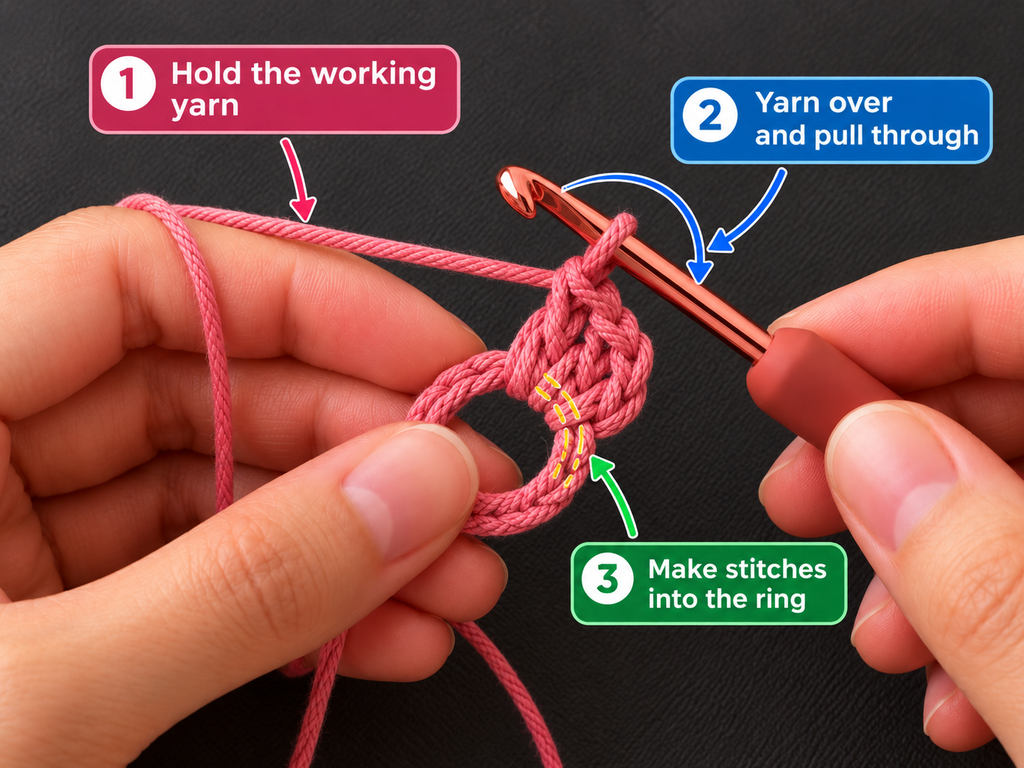
Make a magic ring.
Work five single crochet stitches into the ring.
Pull the starting tail gently to close the center, but leave the stitches loose enough for the next round.
Slip stitch into the first single crochet to join.
You now have five stitches.
Flower Round 2:
Work the following into the first stitch:
(sl st, ch 2, 2 dc, ch 2, sl st)
This forms the first petal.
The two double crochet stitches create its rounded middle, while the chains shape the sides.
Do not work additional petals into this same stitch.
Move to the next stitch for the next petal.
Beginner tip: Keep the center ring accessible while working the petals so you can tighten it again if needed.
Common mistake to avoid: Forgetting the final slip stitch inside the petal cluster. This stitch helps bring the petal back toward the center.
Step 7: Complete All Five Flower Petals
Continue around the small flower.
Repeat the same petal sequence in each remaining single crochet stitch:
(sl st, ch 2, 2 dc, ch 2, sl st)
You’ll finish with five rounded petals.
After making the final petal, fasten off with a long tail for sewing.
Tighten the magic ring again if the center has loosened.
Use your fingers to spread the petals gently.
If they overlap slightly, that’s fine. They should remain distinct rather than folding into a thick bundle.
For the flower center, use your yarn needle and a short length of warm cream yarn.
Make two or three small embroidery stitches across the central opening, securing the yarn on the reverse side.
Alternatively, leave the center pink for an even simpler project.
Make six identical flowers.
You can make them all in dusty rose or change one or two to cream if you want a more varied look.
For the sample, keeping the six flowers in the same shade creates a balanced, coordinated result.
Beginner tip: Complete all the flowers before attaching them. This makes it easier to compare sizes and arrange them evenly.
Common mistake to avoid: Making a different number of double crochets in each petal. Check that every petal contains two double crochet stitches.
Step 8: Make the Yarn Tassels
The tassels are one of the most recognizable features of a parandi.
They add movement and create a neat ending for the hanging cords.
Cut a cardboard rectangle approximately 7 cm wide.
This will act as your tassel template.
Hold one end of the deep berry yarn against the cardboard and wrap the yarn around its width fifteen to twenty times.
You can add several wraps of sage-green yarn to coordinate with the cords.
The exact number of wraps controls the fullness of your tassel.
For two matching tassels, use the same number of wraps for each one.
Slide a separate length of yarn beneath the wrapped strands at one edge of the cardboard.
Tie this yarn firmly to gather the strands.
Carefully slide the wrapped bundle off the cardboard.
Cut through the loops at the opposite edge.
You now have a bunch of loose strands attached at one end.
Fold and arrange the strands so they hang evenly.
Wrap another length of yarn around the bundle approximately 1 cm below the top knot.
Tie securely and hide the wrapping ends within the tassel.
Repeat to make the second tassel.
Use the same colors and approximate amount of yarn.
Don’t trim the bottom too closely yet. You’ll make the final adjustment after attaching the tassels to the cords.
Beginner tip: Count your wraps rather than guessing. Matching wrap counts help the two tassels look evenly balanced.
Common mistake to avoid: Tying the tassel loosely at the top. A weak gathering knot can allow individual strands to slip out.
Step 9: Arrange and Attach the Crochet Flowers and Leaves
Lay the attachment tab and two cords flat on your tabletop.
Place three flowers beside each cord.
Arrange three leaves between or near the flowers on each side.
Before sewing, move the motifs around until the arrangement looks balanced.
Leave the first few centimeters of the hanging section relatively undecorated.
This gives the parandi space to sit comfortably against the hair without creating a bulky attachment point.
Try placing the flowers in a gentle alternating arrangement rather than lining them up in perfectly identical positions.
For example, put the first flower slightly higher on the left cord and the next flower slightly lower on the right.
Position the leaves so their pointed ends generally face downward.
Once you’re happy with the layout, use your yarn needle and the long tails from your motifs to attach them.
For each flower:
- Bring the yarn needle through the back of the flower center.
- Pass it through a secure part of the crochet cord.
- Return through the flower center or the neighboring stitch.
- Repeat until the motif sits securely.
- Weave the remaining tail into the back of the flower.
For each leaf, stitch through its base and one or two points along its center if needed to prevent twisting.
Avoid attaching the entire leaf edge flat against the cord.
A little freedom around the outer edge gives the leaf a softer appearance.
Once you’ve attached all the motifs, lift the parandi by its tab and let the cords hang.
Check that flowers aren’t turning backward or pulling one strand shorter than the other.
Beginner tip: Use removable stitch markers to hold the flowers temporarily before sewing. You’ll be able to adjust the spacing without undoing stitches.
Common mistake to avoid: Attaching flowers only by one loose loop. Secure each flower through the firm central stitches so it doesn’t swing out of position.
Step 10: Secure the Tassels to the Hanging Cords
Take one completed tassel and one hanging cord.
Use the remaining yarn tail from the end of the cord to stitch through the top gathering section of the tassel.
Pass the needle through the gathered yarn several times, making sure the cord and tassel are firmly connected.
If the cord tail is too short, attach a separate length of matching sage yarn.
Tie the yarn securely, then weave the ends into the tassel wrapping.
Repeat with the second cord and tassel.
Lift the parandi to check that both tassels hang at approximately the same height.
If one tassel appears lower because the cord is longer, adjust the join before trimming the tassel ends.
Check that the gathered strands don’t slide when gently pulled.
Beginner tip: Attach each tassel through its secure gathering knot instead of only through a few loose lower strands.
Common mistake to avoid: Relying on glue alone. Stitching is preferable for a flexible accessory that will move and be handled regularly.
Step 11: Check the Length and Test the Fit
Your floral parandi is almost finished.
Hold it by the attachment tab and allow both decorated cords to hang naturally.
Check the overall shape from top to bottom.
Does one side have noticeably more flowers or leaves than the other?
Do the tassels hang at about the same height?
Does the upper tab remain flexible enough to fold or tie comfortably?
If something looks uneven, adjust it before securing every remaining yarn tail.
To test the fit, position the top tab near the upper section of a loose braid.
You can fold the tab around a small secured section or fasten it with a suitable hair elastic. Do not force the decorated cords into the braid if that creates uncomfortable bulk.
For a decorative hanging style, allow the two floral cords to run alongside the braid.
If you prefer the parandi to be incorporated into the braid itself, test the placement with your hair divided into sections before wearing it for a full day.
If your hairstyle is very long, consider extending the cords.
The important measurement is the finished hanging position, not simply how long the project looks on the table.
Beginner tip: Test the parandi with the hairstyle you actually plan to wear. A finished accessory can look very different when suspended beside hair.
Common mistake to avoid: Attaching thick flowers directly at the top, where they’ll be hidden inside the braid or become uncomfortable.
Crochet Parandi Pattern Notes
Turning Chain Rules
The attachment tab uses one chain at the beginning of every new row.
This turning chain does not count as a stitch.
Each completed row should contain six single crochet stitches.
The leaves are made around a foundation chain, not in repeated turning rows.
The flowers are crocheted in joined rounds.
Stitch Counts
Attachment tab
- Starting chain: 7.
- Single crochet stitches per row: 6.
- Continue to your preferred tab length.
Leaves
- Starting chain: 7.
- First side: 6 shaped stitches.
- Second side: 6 shaped stitches.
- One turning chain at the tip.
- Slip stitch to close.
Flowers
- Round 1: 5 sc.
- Round 2: 5 petal clusters.
- Each petal:
(sl st, ch 2, 2 dc, ch 2, sl st)worked in one stitch.
Cords
- Starting chain: Measure to desired length.
- Reinforcement row: One slip stitch in each foundation chain except the skipped first chain.
Right Side and Wrong Side
Small crochet leaves and flowers usually have a side that looks neater to you.
Choose this side as the front when arranging the motifs.
Try to keep all flower centers facing the same direction when the parandi is hanging.
The reverse sides should have neatly secured yarn tails.
Repeat Pattern
Make six leaves and six flowers for the sample.
This creates three flowers and three leaves for each of the two cords.
If you make a longer parandi, you can increase the number of motifs while keeping the same basic arrangement.
Adjusting the Size
For a more delicate accessory, use thinner yarn and a correspondingly smaller hook.
For a longer accessory, lengthen the cords and increase the number of motifs if desired.
For a fuller tassel finish, increase the wraps on your cardboard template.
Keep the two tassels approximately equal in fullness and finished length.
Common Beginner Mistakes and How to Fix Them
1. The Crochet Foundation Chain Is Too Tight
A tight foundation chain makes the following stitches difficult to work.
It can also cause your tab to curve.
Fix: Relax your yarn tension or use a hook one size larger for the starting chain before returning to your usual hook.
2. The Attachment Tab Becomes Wider
If the number of stitches increases accidentally, the strip may become triangular.
Fix: Count six single crochets at the end of every row. Avoid inserting an extra stitch into the turning chain.
3. Your Crochet Leaves Look Uneven
One side may appear taller or wider than the other.
Fix: Check the order of stitches on both sides of the chain. The tallest double crochet stitches should sit near the middle of the leaf.
4. The Flower Has Different-Sized Petals
This often happens when one petal contains more double crochets or chains than the others.
Fix: Follow the same sequence in each of the five center stitches. Work slowly and count each completed petal before proceeding.
5. The Hanging Cords Curl
Tight slip stitches can make long crochet cords twist.
Fix: Work more loosely and allow the cords to relax before measuring. If the yarn still twists severely, remake the cord using a larger hook or a different cord technique.
6. The Two Tassels Have Different Fullness
Uneven tassels can make the finished accessory look unbalanced.
Fix: Count the yarn wraps and use the same template for each tassel. Trim both only after securing them to the parandi.
7. Flowers Turn Around the Cord
A flower attached with only one loose stitch may rotate.
Fix: Use several secure stitches through the center or back of the flower, taking care not to flatten the petals.
8. The Parandi Feels Heavy
Using too many large flowers, beads, or thick yarns can add unnecessary weight.
Fix: Reduce the number of motifs, use a lighter yarn, and concentrate decoration farther down the hanging cords.
9. Yarn Ends Catch in Hair
Loose ends and protruding knots can snag.
Fix: Weave yarn tails into the backs of the motifs and inspect the hair-facing side before wearing the accessory.
How to Customize Your Crochet Parandi
One of the nicest things about this project is how easy it is to make it your own.
Try Different Yarn Colors
For a soft everyday accessory, combine sage green, dusty pink, cream, and light lavender.
For a more dramatic finish, choose burgundy flowers with dark green leaves.
A festive palette could use bright pink, yellow, and green.
For a minimalist look, crochet all the flowers in one neutral shade.
When changing colors, try to keep the main cords consistent. This gives the accessory a clear visual structure.
Make the Flowers Larger
You can experiment with a slightly larger hook or thicker yarn to create more prominent petals.
Bear in mind that the flowers will also become heavier.
For a beginner project, small, lightweight flowers are easier to attach neatly.
Add More Leaves
If you enjoy crocheting leaves, use additional green motifs between the flowers.
Avoid placing them so closely together that the underlying cord disappears.
The open spaces help the design feel balanced.
Change the Tassel Style
The tassels can be long and flowing or short and compact.
For a fuller tassel, wrap the yarn more times around the cardboard template.
For a fine finish, use fewer wraps.
You can also mix two or three related colors within each tassel.
Make a Longer Parandi
Measure your desired finished drop, subtract the planned tassel length, then crochet the two cords to suit.
For example, if you want an approximately 40 cm decorative drop with 7 cm tassels, the hanging cord section should measure roughly 33 cm before attaching the tassels.
Always test the actual hairstyle before final assembly.
Add Decorative Centers
Small embroidery stitches in cream or pale yellow make the flower centers stand out.
If using beads for an adult accessory, secure them carefully and inspect them regularly.
Avoid small detachable beads and charms on accessories intended for babies or young children because they may present a choking hazard.
Gift Ideas
A floral crochet parandi can make a thoughtful handmade gift for someone who loves braids, handmade accessories, or festive hairstyles.
Choose colors that match the recipient’s favorite clothing, or make two shorter coordinating accessories for two braids.
You can also combine a parandi with a handmade crochet scrunchie or small floral hair clip.
Finishing Instructions
Finishing makes a big difference to how comfortable and durable a crochet hair accessory feels.
Fasten Off and Weave In Ends
Inspect every leaf, flower, cord, and tassel connection.
Thread each loose yarn tail onto your tapestry needle and weave it through several secure stitches on the reverse side.
Change direction once or twice to help prevent the tail from slipping out.
Trim excess yarn only after the tail is secure.
Avoid leaving large knots that could rub against the hair.
Shape the Flowers and Leaves
Arrange the flower petals with your fingers.
If the leaves curl slightly, lay them flat and smooth the stitches gently.
You can lightly dampen cotton motifs and let them dry flat if needed.
Avoid heavy stretching, which may distort the points of the leaves.
Trim the Tassels
Hold the completed parandi vertically, allowing the tassels to hang freely.
Comb through the strands gently with your fingers.
Use sharp scissors to trim uneven ends.
Cut gradually rather than removing too much at once.
Lay both tassels together and compare their lengths.
Check that the lower edges look balanced when the accessory is hanging.
Check the Final Assembly
Hold the parandi from its top attachment.
Confirm that both decorated cords hang freely without twisting around one another.
Make sure every motif is securely sewn in place.
Run your fingers gently along the back of the crochet pieces. There shouldn’t be any sharp attachments, rough knots, or loose thread loops.
Washing and Care
Hand-wash the accessory only when necessary, using cool water and a mild detergent suitable for your yarn.
Avoid scrubbing the flowers or twisting the cords.
Press out excess moisture gently with a towel.
Reshape the motifs and let the parandi dry flat.
Do not tumble dry unless the yarn label specifically permits it.
Once dry, hang the accessory briefly and check that the tassels remain neat.
The Finished Crochet Parandi
Your completed project should have a flexible upper attachment, two decorative cords, six small flowers, six pointed leaves, and two soft matching tassels.
Quick Printable-Style Crochet Parandi Summary
Easy Floral Crochet Parandi
Original beginner pattern · US crochet terms
Skill Level: Confident beginner
Materials: DK cotton yarn in sage, dusty rose, cream, and berry; 3.5 mm hook; yarn needle; scissors; measuring tape.
Stitches: ch, sc, hdc, dc, sl st.
Starting Method: Ch 7 for the attachment tab.
Attachment Tab: Sc in second ch from hook and across (6). Ch 1, turn, work 6 sc per row until 8–10 cm long.
Hanging Cords: Make two chains approximately 25 cm long. Slip stitch back along each chain. Attach to the tab.
Leaves: Make 6. Ch 7, work sc, hdc, dc, dc, hdc, sc along the first side; ch 1 at the tip, repeat the shaped sequence on the opposite side. Join and fasten off.
Flowers: Make 6. Magic ring, 5 sc, join. Work (sl st, ch 2, 2 dc, ch 2, sl st) in each of the 5 stitches.
Tassels: Make two matching yarn tassels approximately 5–7 cm long.
Assembly: Sew three flowers and three leaves onto each cord, attach tassels, secure all yarn ends, and check the finished balance.
Finishing: Gently shape motifs and trim tassels evenly.
Frequently Asked Questions About Crochet Parandi
1. What is a crochet parandi?
A crochet parandi is a handmade variation of a traditional decorative hair-braid accessory. It can be made with crocheted cords, yarn tassels, flowers, leaves, or other embellishments.
Some styles are braided into the hair, while floral versions can also hang alongside the braid.
The basic idea is to combine a flexible attachment with decorative strands that add length, color, or movement.
2. Can a beginner make a crochet parandi?
Yes. A simple cord-and-tassel parandi can be suitable for someone who knows chain and slip stitches.
The floral version in this tutorial introduces single crochet, half double crochet, and double crochet.
If you’re completely new to crochet, practice these stitches on a small swatch before beginning the flowers and leaves.
3. What yarn is best for crochet parandi?
Smooth cotton or a lightweight cotton blend works well because the stitches are visible and the finished pieces are easy to shape.
Fine crochet thread can create a more delicate accessory, while thicker yarn produces larger decorative elements.
Avoid excessively fuzzy or scratchy yarn if the parandi will rest against hair or skin.
4. How long should a crochet parandi be?
The ideal length depends on the hairstyle and whether the accessory will be woven into the braid or hang alongside it.
A short decorative version might have a hanging section of around 25–35 cm.
A traditional long braid-integrated accessory may need considerably more length.
Measure the intended hairstyle and test the attachment before deciding on the final cord length.
5. How do I keep crochet parandi flowers from falling off?
Sew the flowers securely through their center stitches into the supporting cord.
Use several small stitches rather than relying on one loose attachment loop.
Weave the yarn tail into the reverse side and check the connection before wearing.
Avoid attaching flowers using glue alone, particularly if you plan to wash the accessory.
6. Can I make a crochet parandi without flowers?
Absolutely.
You can make a simple version using an attachment tab, two or three slim crochet cords, and matching yarn tassels.
This is a good option if you want a quicker beginner project or prefer a minimalist accessory.
Once you’re comfortable with the basic construction, you can add flowers or leaves to a second version.
7. How do I stop the crochet strands from tangling?
Keep the cords approximately equal in length and avoid attaching too many bulky motifs close together.
Allow the finished accessory to hang freely while checking its balance.
When storing it, straighten the cords and place the parandi flat or hang it in a dry location.
Don’t twist the tassels together for storage, because the loose yarn strands can become tangled.
Conclusion
Making your own crochet parandi is a lovely way to combine simple crochet techniques with a useful, decorative project.
Start with the foundation chain and attachment tab, take your time with the little leaves and flowers, and enjoy arranging the motifs before stitching them together.
A few carefully made details can have more impact than an accessory crowded with embellishments.
Once you’ve finished your first floral parandi, try a new color palette, make the cords longer, or experiment with smaller flowers for a lighter everyday version.
Save this crochet parandi tutorial for your next handmade hair-accessory project, and consider pairing it with a matching crochet flower hair clip or scrunchie.





