
Have you ever finished a jar of jam, washed it out, and thought it was too useful to throw away? Maybe you also have a little leftover cotton yarn from a blanket, dishcloth, or granny square project.
Those two things are all you need to start one of my favorite kinds of crochet upcycle ideas: turning something ordinary into something useful and pretty.
For this beginner-friendly project, we’re going to give an old glass jar a soft, handmade crochet cover. Once it’s finished, you can use your jar to organize crochet hooks, pencils, makeup brushes, or other little things that tend to collect on a desk.
The best part? You don’t need to crochet anything complicated. We’ll make a small circular base using single crochet stitches, build straight sides, and finish with a simple contrasting stripe.
This tutorial includes a complete original beginner pattern, detailed explanations, and 11 planned instructional image placements, so you can follow the project from the first loop to the finished organizer.
What You’ll Learn
By the end of this crochet upcycling project, you’ll know how to:
- Prepare a recycled glass jar for a crochet cover.
- Create a small circular crochet base.
- Use increases to keep your crochet circle flat.
- Measure the circle to fit your jar.
- Crochet in the back loop to create a defined bottom edge.
- Work even single crochet rounds to build the sides.
- Add a decorative stripe using leftover yarn.
- Finish neatly and adjust the design for different jar sizes.
You’ll also learn how to reuse the same construction method for other everyday containers.
Why Crochet Upcycling Is Worth Trying
Upcycling means transforming an existing item into something useful or attractive instead of simply disposing of it.
Crochet works particularly well for this because it can be shaped around everyday objects. A simple piece of crochet fabric can become a jar cover, basket sleeve, storage pouch, or decorative organizer.
It is also a good way to use small quantities of leftover yarn. You don’t need to purchase several matching skeins or commit to a large project.
A jar cozy is especially suitable for beginners because the project is small enough to finish in an afternoon, and you can see its shape developing as you work.
Plus, handmade storage containers make thoughtful gifts. Fill a finished jar with pens for a teacher, crochet hooks for a crafty friend, or wrapped sewing supplies for someone who loves making things.
Materials You’ll Need
For one small or medium crochet jar cover, gather:
| Material | Recommendation |
|---|---|
| Recycled glass jar | One clean, smooth-sided jar, approximately 7–8 cm wide |
| Main yarn | 25–40 g dusty sage worsted-weight cotton, approximately |
| Accent yarn | 5–10 g oatmeal worsted-weight cotton |
| Crochet hook | 4.5 mm (US 7) |
| Scissors | Sharp craft scissors |
| Yarn needle | Blunt tapestry needle |
| Stitch marker | One removable marker |
| Measuring tape | For checking diameter and height |
Yarn quantities are estimates. The amount you use will depend on the jar’s diameter, its height, and your crochet tension.
Cotton is a practical choice because it creates clearly defined stitches and does not stretch as much as many very elastic yarns. Medium-weight cotton also holds its shape nicely around the glass.
If you’re using leftover yarn from another project, check that it is reasonably similar in thickness. Mixing very fine and very bulky yarn in the same cover can produce an uneven fit.
Crochet Abbreviations Used
This pattern uses US crochet terminology.
| Abbreviation | Meaning |
|---|---|
| ch | Chain |
| sc | Single crochet |
| sl st | Slip stitch |
| st / sts | Stitch / stitches |
| inc | Increase: work 2 sc into the same stitch |
| BLO | Back loop only |
| rnd | Round |
| rep | Repeat |
In UK crochet terminology, the US single crochet is called a double crochet. The terminology used here follows the US system throughout, so make sure you’re not accidentally changing between the two.
How to make a single crochet
Insert your hook into the correct stitch, yarn over, and pull up a loop. You now have two loops on the hook.
Yarn over again and pull through both loops.
That’s one single crochet.
How to make an increase
An increase simply means making two single crochet stitches into the same stitch from the previous round.
Instead of moving to the next stitch after making the first sc, work another sc into that same stitch.
This adds one extra stitch, making the circular base a little wider.
Before You Start
Choose a suitable glass jar
A straight-sided jar is easiest for this project. Containers with a very narrow neck or strongly curved sides require more frequent fit adjustments.
Wash your jar, remove any paper labels, and let it dry completely.
Check the rim and base carefully. Do not use glass with chips or cracks.
For your first attempt, choose a relatively small jar. A wide container takes more increasing rounds, and it can be harder to keep the circle flat when you are learning.
Check your crochet tension
Your stitches should be firm enough to hold the shape of the cover without becoming difficult to work.
If your stitches feel extremely tight, try a 5 mm hook. If the fabric is loose enough to stretch away from the jar, try a 4 mm hook.
Gauge isn’t critical because you’ll measure against the actual container. The finished diameter matters more than matching a specific number of stitches per inch.
Understand how we’ll build the project
We’ll work from the bottom upward.
First, we’ll create a circular base using single crochet increases. Then we’ll make one round through the back loops to create a turning edge.
After that, we’ll crochet even rounds without increasing until the cover is tall enough.
This pattern uses joined rounds. Each round ends with a slip stitch, and the beginning chain does not count as a stitch.
Learn to count your stitches
Look along the top edge of your work. Each completed single crochet stitch has a small V-shaped top.
Count those V shapes to check how many stitches you made.
Keep your stitch marker in the first single crochet stitch of each round. This helps you avoid accidentally crocheting into the slip stitch or starting chain.
Check the fit regularly
Because recycled jars come in so many sizes, you will not necessarily need the same number of base rounds every time.
The written example begins with eight stitches and grows by eight stitches on each increase round.
You can continue the pattern until the base fits the jar you have chosen.
Beginner reminder
Don’t force a crochet circle to fit a jar. It is easier to add or remove one round while the project is still flat than to fix a badly fitting cover after completing all the side rounds.
Step-by-Step Crochet Tutorial
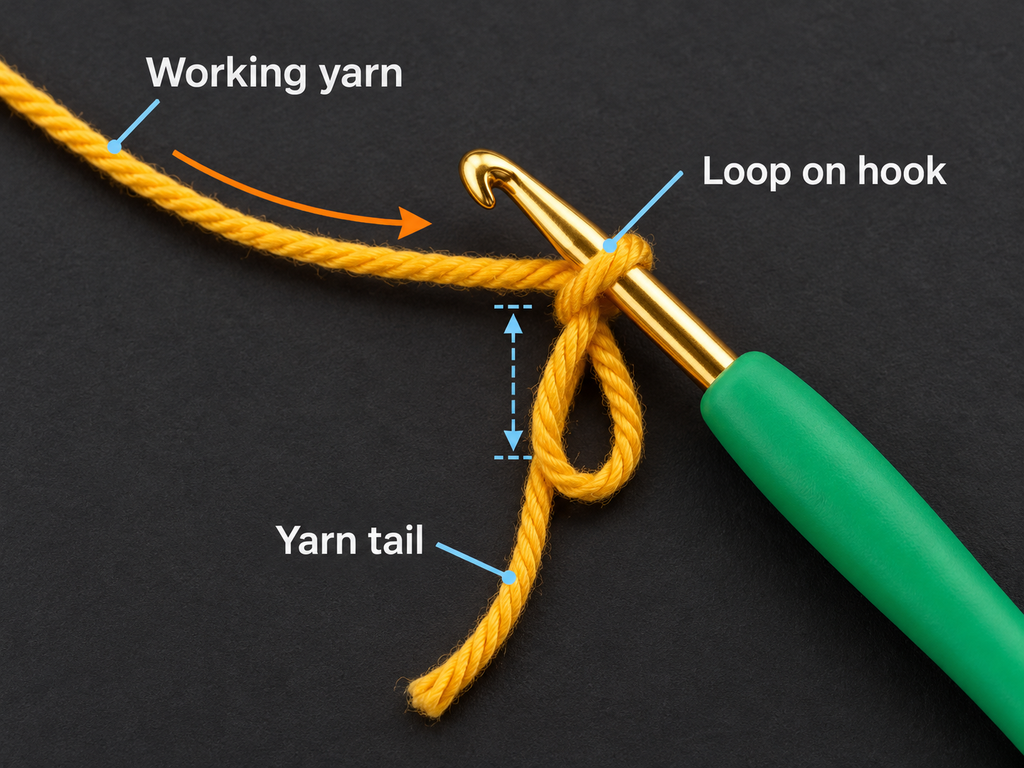
Step 1: Make an adjustable crochet ring
Start with your dusty sage cotton yarn.
Leave a short yarn tail, approximately 12–15 cm long. Wrap the yarn into a loop, placing the working yarn over the tail.
Insert your hook through the loop and draw up the working yarn.
Make one chain stitch to secure the ring. This chain does not count as a stitch.
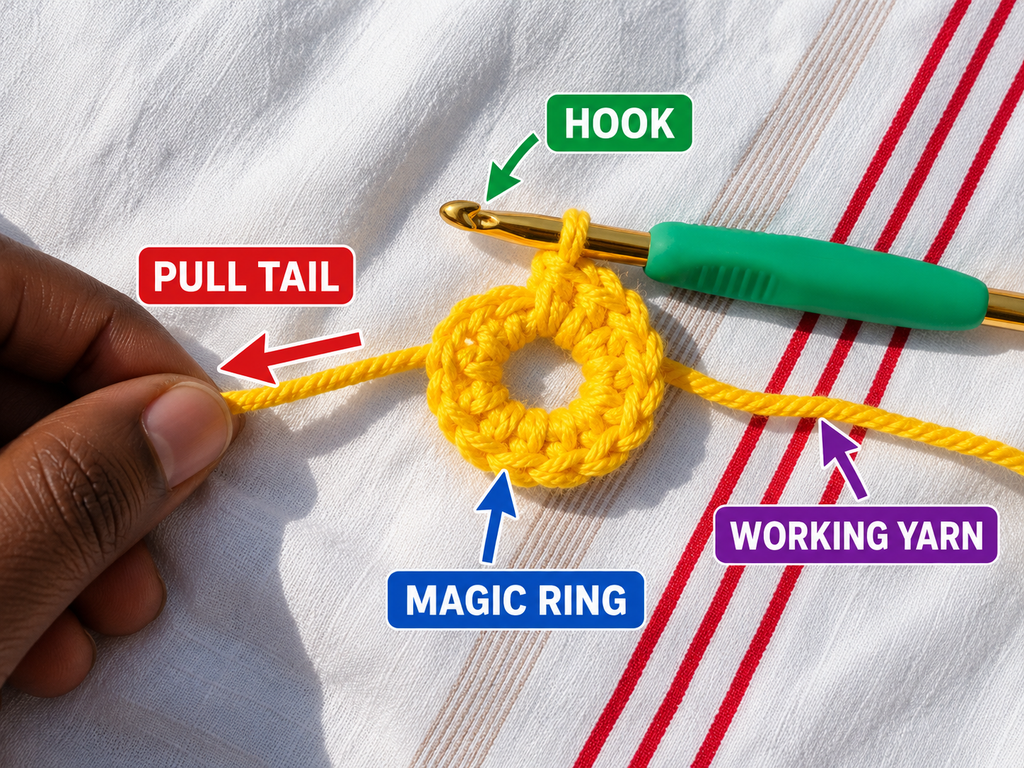
The center should remain adjustable, allowing you to tighten it after crocheting the first round.
If you find a magic ring difficult, you can use a simpler alternative: chain two stitches and work your first eight single crochet stitches into the second chain from the hook.
That creates a similar starting point, although the center may be slightly more visible.
Beginner tip: Keep the tail separate from the working yarn so you can recognize which strand tightens the ring.
Common mistake to avoid: Don’t pull the ring completely closed before making the first round. You need enough space to insert your hook.

Step 2: Crochet the first round
Now we will make the center of the circular base.
Round 1:
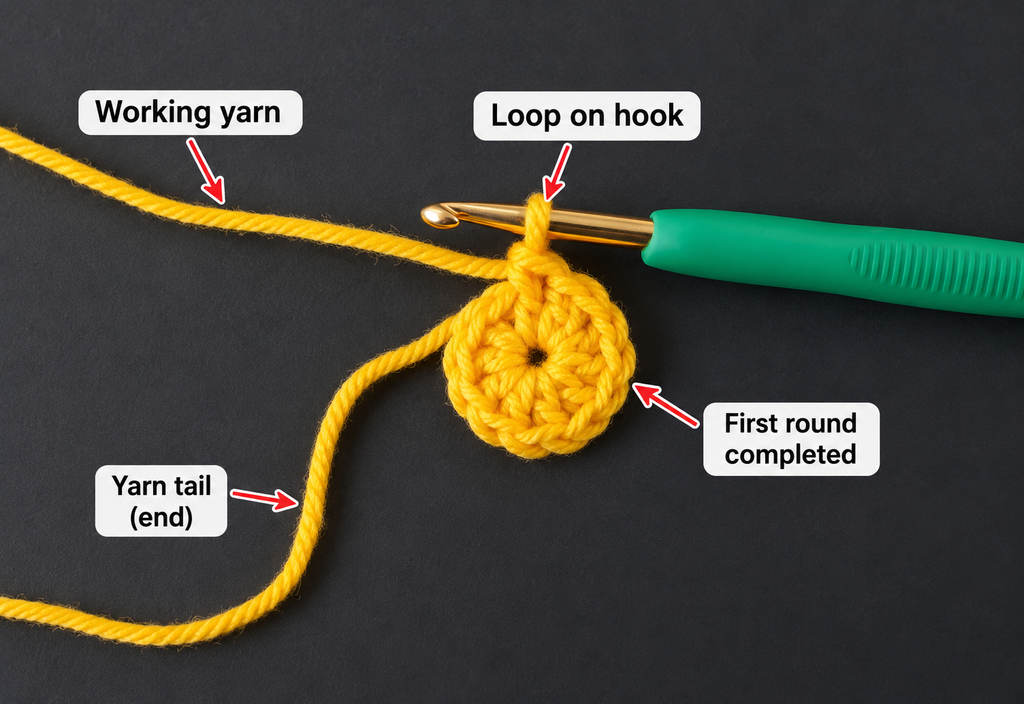
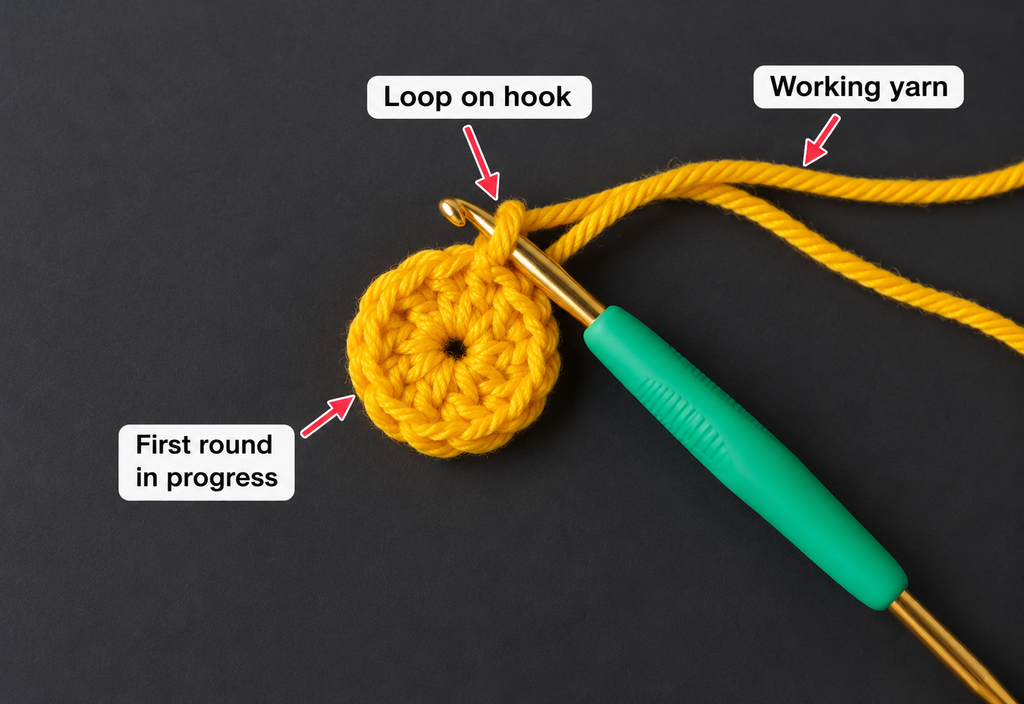
Work eight single crochet stitches into the adjustable ring.
Once all eight stitches are complete, gently pull the yarn tail to close the center.
Insert your hook into the top of the first single crochet and join with a slip stitch.
You should have eight single crochet stitches, not counting the joining slip stitch.
The first round may look very small. That’s expected. The next few rounds will make it wider.
Use your fingers to spread the stitches around the center so you can see their shape.
Stitch count: 8 sc
Beginner tip: Count your stitches before joining. If you have nine instead of eight, remove the extra stitch now rather than letting the mistake continue.
Common mistake to avoid: The slip stitch that joins the round is not another single crochet. Avoid counting it as part of the base.
Step 3: Increase to make the circle wider
The next round doubles the number of stitches.
Round 2:
Chain one. Work two single crochet stitches into the first stitch.
Continue working two single crochet stitches into every stitch around.
Join with a slip stitch to the first single crochet.
Since you started with eight stitches and made two stitches in each one, you should now have sixteen.
Stitch count: 16 sc
This is your first increasing round.
If the circle begins to curl slightly, spread it gently between your fingers. Minor unevenness is normal in small rounds, but severe curling can indicate tight tension or missing increases.
Beginner tip: When making the second stitch of an increase, aim for the same insertion point as the first stitch.
Common mistake to avoid: Don’t move into the next stitch too early. Both stitches must be made into the same original stitch to count as an increase.
Step 4: Make a larger flat crochet circle
We will spread the increases more evenly in the next round.
Round 3:
Chain one.
Work two single crochet stitches into the first stitch.
Work one single crochet into the next stitch.
Repeat this sequence around:
2 sc in the next stitch, 1 sc in the following stitch.
Join with a slip stitch.
Stitch count: 24 sc
Take a moment to look at your work. You should see a small flat circle with the stitches arranged around the center.
Depending on your yarn thickness and the size of your jar, this circle may already be large enough.
If it is too small, you can continue increasing.
Optional Round 4: Chain one. Repeat 2 sc in the next stitch, 1 sc in each of the next 2 stitches around. Join. You will have 32 sc.
Optional Round 5: Chain one. Repeat 2 sc in the next stitch, 1 sc in each of the next 3 stitches around. Join. You will have 40 sc.
Always check the diameter before adding another round.
Beginner tip: Lay the circle on the table instead of holding it in your hand when checking whether it is flat.
Common mistake to avoid: Adding too many increases can create ripples. Missing increases can make the circle form a cup before you intend to start the sides.
Step 5: Measure the crochet base against your jar
Before we start making the sides, we need to check the size.
Place your jar on the crochet circle.
Look straight down at the base of the jar and compare the outside edge of the crochet with the jar’s bottom.
For a snug cover, the crochet circle should be close to the diameter of the jar’s base. A very slightly smaller circle can work well because the crochet fabric has some flexibility.
If the crochet circle extends far beyond the jar, the finished cover may sag or look baggy.
If the crochet circle is much too small, your cover may become overstretched.
Remove the jar, add or undo a round if necessary, and check again.
This measurement step is what makes the pattern adaptable to several jar sizes.
Beginner tip: Measure using the actual jar instead of relying only on the size printed on its label.
Common mistake to avoid: Do not measure only the jar opening. A jar may have a wider body or a narrower base.
Step 6: Begin crocheting the upright sides
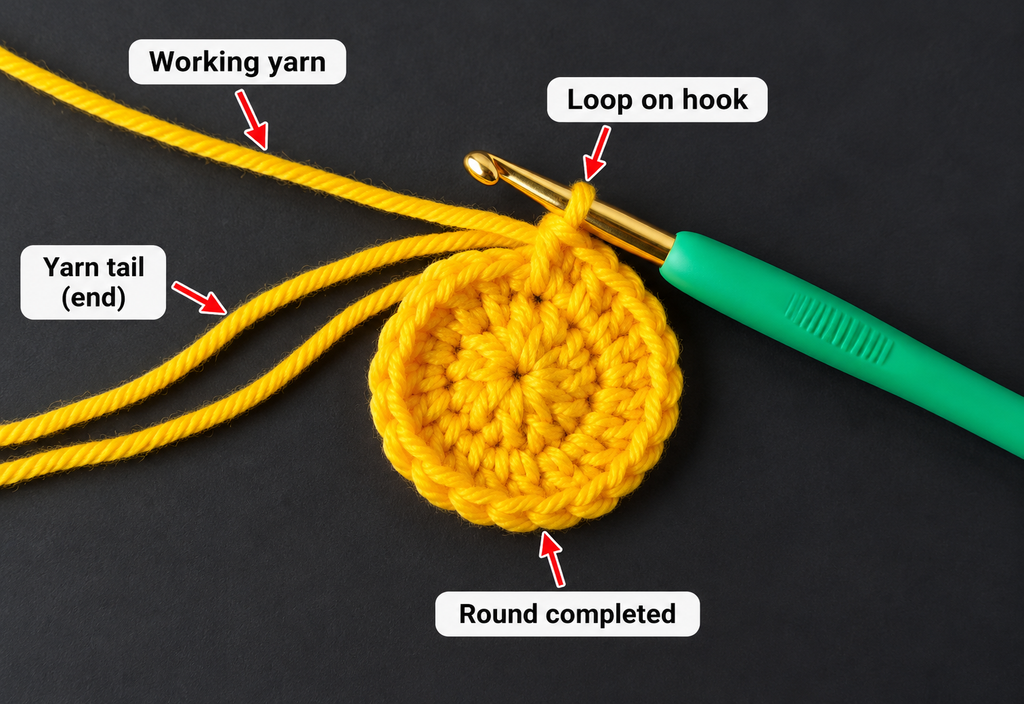
Now comes the satisfying part: turning the flat circle into a little container-shaped cover.
We will create a defined corner by working one round through the back loops only.
Look at the top of a single crochet stitch. You’ll see two strands forming a V.
The strand closest to you is the front loop. The strand farther away is the back loop.
For this round, insert your hook only beneath the back loop.
Next round:
Chain one.
Work one single crochet in the back loop of each stitch around.
Join with a slip stitch to the first single crochet.
Do not add any increases.
Your stitch count stays exactly the same as the final base round.
This creates a small ridge where the base changes direction and helps the sides begin standing upright.
If your circle finished with 24 stitches, this round has 24 stitches.
If you finished with 32 stitches, this round has 32 stitches.
Beginner tip: Hold the flat circle so you can see the top V of each stitch clearly. Rotate the work slightly if necessary.
Common mistake to avoid: Don’t insert the hook through both loops on this round. Working both loops makes a softer transition rather than the defined turning ridge used in this design.
Step 7: Build the sides with even single crochet rounds
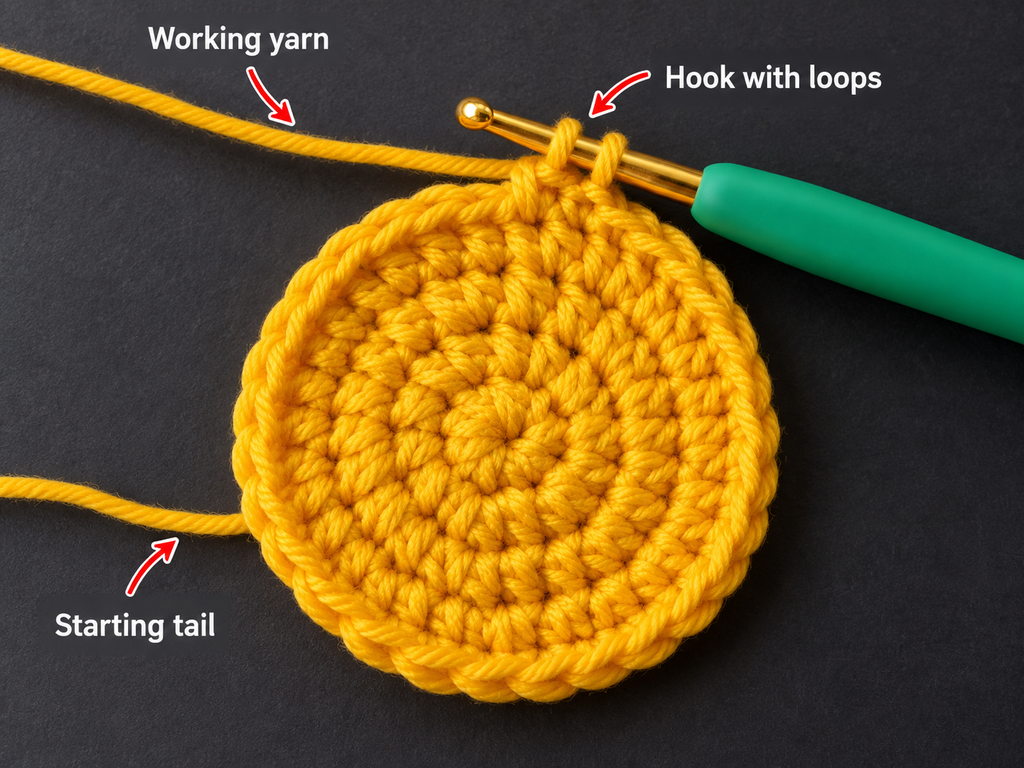
Once the turning round is complete, we’ll work straight upward.
Following rounds:
Chain one.
Work one single crochet into both loops of each stitch around.
Join with a slip stitch to the first single crochet.
Repeat this same round until the cover reaches the desired height.
Do not increase or decrease.
The sides should gradually become a short cylinder.
If the crochet begins to flare outward, count your stitches. Accidental increases often occur when the slip stitch at the end of the round is mistaken for a regular stitch.
After every two rounds, slide the crochet cover over the clean jar to check the fit.
It should feel snug but not so tight that you must force it into place.
Aim to stop approximately 1–2 cm below the top rim of the jar, leaving some glass visible.
This also makes it easier to use the container as a desk organizer.
Beginner tip: Keep a marker in the first single crochet so you always know where each round begins and ends.
Common mistake to avoid: Try not to pull the yarn too tightly when making each stitch. Very tight fabric may fit the base but become difficult to stretch around the sides of the jar.
Step 8: Add a simple contrasting stripe
A small accent stripe can make a basic crochet project look more finished.
For this tutorial, we’ll use oatmeal cotton yarn to contrast with the dusty sage main color.
Complete your current sage round.
When you reach the joining point, introduce the oatmeal yarn and use it to make the joining slip stitch. Chain one with the new color.
Work one single crochet into each stitch around using the oatmeal yarn.
Join the round as usual.
You now have a narrow contrasting stripe.
For a slightly thicker stripe, repeat one more round in the accent color.
Remember to keep your stitch count unchanged.
Leave enough yarn tail to weave in securely when you finish. With different yarn weights or colors, check that the new yarn produces stitches of similar size.
Beginner tip: Change colors at the beginning of a round to keep the transition in one location.
Common mistake to avoid: Avoid pulling the new yarn too tightly when joining. This can make one side of the cover noticeably narrower.
Step 9: Finish the top edge
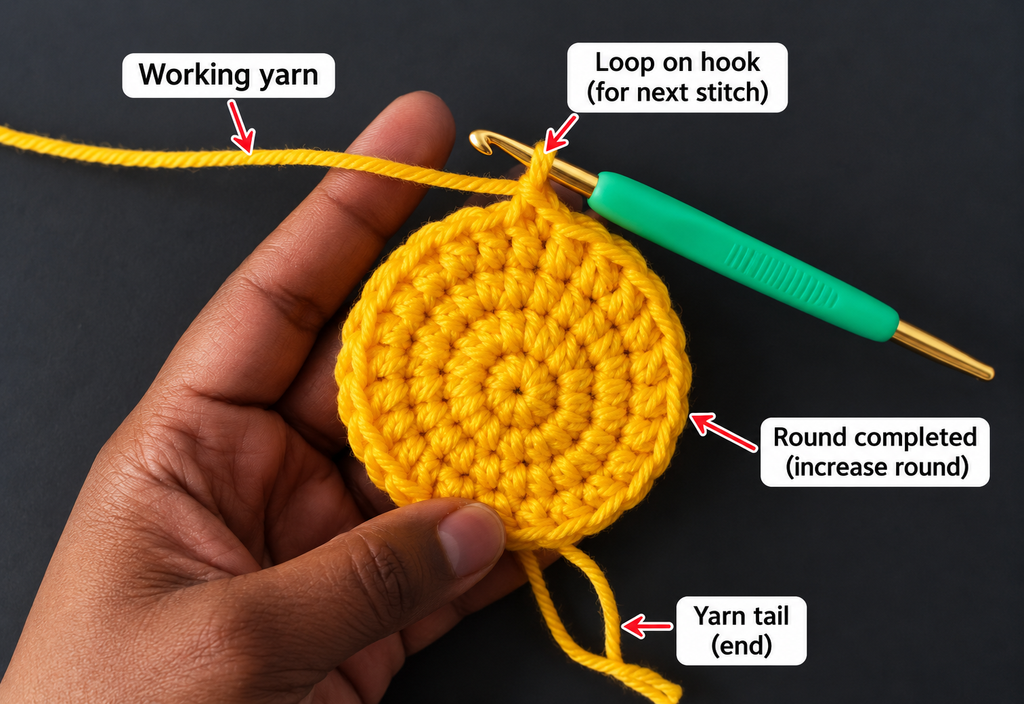
When the crochet reaches your desired height, you can finish the top.
Make sure you have completed the final round and joined it correctly.
Check that the rim lies smoothly around the jar.
If the edge seems uneven, you may add another round of single crochet stitches in the same color.
Try not to make the last round much tighter than the rounds below it.
To fasten off, cut the yarn, leaving a tail approximately 12–15 cm long.
Pull the tail through the final loop and tighten gently.
Don’t yank the yarn. You want a secure finish without creating a noticeable knot.
At this point, the cover should resemble a small open-topped crochet cup.
Step 10: Weave in the yarn ends
Turn the crochet cover inside out.
Thread the yarn tail through a blunt tapestry needle.
Pass the needle through several stitches on the inside of the fabric, following the path of the yarn rather than piercing through to the front.
Change direction once or twice to help secure the tail.
Trim the remaining end close to the fabric without cutting any of the crochet stitches.
Repeat for the starting yarn tail and any yarn ends left from the color change.
Now turn the cover right side out again.
Beginner tip: If you can see a yarn tail through the outside of the cover, reposition it before cutting it short.
Common mistake to avoid: Don’t simply cut the yarn close to the last stitch without weaving it in. The final stitches may loosen with use.
Step 11: Fit the finished crochet cover onto your jar
Your crochet project is almost ready to use.
Check that the glass is completely dry and free of residue.
Gently slide the finished crochet cover over the base of the jar.
Work slowly around the sides, easing the stitches into place rather than pulling hard on one section.
Adjust the cover until the bottom sits flat and the top edge looks even.
The crochet should sit close to the glass without large gaps.
Now fill your jar with lightweight craft or desk supplies.
Try crochet hooks, colored pencils, markers, or sewing clips.
You’ve turned a container that might otherwise have been discarded into a useful handmade organizer.

Pattern Notes and Stitch Count Reference
This project uses joined rounds. Each round begins with a chain one that does not count as a stitch, and each round ends with a slip stitch into the first single crochet.
Here is the base sequence for reference:
| Round | Instructions | Stitch count |
|---|---|---|
| 1 | 8 sc into adjustable ring | 8 |
| 2 | 2 sc in every stitch | 16 |
| 3 | Repeat (2 sc, 1 sc) | 24 |
| 4, optional | Repeat (2 sc, 1 sc, 1 sc) | 32 |
| 5, optional | Repeat (2 sc, 1 sc, 1 sc, 1 sc) | 40 |
| Turning round | 1 sc in BLO of every stitch | Same as final base |
| Side rounds | 1 sc in both loops of every stitch | Unchanged |
| Accent round | 1 sc in every stitch using new color | Unchanged |
For a larger jar, continue increasing by eight stitches each round, adding one additional single crochet between increases.
For example, the next increase round after 40 stitches would repeat an increase followed by four regular single crochet stitches, giving 48 stitches.
This approach gives you a predictable way to adjust the diameter.
However, the jar’s actual size matters more than the number of rounds. If your yarn is thick, you may need fewer rounds. If your stitches are small, you may need more.
Right side and wrong side
The right side is the outside of the finished cover.
The wrong side is the inside, where the yarn tails are woven in.
You can turn the piece inside out while finishing, but make sure the decorative ridge and stripe appear as intended when the cover goes back onto the jar.
Adjusting the height
To make a taller cover, work additional even rounds after the turning round.
To make a shorter cover, simply stop sooner.
Keep the height practical. If the cover blocks too much of the jar opening or bunches below the rim, remove one or two rounds.
Common Beginner Mistakes and How to Fix Them
1. The circular base is curling upward
This may happen if you’re crocheting too tightly or haven’t worked enough increases.
First, count your stitches. If your count is correct, try relaxing your tension or using a slightly larger hook.
For a particularly tight circle, undo the latest round and rework it more loosely before deciding whether another increase round is needed.
2. The base looks wavy instead of flat
A wavy circle can indicate that the fabric has more width than it needs.
Make sure you haven’t worked extra increases or accidentally placed two stitches into locations that should have only one.
If your count is correct but the fabric still ripples, check the hook size and yarn behavior. Some cotton yarns require a smaller hook to make a flatter, firmer circle.
3. The sides become wider as you crochet
This commonly happens when beginners mistake a joining slip stitch for a regular stitch.
Mark the first single crochet of the round and count regularly.
Once the side construction begins, every even round should contain the same number of stitches.
4. The crochet cover is too tight
If the cover fits around the bottom but will not slide over the jar, the container may widen toward the top or your stitches may have become tighter.
You can try a slightly larger hook for the side rounds. For a significant size difference, undo the sides and adjust the base or shape before continuing.
5. The stripes have an uneven join
Joined crochet rounds can leave a small visible color transition.
Position this join toward the back of the jar, or make your stripe in the same color throughout to reduce contrast.
You can also treat the join as a subtle handmade detail rather than trying to make it completely invisible.
6. The cover slides down the jar
If the cover is much larger than the glass, it may not hold its position.
Try working a smaller base or using a more suitable hook size.
A more elastic yarn can also stretch over time, which is one reason cotton is helpful for this project.
7. The center of the base has a hole
If you started with an adjustable ring, pull the beginning tail carefully to tighten the center.
If the opening won’t close completely, check whether the first stitches were worked around the correct strands.
Small decorative gaps are not necessarily a problem for a jar cover, but the center should be secure enough to withstand normal handling.
How to Customize This Crochet Upcycle Project
One reason I enjoy small crochet upcycle ideas is that you can make them look completely different with only a few changes.
Use different yarn colors
Try oatmeal with terracotta for a warm farmhouse style, dusty blue with white for coastal-inspired decor, or cream with sage green for a soft botanical look.
You can use leftover yarn for the stripe rather than opening a new skein.
Just make sure the yarn weights are similar.
Add simple crochet texture
If you’re comfortable with basic stitches, you can experiment with a few rounds worked through the back loops only.
This creates horizontal ridges.
For a more textured design, alternate regular single crochet rounds with back-loop rounds.
Remember that stitch texture can change the cover’s stretch and finished dimensions, so measure the fit as you go.
Change the height
A short jar cozy can make a useful pen holder.
A taller one can cover most of a large recycled food jar.
You could even make several coordinating covers in different sizes for a craft shelf.
Keep each cover individually fitted rather than assuming the same stitch count will work for every jar.
Try a decorative border
The simplest finish is one regular round of single crochet.
You could also work a final round of slip stitches for a firmer-looking rim, provided it doesn’t become too tight.
More experienced crocheters may enjoy a tiny scalloped edge on a loosely fitted decorative jar cover.
Avoid bulky borders that might catch when removing supplies from the container.
Turn it into a handmade gift
Fill your finished organizer with art pencils, wrapped crochet notions, small sewing supplies, or other lightweight items.
Add a handmade gift tag around the container, not through the crochet fabric.
It’s a thoughtful way to combine a recycled object with a small handmade project.
Other Easy Crochet Upcycle Ideas to Try Next
Once you’ve made a jar cover, you can apply similar crochet skills to other items around your home.
| Item to upcycle | Crochet transformation |
|---|---|
| Clean tin can | Crochet sleeve for a desk organizer, only after all sharp edges are safely covered |
| Old cotton T-shirt | Cut into T-shirt yarn for chunky baskets or mats |
| Recycled glass bottle | Decorative crochet sleeve for dry branches or artificial flowers |
| Leftover cotton yarn | Small coasters, covers or storage pouches |
| Old fabric strips | Crochet rag basket or small floor mat |
| Reusable container | Custom-fit crochet storage sleeve |
You don’t need to attempt all these at once. One finished jar cozy is enough to learn the basic shaping method, and each future project can teach you something new.
Finishing, Washing and Care
Before using the jar, check the crochet cover one last time.
Make sure all yarn ends are woven in securely and there are no loose stitches along the top edge.
If the piece looks uneven, gently smooth it with your fingers.
Does the jar cozy need blocking?
For a firm cotton cover, blocking is usually optional.
If the fabric needs a little shaping, lightly dampen the crochet cover and let it dry in its intended shape.
Avoid stretching it larger than the jar.
Always test your yarn’s care requirements before washing or blocking.
How should you wash it?
Remove the crochet cover from the glass jar before washing.
Depending on the yarn label, you may be able to hand-wash the cover in cool or lukewarm water with mild detergent.
Gently press out excess water, reshape, and allow it to dry completely.
Avoid twisting the fabric harshly.
Wash the glass container separately.
Important safety notes
This crochet cover is intended primarily for dry storage and decoration.
Do not place it near a flame or use it as a candle holder while a candle is burning. Yarn can catch fire.
Do not put the glass jar in an oven or microwave with the cover attached.
For fresh flowers, avoid prolonged moisture against the crochet fabric. Remove the cover before washing the jar and let both parts dry completely.
If children will use the finished organizer, choose an age-appropriate container and avoid sharp tools or breakable glass where unsafe.
Quick Printable-Style Summary
Easy Crochet Upcycled Jar Cozy
Original beginner pattern • US crochet terms
Skill Level: Beginner
Time: Approximately 1–2 hours
Materials: Small clean glass jar, worsted-weight cotton scraps, 4.5 mm crochet hook, scissors, stitch marker, tapestry needle
Stitches: ch, sc, sl st, inc, BLO
Starting Method: Adjustable ring
Round 1: 8 sc into ring (8)
Round 2: 2 sc in every stitch (16)
Round 3: (2 sc, 1 sc) around (24)
Additional base rounds: Increase evenly by eight stitches per round until the circle fits the jar base.
Turning round: 1 sc in BLO of each stitch.
Side repeat: 1 sc in each stitch around; join and repeat without increasing.
Color change: Add one or two accent rounds near the top.
Finishing: Fasten off, weave in all ends, and fit over a clean, dry jar.
Copy quick pattern
FAQ: Crochet Upcycle Ideas for Beginners
1. What can I upcycle using crochet?
You can use crochet to transform clean glass jars, reusable containers, old fabric, leftover yarn, and some household accessories.
Good beginner projects include jar covers, simple storage sleeves, coasters made from scrap yarn, and small baskets made with recycled T-shirt yarn.
Start with items that are clean, structurally sound, and safe to handle.
2. Is a crochet jar cozy suitable for beginners?
Yes. It’s a manageable project if you know how to make a chain and single crochet.
The main new skills are increasing in a circle, working through the back loop, and checking the size as you go.
Because the project is small, you can practice these techniques without committing to a blanket or garment.
3. Can I use leftover yarn for this project?
Absolutely. Using leftover yarn is one of the main benefits of this crochet upcycle idea.
Worsted-weight cotton scraps work especially well.
If you don’t have enough of one color, create stripes or use a coordinating accent shade.
Avoid combining yarns with dramatically different thicknesses unless you’re prepared to adjust your tension and hook size.
4. What crochet stitch is best for a jar cover?
Single crochet is a great beginner choice because it creates a firm, fairly dense fabric.
Half double crochet is another option for crocheters who want slightly taller stitches and a softer appearance.
For this tutorial, single crochet helps keep the construction easy to count and the fit more controlled.
5. How do I make the crochet jar cozy bigger?
Continue the circular increase pattern until the base is approximately the size of your jar’s bottom.
Then work the turning round and continue the sides without increasing.
If your jar becomes noticeably wider as it rises, you may need to adapt the side shaping rather than simply work a straight cylinder.
6. Can I use acrylic yarn instead of cotton?
Yes, you can use acrylic yarn for a decorative cover.
However, acrylic often behaves differently from cotton and may produce a softer or more elastic fabric.
Make a few test rounds and check the fit before committing to the whole project.
For a storage container you want to keep fairly structured, cotton is a practical starting choice.
7. Are crochet upcycle projects good handmade gifts?
They can be lovely handmade gifts, especially when they serve a practical purpose.
A crocheted pencil jar is useful for teachers, a crochet-hook organizer is thoughtful for makers, and a set of coordinating storage containers can look charming on a craft-room shelf.
Choose a color palette suited to the recipient and make sure the recycled container is clean and safe before gifting.
Conclusion
You don’t need expensive supplies or a complicated pattern to make something satisfying with crochet.
Sometimes the best projects begin with a leftover ball of cotton yarn and an ordinary household object.
This easy crochet jar cozy lets you practice crocheting in the round, shaping, color changes, and simple finishing techniques while creating something practical for your home.
Once you’ve made your first one, try a matching set in different sizes, use up more of your yarn scraps, or experiment with another crochet upcycle idea.
Save this tutorial to your favorite crochet Pinterest board so you can return to the steps whenever you find another jar worth keeping.





