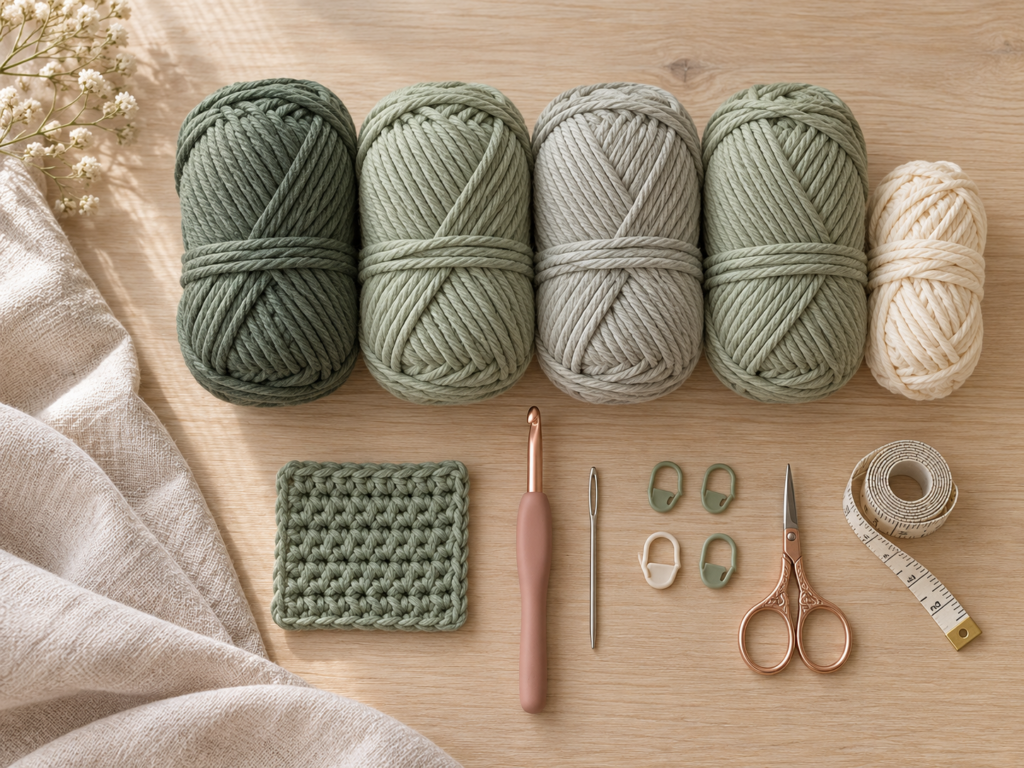
There is something especially satisfying about watching a small crochet circle grow into something you can actually use. What begins as a handful of stitches can become a beautiful round play mat for a nursery, a soft floor layer for supervised playtime, or a handmade gift for a new parent.
If you have been looking for a crochet play mat pattern that doesn’t require complicated stitches or sewing lots of separate pieces together, this project is a lovely place to begin.
The entire mat is worked in one piece, starting from the center and gradually expanding outward. You will use simple single crochet stitches, regular increases, and a straightforward finishing method. There are no granny squares to join, no tricky seams, and no long foundation chain to count.
In this tutorial, you’ll learn how to make a flat crochet circle, increase without accidentally creating a bowl shape, measure your work as it grows, and finish with a smooth edge.
The proposed pattern uses soft, washable yarn in a calming dusty sage color, but you can make yours in warm cream, oatmeal, muted peach, or another color that fits your nursery.
The best part? Once you understand how the increases work, you can adjust the size without learning a completely new pattern.
What You’ll Learn
By the end of this crochet play mat tutorial, you will know how to:
- Choose soft, washable yarn for a floor mat.
- Start a round crochet project with a magic ring.
- Make single crochet stitches in continuous rounds.
- Use increases to keep a circle growing evenly.
- Count your stitches and mark the beginning of each round.
- Recognize and correct curling or ruffling.
- Adjust the play mat diameter for your space.
- Fasten off and weave in the ends securely.
- Wash and reshape your finished project.
This is a confident-beginner project. You don’t need experience crocheting rugs or blankets, but it helps to know how to make a basic single crochet stitch.
Materials You’ll Need
Yarn
Choose soft, low-shedding, machine-washable bulky-weight (#5) cotton-blend yarn.
For a play mat approximately 80–90 cm (31–35 inches) wide, start with a provisional allowance of 900–1,400 meters (985–1,530 yards) of bulky yarn. Actual requirements can vary significantly with strand thickness, stitch height, finished diameter, and tension. This is a planning estimate, not a measured yarn requirement for a tested sample.
The tutorial uses one primary shade, dusty sage, to make it easier for beginners to see the stitching and avoid color changes.
Tools
- 6.5 mm (K/10.5) crochet hook, or a hook appropriate for your yarn.
- Blunt yarn needle.
- Sharp yarn scissors.
- Locking stitch marker.
- Measuring tape.
- Flat surface for checking the shape.
- Optional additional markers for dividing longer rounds into sections.
Avoid very fuzzy, easily shedding, or loosely constructed novelty yarns that can leave fibers or small pieces behind during use.
Crochet Abbreviations Used
This tutorial uses US crochet terminology.
| Abbreviation | Meaning |
|---|---|
| ch | Chain |
| sc | Single crochet |
| sl st | Slip stitch |
| st / sts | Stitch / stitches |
| inc | Increase: work 2 sc in the same stitch |
| rep | Repeat |
| rnd | Round |
In UK crochet terminology, the US single crochet used here is called a double crochet.
There are no US double crochet or half double crochet stitches in the main pattern.
Before You Start
Choose yarn that feels comfortable against skin
A floor mat needs a slightly different yarn from a decorative wall hanging or a sturdy basket.
Very stiff cord may produce a beautiful rug, but it is not my first choice for a soft baby play mat. Instead, look for smooth yarn that produces a comfortable surface and can tolerate regular cleaning.
A cotton-blend yarn can offer a pleasant balance of structure, flexibility, and washability. Read the fiber label before starting. Some bulky yarns are washable, while others require special care.
If your yarn feels rough when you crochet a small sample, it will probably feel rough across a much larger finished mat.
Check your gauge and tension
Before beginning the full mat, make a practice circle about 15 cm (6 inches) wide.
Check whether the fabric is dense enough to stay together without becoming stiff. If it feels too rigid, try a slightly larger hook. If it is too open or loose, try a smaller hook.
An illustrative working gauge is approximately 10–12 single crochet stitches over 10 cm (4 inches) of fabric. Because the mat is circular and gauge depends heavily on yarn structure, this is a starting reference rather than a guaranteed finished-size calculation.
Measure your actual fabric rather than relying on a round count to determine size.
Learn how to count single crochet stitches
Look at the upper edge of your crochet work. Every single crochet stitch creates a small V shape.
Each V represents one completed stitch.
When you make an increase, you put two single crochet stitches into one stitch from the previous round. Those two new stitches will appear as two separate V shapes along the top edge.
This is important because counting the individual V shapes tells you whether your circle is growing correctly.
Keep the circle flat
The basic increase formula for this pattern begins with six single crochet stitches in a magic ring.
Every following increase round adds six new stitches.
That means your stitch totals should follow this sequence:
R1
6
R2
12
R3
18
R4
24
R5
30
R6
36
Stitch counts for the first six rounds. The same +6 progression continues as the circle expands.
If the circle starts curling upward, you may have too few increases or overly tight tension.
If the edges become wavy, there may be too many increases or the fabric may be too loose.
A little adjustment is normal, especially when you substitute a different yarn.
Important safety note
This pattern makes a soft textile floor mat, not a certified infant sleep surface or a replacement for a firm, flat baby mattress.
Use it for supervised floor activities only, on a clean, flat, non-slip surface. Keep loose ends, fringe, ties, buttons, pom-poms, and other detachable decorations off the mat. Check for damage and loose fibers before use. Never leave an infant sleeping unattended on it.
Step-by-Step Crochet Play Mat Tutorial
Step 1: Make a Magic Ring
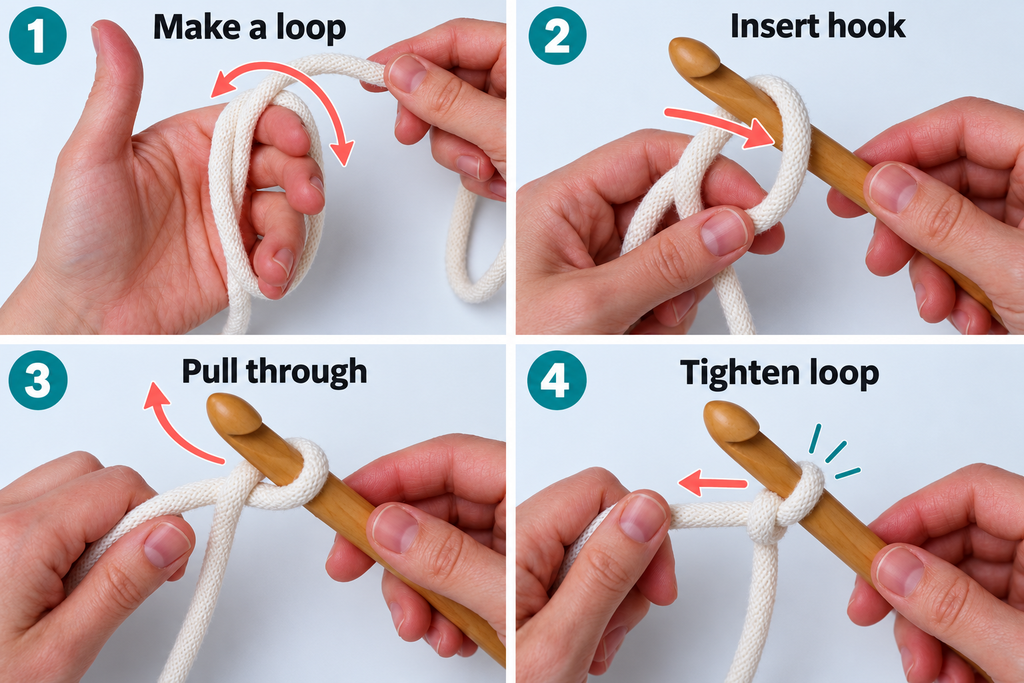
Every round crochet play mat needs a starting point, and for this project we will use an adjustable magic ring.
Hold the end of your dusty sage yarn in one hand, leaving a tail of approximately 15–20 cm (6–8 inches).
Wrap the working yarn around two fingers so that it crosses over the tail and creates a loop.
Carefully slide your crochet hook beneath the loop, catch the working strand, and pull it back through.
Yarn over and make one chain to secure the adjustable ring.
Do not pull the center closed yet. You need enough space to work your first stitches into the loop.
Beginner tip: Keep the initial loop loose enough that you can clearly see where to insert your hook.
Common mistake to avoid: Do not crochet into the short yarn tail alone. The first stitches must be made around the adjustable loop so that you can pull it closed afterward.
Step 2: Crochet the First Six Stitches
Now you are ready to create the center of the play mat.
Insert your hook into the middle of the magic ring.
Yarn over and pull up a loop. You should have two loops on your hook.
Yarn over again and pull through both loops.
You have completed your first single crochet stitch.
Continue until you have made six single crochet stitches into the ring.
Gently pull the short yarn tail until the opening closes.
Your work should now look like a small circle.
Round 1:
Work 6 sc into the magic ring.
Stitch count: 6 sc
Do not join with a slip stitch. This pattern is worked in continuous spiral rounds.
Place a stitch marker in the first stitch so you always know where the round begins.
Beginner tip: If your six stitches bunch up before closing the ring, that is normal. Gently spread them around the loop before pulling the center tight.
Common mistake to avoid: Do not count the securing chain as one of your six single crochet stitches.
Step 3: Increase to Twelve Stitches
The first round creates the center. The second round begins widening the circle.
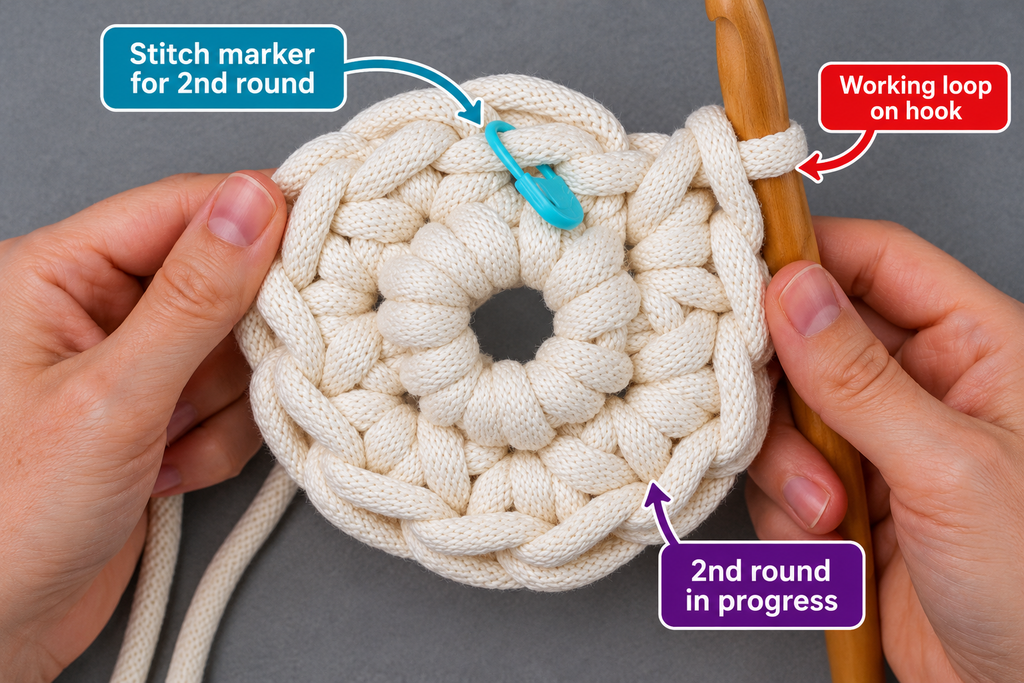
Instead of placing one single crochet in every stitch, you will place two single crochet stitches in each stitch.
This is called an increase.
Insert your hook into the first stitch and make one single crochet.
Insert your hook into that very same stitch again and make another single crochet.
That completes one increase.
Repeat this into each of the six stitches from the previous round.
Round 2:
Work 2 sc in each stitch around.
Stitch count: 12 sc
As you finish the round, move your stitch marker into the first stitch of the next round.
Your work should now be a slightly larger flat circle.
Beginner tip: Count all twelve V shapes after finishing the round, especially while you’re getting comfortable with increases.
Common mistake to avoid: When you insert the hook twice into the same stitch, make sure you’re creating two completed single crochets rather than two loops that accidentally become one stitch.
Step 4: Work the Next Increasing Rounds
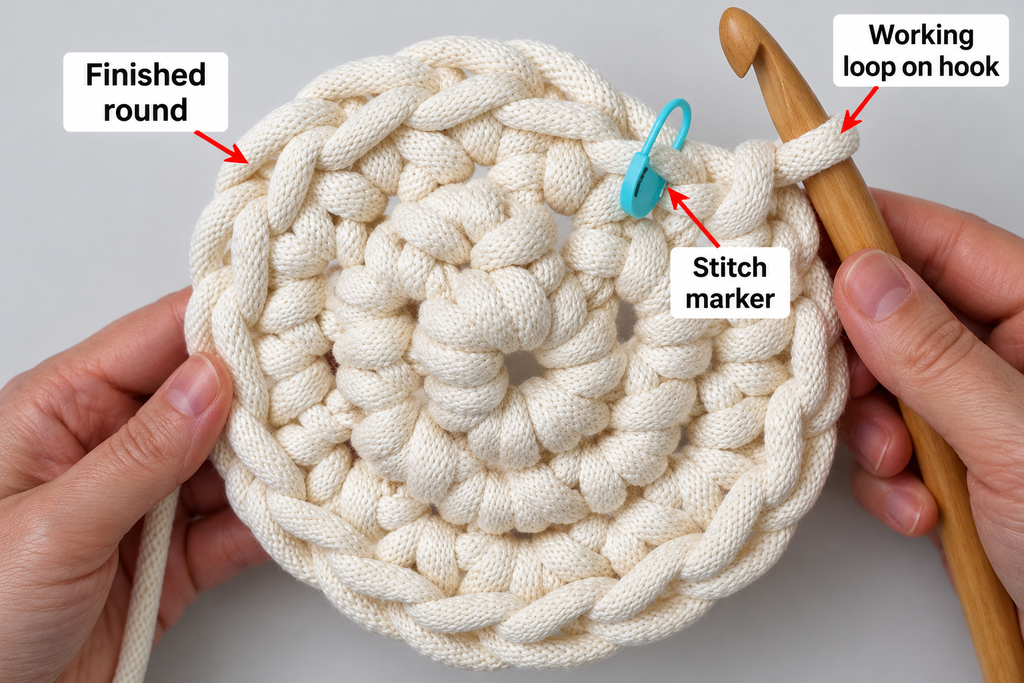
Now the circle needs more space between each increase.
This is where the pattern starts becoming easier to remember.
Round 3: Repeat (1 sc in the next stitch, inc in the following stitch) six times.
Stitch count: 18 sc.
Round 4: Repeat (1 sc in each of the next 2 stitches, inc in the following stitch) six times.
Stitch count: 24 sc.
Round 5: Repeat (1 sc in each of the next 3 stitches, inc in the following stitch) six times.
Stitch count: 30 sc.
Round 6: Repeat (1 sc in each of the next 4 stitches, inc in the following stitch) six times.
Stitch count: 36 sc.
Round 7: Repeat (1 sc in each of the next 5 stitches, inc in the following stitch) six times.
Stitch count: 42 sc.
Round 8: Repeat (1 sc in each of the next 6 stitches, inc in the following stitch) six times.
Stitch count: 48 sc.
You can see the pattern developing: every new round has one more ordinary single crochet between the increases.
The circle also gains six additional stitches each round.
For beginners, I recommend counting after every round until you are familiar with how the increasing pattern feels.
Beginner tip: Divide the circle mentally into six sections. Each section receives one increase per round.
Common mistake to avoid: If you work all your increases directly above those in previous rounds, the circle may develop six subtle corners. This is not a disaster, but staggering the increase positions in later rounds can give the mat a smoother circular outline.
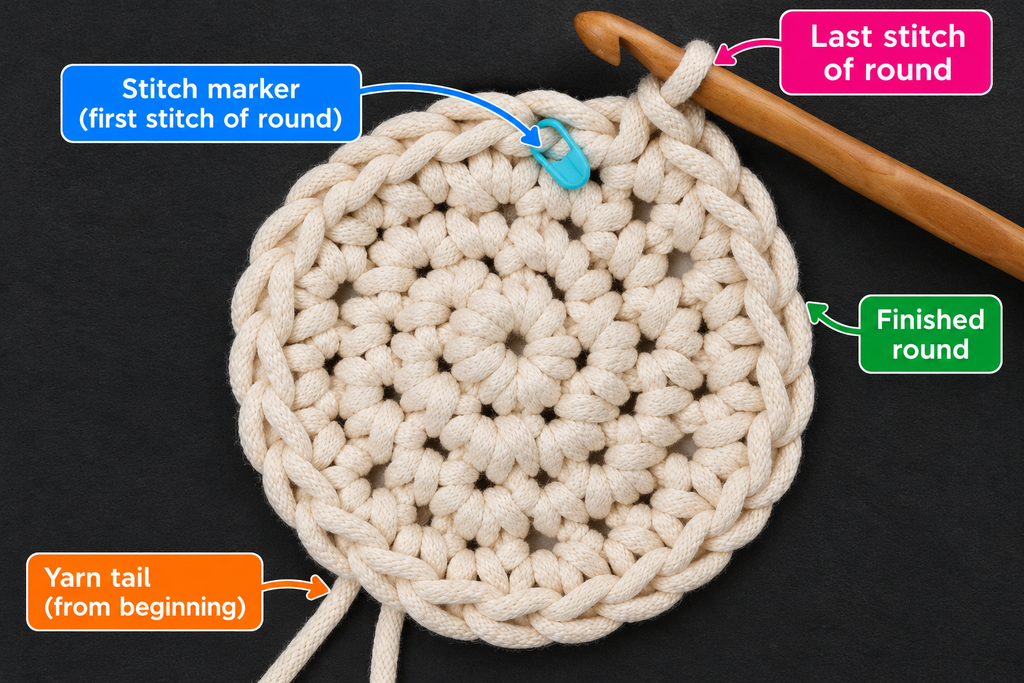
Step 5: Check Your Single Crochet Stitches
Before continuing with a much larger circle, take a moment to inspect your stitches.
Set the crochet hook down and turn the mat so that you can see the outer edge clearly.
The top of every single crochet stitch should resemble a small V.
In this pattern, you generally insert the hook under both loops of that V.
If you accidentally work through only one loop, the fabric may begin showing ridges or variations in texture.
That can be a pretty design choice in other projects, but for this beginner play mat, we want an even surface.
To make each single crochet:
- Insert the hook under both top loops of the next stitch.
- Yarn over and pull up a loop.
- Yarn over and pull through both loops on the hook.
Repeat that motion at a comfortable pace.
It is more important to make consistent stitches than to crochet quickly.
Beginner tip: If you are unsure where your hook belongs, gently stretch the top edge between your fingers so you can see the individual V shapes.
Common mistake to avoid: Don’t insert the hook into the space between stitches. Work under the top loops unless the instructions specifically tell you otherwise.
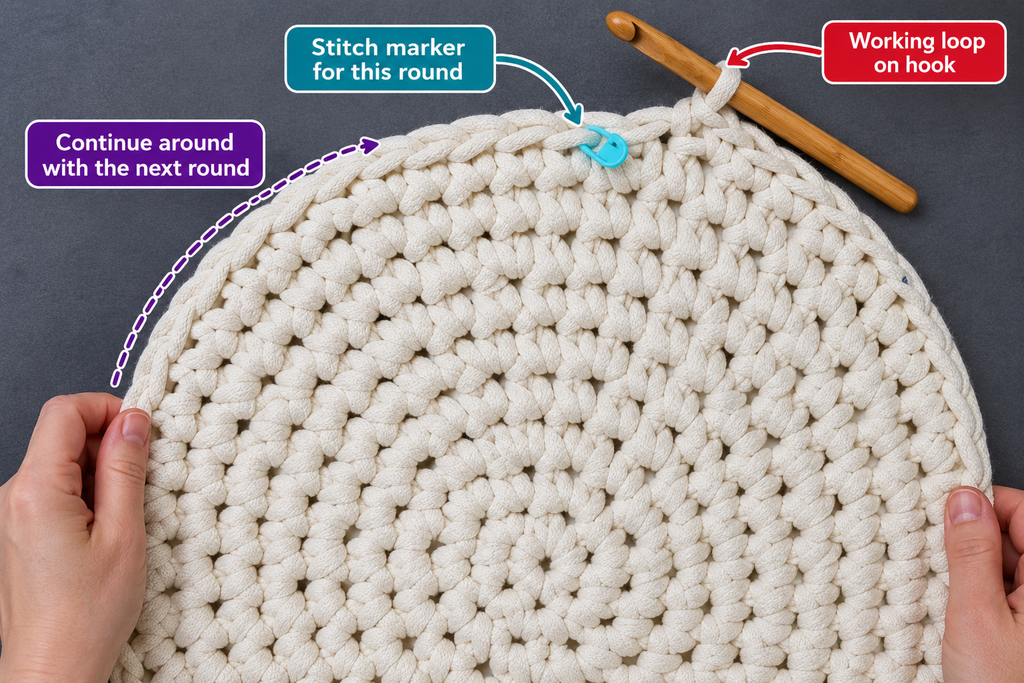
Step 6: Continue Growing the Play Mat
At this point, you understand the entire foundation of the pattern.
You will continue crocheting in rounds, increasing six times in each round.
Here are the next four rounds to make the progression clear:
Round 9: Repeat (1 sc in each of the next 7 stitches, inc) six times. You will have 54 stitches.
Round 10: Repeat (1 sc in each of the next 8 stitches, inc) six times. You will have 60 stitches.
Round 11: Repeat (1 sc in each of the next 9 stitches, inc) six times. You will have 66 stitches.
Round 12: Repeat (1 sc in each of the next 10 stitches, inc) six times. You will have 72 stitches.
Continue using the same formula.
For any round after the first:
- Work one fewer ordinary single crochet between increases than the round number minus two.
- Make six increases around the circle.
- Confirm that your total stitch count is six times the round number.
For example, on Round 20, you would work eighteen ordinary single crochets followed by one increase, repeating this six times.
You would finish that round with 120 stitches.
As the mat grows, you can stagger the increases by shifting where each increase section begins. Keep exactly six increases overall and the required total stitch count.
This avoids having all the extra stitches stacked into straight lines.
Beginner tip: Don’t worry if the circular mat becomes too wide to hold comfortably. Lay it on a table or clean floor and rotate the project rather than trying to lift the entire circle while crocheting.
Common mistake to avoid: Don’t stop increasing in every round just because the mat looks wide enough. Without sufficient increases, the edges may begin turning upward.
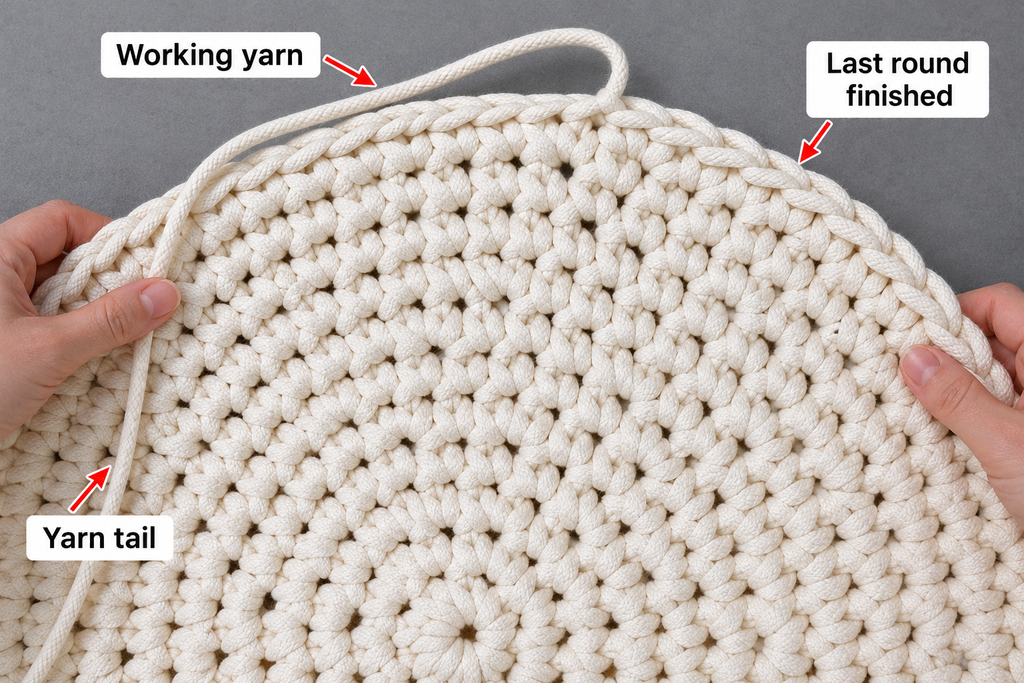
Step 7: Measure and Adjust the Shape
Once your play mat becomes around 40–50 cm (16–20 inches) wide, start measuring it regularly.
Spread the fabric on a clean, flat surface.
Gently smooth the circle without stretching it.
Measure from one edge straight across the center to the opposite edge.
For a nursery or small supervised play space, you may want a mat approximately 80–90 cm (31–35 inches) across.
You may need more or fewer rounds than expected. Bulky yarn varies widely between brands, and stitch tension affects how quickly the diameter grows.
If the circle starts forming a shallow bowl, first confirm your stitch counts. If they are correct, check whether your fabric is unusually tight or whether your yarn requires a different increase rate.
If the circle starts creating ruffles, verify that you haven’t accidentally added more than six increases per round.
Occasional gentle rippling may relax after washing and drying flat, but strong ruffles should be corrected before you continue.
Beginner tip: Take a measurement every three to five rounds once the circle becomes large. That makes it easier to recognize changes in the shape before they become difficult to correct.
Common mistake to avoid: Never force the circle flat by pulling hard on the edges. Measure and inspect the actual fabric rather than temporarily stretching it into shape.

Step 8: Finish with a Smooth, Simple Edge
When your mat has reached the size you want, finish your final round with its full required stitch count.
Do not make an increase halfway through a repeat and immediately stop; completing the round makes the edge more consistent.
Because this pattern uses continuous spiral rounds, the final stitch may sit slightly higher than the beginning of the outermost round.
To smooth the transition, make one slip stitch into the next stitch.
Pull the working yarn through gently.
Cut the yarn, leaving a tail approximately 15–20 cm (6–8 inches) long.
Pull the tail through the final loop to secure the work.
For a baby play mat, I recommend a simple, clean edge rather than fringe, tassels, decorative cords, or dangling ties.
Beginner tip: Look around the entire outside edge before cutting the yarn. If one section appears significantly tighter or looser than the rest, correct it while the work is still attached.
Common mistake to avoid: Don’t pull the finishing slip stitch too tightly. A tight final stitch can make a visible bump or pinch at the edge.

Crochet Play Mat Pattern Notes
Continuous rounds
This play mat is crocheted in a spiral.
You do not slip stitch to join every round, and you do not make a turning chain at the beginning of each new round.
Move your stitch marker every time you begin a new round.
This helps keep the stitching continuous and avoids a prominent joining seam.
Turning chain rules
There are no turning chains after the initial magic-ring securing chain because you never turn your work.
Keep the same side of the mat facing you while crocheting.
Right side and wrong side
The side facing you as you crochet is treated as the right side.
The reverse side is where you should weave in the loose yarn ends. Both surfaces should be relatively smooth because the pattern uses simple single crochet stitches.
Stitch count guide
This is an original, expandable six-increase design. Use the stitch counts as checkpoints, and make adjustments for your yarn if needed.
| Round | Sc between increases | Total stitches |
|---|---|---|
| 1 | Magic ring | 6 |
| 2 | 0 | 12 |
| 3 | 1 | 18 |
| 4 | 2 | 24 |
| 5 | 3 | 30 |
| 6 | 4 | 36 |
| 8 | 6 | 48 |
| 10 | 8 | 60 |
| 12 | 10 | 72 |
| 16 | 14 | 96 |
| 20 | 18 | 120 |
| 24 | 22 | 144 |
| 28 | 26 | 168 |
| 32 | 30 | 192 |
| 36 | 34 | 216 |
The number of single crochet stitches between increases grows by one per round.
The final number of rounds is determined by your chosen finished diameter and actual gauge. Round 36 is an example checkpoint, not a guarantee that the mat will measure 80–90 cm.
How to make a larger play mat
Continue adding six evenly distributed increases per round while the fabric remains flat.
If you need more floor coverage, continue until you reach your intended diameter.
If you want a smaller mat, simply stop sooner, complete the current round, and finish the edge.
How much yarn should you buy?
The amount of yarn depends on thickness, fiber, hook size, and final diameter.
If you’re buying yarn specifically for this project, make sure you can purchase more in the same dye lot, or buy sufficient yarn upfront and retain any unused skeins.
A small test circle can provide a more accurate estimate than a generic yardage figure.
Weigh your sample after crocheting several rounds. You can then compare that weight with how much yarn you have available, remembering that the outer rounds use much more yarn than the first few rounds.
Common Beginner Mistakes and How to Fix Them
1. The crochet circle curls into a bowl
This usually happens when the outer edge is not growing fast enough for the fabric to lie flat.
First, count your stitches. If you accidentally skipped an increase, undo the affected section and correct it.
If all counts are correct, try relaxing your tension or testing a slightly larger hook. Some yarns need an adjusted increase rate.
2. The outer edge becomes wavy
Rippling can occur when there are too many increases or when the tension is too loose.
Check whether you placed more than six increases in one round. If so, remove the extras.
If the stitch counts are correct, you may need to adjust the hook size or the increase spacing for your yarn.
3. The circle starts looking hexagonal
Six increases worked in exactly the same positions can make the circle develop six noticeable corners.
To avoid this, shift the positions of the increases between rounds.
You should still work six increases in each round, but they do not all need to line up vertically.
4. You lose track of the round
A continuous crochet spiral doesn’t have the obvious starting point of a joined-round pattern.
Without a marker, you may accidentally finish a round early or work too many stitches.
Always place a locking stitch marker in the first stitch of every round. Move it as you continue.
5. The center has an opening
The magic ring may not have been pulled closed tightly enough.
Gently pull the starting tail again before weaving it in.
If the ring will not close, make sure the stitches were worked around the adjustable loop correctly.
6. The mat feels too stiff
Using a hook that is too small for thick yarn can create a dense, uncomfortable fabric.
Try a slightly larger hook on a practice sample.
Remember, you want enough stitch density for a durable textile, but not such tight tension that the project behaves like a hard basket base.
7. The outer edge looks uneven
A loose finishing stitch, an accidental extra increase, or inconsistent tension can create a bump.
Check the last round carefully before fastening off.
Often, correcting only a few stitches will improve the edge substantially.
How to Customize This Crochet Project
Try a different yarn color
A single-color mat is especially beginner-friendly because you don’t need to join new shades at planned intervals.
Dusty sage is beautiful for a neutral nursery, but oatmeal beige, light terracotta, warm cream, soft blue, and muted lavender are also lovely options.
Choose colors that work with the room rather than forcing a complicated palette.
Add simple color changes
For a subtle striped design, change color at the beginning of a marked round.
For example, you could crochet most of the play mat in cream and introduce dusty sage during the final few rounds.
If you change colors, secure every yarn tail carefully. The continuous spiral may create a slight jog where one color meets another; that is normal.
Make the play mat smaller
A smaller circle can work as a decorative floor accent or a textile layer for supervised activities.
Use the same stitch sequence and stop when it reaches the diameter you need.
A smaller project also uses less yarn, so it’s a good option if you want to practice before making a full-size play mat.
Make a larger family floor mat
To create a larger mat, continue increasing while checking that the fabric stays flat.
Keep in mind that larger rounds take more time and use more yarn.
The mat will also become heavier, especially if you choose a high-cotton-content bulky yarn.
Choose a simple border
For the most beginner-friendly and baby-appropriate finish, the edge can be left as the final round of single crochet stitches.
If you want a slightly more defined border, you can experiment on a sample with one evenly worked round of single crochet, but the circle must remain flat. Depending on your yarn and tension, further increases may be required.
Avoid decorative loops or loose attachments that could catch small fingers.
Use the same construction for other projects
Once you understand this flat-circle technique, you can adapt the general method to round placemats, table mats, decorative floor rugs, circular cushions, or pet resting mats.
Each project will need yarn and construction choices appropriate to its intended use.
Finishing Instructions
A beautiful finished mat needs more than simply cutting the yarn.
Taking a little extra time with the finishing makes the project neater and more durable.
Fasten off securely
After completing your final slip stitch, cut the yarn with enough length to weave securely into the fabric.
Pull the remaining loop through so the yarn is fastened off.
Don’t leave a large knot sitting on the surface of the mat.
Weave in the loose ends
Thread the yarn tail through a blunt yarn needle.
Turn the mat over.
Pass the needle beneath several stitches on the reverse side, following the existing stitch structure.
Change direction and weave beneath several more stitches to help secure the yarn.
For bulky yarn, gently distribute the tail so you don’t create a hard lump.
Repeat this process for the starting magic-ring tail.
Trim only after the ends are securely woven in.
Wash and reshape
Before using the mat, follow the yarn manufacturer’s washing instructions.
If the yarn is machine washable, use a suitable gentle cycle with mild detergent, according to its care label. A large, heavy mat may need hand washing or more careful handling depending on its size and fiber content.
Reshape the mat while damp and lay it flat to dry.
Avoid hanging a wet, heavy crochet mat from one edge. Doing so can stretch it unevenly.
Check the finished mat
Run your hands gently across both sides.
Look for loose yarn tails, uneven stitches, gaps, or damaged fibers.
Place the mat on a clean floor and check that it does not bunch or slide easily. Use it only where it can remain stable.
Quick Printable-Style Crochet Play Mat Pattern Summary
Round Crochet Play Mat — Quick Pattern
Skill level
Confident beginner
Hook
6.5 mm, adjustable
Yarn
Washable bulky #5 cotton blend
Finished size
Approximately 80–90 cm, measured
Starting method: Magic ring, 6 sc.
Round 2: 2 sc into every stitch. (12)
Round 3: (1 sc, inc) × 6. (18)
Round 4: (2 sc, inc) × 6. (24)
Round 5: (3 sc, inc) × 6. (30)
Continue: Add one additional ordinary sc between increases on each new round; make exactly six increases per round. Stagger increase placement where useful.
General stitch count: Round number × 6.
Finishing: Complete your final round, smooth with a slip stitch, fasten off, weave in ends, wash according to yarn label, and dry flat.
Use the detailed instructions and shape-checking notes above. Gauge, finished size, and yarn quantity are not sample-tested. Copy quick pattern
Frequently Asked Questions About Crochet Play Mats
1. Can a beginner crochet a play mat?
Yes. This pattern uses basic single crochet stitches and regular increases. The main challenge is keeping track of your stitches and maintaining a flat circle, not learning complicated crochet techniques.
It helps to practice the magic ring and the first few rounds before starting a large mat.
2. What yarn is best for a crochet baby play mat?
A soft, low-shedding, washable yarn is a practical choice. Bulky cotton-blend yarn can give the mat enough structure while still producing a comfortable fabric.
Choose a yarn with clear care instructions and avoid fibers that shed easily, feel scratchy, or produce loose decorative pieces.
3. How big should a crochet play mat be?
An approximately 80–90 cm (31–35 inch) round mat is one possible size for a small supervised floor-play area.
You can make yours larger or smaller depending on available space, the age and activities of the user, and the practical needs of the household.
The mat does not replace an approved playpen, safety surface, or infant sleep product.
4. How do I stop my crochet circle from curling?
Start by checking your stitch counts and increase placement.
If you missed increases, correct them. If the stitch count is correct but the fabric curls, experiment with slightly looser tension or a different hook size.
The best increase rate can vary with the specific yarn and stitch proportions.
5. Can I make this crochet play mat with cotton yarn?
Yes. Cotton and cotton-blend yarns can work well, especially when easy washing is important.
Remember that a large cotton mat can become heavy when wet, and some cotton yarns produce a relatively firm fabric. Test the texture and care requirements before making the full project.
6. Do I need to add a border to the crochet play mat?
No. A simple single crochet edge is enough for this design.
For an infant-oriented floor mat, a smooth edge without loose decorative attachments is preferable to fringe or tassels.
7. How do I wash a handmade crochet play mat?
Always follow the yarn label. Many cotton-blend yarns can be washed gently, but some require hand washing or special drying methods.
After washing, reshape the mat and lay it flat to dry thoroughly before storing or using it.
Conclusion
A round crochet play mat is a rewarding project because you can see it growing with every new round.
Once you understand the magic ring, single crochet increases, and stitch-count formula, the process becomes easy to follow. You can crochet a few rounds in the evening, set the project aside, and continue whenever you have time.
The finished mat can be a beautiful handmade part of a nursery, a practical floor textile for supervised activities, or a thoughtful gift for someone who appreciates handmade projects.
If you enjoyed this pattern, save it to your favorite crochet Pinterest board so you can return to the increase instructions, size-adjustment tips, and finishing guidance whenever you need them.





