A water bottle holder is one of those crochet projects that becomes more useful the moment you finish it. You can carry your drink on a walk, keep your hands free at a market, or make a practical gift for someone who is always heading to the gym, park, or beach.
This beginner-friendly crochet water bottle holder pattern starts with a solid round base, changes into a flexible mesh body, and finishes with a reinforced shoulder strap. The mesh uses less yarn than a completely solid carrier, while the dense base helps support the weight of a filled bottle.
You will work through the project one section at a time. First, you will crochet a flat circle. Next, you will make a defined ridge and build the open sides. Finally, you will crochet a separate strap and sew it securely to the top band.
The written pattern below is an original design. It does not reproduce the construction, stitch counts, or wording of the visual reference tutorial.
What You’ll Learn
By completing this project, you will practice:
- Making a magic ring.
- Crocheting a flat single crochet circle.
- Placing increases evenly.
- Working in continuous and joined rounds.
- Crocheting in the back loop only.
- Making simple chain-space mesh.
- Recovering the original stitch count above an openwork section.
- Crocheting a low-stretch ribbed strap.
- Positioning and reinforcing strap attachments.
- Adjusting a crochet project to fit a specific bottle.
Project Details
Tutorial type: Pattern-style project tutorial
Skill level: Easy beginner
Finished base: Approximately 3 inches in diameter
Finished body height: Approximately 7–7½ inches
Suggested strap length: 40–44 inches
Estimated time: 3–4 hours
Construction: Bottom-up holder with separately crocheted strap
The standard instructions fit many bottles with a bottom diameter close to 2¾–3 inches. Measure your own bottle instead of relying only on its listed fluid capacity.
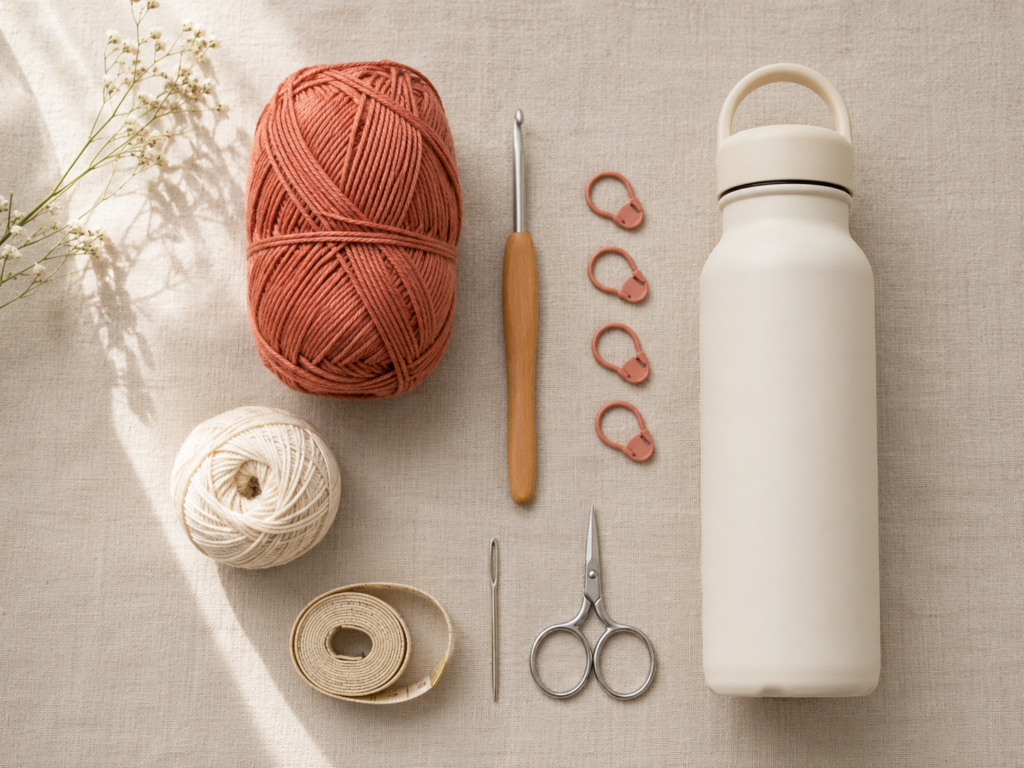
Materials You’ll Need
- 120–150 yards of medium-weight #4 cotton yarn.
- 4.0 mm crochet hook.
- Locking stitch marker.
- Tapestry needle.
- Small scissors.
- Flexible measuring tape.
- Two additional stitch markers or safety pins for holding the strap.
- The water bottle you want the holder to fit.
A smooth cotton yarn makes the stitch openings easy to see and gives the carrier a practical, structured feel. Mercerized cotton is another good option when you want a smoother surface and more defined stitches.
Yarn categories and label information are standardized separately from the physical weight of a skein. Check the number symbol, fiber content, yardage, gauge information, and care directions on the yarn label before beginning.
Crochet Abbreviations Used
- ch = chain
- sc = single crochet
- sl st = slip stitch
- st/sts = stitch/stitches
- rep = repeat
- BLO = back loop only
- inc = work 2 single crochet stitches in the same stitch
- ch-2 sp = chain-two space
- MR = magic ring
These abbreviations follow common US crochet terminology. The Craft Yarn Council maintains a broader standardized abbreviation list for pattern readers.
Before You Start
Gauge and tension
Suggested gauge is approximately:
16 single crochet stitches and 18 rows = 4 inches
Exact gauge is less important than the physical fit of the base. Your base should lie flat and should be approximately the same width as the bottom of your bottle.
Use firm but comfortable tension. Very loose stitches may stretch excessively when the bottle is full. Extremely tight stitches can make it difficult to insert the hook and may cause the circular base to cup.
How to count your stitches
The base is worked in a continuous spiral. Place a locking marker in the first stitch of every round. Move the marker upward each time you reach it.
Do not count the loop on your hook as a stitch. Look for the V shape at the top of each completed single crochet.
How to keep the base flat
A flat single crochet circle generally needs evenly distributed increases. In this pattern, every increase round adds six stitches.
- A bowl shape usually means you need more increases or looser tension.
- A wavy edge usually means the base has too many increases or the stitches are too loose.
- A slight curve can often be flattened by hand, but pronounced ruffling should be corrected before you continue.
Choosing colors
A single solid color makes stitch counting easiest. You can also use one color for the base and top band and another for the mesh.
For the most visually consistent tutorial photographs, the prompts use muted terracotta cotton yarn, a warm cream bottle, a pale oatmeal background, and the same wooden-handled hook.
Beginner note
The magic ring is useful because it produces a small adjustable center. When you find it frustrating, chain 2 and work the first six single crochet stitches into the second chain from the hook instead.
US and UK terms
This pattern uses US terminology.
- US single crochet equals UK double crochet.
- US double crochet equals UK treble crochet.
Term differences should always be checked before following a pattern written for another region.
Step-by-Step Crochet Tutorial
Step 1: Make the Magic Ring
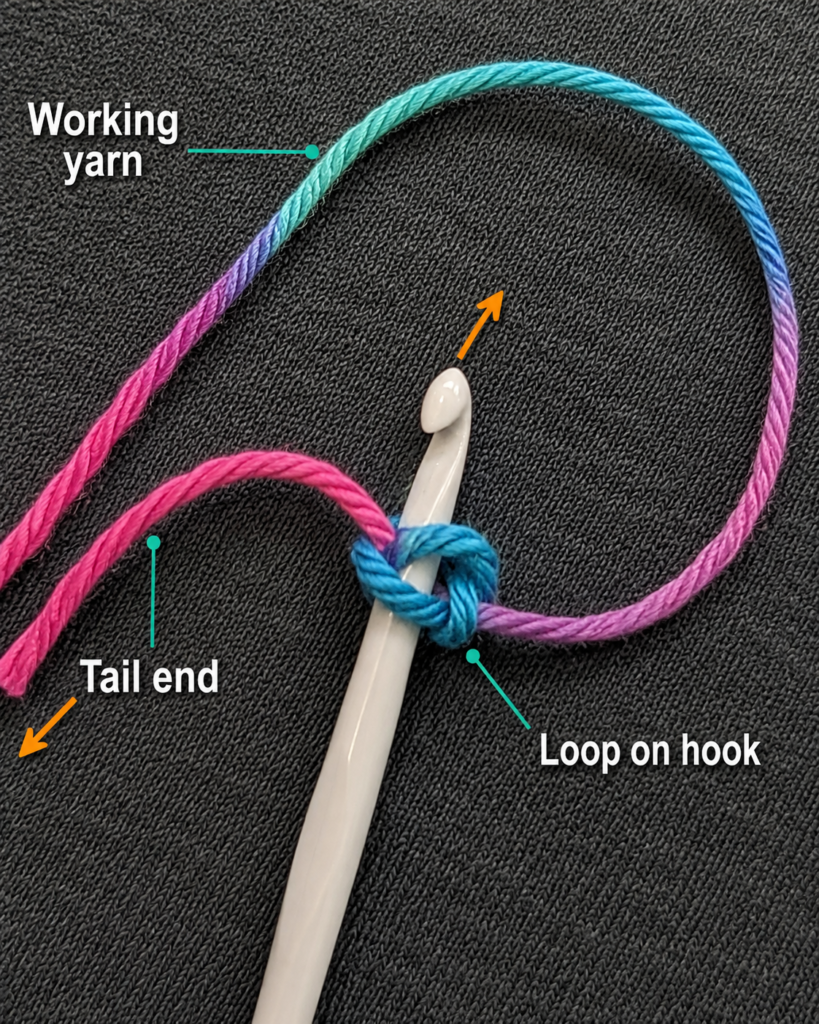
Form a magic ring and place the working loop on your hook.
Base Round 1: Work 6 sc into the center of the ring. Pull the yarn tail gently until the center closes. Do not join. Place your stitch marker in the first sc. 6 sts
The first round will look small, and the stitches may feel crowded. Spread them around the ring before pulling the center completely closed.
Beginner tip:
Hold the base of the stitches between your thumb and middle finger. This stops the ring from turning while you insert the hook.
Common mistake to avoid:
Do not crochet into the yarn tail. The stitches should wrap around both strands of the ring, but the tail must remain free enough to pull the center closed.
Step 2: Increase the Flat Base
Continue in a spiral. Move your stitch marker into the first stitch of each new round.
Base Round 2: Inc in every stitch around. 12 sts
Base Round 3: Rep [sc in next st, inc in next st] around. 18 sts
Base Round 4: Rep [sc in next 2 sts, inc in next st] around. 24 sts
Base Round 5: Rep [sc in next 3 sts, inc in next st] around. 30 sts
Base Round 6: Rep [sc in next 4 sts, inc in next st] around. 36 sts
Stop and count at the end of every round. Correcting one missed increase now is much easier than correcting it after the body has been started.
The increases should appear in six evenly spaced sections. To reduce a visible hexagonal effect, you may stagger the first increase of alternating rounds, but this is optional for a beginner project.
Beginner tip:
Count each round before moving on. A washable marker can be placed in every sixth increase section when you need more visual guidance.
Common mistake to avoid:
Do not place an increase in every stitch after Round 2. Each later round contains more ordinary single crochet stitches between the increases.

Step 3: Check the Base Against Your Bottle
Place the bottle upright on the crochet circle.
For a close but comfortable fit, the crochet base should reach the outer edge of the bottle bottom. It may extend slightly beyond the edge, but it should not be significantly wider.
Use the following adjustment guide:
- Stop after Round 5 with 30 stitches for a narrow bottle.
- Stop after Round 6 with 36 stitches for the standard version.
- Add another increase round for a wider bottle.
Optional Base Round 7: Rep [sc in next 5 sts, inc in next st] around. 42 sts
The body mesh requires a stitch count divisible by three. The suggested stopping counts of 30, 36, and 42 all work with the mesh repeat.
Beginner tip:
Test the actual bottle rather than relying on a label such as 20 ounces or 750 milliliters. Bottles with the same capacity can have different diameters.
Common mistake to avoid:
Do not make the base much larger in anticipation of the bottle’s weight. Cotton fabric normally relaxes with use, and an oversized base can allow the bottle to lean.

Step 4: Create the Base-to-Body Ridge
The next round changes the direction of the fabric.
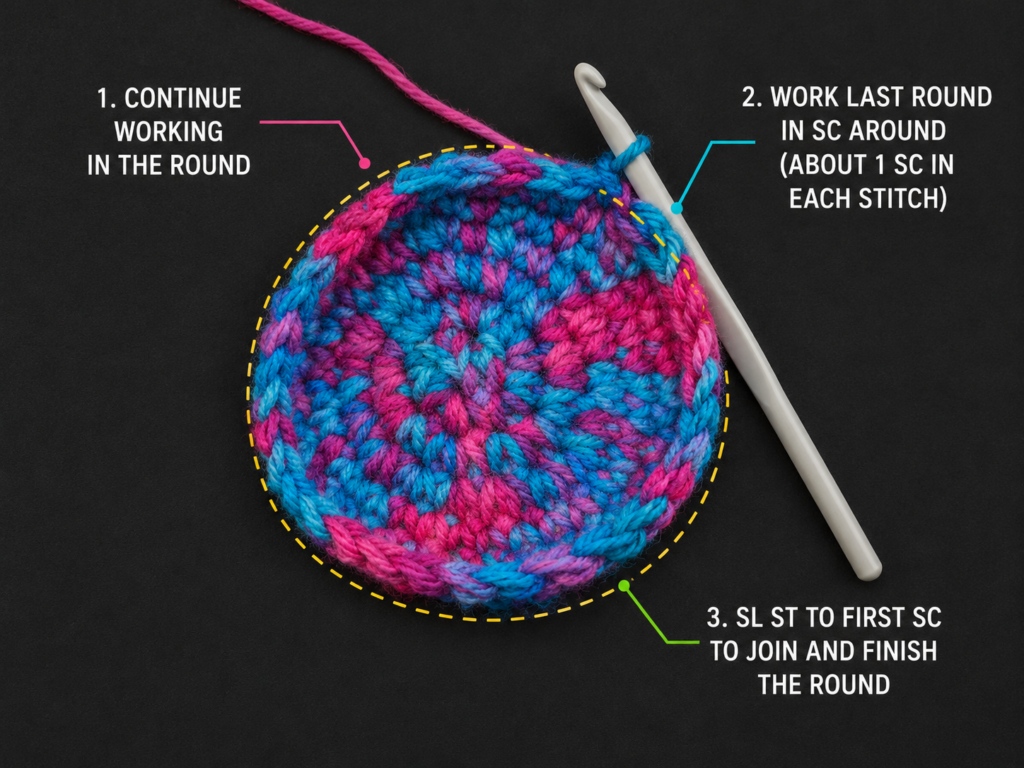
Work one single crochet in the back loop only of every stitch around.
For the standard size:
Transition Round: Sc BLO in each st around. Join with a sl st to the first sc. 36 sts
The unused front loops create a visible horizontal line. Above that line, the stitches begin moving upward instead of continuing to expand outward.
After joining this round, remove the marker used for the continuous spiral. The mesh section will use joined rounds.
Beginner tip:
At the top of each stitch, identify the two strands that form a V. Insert the hook under the strand farthest from you.
Common mistake to avoid:
Do not work through both loops during this round. Missing the back-loop placement will not destroy the holder, but the base will have a softer, less defined corner.
Step 5: Crochet the Mesh Body
The mesh repeat uses one single crochet followed by a chain-two space.
For the standard 36-stitch base:
Mesh Round 1: Ch 1, which does not count as a stitch. Sc in the same stitch. Ch 2 and skip the next 2 stitches. Rep [sc in next st, ch 2, skip next 2 sts] around. Join with a sl st to the first sc. 12 sc and 12 ch-2 spaces
Mesh Round 2: Sl st into the first ch-2 space. Ch 1 and sc in the same space. Ch 2. Rep [sc in next ch-2 sp, ch 2] around. Join with a sl st to the first sc. 12 sc and 12 ch-2 spaces
Repeat Mesh Round 2 until the mesh section measures approximately 5½ inches from the base ridge, or until the body reaches about 1½ inches below the bottle lid.
For other base sizes:
- A 30-stitch base creates 10 mesh spaces.
- A 36-stitch base creates 12 mesh spaces.
- A 42-stitch base creates 14 mesh spaces.
Insert the bottle every few rounds. The mesh should stretch gently around it without pulling the top edge downward.
Beginner tip:
When beginning a new mesh round, work into the open chain space rather than into an individual chain strand.
Common mistake to avoid:
Do not add an extra chain after completing the last repeat. Count the mesh spaces before joining so the body does not gradually widen.
Step 6: Finish the Body and Top Band
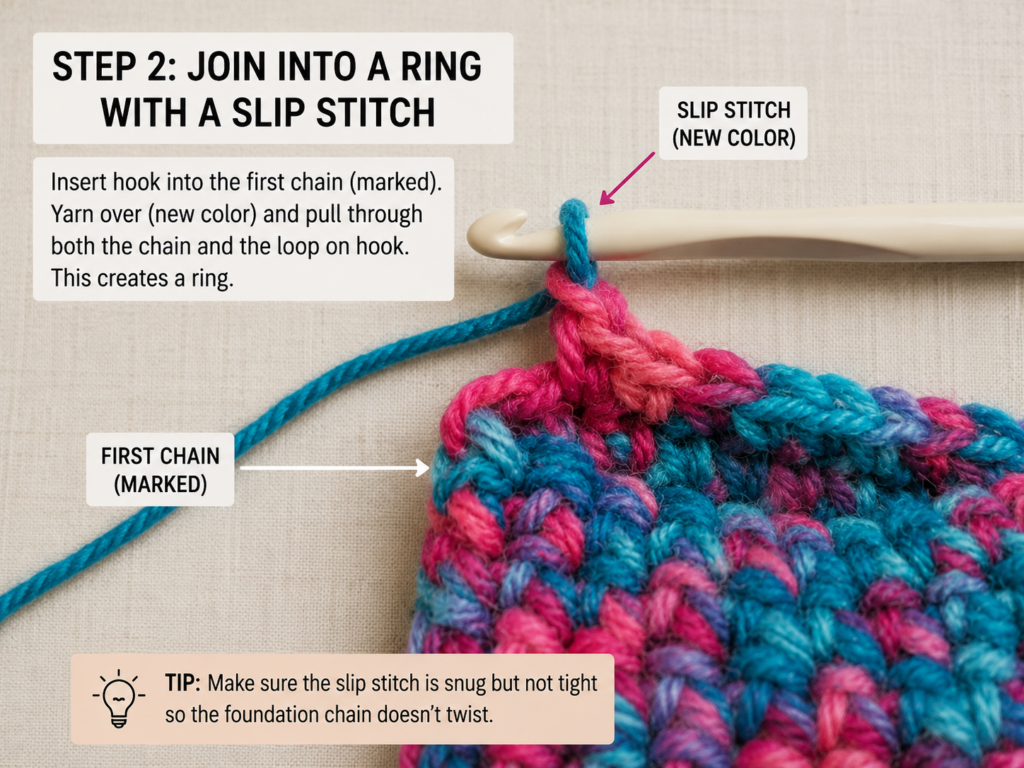
The open mesh must be converted back into a solid stitch count before the strap is attached.
Top Band Round 1: Ch 1. Sc in the same sc. Work 2 sc in the next ch-2 space. Rep [sc in next sc, 2 sc in next ch-2 sp] around. Join with a sl st to the first sc. 36 sts
Top Band Round 2: Ch 1. Sc in each st around. Join. 36 sts
Top Band Round 3: Ch 1. Sc in each st around. Join. 36 sts
Fasten off and leave a 6-inch tail for weaving.
The three-round band stabilizes the opening and provides a dense area for the strap seams.
Beginner tip:
Count Top Band Round 1 carefully. Each mesh unit returns to three stitches: one sc above the previous sc and two sc inside the chain space.
Common mistake to avoid:
Do not place three stitches into every chain space. That would increase the total stitch count and cause the top edge to flare.

Step 7: Crochet the Reinforced Strap
The strap is made separately so you can check its length before attaching it.
Leave an 18-inch beginning tail.
Chain until the foundation measures approximately 2 inches longer than your desired finished strap. For an adult shoulder or crossbody carrier, begin with a chain measuring approximately 44–46 inches.
Depending on your tension, this may require about 145–155 chains. The measurement is more important than the exact number.
Strap Row 1: Sc in the second ch from the hook and in every remaining chain. Turn.
Strap Row 2: Ch 1, which does not count as a stitch. Sc BLO in every stitch across. Turn.
Strap Row 3: Ch 1. Sc BLO in every stitch across.
Fasten off, leaving an 18-inch tail.
The completed strap should be approximately three rows wide. Pull it gently lengthwise before measuring because it will relax slightly under the weight of a bottle.
Beginner tip:
Work into the back bumps of the starting chain for Row 1 when you want both long strap edges to look neat.
Common mistake to avoid:
Do not make the foundation chain tight. A tight chain pulls one edge inward and can cause the finished strap to curve.
Step 8: Position and Sew the Strap
Place the bottle inside the holder. This helps the body retain its shape while you identify the correct attachment points.
Flatten the holder gently so the top band has two clear side edges. Position one strap end inside the band and overlap it by approximately 1½ inches.
Use a locking marker to hold it in place. Position the other end directly opposite the first one. Confirm that the strap is not twisted before marking the second side.
Remove the bottle before sewing.
Using one long yarn tail and the tapestry needle:
- Sew across the lower edge of the overlap.
- Sew upward along one side.
- Sew across the upper edge.
- Sew down the second side.
- Sew diagonally through the center.
- Sew back across the opposite diagonal to create an X.
Repeat with the other strap end.
A rectangular seam with a central X spreads the load over a larger area than a single straight seam.
Beginner tip:
Pass the needle through complete stitches in both layers rather than splitting individual strands of yarn.
Common mistake to avoid:
Check for twisting before sewing. Once both ends have been reinforced, correcting a twisted strap requires removing the seam.
Step 9: Weave In the Ends and Test the Holder
Thread each remaining yarn tail through the tapestry needle.
Weave through the dense single crochet areas rather than through the open mesh. Change direction at least once so the tail cannot slide out easily. Trim only after the tail feels secure.
Insert an empty bottle and check:
- The base sits flat.
- The holder reaches high enough to support the bottle.
- The lid remains accessible.
- The strap attachments are directly opposite.
- The strap is not twisted.
- The bottle can be removed without excessive stretching.
Next, fill the bottle and hold the carrier a few inches above a soft surface. Watch the strap seams and top band for movement. Reinforce either seam before regular use when you see widening or looseness.
Do not use the holder for an uncovered container, a bottle containing hot liquid, or a breakable bottle until the attachment points have been thoroughly tested.
Pattern Notes or Stitch Notes
Turning-chain rule
The beginning ch 1 does not count as a stitch anywhere in this pattern. Work the first sc in the same location indicated by the instructions.
Base stitch counts
The base increases by six stitches per round:
- Round 1: 6
- Round 2: 12
- Round 3: 18
- Round 4: 24
- Round 5: 30
- Round 6: 36
- Optional Round 7: 42
Mesh repeat
The mesh repeat uses three foundation stitches:
sc in next stitch, ch 2, skip 2 stitches
Your base count must therefore be divisible by three.
Joined-round seam
The mesh rounds are joined. The joining point may travel slightly to one side as the holder grows. This is normal and will be less obvious after the bottle is inserted.
Right side and wrong side
The side facing you while crocheting the mesh is considered the right side. The strap ends are positioned against the wrong side, or inside, of the top band.
Strap size
Measure from the top edge of one side of the holder, over your shoulder or across your body, to the opposite top edge.
The strap can lengthen under load, so make the finished strap slightly shorter than a loosely measured cord when your yarn stretches easily.
Common Beginner Mistakes
1. The base turns into a bowl too early
Cause: Missing increases or working very tightly.
Fix: Count the previous round. Undo the incorrect round and confirm that all six increases are present.
2. The base edge becomes wavy
Cause: Too many increases, accidental double stitches, or loose tension.
Fix: Check the round count and remove accidental increases. A severely ruffled base should be corrected rather than forced flat.
3. The mesh count changes
Cause: Adding an extra chain space near the join or skipping the first space.
Fix: Count the spaces before joining every round. Use a marker in the first sc.
4. The body is too loose around the bottle
Cause: Oversized base, large hook, or very loose mesh chains.
Fix: Use a smaller hook, shorten each mesh opening from ch 2 to ch 1, or begin again with one fewer base increase round.
5. The top band flares outward
Cause: Working too many stitches into each chain space.
Fix: Work exactly one sc above each mesh sc and two sc inside every ch-2 space.
6. The strap curves
Cause: The foundation chain is tighter than the rows above it.
Fix: Remake the chain with a hook 0.5 mm larger, then return to the 4.0 mm hook for the strap rows.
7. The strap twists after attachment
Cause: One end was turned before sewing.
Fix: Lay the complete project flat and follow the same strap edge from one attachment point to the other before sewing.
8. The strap seam stretches the top band
Cause: The strap was attached through only one or two stitches.
Fix: Overlap the strap with at least 1–1½ inches of the band and sew around the full perimeter of the overlap.
How to Customize This Crochet Project
Change the yarn
Cotton creates a structured, washable holder. A cotton-linen blend can provide a slightly more rustic texture.
Acrylic can be used, but test the completed holder carefully because some acrylic yarns stretch more under the weight of a full bottle.
Add color changes
Try one of these arrangements:
- Cream base, terracotta mesh, cream top band.
- Solid neutral holder with a contrasting strap.
- Two mesh rounds per color for narrow stripes.
- Scrap-yarn color blocks while keeping the base and strap in one strong yarn.
Complete each color change at the final yarn-over of the stitch before the new color begins.
Adjust the diameter
Stop the base after any round that produces a stitch count divisible by three.
For an unusually large bottle, continue the increase sequence:
Work one additional ordinary sc between the increases in each new round.
Always test the circle against the bottle before beginning the transition ridge.
Adjust the height
Repeat the mesh round until the body reaches the required height. Keep the top below the lid and any drinking spout.
A shorter holder works well for a child-sized bottle. A taller holder provides more support for a narrow metal bottle.
Change the mesh
For a denser body, replace each ch 2 with ch 1 and skip only one stitch. Ensure the base stitch count is even before using that variation.
For a more decorative body, alternate the terracotta mesh rounds with solid cream single crochet rounds.
Add a border
Finish the top with:
- One round of reverse single crochet.
- A simple contrasting slip-stitch round.
- Small evenly spaced picots.
- A narrow scalloped border.
Avoid a heavy border that pulls the opening outward.
Add a pocket
Crochet a small single crochet rectangle and sew it to the lower body for a key, card, or lip balm. Do not place a heavy phone pocket on very open mesh unless the body and strap attachments are reinforced.
Gift ideas and uses
A crochet bottle holder works well as:
- A teacher gift.
- A walking or hiking accessory.
- A gym-bag addition.
- A summer market gift.
- A travel accessory.
- A reusable-bottle gift set.
- A craft-fair item when the seams have been load-tested.
Finishing Instructions
Fastening off
After the final stitch, cut the yarn while leaving a 6-inch tail. Pull the cut end through the final loop and tighten gently.
Weaving in ends
Use the tapestry needle to weave each tail through several dense stitches. Change direction and weave through another section before trimming.
Do not weave short tails only through the mesh chains. Chain spaces move and stretch more than the solid base and top band.
Blocking and shaping
This holder usually needs only light shaping.
- Dampen the finished project.
- Insert the intended bottle or a similarly sized waterproof form.
- Straighten the mesh and top band.
- Remove the bottle when the holder is almost dry.
- Allow it to finish drying flat.
Do not leave a metal bottle inside wet cotton for a prolonged period.
Washing and care
Follow the care directions on the yarn label. When machine washing is permitted, place the holder inside a mesh laundry bag and use a gentle cycle. Reshape the base and strap and allow the project to dry flat.
Yarn labels commonly include fiber content, laundering information, yardage, and gauge guidance, so the label for the actual yarn remains the most appropriate care reference.
Quick Printable-Style Summary
Skill level: Easy beginner
Yarn: 120–150 yards medium-weight #4 cotton
Hook: 4.0 mm
Other materials: Stitch markers, tapestry needle, scissors, measuring tape, water bottle
Stitches: Ch, sc, sl st, inc, sc BLO
Starting method: Magic ring with 6 sc
Base: Increase by 6 stitches per round until the circle matches the bottle bottom
Standard base count: 36 sts
Transition: Sc BLO around
Mesh repeat: Sc in next location, ch 2, skip 2 sts or work into next ch-2 space
Standard mesh count: 12 spaces
Top band: Recover 36 sc, then work 2 additional sc rounds
Strap: Long foundation chain followed by 3 rows; Rows 2–3 worked BLO
Attachment: Overlap each end inside the top band and sew a rectangle with an X
Finishing: Weave in ends, test with an empty bottle, then carefully test under full weight
Frequently Asked Questions
What yarn is best for a crochet water bottle holder?
A medium-weight cotton yarn is a practical choice because it creates visible stitches and a relatively structured fabric. A cotton blend can also work, but make a small swatch and test its stretch before beginning.
Can a complete beginner make this pattern?
A beginner who can make a chain and single crochet can work through it slowly. The most important new skills are crocheting in a circle, placing increases, and identifying chain spaces.
Practice the magic ring with scrap yarn first, or use the chain-2 alternative.
How much yarn does a crochet water bottle holder require?
The standard holder generally uses approximately 120–150 yards, including the long strap. A short hand strap or child-size holder will require less. A wider bottle and long crossbody strap will require more.
How do I make the holder fit a larger bottle?
Continue the base increase sequence until the circle matches the bottle bottom. End with a stitch count divisible by three so the mesh repeat works evenly.
Repeat additional mesh rounds to increase the height.
How long should the strap be?
A shoulder strap may measure approximately 28–34 inches. An adult crossbody strap commonly needs approximately 40–48 inches, depending on the wearer and preferred drop.
Measure the intended wearer and account for yarn stretch before attaching the strap.
Why is my crochet water bottle holder stretching?
The yarn, hook size, tension, mesh size, and bottle weight all affect stretching.
Use a smaller hook, firmer tension, shorter mesh chains, or a denser strap when the holder stretches excessively. Cotton can relax after use, so load-test the completed project.
Can I put the holder in a washing machine?
That depends on the yarn. Check its label first. When machine washing is allowed, use a mesh laundry bag, a gentle cycle, and cool water. Reshape and dry flat.
Conclusion
This crochet water bottle holder combines several foundational skills in one practical project. The solid circle supports the bottle, the open mesh keeps the body lightweight, and the dense top band gives the reinforced strap a secure attachment area.
Once you understand the construction, you can resize it for narrow plastic bottles, wide reusable bottles, children’s bottles, or short travel cups. You can also change the color placement, replace the mesh, add a pocket, or make a shorter carrying handle.
Save the tutorial with your beginner crochet projects so you can return to the sizing and strap instructions when making another holder.





