A tablet sleeve is a satisfying project when you want to crochet something practical without committing to a blanket or wearable. This version is assembled from compact mini granny squares, so every small motif feels like a finished accomplishment.
Instead of asking you to match one exact tablet model, this crochet tablet sleeve pattern begins with your device measurements and the size of one completed motif. You can therefore adjust it for a standard tablet, an iPad, an e-reader, a drawing tablet, or even a small notebook.
The main construction uses two rectangular granny-square panels joined around three sides. You can finish the opening with a simple button loop or add a fabric lining and zipper for a more polished case.
This is a confident-beginner project. You should already be comfortable making chains and double crochet stitches, but the joining and finishing techniques are explained carefully.
What You’ll Learn
- How to crochet a compact three-round granny square.
- How to measure a tablet and calculate the required motif layout.
- How to join motifs during the final round.
- How to prevent gaps at shared corners.
- How to make two matching sleeve panels.
- How to seam the bottom and sides neatly.
- How to add a simple button-loop closure.
- How to add an optional fabric lining and zipper.
- How to resize the sleeve for a different device.
Project Details
Skill level: Confident beginner
Construction: Two modular panels joined around three sides
Example finished size: Approximately 8 × 10.5 inches / 20 × 27 cm
Example motif layout: Three squares across and four squares high per panel
Total example motifs: 24
Estimated time: 6–10 hours
Primary stitch pattern: Three-round granny square
Terminology: US crochet terms
The finished size depends on your motif gauge and tablet measurements. Do not make all 24 motifs before checking the size of your first one.
Materials You’ll Need
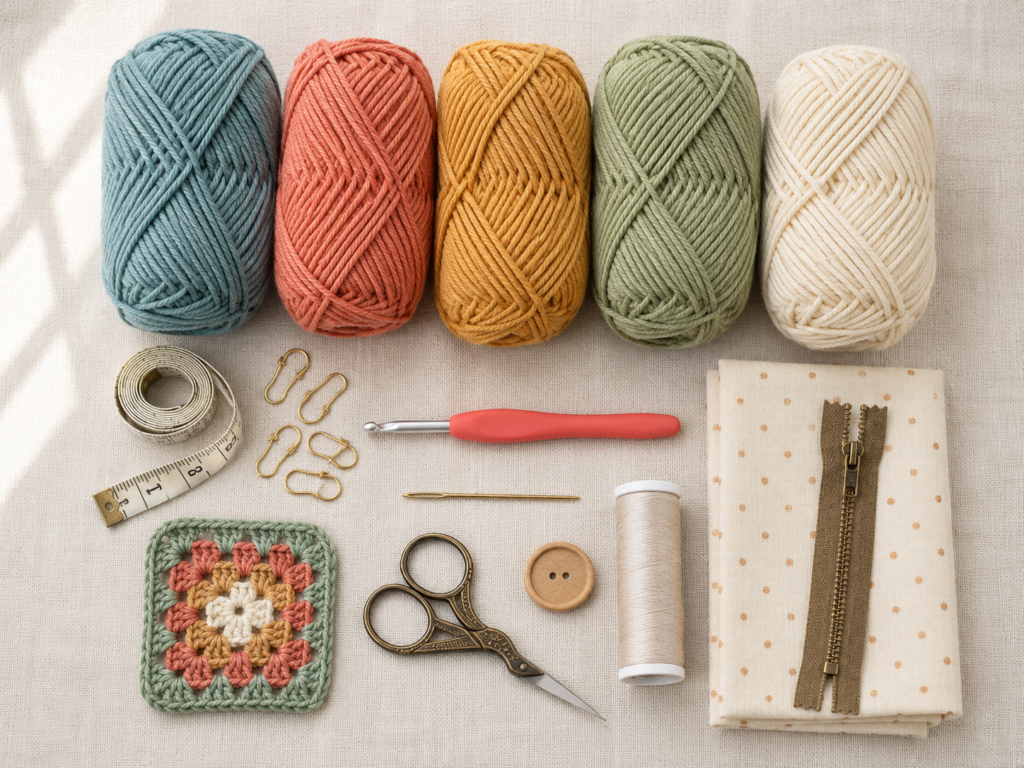
- Approximately 250–350 yards / 230–320 metres of DK-weight cotton or cotton-blend yarn.
- Four colors for the motif centers and middle rounds.
- One consistent joining color for the final rounds.
- 4.0 mm / US G-6 crochet hook.
- Scissors.
- Tapestry needle.
- Locking stitch markers.
- Flexible measuring tape.
- Tablet for fit testing.
- One ¾–1 inch flat button for the basic closure.
- Sewing needle and matching thread for the button.
Optional Lined Zipper Finish
- Cotton lining fabric.
- Lightweight fusible interfacing if you want a firmer lining.
- Zipper approximately equal to or slightly shorter than the finished opening.
- Sewing clips or pins.
- Hand-sewing needle and matching thread.
A 4.0 mm hook is commonly identified as a US G-6, but millimetre sizing is the more dependable measurement because letter designations can vary among manufacturers. The Craft Yarn Council also recommends using a gauge swatch to determine whether the selected hook creates the required fabric.
Calculate the panel layout
Use this formula:
Required sleeve width ÷ blocked motif width = motifs across
Required sleeve height ÷ blocked motif height = motifs high
Always round up to the next whole motif.
For example:
- Required width: 7.6 inches.
- Motif width: 2.6 inches.
- 7.6 ÷ 2.6 = 2.92.
- Round up to three motifs across.
If the required height is 10.1 inches:
- 10.1 ÷ 2.6 = 3.88.
- Round up to four motifs high.
Make two panels of three motifs across by four motifs high. That requires 12 motifs per panel and 24 motifs altogether.
How to keep the project consistent
- Use the same yarn weight for every square.
- Use the same hook for all motifs.
- Keep the final joining round in one color.
- Finish each motif at the same point.
- Measure after the first, fourth, and twelfth motifs.
- Relax your hands if later motifs begin shrinking.
Step-by-Step Crochet Tutorial
Step 1: Crochet the First Three-Round Mini Granny Square
Round 1
Create a magic ring.
Chain 3. The chain 3 counts as the first double crochet.
Work 2 double crochets into the ring, then chain 2.
Work the following sequence three more times:
3 dc into the ring, ch 2.
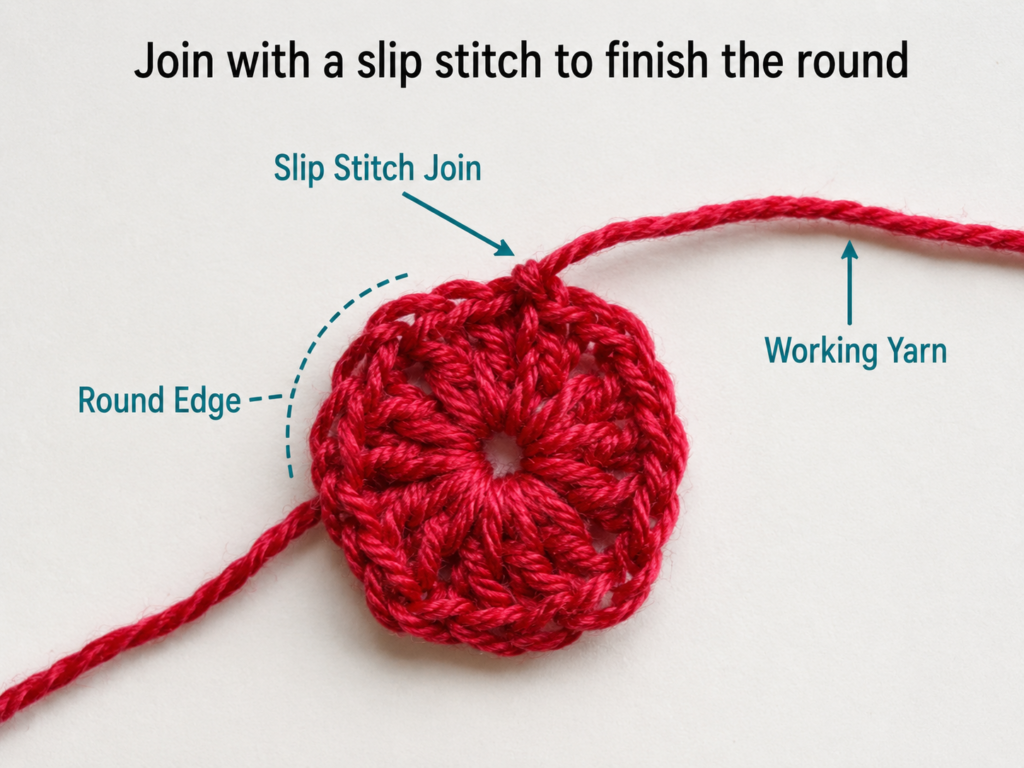
Slip stitch to the top of the beginning chain 3.
Pull the yarn tail gently to close the center.
Round 1 stitch count: Four groups of 3 dc and four ch-2 corner spaces.
Round 2
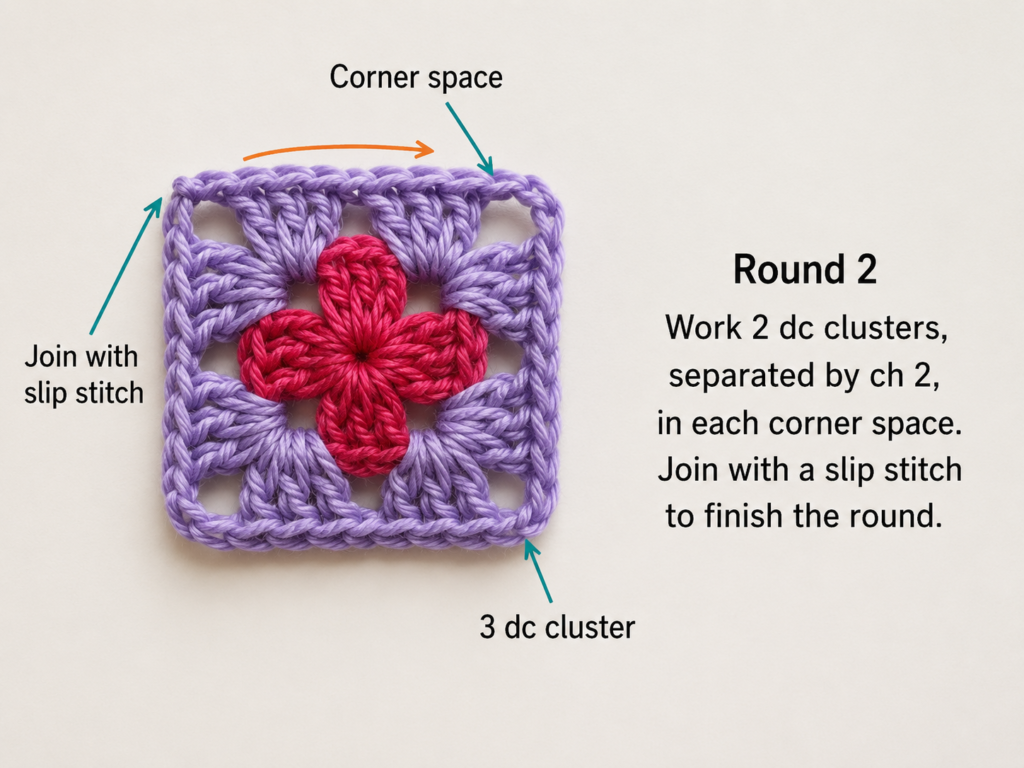
Slip stitch across the first two double crochets and into the next corner space.
Chain 3, then work:
2 dc, ch 2, 3 dc in the same corner space.
Chain 1.
In each remaining corner, work:
3 dc, ch 2, 3 dc, ch 1.
Join with a slip stitch to the top of the beginning chain 3.
Round 2 stitch count: Eight 3-dc clusters, four ch-2 corner spaces, and four ch-1 side spaces.
Round 3
Slip stitch into the next corner space.
Chain 3, then work:
2 dc, ch 2, 3 dc in the same corner.
Chain 1, work 3 dc in the next side space, then chain 1.
Continue around, working the following in each corner:
3 dc, ch 2, 3 dc.
Work one 3-dc cluster in each side space, with a chain 1 before and after it.
Join with a slip stitch and fasten off.
Round 3 stitch count: Twelve 3-dc clusters, four ch-2 corners, and eight ch-1 side spaces.
Beginner tip:
After every corner, look ahead and identify the next side space. This prevents you from accidentally placing a side cluster into a stitch instead of the open chain space.
Common mistake to avoid:
Do not pull the corner chains too tightly. A tight corner can make the motif curl into a shallow cup.
Step 2: Measure and Approve the Test Motif
Lay the square on a flat surface without stretching it.
Measure from one outer edge to the opposite outer edge. Measure again in the other direction.
A small difference of a few millimetres is not a problem. A noticeable rectangle usually means one side has a missing cluster, an extra chain, or tighter tension.
Lightly shape the corners with your fingers. If the square still curls strongly:
- Check that every corner contains two clusters.
- Confirm that you made both corner chains.
- Try a 4.5 mm hook for the final round.
- Relax the chain stitches between clusters.
Record the blocked or relaxed motif width. Use that measurement in your sizing calculation.
Beginner tip:
Keep the approved test motif beside you while working. Compare new motifs to it before joining them.
Common mistake to avoid:
Do not measure a motif while pulling it outward. A stretched measurement produces a sleeve that is too small once the crochet relaxes.
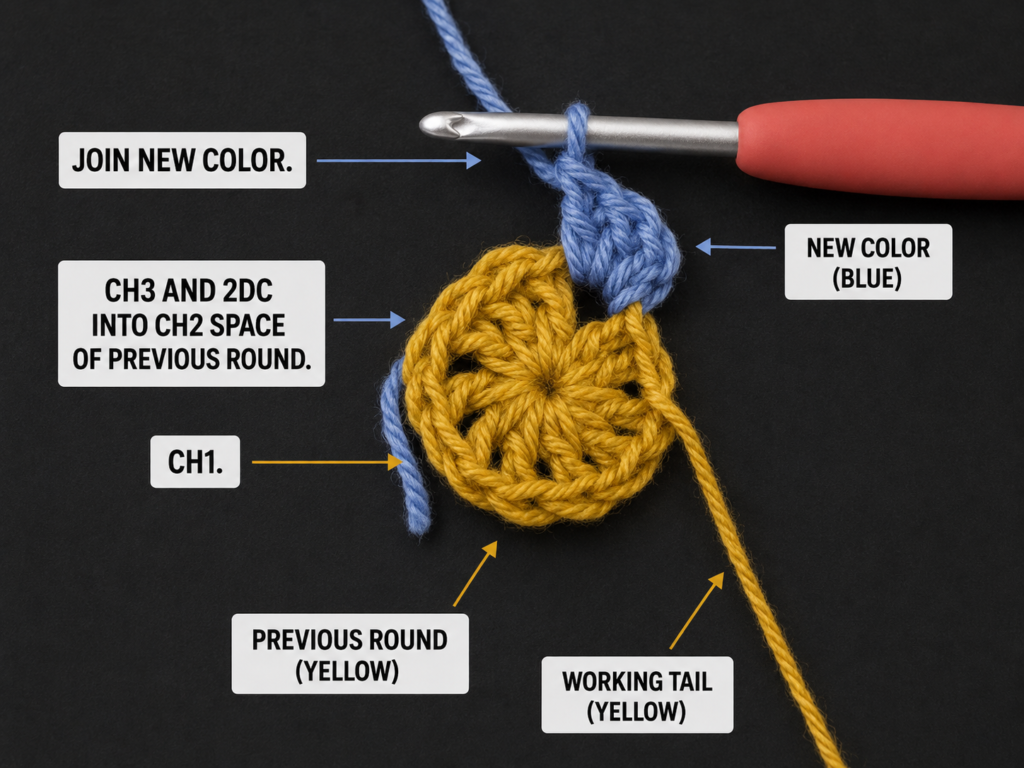
Step 3: Prepare the Second Motif for Joining
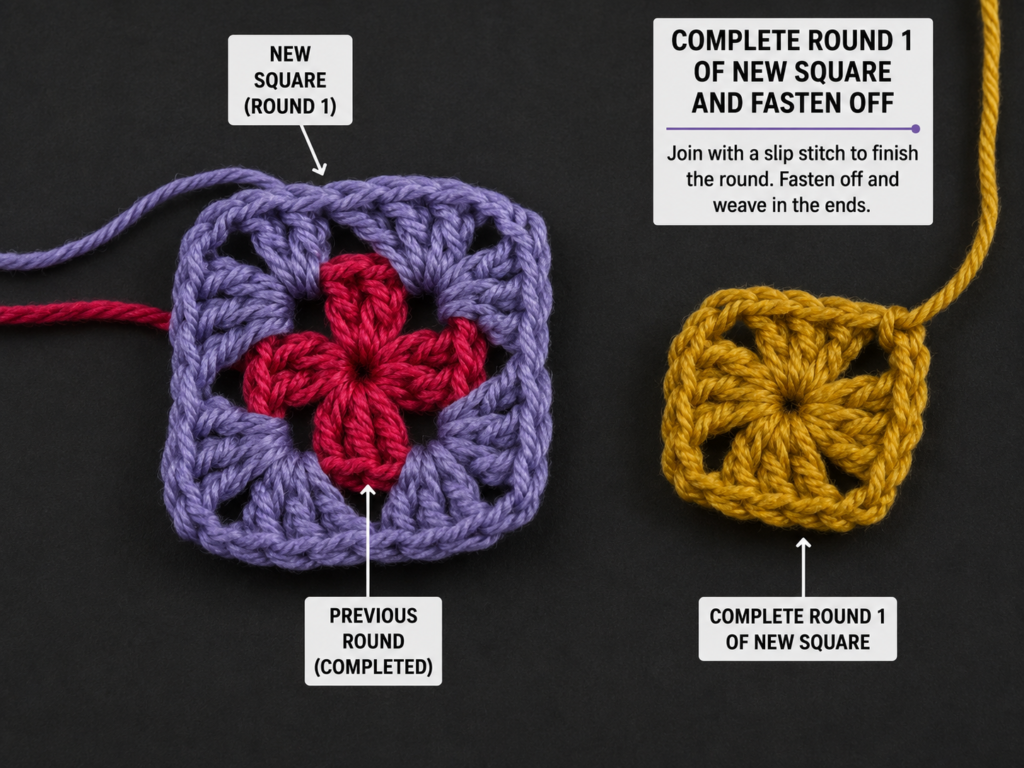
Work Rounds 1 and 2 of the second square normally.
Begin Round 3 and continue until you reach the side that will touch the first completed motif.
Place the two squares beside each other with their right sides facing up. Their edges should touch without overlapping.
The joining method replaces selected chain stitches with slip stitches into the corresponding spaces of the completed motif.
Beginner tip:
Lay both squares flat every time you make a connection. This makes it easier to identify the corresponding side and corner spaces.
Common mistake to avoid:
Do not rotate the completed motif accidentally. Confirm that both right sides face you before beginning the join.
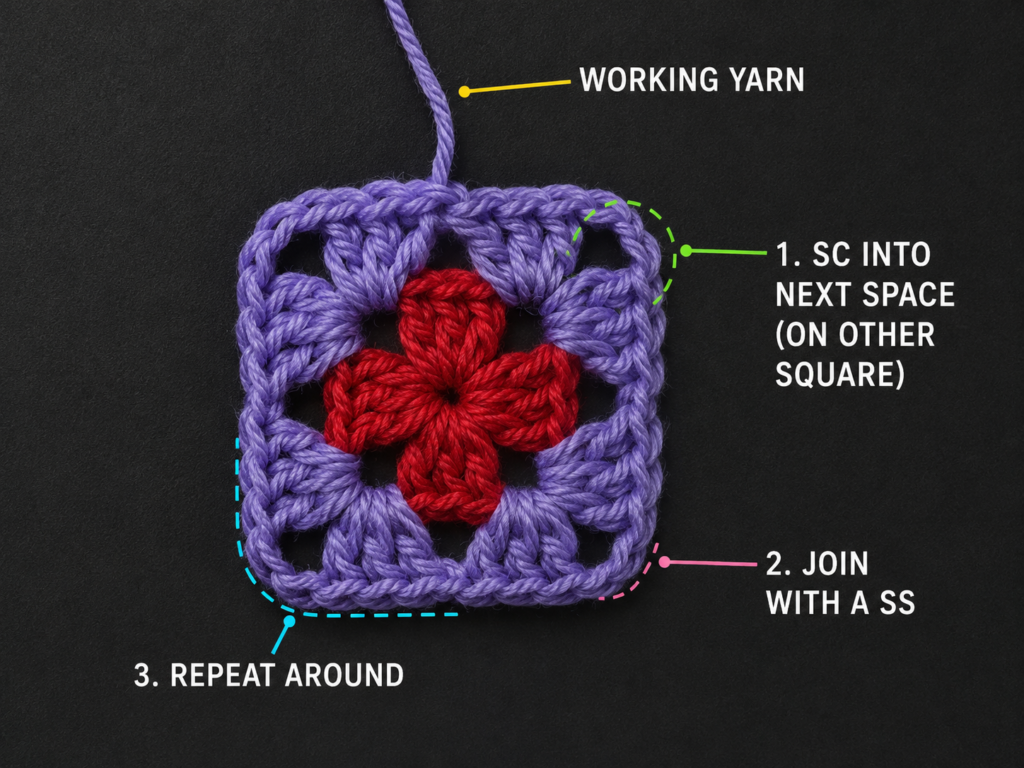
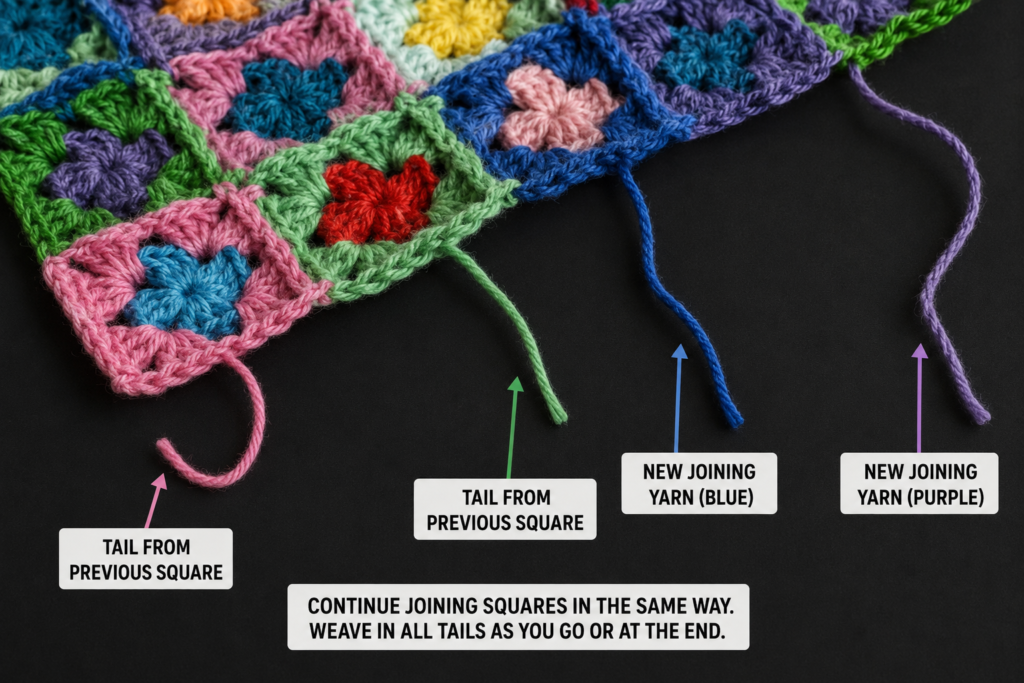
Step 4: Join the Two Squares Along One Side
Work the first 3-dc cluster of the new corner.
Instead of making a normal ch-2 corner:
- Chain 1.
- Remove the active loop from the hook.
- Insert the hook from front to back through the corresponding corner space of the completed motif.
- Return the active loop to the hook.
- Pull the loop through the completed motif’s corner space.
- Chain 1.
- Complete the second 3-dc cluster in the active corner.
At the next side space:
- Work the cluster before the joining point.
- Slip stitch into the corresponding side space of the completed motif in place of the usual chain 1.
- Work the next cluster in the active motif.
At the final corner, repeat the corner joining method.
Finish the remaining unjoined sides of Round 3 normally.
Beginner tip:
Think of the completed square as a guide rail. You are connecting the active square only at its corner and side spaces.
Common mistake to avoid:
Do not work the joining slip stitches into the tops of double crochets. Joining through the open chain spaces keeps the seam flexible and visually balanced.
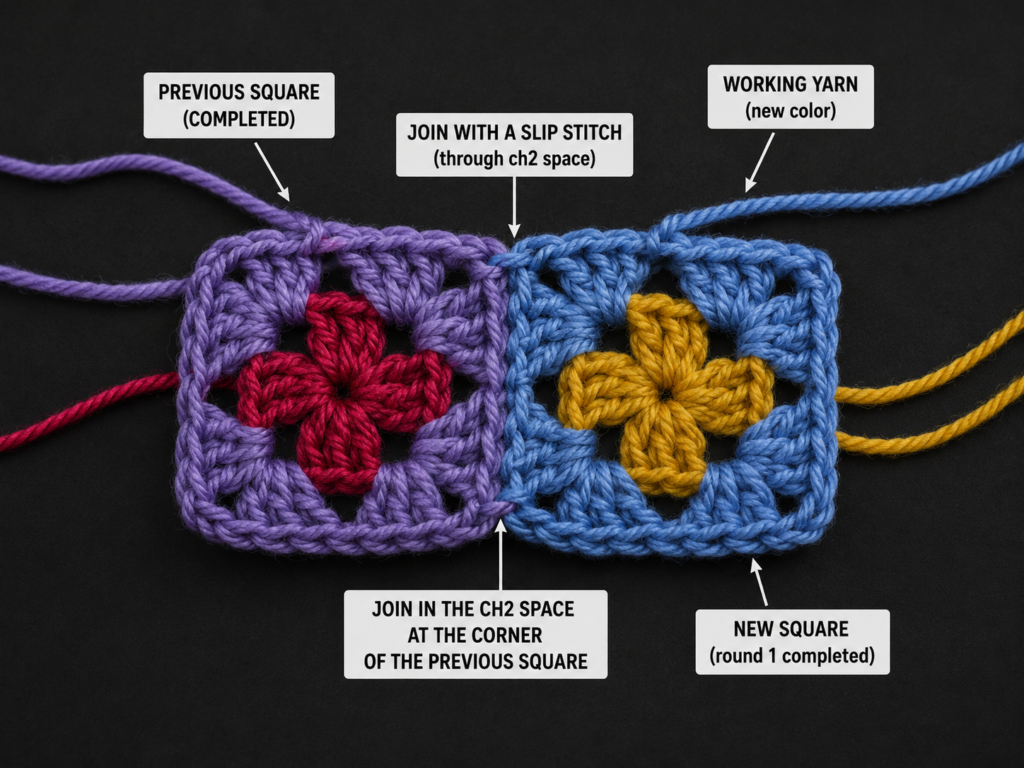
Step 5: Join a New Motif at a Shared Corner
The first row requires only one-side joins. The second row introduces corners where three or four motifs meet.
Work the new motif’s final round until you reach the first joining corner.
Join the first side to the motif above it.
When you reach the corner shared with another completed motif:
- Work the first corner cluster.
- Chain 1.
- Slip stitch into the shared corner space where the completed motifs meet.
- Chain 1.
- Work the second corner cluster.
- Continue joining the next side.
The corner should remain compact but not puckered.
Beginner tip:
Pause after the corner join and spread the motifs flat. The shared point should resemble a small plus sign rather than a knot.
Common mistake to avoid:
Do not make several extra slip stitches at the center to “strengthen” the join. Too many stitches create a hard lump that could press against the tablet.
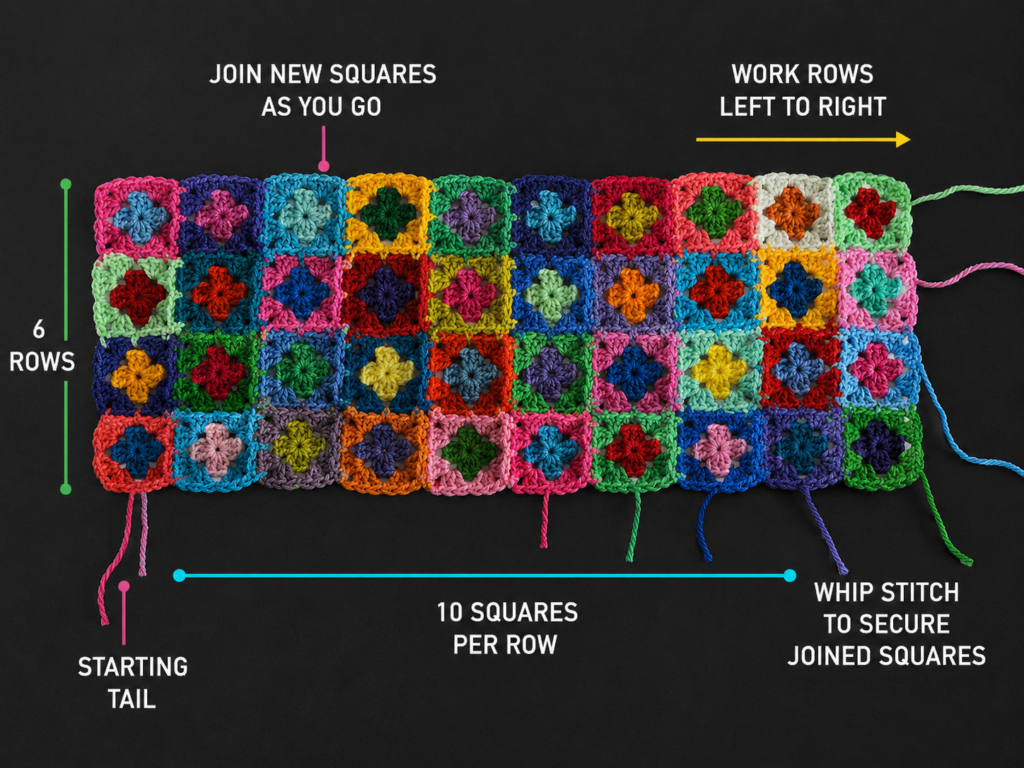
Step 6: Complete the First Row
Continue adding motifs until the row reaches the required panel width.
For the example size, join three squares in one straight row.
Check that:
- The top and bottom edges form reasonably straight lines.
- The motifs are not twisted.
- Every join lies flat.
- The overall width matches the planned sleeve width.
Place the tablet above the row to confirm the width before building upward.
Beginner tip:
If the row is slightly too narrow, do not stretch it and assume the rest will fit. Add another motif or enlarge the final round before committing to the complete panel.
Common mistake to avoid:
Do not alternate the position at which you finish the motifs. Finish every square in the same corner so the tails remain predictable.
Step 7: Build the First Complete Panel
Add the second row one motif at a time.
Each motif in an internal row will usually join along two sides:
- One side joins to the motif above.
- One side joins to the motif beside it.
Continue until your panel reaches the planned height.
For the example sleeve, make a rectangle that is:
- Three motifs wide.
- Four motifs high.
- Twelve motifs altogether.
Lay the panel flat after each completed row. Count the motifs and inspect all shared corners before beginning the next row.
Beginner tip:
Photograph the panel after every row. A photo often reveals a twisted motif or color-placement issue more quickly than looking at the work in your lap.
Common mistake to avoid:
Do not continue when one motif is noticeably smaller. Remove it before the panel becomes harder to repair.
Step 8: Make the Second Matching Panel
Repeat the same layout for the back.
You can use the same color sequence or create a controlled variation. Keep the following consistent:
- Motif dimensions.
- Final-round color.
- Number of motifs.
- Joining tension.
- Overall panel dimensions.
When both panels are complete, place them on top of each other. The edges and corners should align.
Insert the tablet between them without seaming. There should be enough room for the device to slide inside without forcing the motifs outward.
Step 9: Block and Shape the Panels
Before seaming, lightly block both panels to the same dimensions.
For cotton yarn:
- Dampen the panels evenly.
- Press them gently in a towel.
- Shape them into matching rectangles.
- Pin the outer corners and any uneven joins.
- Allow them to dry completely.
Do not stretch the fabric into an artificially large size. Blocking should organize the stitches, not compensate for an undersized panel.
If you plan to line the sleeve, blocking before measuring the fabric is especially important.
Step 10: Join the Front and Back
Place the panels together with the wrong sides touching and the right sides facing outward.
Secure the panels with locking stitch markers at:
- Both top corners.
- Both bottom corners.
- The midpoint of each side.
- The center of the bottom.
Choose one seaming method.
Option A: Whipstitch seam
Thread a long piece of the joining color onto a tapestry needle.
Beginning at one top corner, sew through the corresponding outer loops of both panels. Continue down the first side, across the bottom, and up the second side.
Leave the complete top edge open.
Option B: Single crochet seam
Join the yarn at one top corner.
Single crochet through both panels down the side, across the bottom, and up the other side.
Fasten off at the opposite top corner.
A single crochet seam creates a more visible border. Whipstitching produces a flatter outline.
Beginner tip:
Insert the tablet after seaming the first side and bottom but before completing the second side. This gives you one final opportunity to check the fit.
Common mistake to avoid:
Do not seam through random parts of the edge. Match corner to corner and cluster to cluster so the panels remain aligned.
Step 11: Add a Simple Button-Loop Closure
A button loop is the easiest finish and does not require sewing a zipper.
Find the center of the back top edge and mark it.
Join the yarn at the marked space.
Chain enough stitches to reach over the tablet opening and fit around the button. Begin with approximately 14–20 chains, but test the loop around the actual button.
Slip stitch into the same starting point to close the loop.
Fasten off and weave in the ends.
Insert the tablet, fold the loop over the front, and mark the correct button position. Remove the tablet before sewing.
Use ordinary sewing thread rather than thick yarn to attach the button securely.
Beginner tip:
Make the loop slightly snug. Crochet chains usually relax with use.
Common mistake to avoid:
Do not sew the button while the tablet is inside. The sewing needle could scratch or puncture the device.
Step 12: Prepare an Optional Fabric Lining
A lining is not essential, but it hides yarn tails and creates a smoother interior.
Place the finished crochet sleeve on folded lining fabric.
Trace around the sleeve, then add approximately ½ inch / 1.25 cm of seam allowance on the sides and bottom.
Cut two matching fabric rectangles.
With the right sides of the fabric together:
- Sew the first side.
- Sew across the bottom.
- Sew the second side.
- Leave the top open.
- Trim the bottom corners carefully.
- Turn the lining right side out.
- Press the seams gently.
Insert the lining into the crochet sleeve.
Fold the raw top edge of the lining toward the wrong side so it sits slightly below the crochet opening.
Beginner tip:
Baste the folded lining edge before inserting it. The temporary stitches keep the fold neat while you attach it.
Common mistake to avoid:
Do not make the lining exactly the same size as the outside of the crochet sleeve. The lining belongs inside and should be slightly smaller.
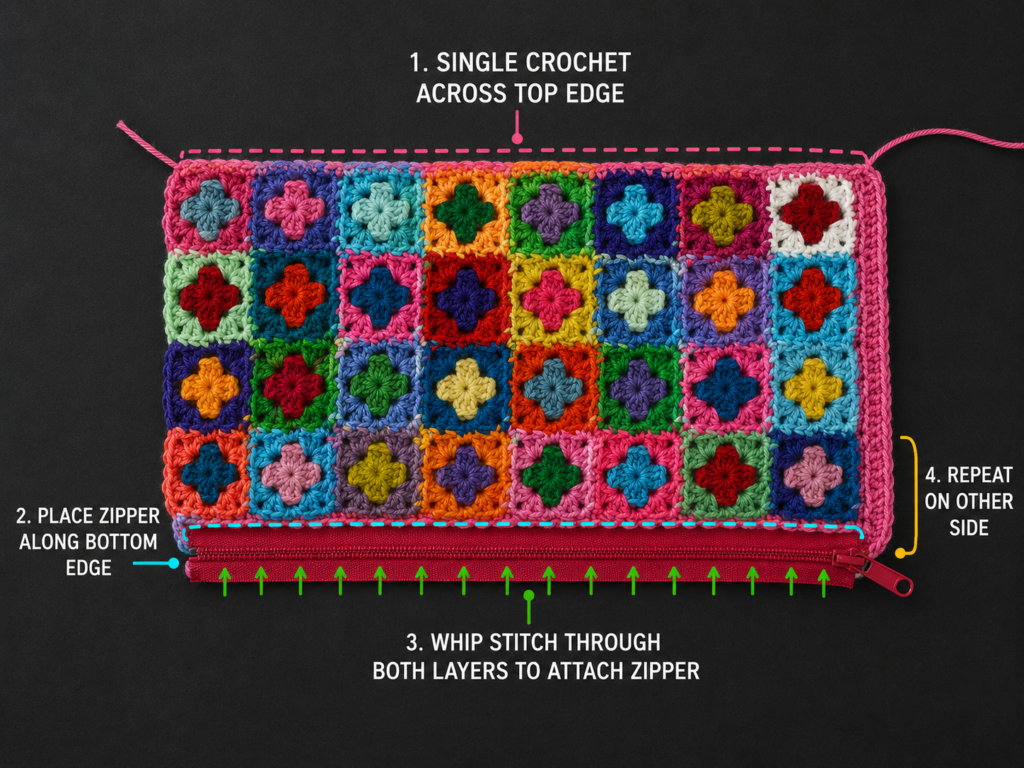
Step 13: Add an Optional Zipper
Choose a zipper that fits the opening without forcing the crochet to stretch.
Open the zipper.
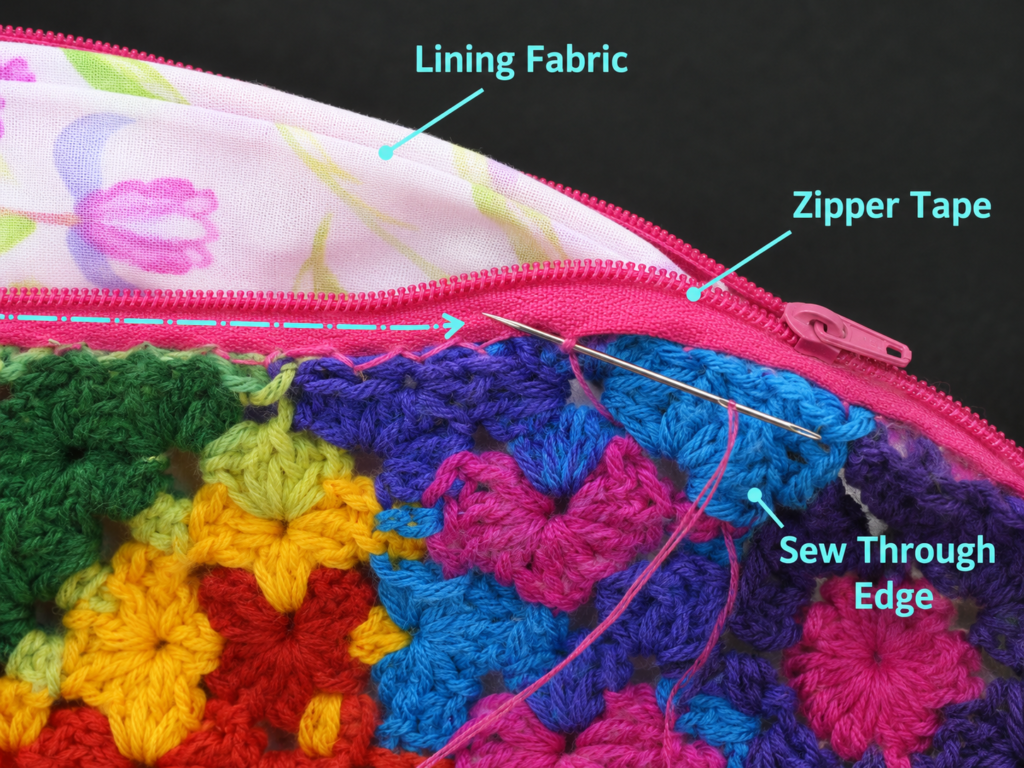
Clip one zipper tape to the inside of the first top edge. Keep the teeth just above the crochet so the slider can move freely.
Using matching sewing thread, make small backstitches through:
- The folded lining edge.
- The zipper tape.
- The back portion of the crochet stitches.
Avoid pushing the needle through the complete crochet edge where the sewing thread would be visible from the front.
Repeat on the opposite side.
Close and open the zipper several times before tying off the thread.
Beginner tip:
Begin by sewing the zipper at both ends and at the center. These anchor points prevent the zipper from shifting while you fill in the remaining stitches.
Common mistake to avoid:
Do not sew too close to the zipper teeth. Thread caught in the teeth will interfere with the slider.
Pattern Notes and Stitch Notes
Turning chains
This pattern is worked in joined rounds rather than rows. The beginning chain 3 counts as the first double crochet.
When joining each round, slip stitch into the top of that beginning chain.
Stitch count
A correct stitch count helps every motif reach the same size.
- Round 1: Four 3-dc clusters.
- Round 2: Eight 3-dc clusters.
- Round 3: Twelve 3-dc clusters.
If the square has fewer or more clusters, compare each side before fastening off.
Repeat pattern
After the first square:
- Work Rounds 1 and 2 normally.
- Work Round 3 normally on unjoined sides.
- Replace chains with joining slip stitches on sides touching completed motifs.
Right side and wrong side
The right side is the side facing you while crocheting the rounds. Keep every motif right side up during join-as-you-go construction.
Size adjustments
To enlarge the sleeve:
- Add another motif across.
- Add another motif to the height.
- Add a fourth round to every motif before joining.
- Use a slightly heavier yarn and appropriate hook.
To reduce the sleeve:
- Use a lighter yarn.
- Use a smaller hook.
- Use two-round motifs.
- Reduce the number of motifs only after checking the device measurements.
Do not resize only one or two motifs. Every motif in the panel must use the same construction.
Common Beginner Mistakes
1. Making all the motifs before testing the size
Problem: The finished panel is too small or much larger than the device.
Fix: Complete, relax and measure one motif first. Calculate the number of squares using the measured motif size.
2. Joining into stitches instead of chain spaces
Problem: The join looks irregular and the motifs pull out of shape.
Fix: Join through matching open side or corner spaces. Spread the motifs flat before inserting the hook.
3. Pulling joining slip stitches too tightly
Problem: The panel puckers along the joins.
Fix: Lift the hook slightly before completing each slip stitch. The joining loop should be as relaxed as an ordinary chain.
4. Creating a large hole at shared corners
Problem: The center where several squares meet becomes loose and open.
Fix: Use one controlled joining point in the shared corner. Do not add unnecessary chains between the adjoining motifs.
5. Allowing motif sizes to change
Problem: Later squares become smaller as your hands tire or larger as you become comfortable.
Fix: Compare every few motifs with the original test square. Take a break when your hand tension changes.
6. Seaming mismatched points
Problem: One panel extends beyond the other at the bottom or sides.
Fix: Mark corners and side midpoints before seaming. Match each cluster or edge space with its partner.
7. Making the lining too large
Problem: Fabric bunches inside the sleeve and catches the tablet.
Fix: Make the finished lining slightly smaller than the crocheted interior. Test it before attaching the top edge.
8. Treating the sleeve as an impact-proof case
Problem: The device is exposed to drops or strong pressure.
Fix: Use the crochet sleeve for scratch and light surface protection. Keep a rigid protective shell on the tablet when stronger protection is needed.
How to Customize This Crochet Project
Change the yarn
Cotton creates defined stitches and a relatively firm fabric. A cotton-acrylic blend may feel lighter and more flexible.
Acrylic can also be used, but check that the fabric is dense enough and does not stretch excessively.
Change the colors
Try one of these palettes:
- Sage, cream, terracotta and mustard.
- Navy, denim blue, grey and white.
- Blush, burgundy, oatmeal and dusty rose.
- Black, charcoal, silver and one bright accent.
- Rainbow centers with one neutral joining color.
Using one color for every final round helps a varied palette look intentional.
Adjust the size
Use the motif formula rather than copying the example layout.
A Kindle or small e-reader may need two motifs across and three high. A large drawing tablet may need four across and five or six high.
Add a border
Before seaming, work one round of single crochet around each complete panel.
Place:
- One single crochet in each stitch.
- One or two single crochets in each edge space.
- Three single crochets in each corner.
Count the stitches on both panels so they remain identical.
Change the texture
For a denser surface:
- Replace the classic granny motif with a solid granny square.
- Use half double crochet motifs.
- Add a fabric lining.
- Use a hook 0.5 mm smaller, provided the fabric remains flat.
Add a pocket
Crochet a small rectangle and sew it to the outer front panel before joining the sleeve. Use it for a charging cable, stylus or earbuds.
Do not place a bulky button or hard snap where it could press directly against the screen.
Gift ideas
This sleeve can be personalized for:
- Students.
- Teachers.
- Digital artists.
- Readers.
- Travelers.
- Remote workers.
- Journal users.
Include the original yarn label with a gifted sleeve so the recipient can follow the correct care instructions. The Craft Yarn Council recommends retaining yarn-label care information for handmade gifts.
Finishing Instructions
Fasten off securely
After completing the final seam, cut the yarn leaving a 6-inch / 15-cm tail.
Pull the tail through the last loop and tighten gently.
Weave in the ends
Use a tapestry needle to weave each end through the backs of several stitches.
Change direction at least once. This helps prevent the end from slipping out.
Keep tails away from the zipper teeth and sleeve opening.
Final blocking
If the assembled sleeve needs shaping:
- Remove the tablet.
- Lightly dampen the crochet exterior.
- Insert a dry towel or blocking mat cut to the approximate interior size.
- Shape the corners.
- Allow the sleeve to dry completely.
Do not block the sleeve with an electronic device inside it.
Washing and care
Follow the instructions on the yarn label.
For a lined or zippered sleeve, gentle hand washing is usually the safest approach unless all yarn, fabric, thread and zipper components are confirmed as machine washable.
Reshape the empty sleeve and dry it flat.
Quick Printable-Style Summary
Skill level: Confident beginner
Materials: DK cotton yarn, 4.0 mm hook, tapestry needle, scissors, stitch markers and measuring tape
Optional materials: Cotton lining, zipper, interfacing, sewing needle and thread
Stitches: Chain, slip stitch, single crochet and double crochet
Starting method: Magic ring
Motif: Three-round mini granny square
Example motif size: Approximately 2.6 inches / 6.6 cm square
Example layout: Three motifs across by four motifs high per panel
Example motif total: 24
Panel construction: Join motifs during Round 3 or make them separately and seam them
Assembly: Place two matching panels together and seam the sides and bottom
Basic closure: Chain loop and button
Optional closure: Fabric lining and hand-sewn zipper
Finishing: Weave in all ends, shape lightly and follow the yarn-label care instructions
Frequently Asked Questions
Can a complete beginner make this crochet tablet sleeve?
A new crocheter who can already chain and make double crochets can attempt it, but the join-as-you-go corners may require practice. Make two spare motifs first and use them to rehearse the join before beginning the main panels.
How much yarn does a crochet tablet sleeve need?
A standard tablet sleeve made with DK yarn may use approximately 250–350 yards, depending on the motif size, tablet dimensions, border and closure. Purchase extra yarn if one consistent color will be used around every motif.
Is cotton or acrylic better for a tablet sleeve?
Cotton generally produces crisp stitches and a firm fabric. Acrylic is lighter and often easier to wash but may stretch more. A cotton-acrylic blend offers a useful compromise. The best choice is a smooth yarn that produces a flat, stable motif.
How do I resize the pattern for my tablet?
Measure your device, add a small amount of ease, and divide the required width and height by the blocked size of one motif. Round each result up to a whole number. Make two panels using that motif layout.
Does the sleeve need a fabric lining?
No. A lining is optional. It gives the interior a smoother surface, conceals yarn ends and can reduce stretching. It is particularly helpful when the motifs have open chain spaces.
Is a zipper necessary?
No. A button loop is easier for beginners and requires fewer materials. A zipper closes the entire opening and creates a more finished travel case.
Will the crochet sleeve protect a tablet from drops?
The sleeve can help prevent scratches and light scuffs, but it is not a rigid or shockproof case. Use it with a proper protective shell when the device may be dropped or compressed in a bag.
Can the sleeve be machine washed?
That depends on the yarn, lining, thread, interfacing and zipper. Follow the most delicate care requirement among all components. Remove the tablet, close the zipper, reshape the sleeve and dry it completely before using it again.
Conclusion
This crochet tablet sleeve pattern turns a group of small, manageable granny squares into a useful everyday accessory. The modular construction makes it easy to pause between motifs, experiment with color and adjust the size before committing to a complete panel.
Start with one accurate test motif, measure carefully and keep the joining tension relaxed. Once the first row lies flat, the rest of the construction becomes a predictable sequence of motifs, shared corners and simple finishing.
Save the tutorial with your tablet measurements written beside it so you can make a matching sleeve later for an e-reader, notebook or charging accessories.





