A crochet lanyard is one of those small projects that quickly becomes part of your everyday routine. It can hold your keys, work badge, transit card, gym pass, small wallet, or a lightweight ID holder. It is also an excellent project when you want to practice a new technique without committing to a large skein of yarn.
This beginner crochet lanyard pattern uses Romanian cord, a compact crochet technique that forms a flat, textured strap. Unlike a long foundation chain, the finished cord has enough body to resist twisting and feels more substantial in your hand.
You will begin with only two chain stitches. After the setup, you will repeat one simple action until the cord reaches your preferred length. The two ends are then secured around a metal ring and covered with a neat wrapped finish.
The tutorial includes measurements for a wristlet and a full neck lanyard, although you can adjust the cord to almost any length.
What You’ll Learn
- How to select a strong yarn or cotton cord.
- How to make the two setup stitches.
- How to identify the side loops of Romanian cord.
- How to maintain even cord tension.
- How to measure wristlet and neck-lanyard lengths.
- How to attach a split ring or swivel clasp.
- How to reinforce and wrap the joined ends.
- How to adapt the project for keys, badges, gifts, and craft markets.
Project Details
Skill level: Beginner to easy
Construction: One continuous crocheted cord with a sewn and wrapped join
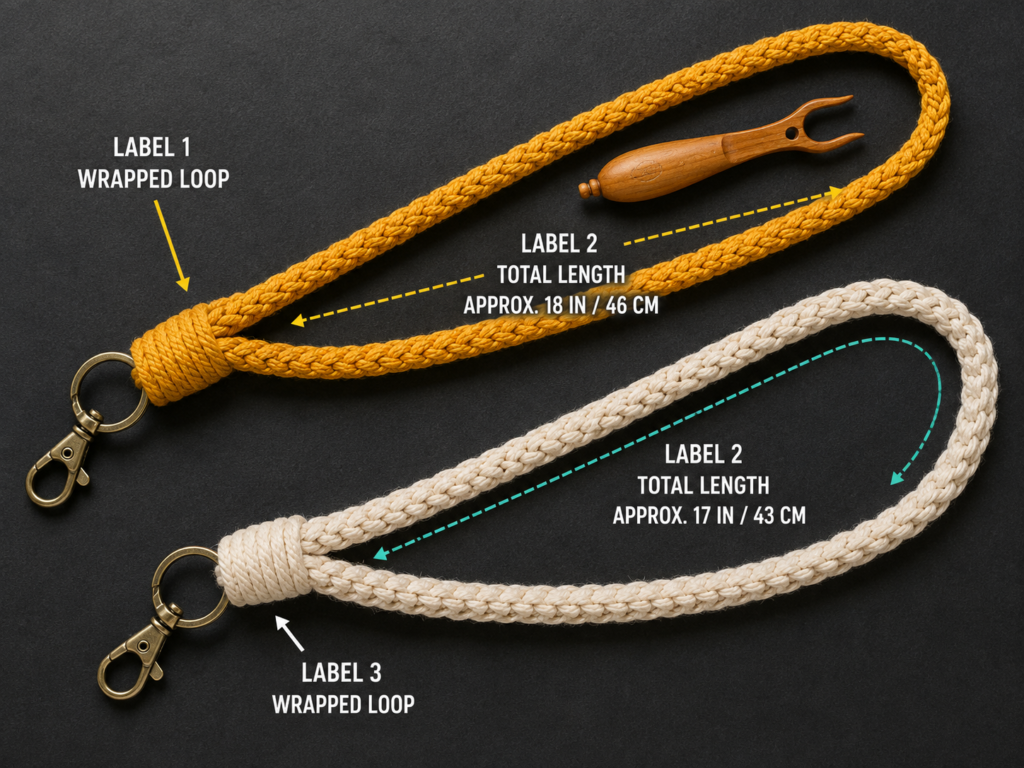
Finished wristlet length: Approximately 6 inches folded, excluding hardware
Finished neck-lanyard drop: Approximately 16–18 inches, excluding hardware
Estimated time: 30 minutes to 2 hours
Gauge: Not critical; measure the finished cord instead
Terminology: Written in US crochet terms
Materials You’ll Need
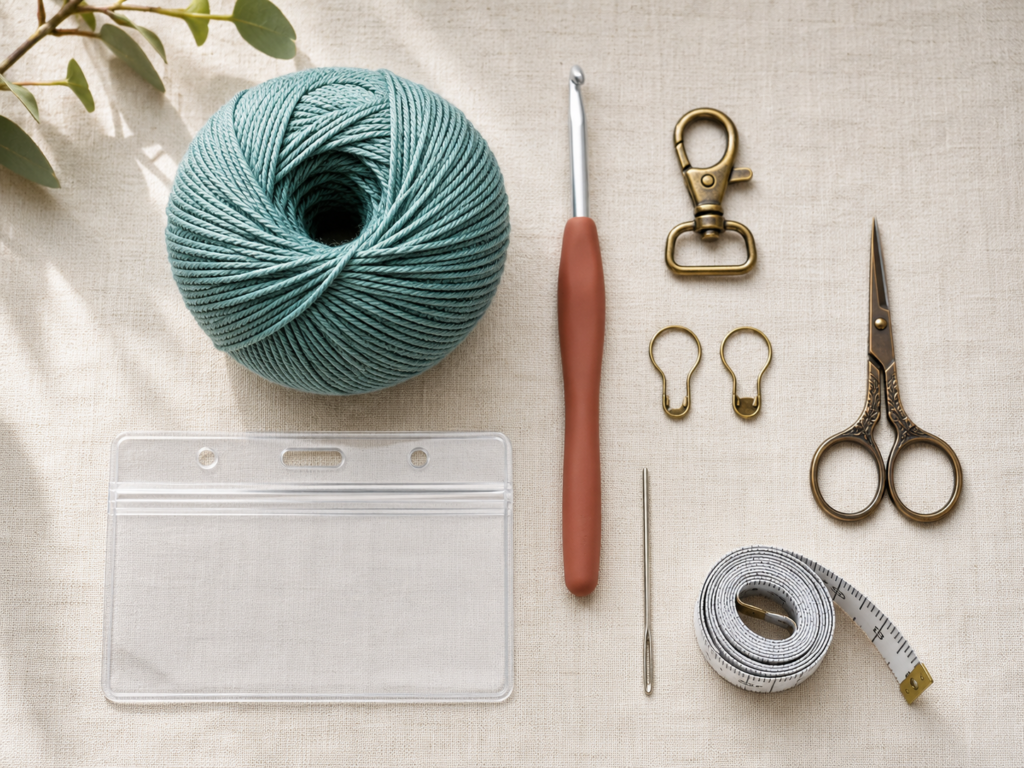
- Approximately 15 yards of 3–4 mm cotton cord for a wristlet.
- Approximately 30–45 yards for a neck lanyard.
- One 8 mm crochet hook.
- One 1–1.25-inch split ring, D-ring, or swivel lobster clasp.
- One large-eye tapestry needle.
- Sharp scissors.
- Measuring tape.
- Two locking stitch markers, optional.
- One breakaway connector for a neck lanyard, optional but recommended where required.
Soft braided cotton cord produces a defined strap without the loose fibers sometimes found in twisted rope. Macramé cord also works, provided it bends comfortably around the hook.
You can substitute two strands of medium-weight cotton yarn held together. Start with an 8 mm hook and adjust until the stitches move smoothly.
Crochet Abbreviations Used
- ch = chain
- sc = single crochet
- st/sts = stitch/stitches
- rep = repeat
- RS = right side
- WS = wrong side
These abbreviations follow common US crochet-pattern conventions. The Craft Yarn Council maintains a standardized master list of crochet abbreviations used by many yarn-industry publishers.
US and UK terminology note
This tutorial uses US terminology.
- US single crochet equals UK double crochet.
- Chain and slip stitch use essentially the same names in both systems.
Before You Start
Choose a cord that is comfortable to wear
A lanyard must be strong, but it should not feel stiff or abrasive. Test the cord by bending a short section around two fingers. If it fights the curve or scratches your skin, reserve it for a bag handle or key wristlet rather than a neck lanyard.
Cotton is an excellent starting material because it produces visible stitches and does not usually feel slippery. Acrylic yarn can also work, but a single strand of ordinary worsted acrylic may form a lanyard that stretches under the weight of keys.
Hook size is a starting point
An 8 mm hook is suggested for approximately 3–4 mm cord. The exact hook depends on how firmly you crochet and how compressible the cord is.
Use a larger hook when:
- The hook will not pass through the side loops easily.
- Your fingers become tired.
- The cord bends into a hard spiral.
- The stitches look pinched.
Use a slightly smaller hook when:
- The cord is floppy.
- Large gaps appear between the stitches.
- The hardware pulls the join out of shape.
Metric measurements are more dependable than lettered hook sizes because letter and number systems can vary between manufacturers.
Gauge and tension
Traditional gauge is not necessary because you will crochet until the cord reaches a physical measurement. However, tension still affects the finished texture.
The stitches should be:
- Loose enough for the hook to enter without force.
- Firm enough that the cord keeps its shape.
- Consistent from the beginning to the end.
Romanian cord is created by turning after each stitch and working through side loops. A larger hook and relaxed tension make those loops easier to identify.
Mark your size before crocheting
Choose one of these starting targets:
- Small key loop: 8–9 inches before joining.
- Standard wristlet: 12–13 inches before joining.
- Compact neck lanyard: 32–34 inches before joining.
- Long neck lanyard: 35–38 inches before joining.
Measure an existing lanyard when possible. The final drop will be approximately half the cord length after the ends are joined.
Neck-lanyard safety
A handmade cord will not automatically release when pulled. Add a purpose-made breakaway connector when the lanyard will be worn around the neck in a workplace, school, workshop, hospital, childcare setting, or around machinery.
Follow the rules of the organization where it will be worn. Do not use a fixed neck lanyard for a young child.
Step-by-Step Crochet Tutorial
Step 1: Make the Two Setup Stitches
Create a slip knot and place it on your hook. Leave a starting tail of approximately 8 inches so it can be secured later if needed.
Chain two.
Insert the hook into the second chain from the hook. Yarn over and pull up one loop. You now have two loops on the hook.
Yarn over again and pull through both loops to complete one single crochet.
Do not tighten this stitch aggressively. The unused part of the first chain needs to remain visible along the side of the single crochet.
Beginner tip:
Hold the new stitch close to its base rather than pulling on the working loop. This keeps the small beginning from rotating uncontrollably.
Common mistake to avoid:
Do not chain a long foundation. Romanian cord is built one compact stitch at a time.
Step 2: Find the First Side Loop
Turn the small piece so you can examine the side of the single crochet.
The unworked part of the starting chain should appear as a small loop beside the stitch. It may look more like a bump than a normal V-shaped crochet stitch.
Insert the hook through that side loop.
Yarn over and pull up a loop. Yarn over again and pull through both loops to complete another single crochet.
You now have the setup required for the repeating cord stitch.
Beginner tip:
Use the tip of the hook or a yarn needle to lift the side loop before inserting the full hook.
Common mistake to avoid:
Do not work back into the top V of the previous single crochet. The hook must enter the loop along the side edge.
Step 3: Begin the Repeating Cord Stitch
Turn the work again in the same direction.
Look immediately below the working loop. Along the side, you should see two short horizontal loops created by the previous stitch.
Insert the hook beneath both loops.
Yarn over and pull a loop through the two side loops. You should have two loops on the hook.
Yarn over and pull through both loops to complete one single crochet.
Turn the work again. Two new side loops should now be available.
Repeat the same operation:
- Turn the cord.
- Locate the two side loops.
- Insert under both loops.
- Yarn over and pull up a loop.
- Yarn over and pull through both loops.
After five or six repeats, the cord structure becomes much easier to recognize.
Beginner tip:
Always rotate the work in the same direction. A consistent motion helps the stitches settle into matching positions.
Common mistake to avoid:
Catching only one side loop can make the edge thin and irregular. Pause and verify that two loops are on the hook before completing the stitch.
Step 4: Continue to the Required Length
Continue repeating the cord stitch until the piece is slightly shorter than your target measurement. Lay it flat and allow it to relax for a minute before measuring again.
Do not stretch the cord while measuring.
For this version, crochet to approximately:
- 12½ inches for a wristlet.
- 34 inches for a compact neck lanyard.
- 36 inches for a standard adult neck lanyard.
The hardware and wrapped join add a small amount of finished length.
Check the cord every few inches. Both edges should look similar, and the cord should rest reasonably flat.
A slight curve is normal. A tight spiral usually means your stitches are too firm or the hook is too small.
Beginner tip:
Place a locking marker every 6 inches. The markers divide a long neck lanyard into manageable measuring sections.
Common mistake to avoid:
Do not estimate the length while the cord hangs from the hook. Its weight can temporarily stretch the stitches.
Step 5: Fasten Off and Position the Hardware
When the cord reaches the required length, complete the final single crochet.
Cut the working cord while leaving a tail approximately 30–36 inches long. Pull the tail through the working loop and tighten it gently.
Lay the entire cord on the table. Trace it from one end to the other with your fingers to ensure it is not twisted.
Slide the metal ring onto the cord and bring the two ends together directly beneath it. The ends should sit evenly against one another without one side pulling tighter.
Thread the long tail through the tapestry needle.
Beginner tip:
Photograph the untwisted cord on your table before lifting it. The photograph gives you a quick reference if the loop shifts during sewing.
Common mistake to avoid:
Do not begin sewing until the complete loop has been checked. A twist cannot be removed after the join is wrapped.
Step 6: Sew the Cord Ends Together
Insert the tapestry needle through the center of one cord end and then through the second end.
Pull the tail through, leaving the ring directly above the join.
Pass the needle through both cord ends several more times. Change the needle angle slightly on each pass so the join is reinforced across its full width.
Next, pass the tail around the metal ring and back through the cord. This helps prevent the hardware from slipping away from the joined section.
The stitches do not need to look decorative because they will be covered.
Beginner tip:
Push the needle between cord strands instead of forcing it through the same hole repeatedly. Spreading the stitches creates a stronger join.
Step 7: Reinforce the Joint
After the ends are connected, tug each side of the lanyard lightly.
The joined area should remain compact. If the cord ends separate or shift, make three or four additional passes with the needle.
Run the tail through approximately 1 inch of the cord below the ring. Bring it back out where you want the decorative wrapping to begin.
This internal pass anchors the tail before wrapping and gives the finished binding extra resistance.
Beginner tip:
Use pliers to pull the needle only when absolutely necessary. If the needle is extremely difficult to move, your cord may be too tightly compressed.
Common mistake to avoid:
Do not rely on wrapping alone. The hidden sewing beneath the wrap provides the structural strength.
Step 8: Wrap the Join Neatly
Hold the tail at a right angle to the joined cord.
Begin wrapping it around both cord ends. Place each wrap directly beside the previous wrap rather than on top of it.
Continue until approximately ¾–1 inch of the join is covered.
The wraps should be firm enough to hold their position but not so tight that the cord folds or the hardware tilts.
Check the front and back of the binding. Gaps can be corrected by nudging the wraps together with the tip of the tapestry needle.
Beginner tip:
Rotate the lanyard in your hand as you wrap instead of passing a long tail around and around the stationary cord.
Common mistake to avoid:
Do not overlap the wraps randomly. A smooth row of parallel wraps looks more professional and is less likely to catch on clothing.
Step 9: Conceal the Final Tail
Thread the remaining tail onto the tapestry needle.
Slide the needle beneath several wraps, moving away from the hardware. Pull the tail through slowly so the wraps do not shift.
For additional security, reverse direction and pass the needle beneath a different group of wraps.
Bring the tail out along the back of the binding. Pull it gently, cut it close to the surface, and massage the wraps so the cut end disappears underneath.
Do not cut the tail until you are satisfied that it is secure.
Beginner tip:
A blunt tapestry needle is safer for this stage because it moves beneath the wraps instead of piercing individual fibers.
Common mistake to avoid:
Do not tie a large exposed knot. It can rub against the wearer and makes the binding look bulky.
Step 10: Inspect the Finished Lanyard
Clip a lightweight object to the swivel hook.
Hold the lanyard above a soft surface and gently pull downward on the hardware. Check that:
- The metal ring remains centered.
- The sewn join does not separate.
- The wraps do not slide.
- The cord does not contain a hidden twist.
- The clasp opens and closes properly.
For a wristlet, slip the loop over your hand. It should move over the widest part of your hand without falling loosely from your wrist.
For a neck lanyard, check the drop while wearing a breakaway connector. The attached badge should rest in a practical position without pulling against your neck.
Pattern Notes or Stitch Notes
Turning rule
Turn the cord after every single crochet. Rotating in the same direction helps the side loops appear in a predictable location.
Stitch count
A fixed stitch count is unnecessary because different cords produce different stitch heights. Measure the physical length instead.
Record your final number of repeated stitches when making matching lanyards for a set.
Repeat
After the two setup stitches:
- Turn.
- Work one single crochet beneath the two side loops.
- Repeat until the target length is reached.
Right side and wrong side
Romanian cord is substantially reversible. One edge may look marginally cleaner depending on your tension, but there is no critical right or wrong side for this lanyard.
Avoiding curling
A slight bend is normal. Strong curling usually indicates:
- Tight stitches.
- A hook that is too small.
- Inconsistent turning.
- One side loop being missed.
- The cord being pulled while measured.
Size adjustment
Stop crocheting when the cord reaches your preferred unjoined length. There is no required stitch multiple.
The hardware and finishing wrap add bulk but very little overall length.
Common Beginner Mistakes
1. The side loops are impossible to find
Cause: The previous stitch was pulled too tightly.
Fix: Enlarge the working loop slightly, relax your yarn hand, and use the hook tip to lift the side loops before inserting the full shaft.
2. The cord becomes narrower
Cause: Only one side loop is being used.
Fix: Look for two parallel strands immediately below the working loop. Insert beneath both before completing the single crochet.
3. The cord forms a tight spiral
Cause: Excessive tension or an undersized hook.
Fix: Move up one or two hook sizes and deliberately lengthen the loop pulled through the side loops.
4. The beginning looks uneven
Cause: The first few stitches are difficult to hold and often receive inconsistent tension.
Fix: Continue for approximately 2 inches before judging the cord. If it does not settle, unravel to the setup and restart.
5. The lanyard is shorter than expected
Cause: The cord was measured while stretched.
Fix: Lay it flat, allow it to relax, and measure without pulling.
6. The finished loop is twisted
Cause: The full cord was not checked before sewing.
Fix: Inspect the entire loop while it is flat on the table. Correct all twists before the first joining stitch.
7. The metal ring feels loose
Cause: The cord ends were wrapped without sufficient internal sewing.
Fix: Remove the wrapping, sew through both ends several more times, pass the tail around the ring, and then rewrap.
8. The join is bulky
Cause: Too many layers were folded beneath the wrapping.
Fix: Keep the two ends aligned compactly and use multiple sewing passes rather than creating a thick folded bundle.
How to Customize This Crochet Project
Change the yarn
For a softer accessory, hold two strands of medium-weight cotton yarn together.
For a slim badge lanyard, use one strand of firm DK cotton with a 4–5 mm hook. The project will take longer because each stitch is smaller.
Avoid delicate novelty yarn. Eyelash fibers and loose bouclé loops can catch in the clasp.
Add color changes
Romanian cord can be color-blocked.
Fasten off one color securely, join the next color at the working loop, and continue the repeat. Place the color change away from the hardware join so both connection points are not concentrated in one area.
Ideas include:
- School colors.
- Team colors.
- Two neutral shades.
- Rainbow sections.
- A contrasting 2-inch section near the clasp.
Make a shorter key loop
Crochet approximately 8–9 inches before joining. This creates a compact loop suitable for a zipper pull, small key ring, or bag charm.
Make a wristlet
Crochet 12–13 inches. Check the size around the widest part of your hand before fastening off.
Make a neck lanyard
Crochet 34–38 inches, depending on the wearer. Add a breakaway connector instead of constructing one uninterrupted fixed loop.
Add a detachable clasp
Use a split ring with a swivel lobster clasp so the badge holder or keys can be removed without taking off the entire lanyard.
Add subtle decoration
Attach one lightweight tassel or small crocheted flower to the metal ring. Keep decorations away from the working mechanism of the clasp.
Try another texture
Once you understand the construction, replace Romanian cord with:
- Crochet I-cord.
- A narrow row of single crochet.
- Thermal stitch strap.
- Slip-stitch cord.
- Foundation single crochet strap.
Do not combine a very stretchy strap with heavy keys.
Gift ideas
A finished crochet lanyard makes a practical gift for:
- Teachers.
- Nurses and office staff, where workplace rules permit.
- College students.
- Library volunteers.
- Conference attendees.
- Gym members.
- New drivers.
- Craft-market customers.
Include the original yarn label or written care instructions with the gift.
Finishing Instructions
Fastening off
Pull the cut tail completely through the final working loop. Tighten gently rather than creating a hard knot at the edge.
Weaving in the starting tail
Thread the starting tail through the center of the first inch of cord. Reverse direction and pass it through a second time.
Trim the tail only after it no longer moves when gently pulled.
Securing the wrapped join
The final tail should pass beneath several wraps in one direction and then beneath a second group in the opposite direction.
Blocking
Heavy blocking is unnecessary.
When the cord curves more than expected:
- Lightly dampen it.
- Roll it in a towel to remove excess moisture.
- Arrange it in a relaxed, untwisted shape.
- Leave it flat until completely dry.
Do not apply high heat unless the yarn manufacturer specifically allows it.
Washing and care
Follow the care instructions printed on the yarn or cord label. The Craft Yarn Council recommends retaining or including the original yarn-label information with handmade gifts so the recipient knows how the item should be cared for.
Remove keys, plastic badges, and hardware that can be detached before washing. Hand washing is generally gentler on the wrapped join.
Quick Printable-Style Summary
Project: Romanian cord crochet lanyard
Skill level: Beginner to easy
Yarn: 3–4 mm braided cotton cord or two strands of medium-weight cotton
Hook: 8 mm or size needed for loose, comfortable stitches
Hardware: Split ring, D-ring, or swivel clasp
Stitches: ch and sc
Gauge: Not critical
Starting method: Ch 2, sc in second ch from hook
Main repeat: Turn, sc under the two side loops, and repeat
Wristlet length before joining: 12–13 inches
Neck-lanyard length before joining: 34–38 inches
Finishing: Sew ends around hardware, wrap the join, bury the tail, and test
Safety: Add a suitable breakaway connection for neck-worn applications where needed
FAQ
What is the best yarn for a crochet lanyard?
Firm cotton yarn or braided cotton cord is usually the easiest material for a structured lanyard. Cotton provides clear stitch definition and tends to stretch less than a loose single strand of acrylic.
Can I use ordinary worsted-weight yarn?
Yes. Hold two strands together to create a thicker, more stable cord. Begin with a 6.5–8 mm hook and adjust according to your tension.
How much yarn does a crochet lanyard require?
A wristlet generally uses a small amount—often well under one standard ball. A full neck lanyard requires more because Romanian cord is dense. Keep at least 30–45 yards available when using 3–4 mm cord.
The amount changes with yarn thickness, hook size, tension, and final length, so do not cut the yarn in advance.
How long should a crochet neck lanyard be?
Many adult lanyards begin with an unjoined cord measuring approximately 34–38 inches. Measure a comfortable existing lanyard because height, badge position, clothing, and workplace requirements affect the ideal length.
Why does my Romanian cord twist?
A mild curve is normal. Severe twisting usually comes from tight tension, inconsistent turning, or working beneath only one side loop.
Move up a hook size and confirm that each repeated single crochet passes beneath two loops.
Can I attach an ID badge holder?
Yes. Use a swivel clasp, split ring, or badge clip compatible with the holder. Confirm that the attachment is lightweight and that the clasp can move without rubbing against the wrapped join.
Is this lanyard suitable for children?
A fixed cord worn around the neck can create an entanglement hazard. Do not give a fixed neck lanyard to a young child. Use an age-appropriate breakaway component and follow school, activity, or product-safety requirements.
Conclusion
This crochet lanyard pattern turns one repeated stitch into a useful accessory that can be completed in a single sitting. The first few Romanian-cord stitches require concentration, but the rhythm becomes straightforward once the two side loops are easy to recognize.
Make the wristlet first when you want a short practice project. Once your tension is consistent, extend the same cord into a neck lanyard, badge holder, bag strap, or detachable key loop.
Save your measurements and hook size after completing the first lanyard. That small record will make it much easier to produce matching gifts or a coordinated craft-market collection.





