A crochet notebook cover is one of the most practical small projects you can make when you want something beautiful, useful, and beginner-friendly. It protects a notebook from scratches, adds a handmade texture to your desk or school bag, and turns a plain journal into something personal.
This tutorial shows you how to make a simple crochet notebook cover from one flat rectangle. You will crochet a textured panel, fold both short ends inward to create pockets, seam the top and bottom edges of those pockets, slide the notebook covers inside, and add an optional strap with a button closure.
The project is designed for an A5-style notebook, but the method is easy to adjust. Instead of forcing one fixed size, this tutorial teaches you how to measure your own notebook and crochet a custom-fit cover.
The stitch pattern is simple and beginner-friendly. It uses a moss-stitch fabric made from single crochet and chain spaces. This creates a neat woven texture that looks more polished than plain single crochet but is still easy to learn. The Craft Yarn Council lists ch, sc, and sl st among standard crochet abbreviations, which are the core terms used in this project.
This is a project-style crochet tutorial, not a stitch dictionary entry and not a random roundup. By the end, you will have a finished notebook cover that can be used for journaling, school notes, crochet project planning, reading logs, gratitude journals, or handmade gifts.
What You’ll Learn
You will learn how to:
- Measure a notebook for a custom crochet cover.
- Calculate rectangle width and flap depth.
- Crochet a flat moss-stitch rectangle.
- Keep crochet edges straight.
- Check fabric height and width against the notebook.
- Fold side flaps evenly.
- Seam the flaps securely.
- Insert the notebook cleanly.
- Crochet an optional strap.
- Attach a button closure.
- Weave in ends neatly.
- Adjust the pattern for journals, planners, sketchbooks, or school notebooks.
Materials You’ll Need
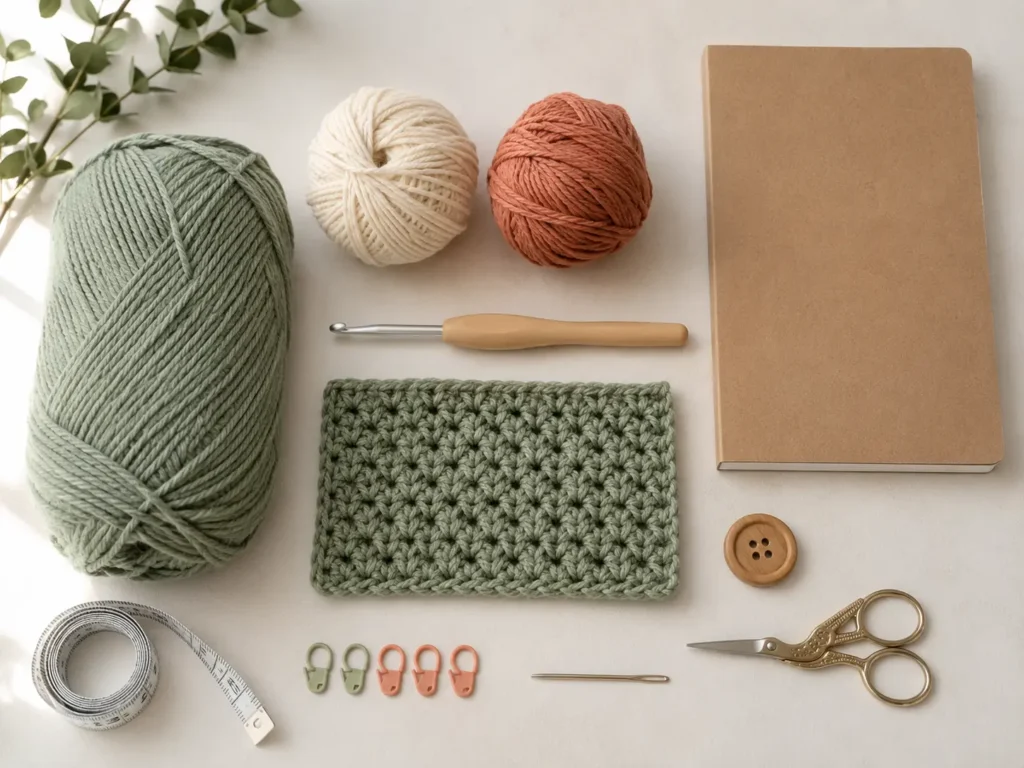
For one A5-style notebook cover, gather:
- DK or light worsted cotton/cotton-blend yarn in sage green.
- Small amount of cream yarn for optional strap.
- Small amount of muted terracotta yarn for optional accent stripe.
- 3.5 mm / E-4 crochet hook.
- One medium wooden button, approximately 3/4–1 inch wide.
- A5 notebook, journal, or planner.
- Locking stitch markers.
- Tapestry needle.
- Measuring tape.
- Scissors.
- Optional sewing clips or pins.
Cotton yarn is a good choice because it gives the cover structure and clear stitch definition. A soft acrylic yarn can also work, but it may stretch more with regular use.
The Craft Yarn Council classifies DK and light worsted under the light yarn-weight range, and its hook chart identifies 3.5 mm as a U.S. E-4 crochet hook.
Finished Size
This sample is designed for a common A5 notebook.
Approximate finished cover when notebook is closed:
- Height: 8.5 inches / 21.5 cm.
- Width: 6 inches / 15 cm.
- Inside flap depth: 2.5–3 inches / 6.5–7.5 cm on each side.
Because notebook brands vary, measure your own notebook before beginning.
Crochet Abbreviations Used
This pattern uses U.S. crochet terminology.
- ch = chain
- sc = single crochet
- sl st = slip stitch
- st/sts = stitch/stitches
- rep = repeat
- RS = right side
- WS = wrong side
Stitch not used
This pattern does not require hdc, dc, tr, BLO, FLO, inc, or dec. Those abbreviations are common in other crochet patterns, but they are not needed for this specific notebook cover.
U.S./U.K. terminology note
This tutorial is written in U.S. crochet terms. In U.K. terminology, the U.S. single crochet is called double crochet. The Craft Yarn Council’s abbreviation reference includes U.S./U.K. terminology differences for standard crochet stitches.
Before You Start
Measure your notebook first
Do not guess.
Open your notebook flat on the table.
Measure:
- Front cover width.
- Back cover width.
- Spine width.
- Notebook height.
For a cover that folds over both notebook boards, your crochet rectangle needs to cover:
front cover + spine + back cover + left flap + right flap
For an A5 notebook, this often means a rectangle around 16–18 inches wide before assembly, but your notebook may be different.
Gauge and tension
Exact gauge is flexible because this pattern is measured against your notebook.
For the sample:
18 moss-stitch repeats × 22 rows = 4 inches / 10 cm, lightly blocked.
Your gauge may differ.
The key is to make a fabric that is:
- Firm enough to protect the notebook.
- Flexible enough to fold around the covers.
- Not so loose that the notebook slides around inside.
- Not so tight that the cover bends the notebook.
How to keep edges straight
Moss stitch is easy, but beginners often lose stitches at the edges.
At the end of every row, make sure you work into the final chain space or final stitch as instructed. If the rectangle starts narrowing, you are probably skipping the last stitch or chain space.
How to choose colors
A notebook cover looks cleanest when the main body is one color and the strap or stripe is a second color.
Good beginner palettes include:
- Sage green + cream.
- Navy + oatmeal.
- Terracotta + ivory.
- Dusty pink + warm gray.
- Mustard + soft brown.
- Black + natural cotton.
Step-by-Step Crochet Tutorial
Step 1: Make a Small Gauge Swatch
Before starting the full rectangle, make a quick swatch.
With sage-green yarn:
Ch 22.
Row 1: Sc in the second ch from hook, *ch 1, skip next ch, sc in next ch; rep from * across.
Row 2: Ch 1, turn. Sc in first sc, *ch 1, sc in next ch-1 space; rep from * across, ending with sc in final stitch.
Repeat Row 2 until the swatch is about 4 inches tall.
This swatch helps you see how firm your fabric is and how much it stretches.
Beginner tip:
Do not skip this step if you are making the cover for a specific notebook. A cover that is too loose will slide around; one that is too tight can curl or pull the notebook covers.
Common mistake to avoid:
Measuring the swatch while it is stretched.
Lay it flat naturally and measure without pulling.
Step 2: Crochet the Foundation Chain
For the sample A5 notebook cover:
Ch 74.
This chain should be approximately the height of your notebook cover, not the total width around the notebook.
This pattern is worked sideways: each row builds across the full wraparound width of the notebook.
That means your starting chain determines the notebook-cover height.
Check the chain against the notebook height.
It should be approximately the same height as the notebook, or just slightly taller.
If your notebook is taller, add chains in multiples of 2.
If it is shorter, remove chains in multiples of 2.
Beginner tip:
The foundation chain should be relaxed. If it is much tighter than the rest of your crochet, use a hook one size larger for the chain only, then switch back to your main hook.
Common mistake to avoid:
Making the chain the width of the open notebook instead of the height.
In this sideways construction, height comes first.
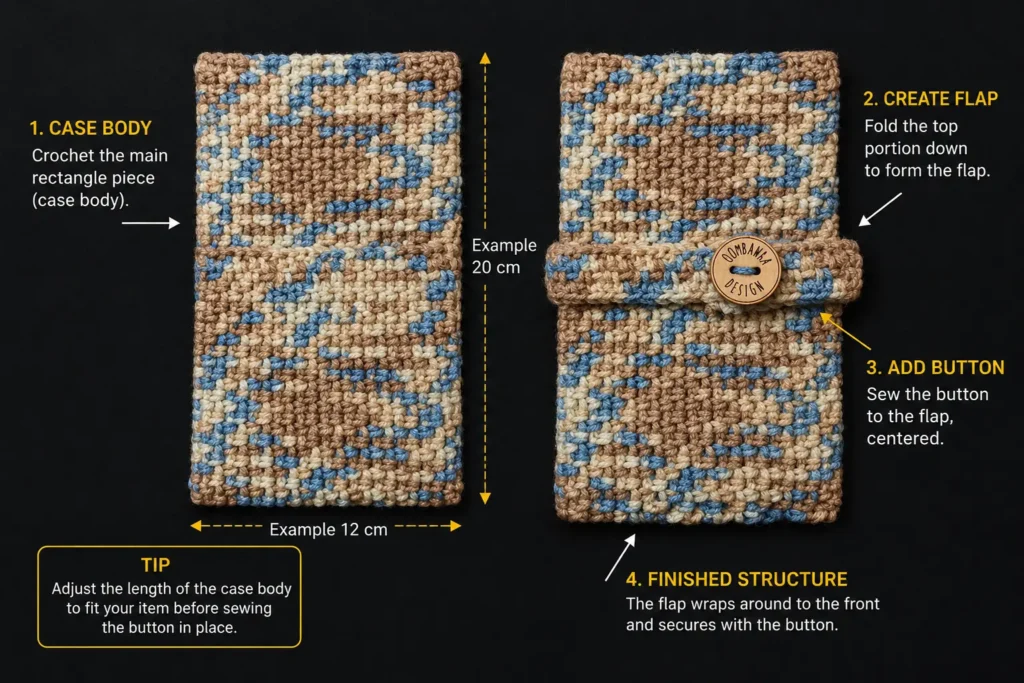
Step 3: Work the Main Rectangle
Row 1:
Sc in the second ch from hook.
Ch 1, skip next ch, sc in next ch.
Repeat from * to * across.
You should end with a single crochet.
Row 2:
Ch 1, turn.
Sc in the first sc.
Ch 1, sc in the next ch-1 space.
Repeat across.
End with sc in the final stitch.
Repeat Row 2 until the rectangle is wide enough to wrap around your opened notebook plus both inside flaps.
For the sample A5 cover, continue until the rectangle measures approximately:
17 inches / 43 cm wide
The height should remain approximately:
8.5 inches / 21.5 cm
Do not fasten off until you test the fit.
Beginner tip:
Lay the rectangle flat every five rows. If one side is slanting inward, count your stitches and make sure the last stitch of each row is not being skipped.
Common mistake to avoid:
Working into the single crochet instead of the chain-1 space.
In moss stitch, most stitches are worked into the open spaces from the row below. This creates the neat woven texture.
Step 4: Test the Rectangle Around the Notebook
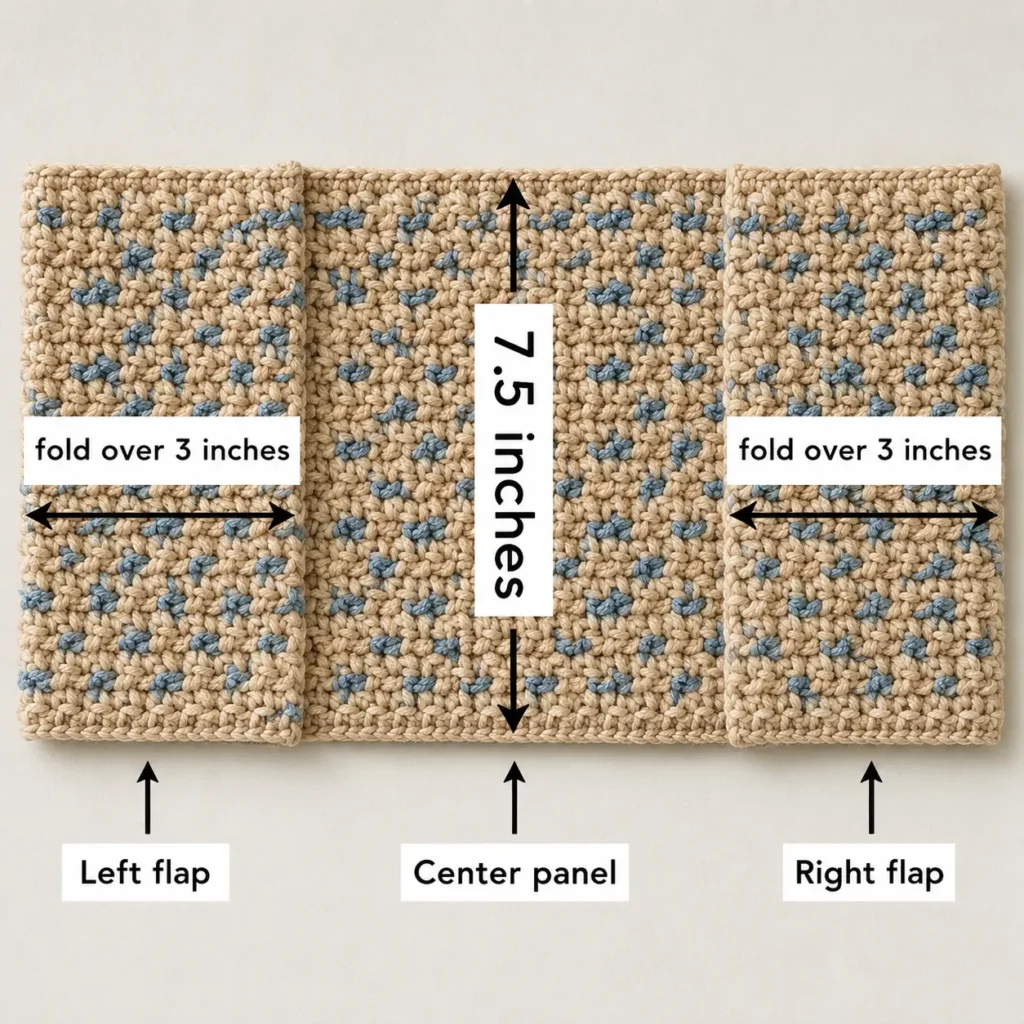
Place the notebook open on top of the crochet rectangle.
Center the notebook spine.
Fold the left and right short ends of the crochet rectangle inward over the notebook covers.
Each flap should cover approximately 2.5–3 inches of the inside notebook cover.
Close the notebook carefully.
Check the fit.
The crochet should wrap around the notebook without pulling.
If the cover feels too loose, remove a few rows before fastening off.
If the cover does not close comfortably, add more rows.
Beginner tip:
Test the fit with the notebook closed and open. A notebook cover that only fits when flat may become too tight when closed.
Common mistake to avoid:
Making the flaps too shallow.
A tiny flap may slip off the notebook cover. Aim for enough depth to hold the boards securely.
Step 5: Fasten Off and Prepare the Flaps
Once the rectangle fits correctly, fasten off.
Leave a long tail, approximately 18–24 inches, if you want to use the same yarn tail for seaming.
Fold the left flap inward.
Fold the right flap inward.
Use stitch markers, clips, or pins to hold the flaps in place.
Remove the notebook before seaming unless you are very confident. This prevents accidentally stitching into the notebook cover.
Keep the folds even.
If one flap is deeper than the other, adjust before sewing.
Beginner tip:
Count the rows in each folded flap. Matching flap depth creates a cleaner finished cover.
Common mistake to avoid:
Seaming through the front layer by accident.
Only seam the top and bottom edges of the flap layers.
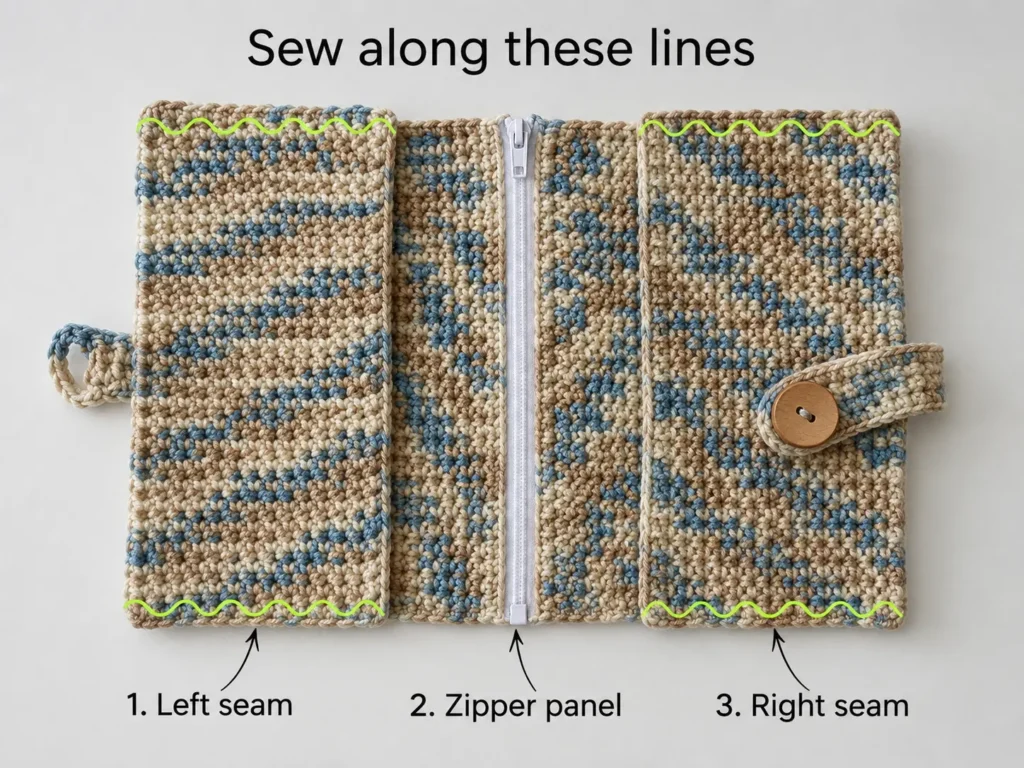
Step 6: Seam the Top and Bottom Edges
Thread the tapestry needle with matching sage-green yarn.
Start at the top edge of one flap.
Use a whipstitch or mattress-style seam to join the folded flap edge to the main rectangle.
Work through matching edge stitches when possible.
Repeat along the bottom edge of the same flap.
Then seam the top and bottom edges of the second flap.
Do not seam the vertical folded edge. That folded side needs to remain open so the notebook board can slide inside.
After seaming all four short edges, weave in the tails securely.
Beginner tip:
Before weaving in ends, slide the notebook into the cover and check the fit. It is easier to adjust a seam before the tail is fully hidden.
Common mistake to avoid:
Seaming too tightly.
A tight seam can pucker the cover and make it difficult to insert the notebook.
Step 7: Insert the Notebook
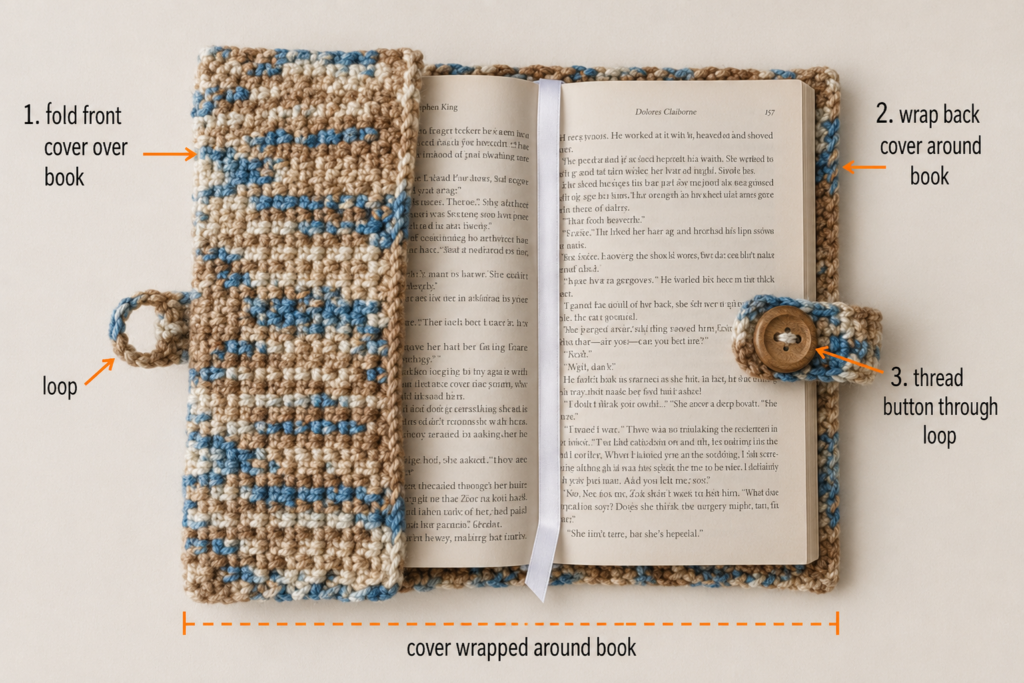
Open the notebook.
Slide the front board into one inside crochet flap.
Slide the back board into the opposite flap.
Close the notebook slowly.
The crochet should sit flat across the front cover, spine, and back cover.
Check the corners.
If the notebook corners pull the fabric too tightly, the cover may be too narrow or the seams may be too tight.
If the boards slip out easily, the flaps may be too shallow or the cover may be too loose.
Beginner tip:
A snug fit is good, but the notebook should still open naturally.
Common mistake to avoid:
Forcing a thick hardback notebook into a cover measured for a thin paperback-style notebook.
Always measure the exact notebook you plan to use.
Step 8: Crochet the Optional Strap
A strap is optional, but it helps keep the notebook closed if you carry it in a bag.
With cream yarn:
Ch 46.
Row 1:
Sc in the second ch from hook and in each chain across.
Row 2:
Ch 1, turn. Sc in each stitch across.
Row 3:
Ch 1, turn. Sc in each stitch across.
Do not fasten off yet.
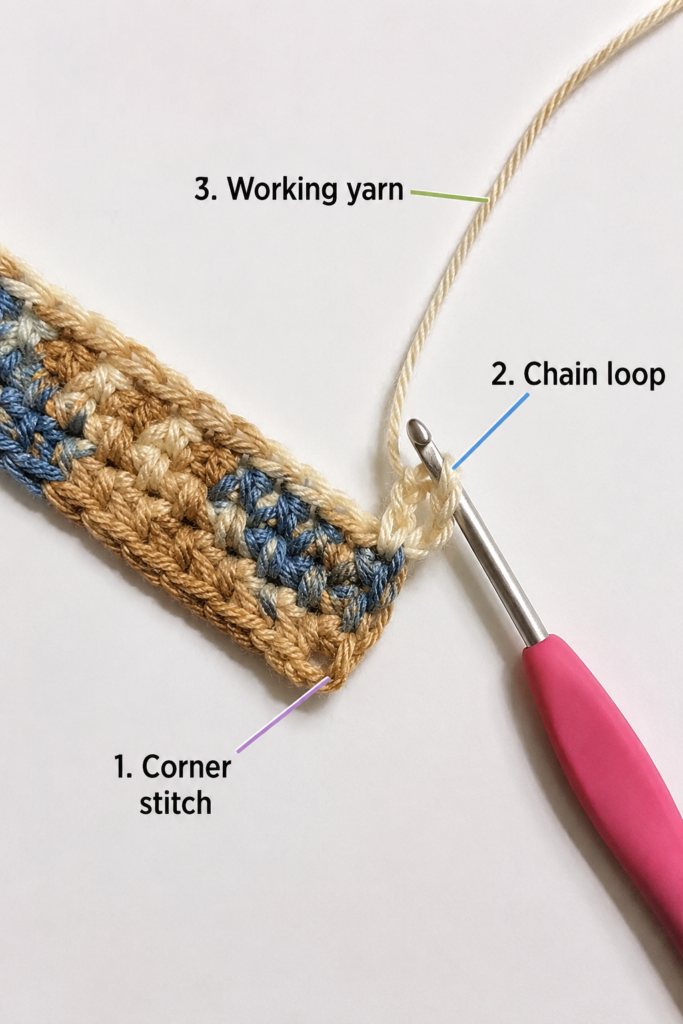
At the end of Row 3, make a button loop:
Ch 8, then sl st into the same end corner of the strap to form a loop.
Test the loop around your button.
If the loop is too small, add 1–2 chains.
If it is too large, remove 1–2 chains.
Fasten off and weave in the tail near the button-loop end.
Leave a long tail on the opposite end for sewing the strap to the back cover.
Beginner tip:
Make the loop only after choosing the button. Buttons vary more than they appear.
Common mistake to avoid:
Making the strap too short.
Wrap it around the closed notebook before sewing. It should reach comfortably without stretching hard.
Step 9: Attach the Strap and Button
Place the notebook inside the finished cover.
Close the notebook.
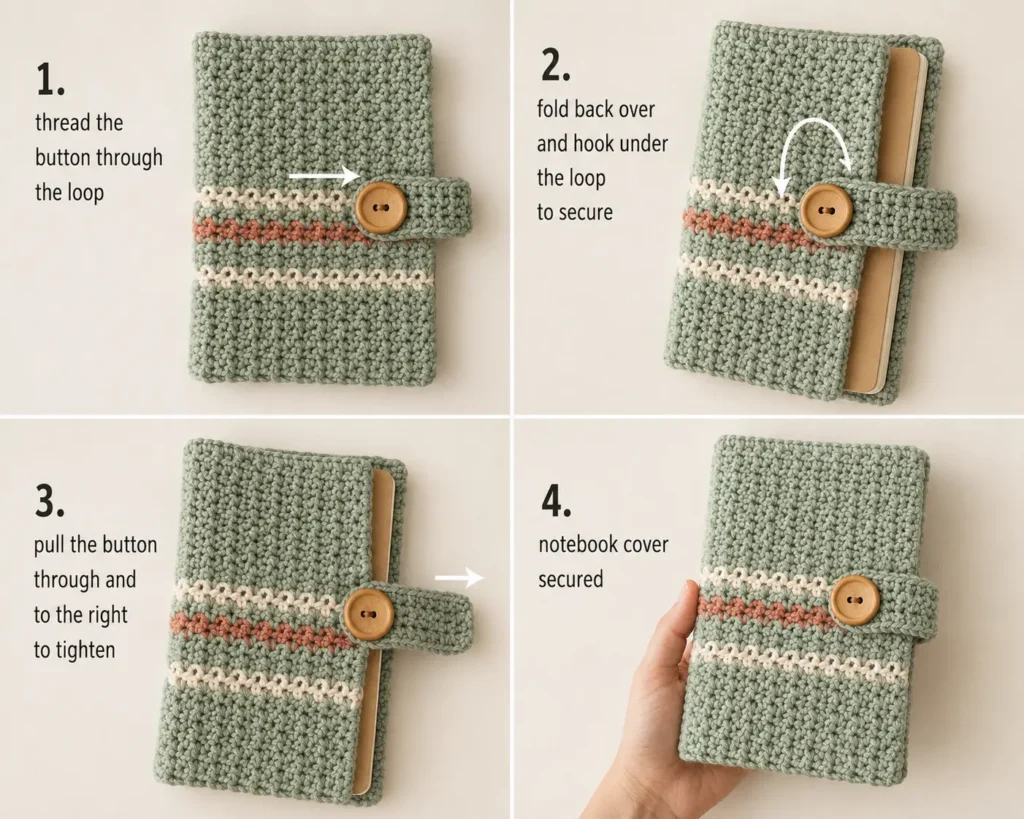
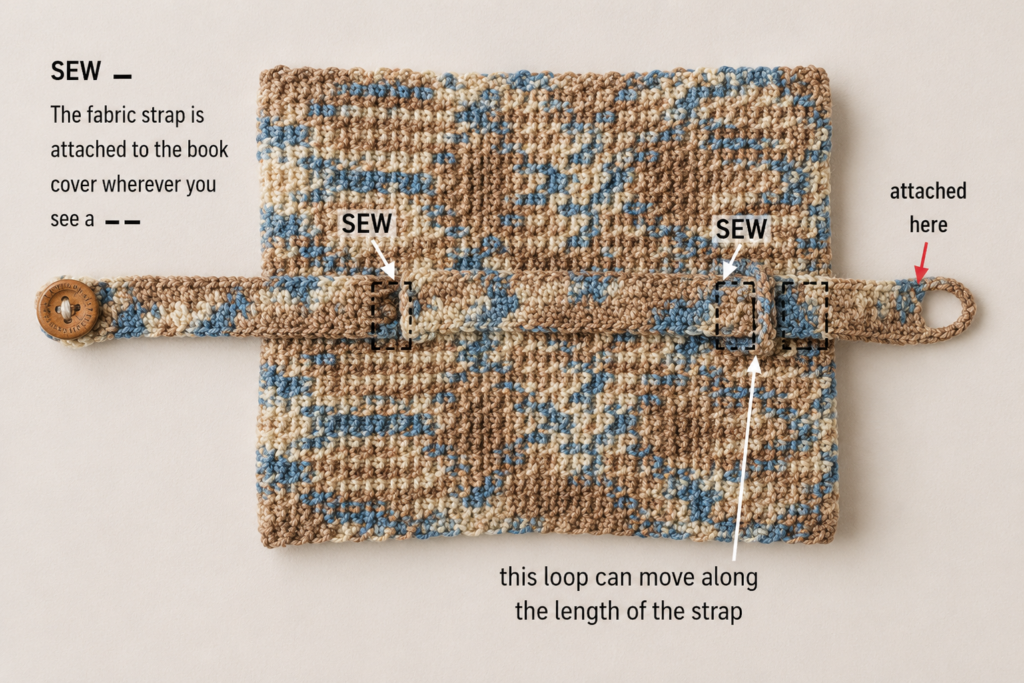
Position the strap on the back cover, centered vertically.
Wrap the strap around to the front.
Mark where the button loop naturally lands.
Sew the non-loop end of the strap securely to the back of the crochet cover.
Use several stitches and pass through the strap and cover fabric multiple times.
Now sew the button onto the front cover where the loop reaches comfortably.
Test the closure.
The strap should hold the notebook closed without bending the cover or stretching the crochet.
Beginner tip:
Do not sew the strap while the cover is empty. The thickness of the notebook changes how the strap sits.
Common mistake to avoid:
Attaching the button too far away from the loop.
This makes the strap pull tightly and can distort the front cover.
Pattern Notes or Stitch Notes
Turning chain rules
The ch 1 at the beginning of each row does not count as a stitch.
Always work the first single crochet into the first stitch or first chain-space position as described.
Stitch count
The exact stitch count depends on your notebook height.
For the sample:
- Foundation chain: 74.
- Moss-stitch row ends with single crochet.
- Row count continues until the rectangle wraps around the open notebook plus both flaps.
Repeat pattern
Main rectangle repeat:
Ch 1, sc in next ch-1 space.
This creates a simple moss-stitch texture.
Row notes
This cover is worked flat in rows.
It is not worked in the round.
Right side and wrong side
The right side is the side you want facing outward.
For simple moss stitch, both sides look similar, so choose the smoother side before folding.
Size adjustment notes
To adjust the cover:
- Change the foundation chain to match notebook height.
- Add or remove rows to match notebook wraparound width.
- Make flaps deeper for heavy hardback notebooks.
- Make flaps shallower for thin softcover notebooks.
- Adjust strap length after the notebook is inside the cover.
Common Beginner Mistakes
1. Starting with the wrong measurement
Problem: The cover fits the notebook height but not the wraparound width, or the reverse.
Fix: Remember that this version is worked sideways. The foundation chain controls height. The number of rows controls the wraparound width.
2. Making the rectangle too short
Problem: The notebook closes only when the crochet is stretched tightly.
Fix: Add more rows before folding the flaps.
3. Making shallow flaps
Problem: The notebook boards slip out.
Fix: Fold at least 2.5–3 inches inward for a standard A5 notebook.
4. Skipping the final stitch of a row
Problem: The rectangle narrows gradually.
Fix: Count your stitches and place a marker at the first and last stitch if necessary.
5. Seaming too tightly
Problem: The flaps pucker or the notebook does not slide in easily.
Fix: Use relaxed, even seaming stitches.
6. Attaching the strap without the notebook inside
Problem: The strap is too short once the notebook is inserted.
Fix: Always test strap placement with the actual notebook inside.
7. Choosing yarn that is too stretchy
Problem: The cover becomes loose with use.
Fix: Use cotton or a firm cotton blend for better structure.
How to Customize This Crochet Project
Yarn changes
Cotton gives the neatest structure.
Acrylic is lighter and often cheaper.
Wool blends can feel cozy but may stretch or felt depending on care.
For school notebooks or planners used daily, choose a washable yarn.
Color changes
Try:
- Solid sage green for a calm study journal.
- Cream body with terracotta strap.
- Navy body with mustard button.
- Striped rows for a back-to-school look.
- Variegated yarn for color-pooling effects.
- Pastel cover for a reading journal.
- Dark neutral cover for a work planner.
Size changes
For a smaller notebook, reduce the foundation chain and row count.
For a larger planner, increase both.
The formula is:
Foundation chain = notebook height
Total rectangle width = front cover + spine + back cover + both flaps
Border options
After seaming, you can add a simple border around the outside edges.
Good beginner borders:
- One round of single crochet.
- Reverse single crochet.
- Slip-stitch surface edge.
- Contrasting stripe along the front edge.
Avoid bulky borders near the flaps if they make the notebook difficult to insert.
Texture options
Once you understand the construction, try other flat stitch patterns:
- Plain single crochet.
- Half double crochet.
- Lemon peel stitch.
- Thermal stitch for extra thickness.
- Suzette stitch.
- Mini bean stitch.
For your first cover, moss stitch is a good balance of simplicity and texture.
Gift ideas
This notebook cover works well for:
- Teacher gifts.
- Back-to-school gifts.
- Journaling kits.
- Crochet project notebooks.
- Bible study notebooks.
- Planner covers.
- Handmade stationery sets.
- Book-club gifts.
Pair it with a pen, bookmark, or small crochet pencil pouch.
Finishing Instructions
Fastening off
After the main rectangle or strap is complete, cut the yarn and pull the end through the final loop.
Do not trim short tails immediately.
Weaving in ends
Use a tapestry needle to weave each tail through the wrong side of the crochet fabric.
Change direction once or twice so the tail stays secure.
Trim only after the tail is hidden.
Blocking
Blocking helps the rectangle lie flat before folding.
For cotton yarn:
- Lightly mist the crochet rectangle.
- Pin it to the correct measurements.
- Allow it to dry fully.
- Fold and seam after it is dry.
Do not over-stretch the fabric during blocking.
Shaping
After inserting the notebook, gently smooth the cover over the front, spine, and back.
Press the folds with your hands.
Do not iron acrylic yarn directly.
Washing and care
Follow the care instructions on your yarn label.
If the cover includes a wooden button, gentle hand washing and flat drying are safest.
Remove the notebook before washing.
Quick Printable-Style Summary
Project: Easy Crochet Notebook Cover
Skill level: Beginner to Easy
Finished size: Custom fit for A5 notebook, journal, or planner
Yarn: DK or light worsted cotton/cotton blend
Hook: 3.5 mm / E-4
Stitches: Chain, single crochet, slip stitch
Main stitch pattern: Moss stitch
Starting method: Foundation chain equal to notebook height
Sample foundation chain: Ch 74
Main repeat: Ch 1, skip next stitch or chain-space position, sc in next space/stitch as established
Construction: Crochet one rectangle, fold both short ends inward, seam top and bottom flap edges
Optional closure: Crochet strap with button loop and wooden button
Finishing: Weave in ends, block rectangle if needed, seam flaps, insert notebook, attach strap and button
FAQ
Is this crochet notebook cover pattern beginner-friendly?
Yes. The main fabric uses chains and single crochet. The construction is simple because you make one rectangle, fold the ends, and seam the flaps.
Can I make this cover for any notebook size?
Yes. Measure the notebook height for the foundation chain, then crochet enough rows to wrap around the opened notebook plus both flaps.
What yarn is best for a crochet notebook cover?
Cotton or cotton-blend yarn is usually best because it creates a firmer fabric and clear stitch definition. Acrylic can work, but it may stretch more over time.
Do I need a button strap?
No. The cover works without a strap if the flaps fit snugly. A button strap is useful if you carry the notebook in a bag.
Why is my crochet rectangle getting narrower?
You are probably skipping the final stitch or final chain space at the end of some rows. Use stitch markers at the edges until you are comfortable with the pattern.
Can I add a bookmark?
Yes. You can sew a ribbon, braided yarn cord, or crochet chain to the top inside spine area before inserting the notebook.
Can this be used as a planner cover?
Yes. The same method works for planners, journals, sketchbooks, reading logs, school notebooks, or crochet project notebooks. Just measure the exact book before starting.
Conclusion
A crochet notebook cover is a smart beginner project because it teaches useful crochet skills while giving you a finished item you can use every day. You practice measuring, stitch consistency, row counting, folding, seaming, and simple finishing without needing complicated shaping.
The most important step is measuring your notebook before you begin. Once you understand the formula, the pattern becomes easy to customize for journals, planners, school notebooks, sketchbooks, and reading logs.
Keep the first version simple: one main yarn color, moss stitch, folded flaps, and neat seams. Then use your next version to experiment with stripes, textured stitches, contrast borders, bookmarks, appliqués, or a decorative button strap.





