A crochet sunflower granny square is one of the most cheerful floral motifs you can make. It has the cozy structure of a classic granny square, but the center blooms into a raised sunflower with a textured brown middle and bright yellow petals.
This tutorial is written for beginners who already know how to make a chain, yarn over, and complete basic crochet stitches. You do not need to be an expert, but it helps if you can recognize stitches and count slowly. The square is worked in rounds, starting from the flower center and building outward until the round sunflower becomes a square.
The finished motif can be used for blankets, cardigans, bags, pillows, table runners, classroom decorations, market bags, wall hangings, or a single framed crochet piece. Once you understand the construction, you can repeat the square in different colors and join the motifs into larger projects.
This article uses one visual reference source for the tutorial image flow, but the written pattern below is original. The reference source shows a sunflower granny square made with a brown center, yellow petals, and a light square border, which makes it useful for understanding the order of construction and what each stage should look like.
What You’ll Learn
- How to start a sunflower granny square with a magic ring.
- How to crochet a textured sunflower center.
- How to join yellow yarn cleanly for the petals.
- How to make raised sunflower petals.
- How to turn a round flower motif into a square.
- How to place granny clusters around petals.
- How to make neat corners.
- How to count stitches and chain spaces.
- How to fasten off and weave in ends.
- How to block the square for cleaner edges.
- How to customize the colors and size.
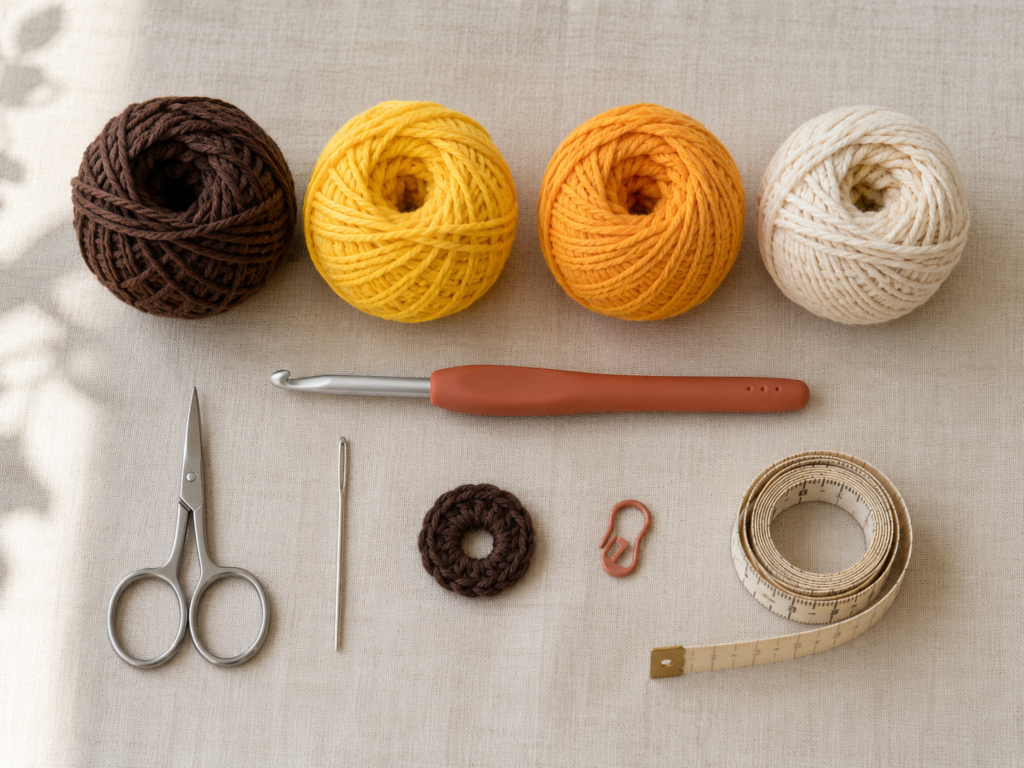
Materials You’ll Need
For one sunflower granny square:
- DK or light worsted yarn in dark mocha brown for the center.
- DK or light worsted yarn in golden yellow for the petals.
- DK or light worsted yarn in soft oatmeal cream for the square background.
- Optional second yellow shade, such as warm marigold, for extra petal variation.
- 3.5 mm / E-4 crochet hook.
- Scissors.
- Tapestry needle.
- Stitch marker.
- Measuring tape.
- Blocking mat and pins, optional but helpful.
The selected reference source uses medium or medium-light yarn with a 3.5 mm hook, scissors, and a tapestry needle, which is close to the materials recommended here. The Craft Yarn Council’s yarn weight system lists DK under the light yarn category, while 3.5 mm corresponds to a U.S. E-4 crochet hook.
Finished Size
With DK yarn and a 3.5 mm hook, one square should measure approximately:
4.5–5 inches / 11.5–12.5 cm across
The finished size depends on your yarn, hook, and tension. If your square is smaller, your tension may be tight. If it is larger, your tension may be loose or your yarn may be thicker.
Crochet Abbreviations Used
This tutorial uses U.S. crochet terminology.
- ch = chain
- sl st = slip stitch
- sc = single crochet
- hdc = half double crochet
- dc = double crochet
- tr = treble crochet
- st/sts = stitch/stitches
- sp = space
- ch-sp = chain space
- rep = repeat
- RS = right side
- WS = wrong side
The Craft Yarn Council provides a standard master list for crochet abbreviations and also notes differences between U.S., U.K., and Canadian terminology.
Before You Start
Gauge and tension
Gauge is not strict for a granny square motif, but consistency matters if you plan to join many squares together. Make one square first, measure it after blocking, and use that first square as your size reference.
How to count the rounds
This square has three main parts:
- Center: the brown sunflower middle.
- Petals: the yellow raised flower section.
- Square background: the cream granny-square frame.
Do not rush the petal round. Most beginner mistakes happen when skipping a petal space, forgetting a chain space, or placing the cream background into the wrong gap.
How to keep the square flat
Your sunflower may cup slightly before the background round is added. That is normal. Once the cream granny-square section is worked around the petals and blocked, the square should lie much flatter.
Choosing colors
For a realistic sunflower look, use:
- Dark brown center.
- Bright or golden yellow petals.
- Cream, white, sky blue, sage green, or tan background.
For a modern cottage-style look, try:
- Cocoa center.
- Mustard petals.
- Oatmeal background.
For a classroom or nursery project, try:
- Espresso center.
- Sunny yellow petals.
- Pastel blue or soft green background.
Step-by-Step Crochet Tutorial
Step 1: Make the Sunflower Center Ring
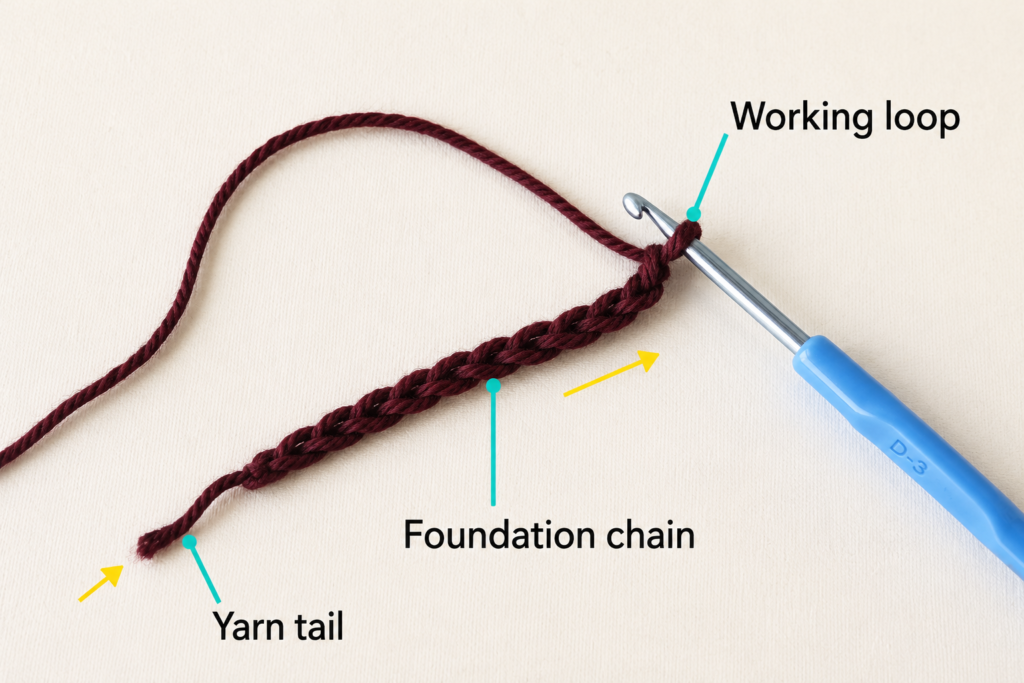
Using dark mocha brown yarn, make a magic ring.
Ch 2. This chain does not count as a stitch.
Work 12 dc into the magic ring.
Pull the magic ring tail gently to close the center.
Join with a sl st to the first dc.
Stitch count: 12 dc.
You now have the first round of the sunflower center.
Beginner tip:
Hold the magic ring tail firmly while making the first few stitches. If the loop gets too large, your stitches may spread apart.
Common mistake to avoid:
Do not pull the magic ring tail too hard before all stitches are complete. Tightening too early can make the last stitches difficult to fit into the ring.
Step 2: Add Texture to the Brown Center
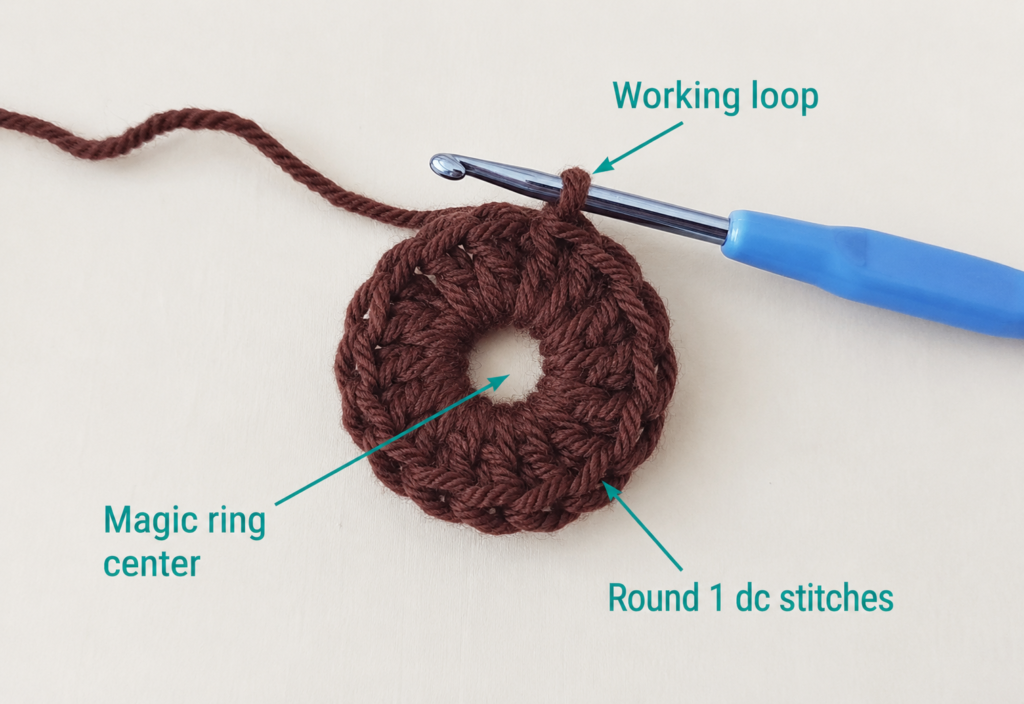
Ch 1.
Work 2 sc in each stitch around.
Join with a sl st to the first sc.
Stitch count: 24 sc.
Fasten off the brown yarn, leaving a tail long enough to weave in later.
This second brown round gives the sunflower center more fullness and makes the yellow petals easier to space evenly.
Beginner tip:
Count the round in groups of six. Four groups of six stitches will give you 24 total.
Common mistake to avoid:
Do not accidentally crochet into the slip stitch from the previous join. Work only into the 12 real double crochet stitches from Round 1.
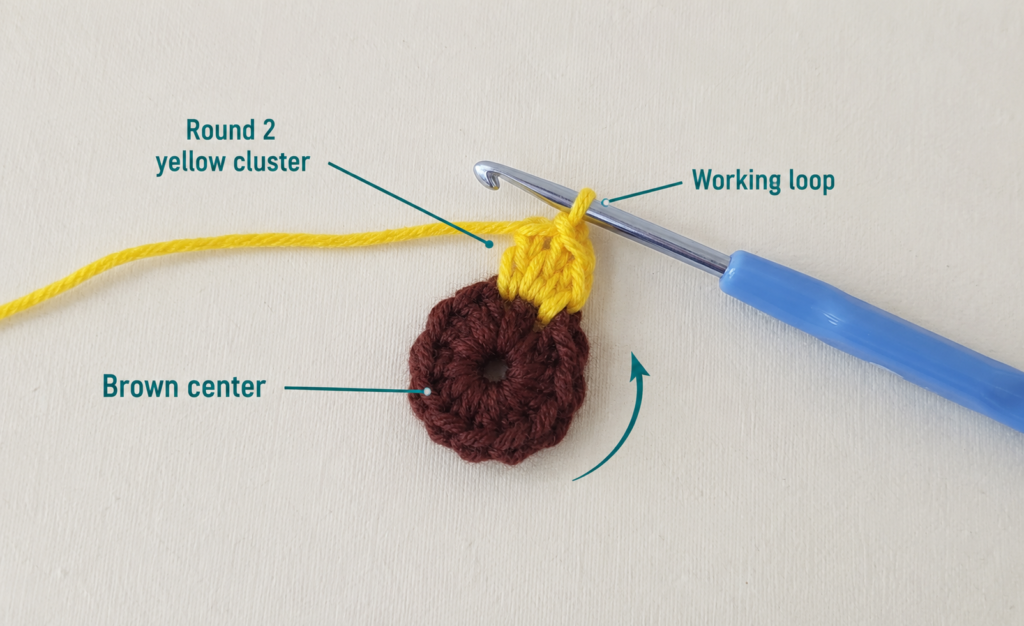
Step 3: Join the Yellow Yarn for the Petals
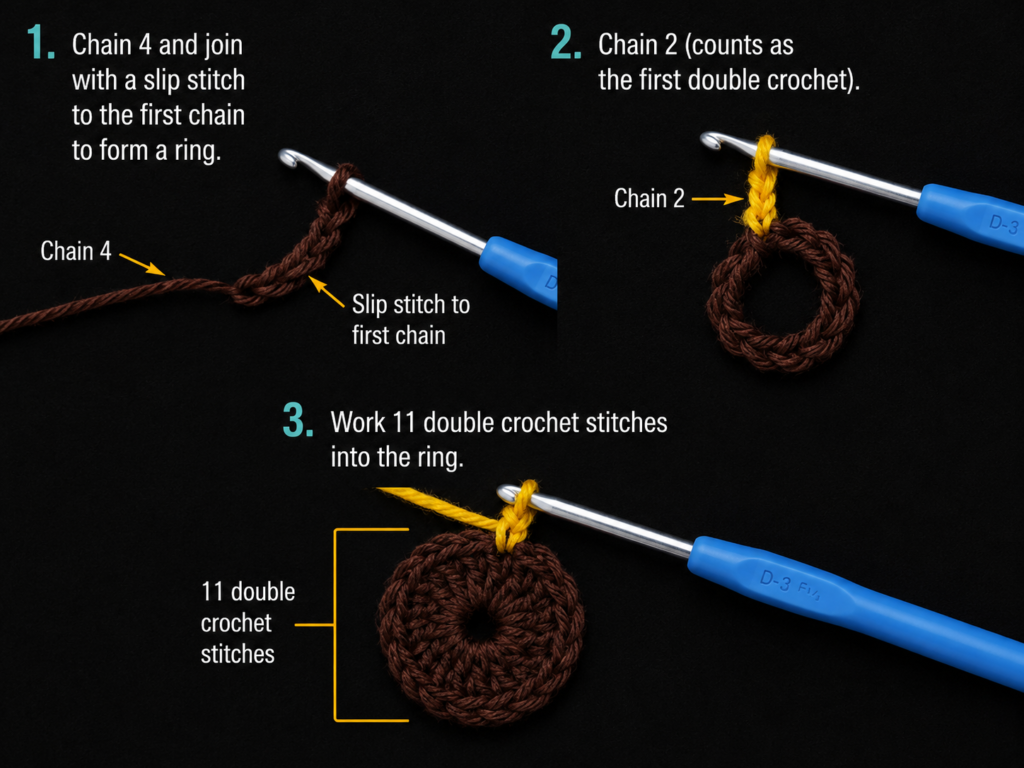
Join golden yellow yarn in any stitch around the brown center.
Ch 1 to secure the yarn.
You will work the petal round into the brown stitches. Each petal uses two brown stitches: one stitch to anchor and one stitch to build the raised petal shape.
Before continuing, check that you have 24 brown stitches around the outside. This will create 12 petals.
Beginner tip:
Use a stitch marker to mark the first stitch of the petal round. It is easy to lose the start once the petals become fluffy.
Common mistake to avoid:
Do not join the yellow yarn into a yarn tail or gap. Insert your hook under the top loops of an actual brown stitch.
Step 4: Crochet the First Raised Petal
For each petal, work the following sequence:
Sl st in next st, ch 3, 2 tr in next st, ch 3, sl st in next st.
This creates one raised yellow petal.
The petal should look slightly pointed and textured. The treble stitches give it height, while the slip stitches anchor it close to the center.
Repeat this same petal sequence around the brown center until you have 12 petals.
Fasten off the yellow yarn after the final petal.
Beginner tip:
If your petals look too loose, reduce the chain height from ch 3 to ch 2. If they look too tight, keep ch 3 and relax your tension.
Common mistake to avoid:
Do not skip the anchoring slip stitches. Without them, the petals may spread too loosely and the sunflower will lose definition.
Step 5: Finish the Sunflower Motif
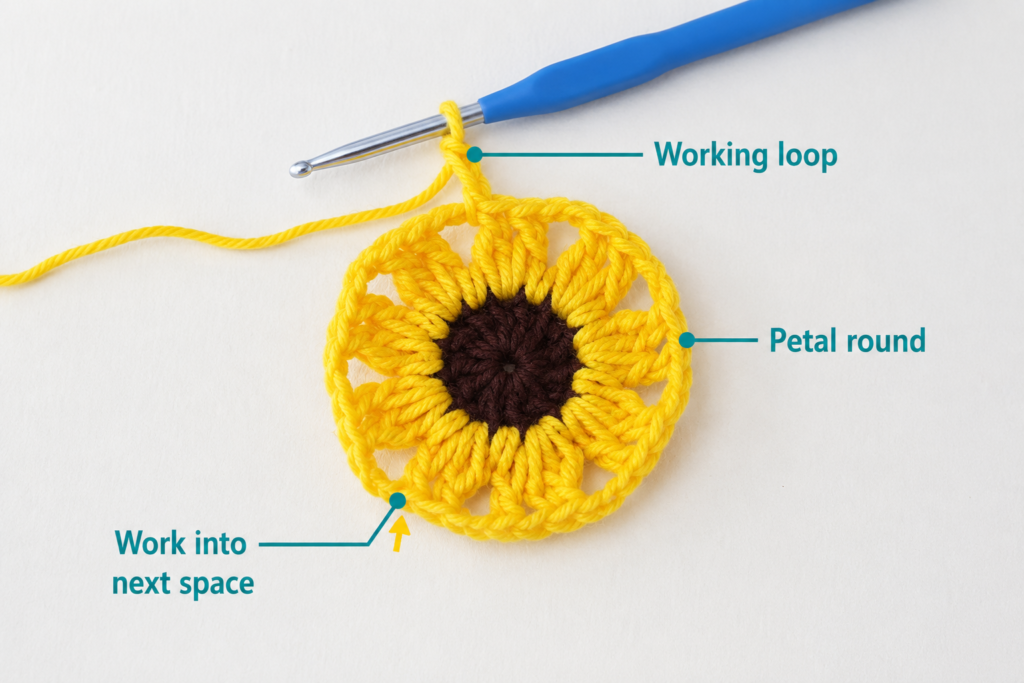
Continue repeating the petal sequence all the way around.
When you reach the beginning, join neatly with a sl st if needed.
Fasten off yellow yarn.
You should now have:
- One dark brown center.
- Twelve raised yellow petals.
- Open spaces between some petals.
These spaces will help you place the cream granny-square background in the next step.
Beginner tip:
Lay the flower flat and gently spread the petals with your fingers. This helps you see the gaps before joining the square background color.
Common mistake to avoid:
If your final petal does not fit, recount the brown stitches. The most common cause is accidentally using three brown stitches for one petal instead of two.
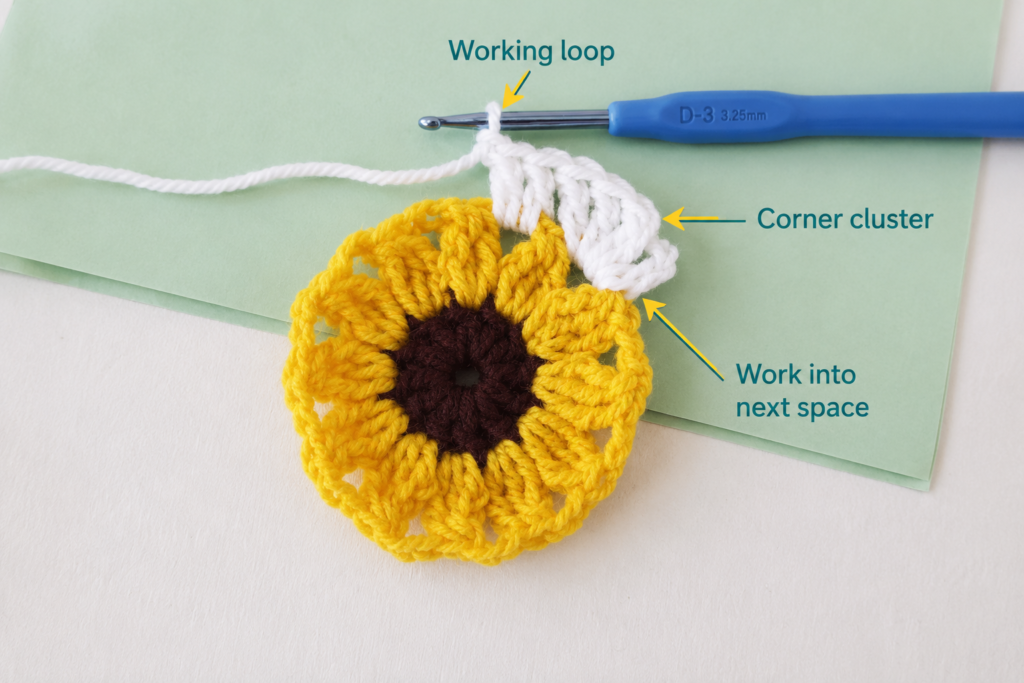
Step 6: Join the Cream Yarn Between Petals
Now you will turn the round flower into a square.
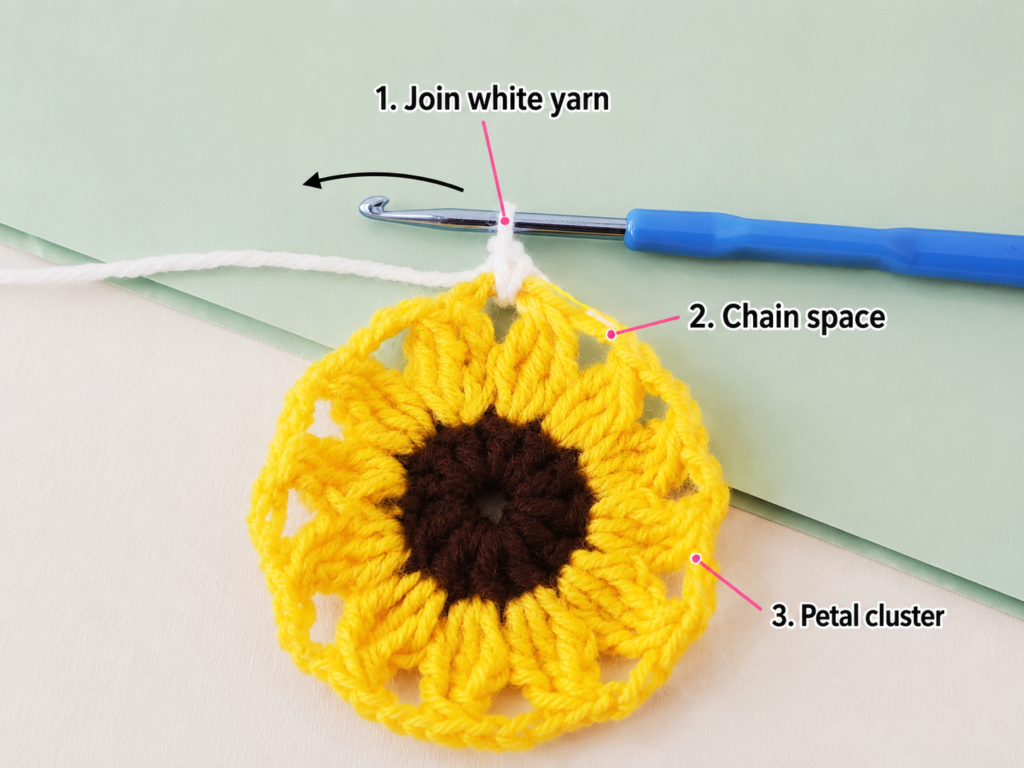
Join soft oatmeal cream yarn in any clear space between petals.
Ch 3. This counts as the first dc of the background round.
Work 2 dc in the same space.
This creates your first granny cluster.
You will now work around the sunflower using granny clusters and corner groups.
Beginner tip:
Before joining the cream yarn, choose four petal gaps that will become the square corners. They should be evenly spaced around the flower.
Common mistake to avoid:
Do not work the cream background into the front of the petals. Place the cream stitches into the spaces between petals so the sunflower remains visible and raised.
Step 7: Work the First Side and Corner
After the first granny cluster, work:
Ch 1, 3 dc in next petal gap, ch 1, 3 dc in next petal gap.
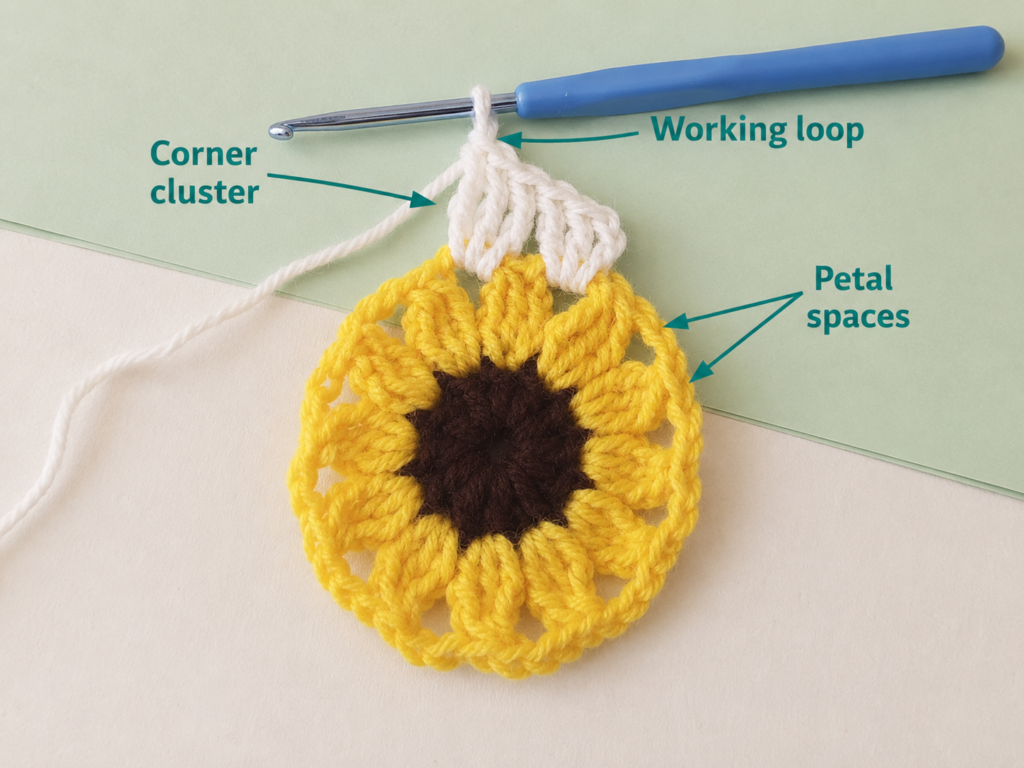
Now make the first corner:
Ch 1, in next petal gap work 3 tr, ch 2, 3 tr, ch 1.
The treble crochet stitches create extra height at the corner, helping the round flower become a square.
Beginner tip:
Think of each side as three smaller spaces, then one corner. Repeat this logic four times.
Common mistake to avoid:
Do not forget the ch 2 in the corner. That chain space gives the square room to open and block neatly.
Step 8: Continue Around the Flower
Repeat the same structure around the sunflower:
Side section:
3 dc in next gap, ch 1, 3 dc in next gap, ch 1, 3 dc in next gap.
Corner section:
3 tr, ch 2, 3 tr in next corner gap, ch 1.
Continue until all four sides and four corners are complete.
At this stage, the motif should clearly look like a square with a sunflower in the center.
Beginner tip:
If you are unsure where the next corner should go, lay the piece flat. Corners should sit at north, east, south, and west positions around the flower.
Common mistake to avoid:
Do not crowd all corners too close together. Uneven corner placement creates a tilted square.
Step 9: Join the Background Round
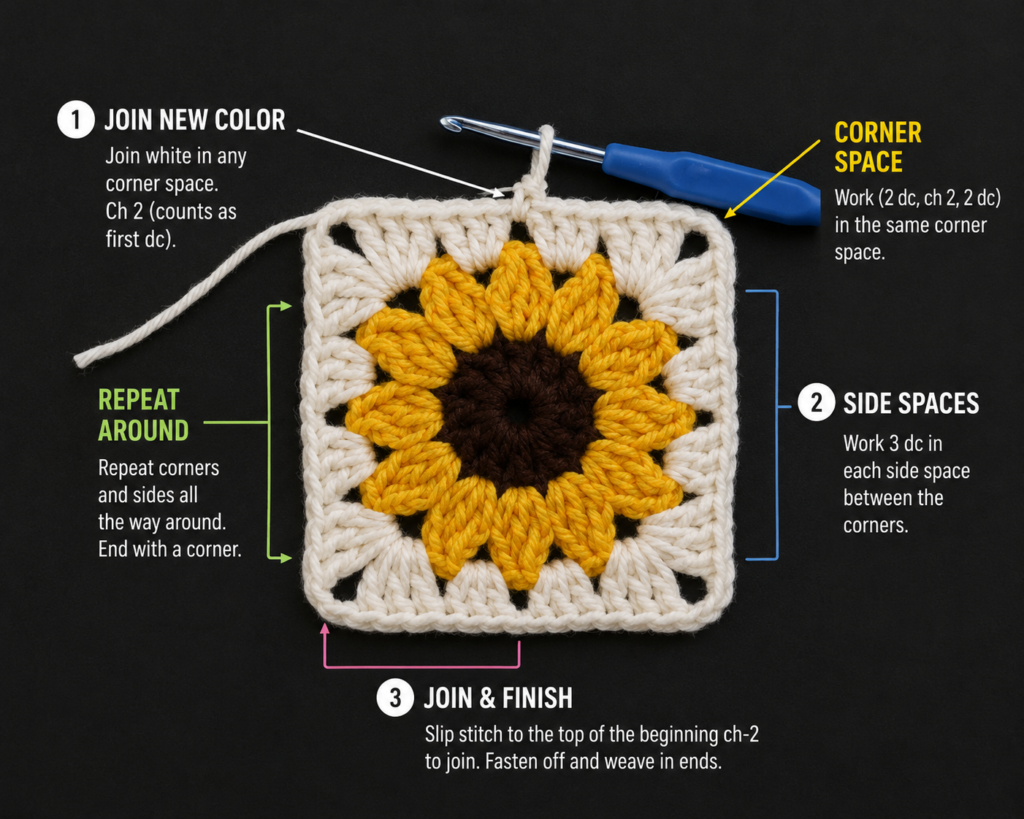
When you return to the beginning of the cream round, join with a sl st to the top of the beginning ch 3.
Fasten off, leaving a tail long enough to weave in.
Look at the square carefully:
- The sunflower should sit in the center.
- The corners should be evenly spaced.
- The sides should not pull tightly against the petals.
- The square should have four visible corners.
If the square looks slightly wavy, blocking will help.
Beginner tip:
Before cutting the yarn, lay the square flat and check that you did not miss one side section or corner.
Common mistake to avoid:
Do not join into the wrong chain. Join to the top of the beginning chain that represents the first double crochet.
Step 10: Weave In Ends and Block the Square
Thread each yarn tail onto a tapestry needle.
Weave the tail back and forth through stitches on the wrong side of the square.
Trim only after the tail feels secure.
To block the square:
- Lay it on a blocking mat.
- Gently shape it into an even square.
- Pin the four corners first.
- Pin the sides if needed.
- Lightly mist with water if your yarn allows.
- Let it dry completely before unpinning.
Blocking is especially helpful if you plan to join many sunflower squares into a blanket, pillow, or bag panel.
Beginner tip:
Block every square to the same measurement before joining. This gives your final project cleaner seams.
Common mistake to avoid:
Do not stretch the square so aggressively that the sunflower petals become distorted.
Pattern Notes or Stitch Notes
Turning chain rules
This square is worked in rounds, so you do not turn the work after each round.
Beginning chains are used to bring the yarn up to the correct stitch height.
Stitch count notes
This original tutorial uses:
- Round 1: 12 dc.
- Round 2: 24 sc.
- Petal round: 12 petals.
- Background round: 4 sides and 4 corners.
Repeat pattern
The petal round repeats the same petal unit around the center.
The square background repeats side clusters and corner groups around the flower.
Right side and wrong side
The raised sunflower petals should face the right side.
Weave in yarn tails on the wrong side.
Size adjustment notes
To make a larger square:
- Use thicker yarn.
- Use a larger hook.
- Add an extra granny-square border round after the first cream round.
To make a smaller square:
- Use sport-weight or fingering-weight yarn.
- Use a smaller hook.
- Keep the same stitch structure but expect a smaller motif.
Common Beginner Mistakes
1. The center hole stays open
Problem: The magic ring was not pulled tight enough.
Fix: Pull the beginning tail carefully after Round 1, then secure the tail firmly when weaving in.
2. The center cups like a bowl
Problem: Tension is too tight, or the stitch count is too low.
Fix: Count both center rounds. If the count is correct, try a slightly larger hook.
3. The petals look uneven
Problem: Some petal bases were worked into the wrong stitches.
Fix: Mark the beginning of the petal round and count 12 petals before fastening off.
4. The cream background covers the petals
Problem: The background yarn was worked too far into the front of the flower.
Fix: Insert the hook into gaps between petals, not through the petal tops.
5. The square has three corners or five corners
Problem: Corner placement was not spaced evenly.
Fix: Identify four corner gaps before starting the background round.
6. The square is wavy
Problem: Too many stitches or loose tension around the background.
Fix: Recount the background groups and block the finished square.
7. The square pulls inward
Problem: Too few chain spaces or tight corner chains.
Fix: Keep the ch 2 corners relaxed and avoid pulling the cream yarn too tightly.
How to Customize This Crochet Project
Yarn changes
Cotton gives a crisp, defined sunflower. Acrylic makes a softer, lighter square. Wool blends can work beautifully for blankets but may require more careful blocking.
Color changes
Try these palettes:
- Classic: dark brown, golden yellow, cream.
- Cottage: cocoa, mustard, oatmeal.
- Summer: espresso, lemon yellow, sky blue.
- Autumn: chestnut, marigold, rust.
- Modern neutral: taupe center, muted gold petals, ivory border.
Size changes
Add one more granny border round if you need larger squares for a blanket or cushion.
For a second border round, work granny clusters into side spaces and corner groups into corner spaces.
Border options
Possible border ideas:
- One round of single crochet.
- One round of reverse single crochet.
- A picot border.
- A second granny round.
- A join-as-you-go border for blankets.
Texture options
For more dimension, make the petals with puff stitches or clusters.
For a flatter motif, replace treble petals with double crochet petals.
Project ideas
Use finished sunflower granny squares for:
- Blankets.
- Tote bags.
- Pillow covers.
- Cardigans.
- Table runners.
- Wall hangings.
- Classroom décor.
- Market bags.
- Crochet book covers.
- Handmade gifts.
Finishing Instructions
Fasten off after the final join.
Weave in every yarn end on the wrong side.
Do not simply knot and trim the yarn. Crochet fabric stretches with use, and loose knots can come undone.
Block the square to a consistent size.
For washable projects, check your yarn label before washing. Cotton can usually handle gentle washing, while wool blends may need special care. If using the square in a bag, cardigan, or blanket, make one test square and wash it before committing to many motifs.
Quick Printable-Style Summary
Skill level: Easy / confident beginner.
Finished size: About 4.5–5 inches with DK yarn and 3.5 mm hook.
Materials: Brown yarn, yellow yarn, cream yarn, 3.5 mm hook, scissors, tapestry needle, stitch marker.
Stitches: Ch, sl st, sc, dc, tr.
Starting method: Magic ring.
Round 1: Brown center, 12 dc into magic ring.
Round 2: Brown texture round, 2 sc in each stitch.
Petal round: Yellow raised petals around the center.
Square round: Cream granny clusters and corner groups worked between petals.
Finishing: Fasten off, weave in ends, block into a square.
FAQ
Is a crochet sunflower granny square beginner-friendly?
Yes, but it is best for a confident beginner. You should already know how to chain, slip stitch, double crochet, and work in rounds. The flower shape makes the pattern more interesting than a basic granny square, but the steps are still manageable when worked slowly.
What yarn is best for sunflower granny squares?
DK cotton, light worsted cotton, acrylic, or cotton-acrylic blends all work well. Cotton gives strong stitch definition, while acrylic is softer and often easier to find in many colors.
Can I use worsted-weight yarn?
Yes. Your square will be larger and slightly thicker. Use a hook size that matches your yarn and make a test square before starting a full blanket or garment.
Why is my sunflower granny square not flat?
It may need blocking, or your stitch count may be off. Check the center stitch count, petal count, and corner placement. Slight curling before blocking is common.
Can I make a blanket with this square?
Yes. Make multiple squares, block them to the same measurement, and join them with slip stitch, single crochet, whip stitch, or a join-as-you-go method.
How many sunflower granny squares do I need for a blanket?
It depends on your square size and blanket size. For example, if each square is 5 inches, a 40-inch baby blanket would need about 8 squares across and 8 squares down, or 64 squares total, before adding any border.
Can I change the border color?
Absolutely. White and cream create a classic sunflower look, but sky blue, sage green, tan, black, or soft gray can all work depending on the project style.
Conclusion
A crochet sunflower granny square is a beautiful next step after learning basic granny squares. It teaches you how to combine a round floral center with a square background, which is a useful skill for many crochet motif projects.
Start with one practice square. Count carefully, keep the petal placement even, and block the final motif before judging the shape. Once the first square makes sense, the next ones will feel much faster and easier.
Use this square for a blanket, bag, pillow, wall hanging, cardigan, or a cheerful handmade gift.





