
Crocheting your first blanket can feel like a much bigger commitment than making a coaster, washcloth, or small pouch. There are more stitches to count, longer rows to manage, and enough yarn involved that nobody wants to discover halfway through the project that the sides are getting narrower.
That is precisely why a good first blanket should be simple.
This crochet baby blanket pattern for beginners is built around one easy two-stitch sequence:
Single crochet in one stitch, double crochet in the next. Repeat.
That is the entire body pattern.
The difference in height between the short single crochet and taller double crochet creates a softly pebbled texture without requiring complicated clusters, post stitches, increases, decreases, or elaborate stitch counting.
The original blanket in this tutorial uses a modern nursery-inspired palette of dusty teal, warm cream, soft peach, muted sage, and gentle mustard. The stripes are arranged symmetrically, so the finished design looks planned and balanced even though the crochet itself is repetitive and beginner-friendly.
You will learn how to:
- Make the starting chain.
- Work the first single crochet correctly.
- Alternate single and double crochet.
- Keep your edges straight.
- Check your stitch count.
- Turn correctly at the end of every row.
- Change yarn colors cleanly.
- Repeat the pattern without constantly rereading instructions.
- Add a simple two-round border.
- Fasten off and weave in ends securely.
- Adjust the finished blanket size.
The selected reference article also uses an easy one-row-repeat blanket construction and provides sequential photos showing the principal crochet mechanics, which makes it particularly useful as a visual teaching reference. This article’s pattern, dimensions, stripe sequence, materials, border, and instructions are newly created rather than reproduced from that source.
What You’ll Learn
By completing this baby blanket, you will practice:
- Making an even foundation chain.
- Recognizing the second chain from the hook.
- Making single crochet.
- Making double crochet.
- Alternating two stitch heights.
- Counting 104 stitches consistently.
- Recognizing the true first and last stitches of a row.
- Using a non-counting turning chain.
- Keeping crochet edges straight.
- Changing yarn colors at the end of a row.
- Working evenly around row ends for a border.
- Shaping corners with additional stitches.
- Weaving in multiple yarn tails securely.
- Measuring gauge and finished dimensions.
Materials You’ll Need
For the approximately 30.5 × 36.5 inch / 77.5 × 93 cm blanket shown in this original pattern:
- Approximately 1,100–1,300 yards / 1,005–1,190 meters of #4 worsted-weight yarn in total
- 5.5 mm / I-9 crochet hook
- Scissors
- Blunt tapestry or yarn needle
- Two locking stitch markers
- Measuring tape
- Optional blocking mats and rustproof pins
Suggested yarn palette
Use approximately:
- Color A — Dusty teal: 250–300 yards
- Color B — Warm cream: 400–450 yards, including border
- Color C — Soft peach: 125–150 yards
- Color D — Muted sage green: 125–150 yards
- Color E — Gentle mustard yellow: 125–150 yards
These quantities are estimates. Actual yardage depends on your gauge, yarn construction, tension, border depth, and any size adjustments.
The Craft Yarn Council classifies yarns through a standardized weight system; #4 is the medium/worsted category. Always check the specific yarn label because yarns within the same general weight category can still behave somewhat differently.
For a baby blanket, choose a yarn that feels comfortable against skin and can be cared for according to the recipient’s practical needs. Washability can be especially useful for frequently used handmade items.
Finished Size
Approximately:
30.5 inches / 77.5 cm wide
36.5 inches / 93 cm long
The body before the border should measure approximately 30 × 36 inches at the suggested gauge.
Your finished measurements may differ slightly, and that is normal for a non-fitted project such as a blanket.
Estimated Time
Approximately 12–20 hours.
A complete beginner may take longer. An experienced crocheter familiar with the stitches may finish sooner.
There is no reason to rush. This is an excellent project to work on for a few rows at a time.
Gauge and Tension
Suggested gauge in the main stitch pattern:
14 stitches × 12 rows = 4 inches / 10 cm
Exact gauge is not as critical as it would be for a fitted garment, but it affects:
- Finished width.
- Finished length.
- Fabric drape.
- Yarn consumption.
Make a small practice swatch first
Before chaining 105 stitches, try:
Ch 21.
Then follow the Row 1 and Row 2 instructions below on this smaller sample.
Practice until you can:
- Identify the first stitch.
- Identify the final stitch.
- End every row with a double crochet.
- Maintain 20 stitches.
- Produce fabric that feels neither stiff nor excessively loose.
A small swatch is also a practical way to determine whether your chosen hook and yarn combination produces the drape you want before committing to the full blanket.
Crochet Abbreviations Used
This pattern uses U.S. crochet terminology:
- ch = chain
- sc = single crochet
- dc = double crochet
- sl st = slip stitch
- st/sts = stitch/stitches
- rep = repeat
- RS = right side
- WS = wrong side
These abbreviations align with standardized Craft Yarn Council terminology.
U.S./U.K. terminology note
Be aware that U.S. and U.K. crochet terminology differs. This article uses U.S. terms throughout.
Before You Start
How to count stitches
The blanket body always contains:
104 stitches per row.
The chain 1 at the beginning of a row does not count as a stitch.
Your first actual stitch is a single crochet worked into the same stitch at the base of that chain 1.
Your last actual stitch should always be a double crochet.
Those two checkpoints are extremely useful:
First stitch = single crochet.
Last stitch = double crochet.
When something does not line up, stop immediately and count the row before continuing.
How to keep the sides straight
Three habits prevent most accidental narrowing:
- Put a stitch marker in the first true stitch of the row while learning.
- Remember that chain 1 is not a stitch.
- Never skip the final double crochet at the far edge.
Straight edges become much easier once you can visually recognize the first and last true stitches.
How to avoid curling
A small amount of curling in the first few rows is usually not a disaster.
Severe curling may indicate:
- A foundation chain that is too tight.
- Tension that is much tighter in one stitch than the other.
- Accidental stitch-count changes.
Possible fixes:
- Remake the foundation chain more loosely.
- Use a 6 mm hook for the foundation chain only, then switch to 5.5 mm.
- Relax your yarn tension.
- Count every row until the edges stabilize.
How to choose yarn colors
The original color arrangement in this tutorial is symmetrical:
- Dusty teal.
- Cream.
- Peach.
- Cream.
- Sage.
- Cream.
- Mustard.
- Cream.
- Dusty teal.
The repeated cream sections create separation between the accent colors, while using dusty teal at both ends visually frames the design.
For a quieter blanket, use only two colors.
For a solid-color version, ignore all color-change instructions and work all 108 rows in one yarn.
Step-by-Step Crochet Tutorial
Step 1: Make the Foundation Chain
With Color A — dusty teal:
Ch 105.
Do not count the loop currently sitting on your hook as a chain.
Lay the chain gently on a flat surface.
It should look relaxed rather than tightly twisted.
You do not need to force it perfectly straight.
Before continuing, count your chains one more time.
Beginner tip:
Place stitch markers after every 20 chains while counting a long foundation. Remove them when you begin Row 1.
Common mistake to avoid:
Pulling every chain extremely tightly.
A tight foundation can make Row 1 unnecessarily difficult and may pull the lower edge of the blanket inward.

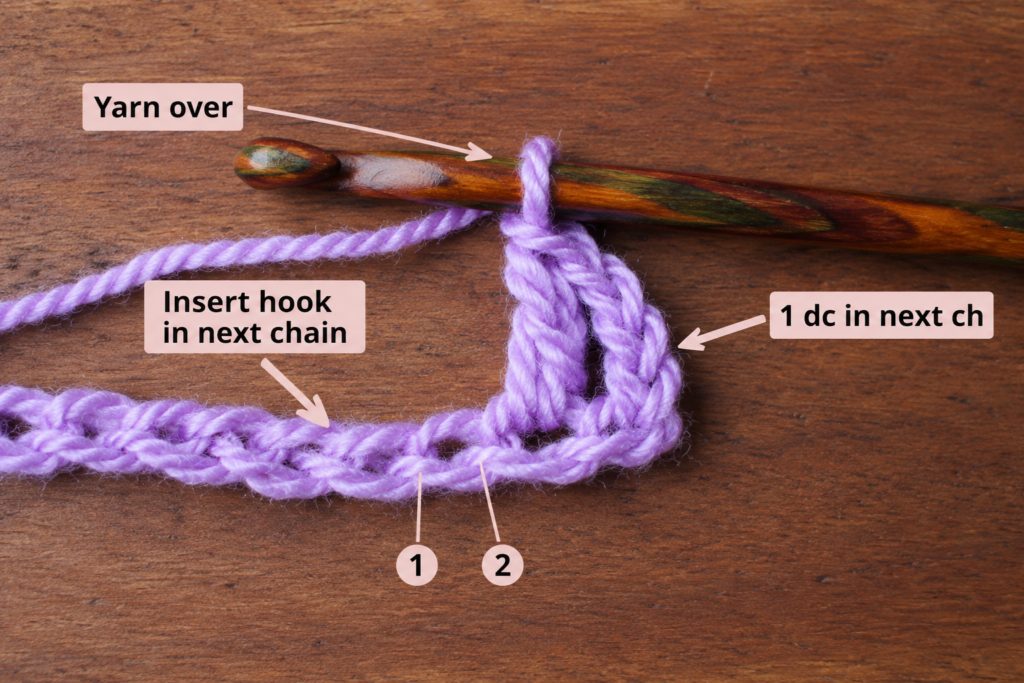
Step 2: Begin Row 1 with Single Crochet and Double Crochet
Starting in the second chain from the hook:
Work 1 sc.
In the next chain:
Work 1 dc.
You have now completed the two-stitch sequence used throughout the entire blanket.
Continue:
*1 sc in next ch, 1 dc in next ch; rep from * across.
At the end of Row 1:
104 sts.
Your final stitch should be a double crochet.
How to make the single crochet
- Insert hook into the chain.
- Yarn over.
- Pull up one loop.
- Two loops are now on the hook.
- Yarn over.
- Pull through both loops.
How to make the double crochet
- Yarn over.
- Insert hook into the next chain.
- Yarn over.
- Pull up one loop.
- Three loops are now on the hook.
- Yarn over and pull through two loops.
- Yarn over and pull through the final two loops.
Beginner tip:
Think:
Short stitch, tall stitch. Short stitch, tall stitch.
That simple rhythm is easier to remember than repeatedly thinking about abbreviations.
Common mistake to avoid:
Accidentally working two single crochets or two double crochets next to each other.
If you lose your place, inspect the previous stitch before continuing.
Step 3: Check the End of Row 1
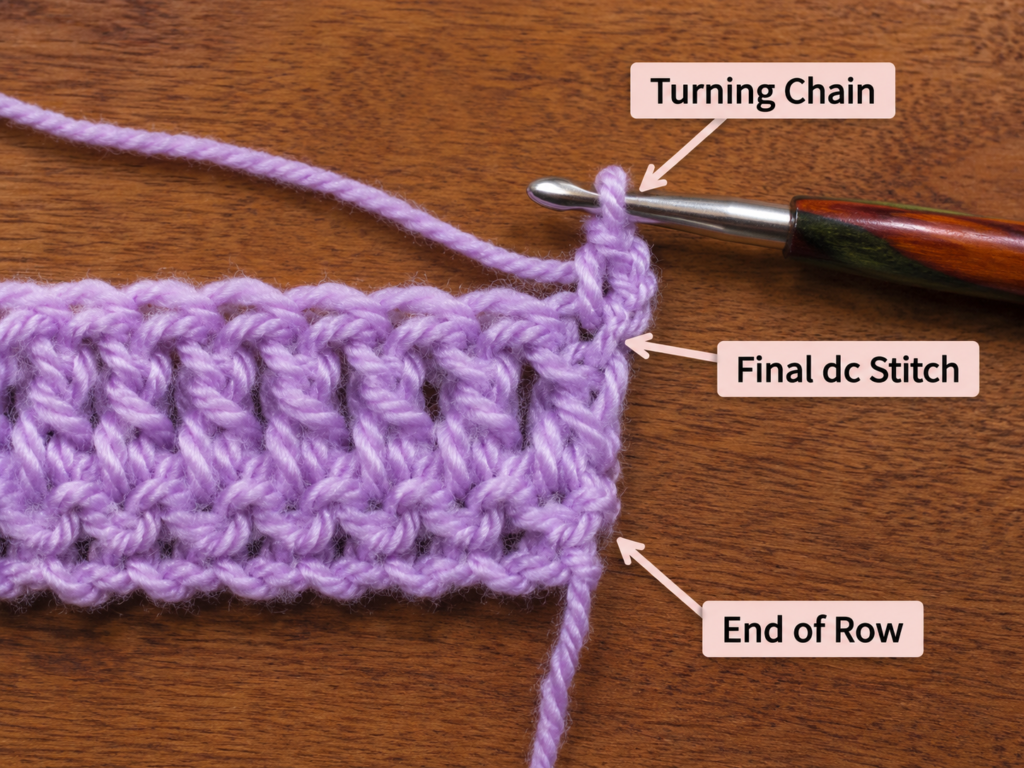
Before making the turning chain, stop.
Check three things:
1. Stitch count: 104.
2. Final stitch: double crochet.
3. The row has no large skipped spaces.
The edge may not look perfectly polished yet. That is fine.
What matters is maintaining the correct number of actual stitches.
Beginner tip:
For your first 10 rows, count every completed row.
Once you become confident that your sides remain straight, you can count less frequently.
Common mistake to avoid:
Missing the last stitch because it looks smaller than the others.
This is one of the fastest ways to make a blanket gradually narrower.
Step 4: Turn and Start Row 2 Correctly
At the end of Row 1:
Ch 1. Turn.
The chain 1 does not count as a stitch.
Now work:
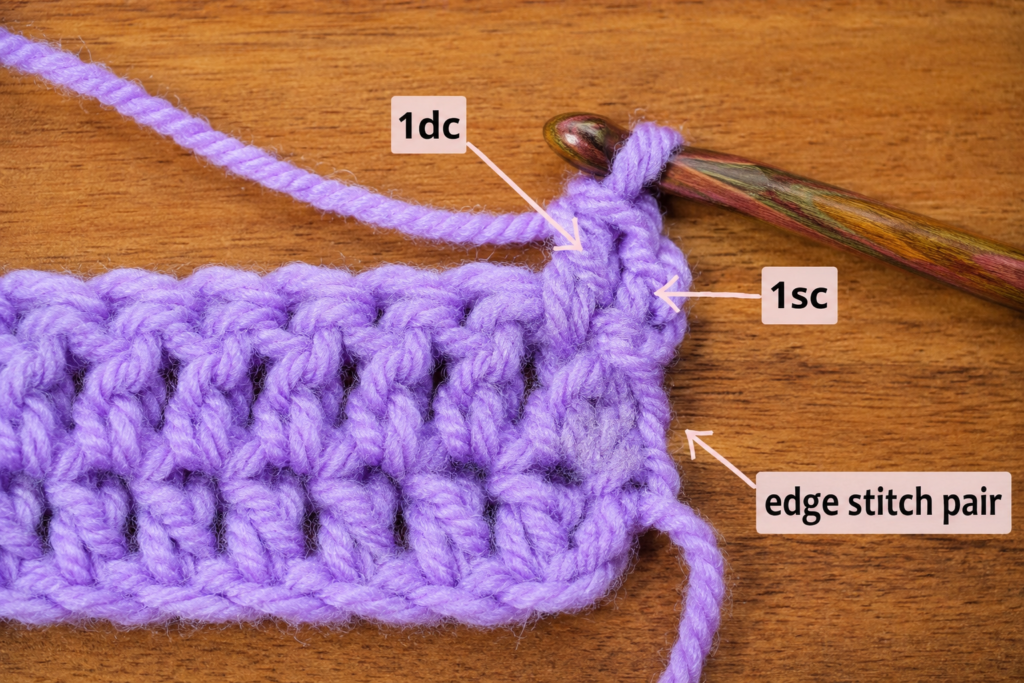
1 sc in the same stitch at the base of ch 1.
Then:
1 dc in the next stitch.
Continue across:
*1 sc in next st, 1 dc in next st; rep from * across.
You should again have:
104 sts.
And once again, the last stitch should be:
1 dc.
Why beginners lose stitches here
The first stitch can hide beside the turning chain.
When the first single crochet is accidentally skipped, the blanket loses one stitch and begins getting narrower.
A locking marker in the first true stitch can solve this problem while you are learning.
Beginner tip:
After making the first single crochet, immediately place a stitch marker in it.
At the next row, you will know exactly where the final stitch belongs.
Common mistake to avoid:
Counting chain 1 as a stitch and then skipping the stitch at its base.
In this original pattern, chain 1 is only used to gain enough height to begin the new row.

Step 5: Repeat the Main Stitch Pattern
Continue repeating Row 2.
Every row follows the same structure:
Ch 1. Turn.
1 sc in same st.
1 dc in next st.
*1 sc in next st, 1 dc in next st; rep across.
104 sts.
This alternating sequence is sometimes called lemon peel stitch. It combines two standard basic crochet stitches and creates a textured fabric through the contrast between the shorter single crochet and taller double crochet.
Your repeating checkpoint
At every row:
- First true stitch = sc.
- Last stitch = dc.
- Total = 104 sts.
Beginner tip:
Learn what the two stitches look like.
The single crochet is shorter and more compact.
The double crochet is taller and has a more visible vertical post.
Being able to recognize them makes it easier to recover when interrupted.
Common mistake to avoid:
Trying to work a single crochet into every previous single crochet and a double crochet into every previous double crochet without checking the row instructions.
For this pattern, simply follow the alternating sequence across each row from beginning to end.
Step 6: Complete the First Stripe and Change Color
Continue in dusty teal through:
Rows 1–12.
At the end of Row 12, prepare to change to warm cream.
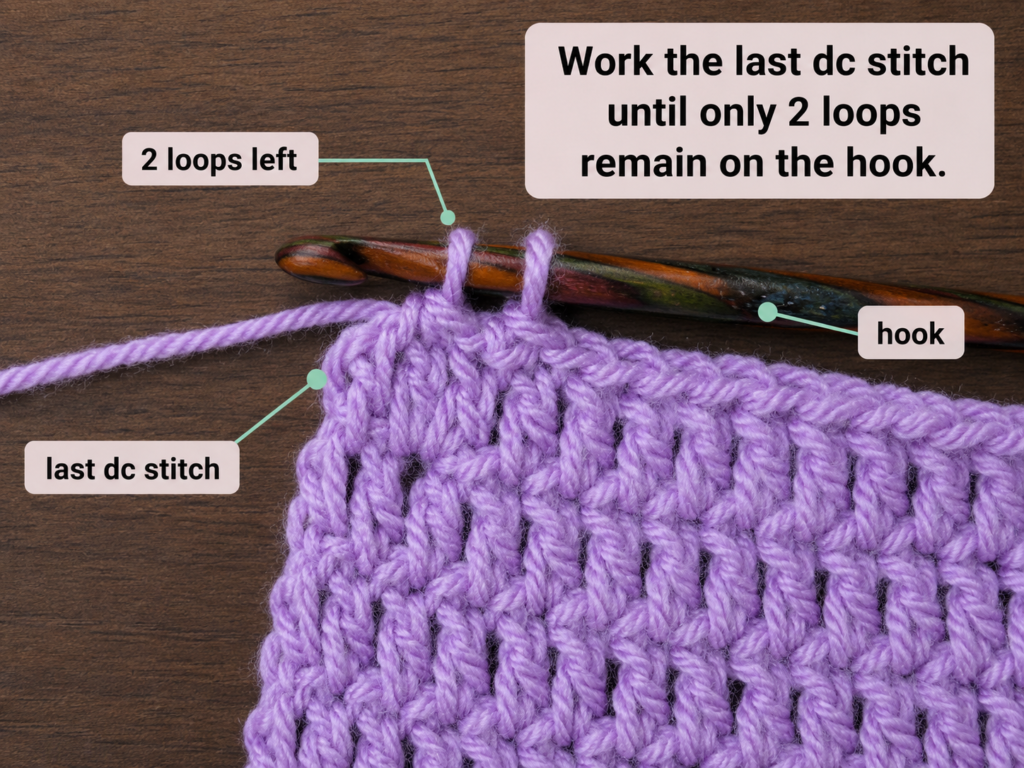
Begin the final double crochet of the row normally:
- Yarn over.
- Insert hook.
- Yarn over.
- Pull up one loop.
- Yarn over.
- Pull through two loops.
Now stop.
You should have two loops remaining on your hook.
Do not complete the final yarn-over with dusty teal.
Pick up the warm-cream yarn, leaving a tail approximately 6 inches long.
Yarn over with cream.
Pull the cream yarn through both remaining loops.
The final double crochet is complete, and your new color is now ready for the next row.
Cut the dusty-teal yarn, leaving approximately a 6-inch tail.
Beginner tip:
Make the color change in the final movement of the final stitch of the old row.
This produces a much cleaner transition than fastening off first and independently joining the next color.
Common mistake to avoid:
Completing the entire last stitch in the old color and then adding the new yarn afterward.
That can create a visible old-color bump at the beginning of the new stripe.
Step 7: Follow the Complete Stripe Sequence
Continue working the same one-row repeat while changing color every 12 rows.
Original color sequence
Rows 1–12: Color A — Dusty teal
Rows 13–24: Color B — Warm cream
Rows 25–36: Color C — Soft peach
Rows 37–48: Color B — Warm cream
Rows 49–60: Color D — Muted sage green
Rows 61–72: Color B — Warm cream
Rows 73–84: Color E — Gentle mustard yellow
Rows 85–96: Color B — Warm cream
Rows 97–108: Color A — Dusty teal
At the end of Row 108:
Do not immediately cut the yarn until you have checked:
- Width.
- Length.
- Stitch count.
- Straightness of both side edges.
- Overall shape.
When satisfied, fasten off.
Beginner tip:
Use a row counter, phone note, notebook, or simple tally marks.
Write:
Teal: 1 2 3 4 5 6 7 8 9 10 11 12
Cross out each row as you complete it.
Common mistake to avoid:
Counting a partially completed row as finished when you stop for the day.
Mark your row only after you have worked the final double crochet.
Step 8: Weave In the Stripe Ends
You can weave in ends as you go or wait until the body is complete.
Thread one yarn tail through a tapestry needle.
On the wrong side:
- Pass the needle through several nearby stitches of the same color.
- Change direction.
- Pass through several more stitches.
- Avoid pulling so tightly that the edge puckers.
- Trim the yarn only when it feels secure.
For a multicolor blanket, weave a colored tail through matching or similar-colored stitches whenever practical.
Avoid dragging dark yarn through a pale cream section where it may be visible from the front.
Beginner tip:
Weaving in a few ends after every finished color block prevents a large finishing session at the end.
Common mistake to avoid:
Cutting tails extremely short before weaving them in.
Leave enough yarn to thread comfortably through a tapestry needle.
Step 9: Start the Simple Cream Border
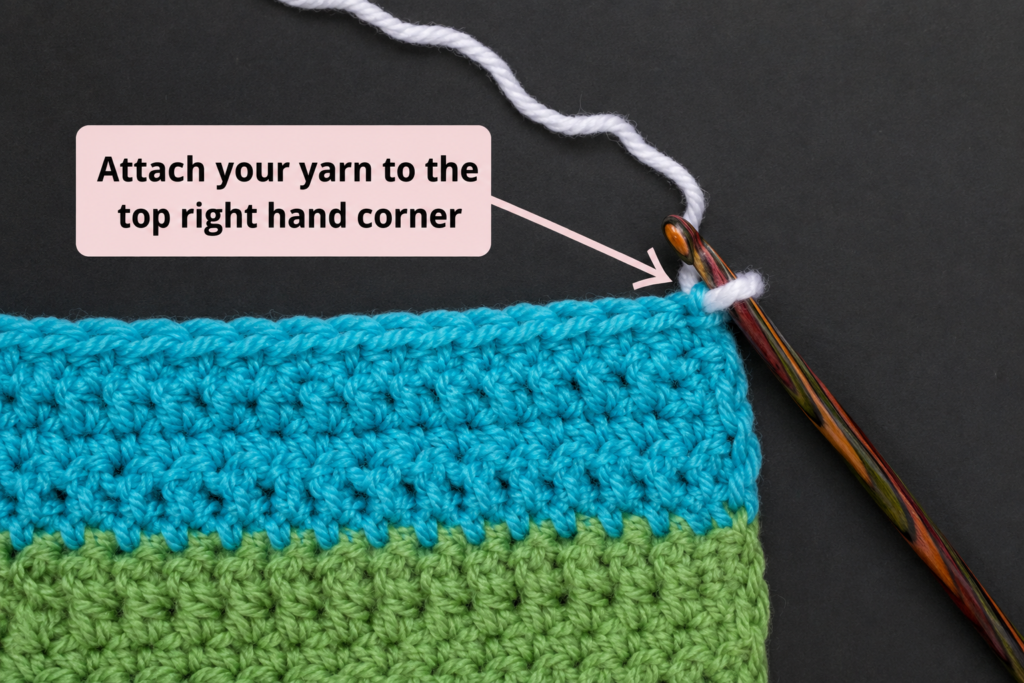
With the right side facing up, attach warm-cream yarn in the upper-right corner.
Border Round 1
Ch 1.
Work:
1 sc in every stitch across the top edge.
At the first corner:
3 sc in the corner.
Work evenly down the first side.
Because you are working into row ends rather than clearly defined top loops, the exact number of side stitches may require adjustment.
A useful starting guideline is approximately:
2 sc for every 3 row ends.
Do not force this ratio if the fabric starts to ruffle or pull inward.
At the next corner:
3 sc in the corner.
Work 1 sc in each foundation-chain position across the bottom.
Work 3 sc in the next corner.
Work evenly up the second side.
At the final corner, work 3 sc.
Join with a sl st to the first sc.
How to tell whether your side spacing is correct
Lay the blanket flat.
If the border ruffles: too many stitches were added.
If the edge pulls inward: too few stitches were added.
Adjust before continuing to Round 2.
Beginner tip:
Do not wait until the entire border is finished to check whether it lies flat.
Inspect each completed side.
Common mistake to avoid:
Packing multiple stitches into every row end simply because there appears to be available space.
The goal is a flat border, not filling every possible gap.
Step 10: Work Border Round 2
Ch 1.
Work:
1 sc in each stitch around.
When you reach the center stitch of each three-single-crochet corner:
Work 3 sc into that center corner stitch.
Continue around.
Join with a sl st to the first sc.
Fasten off.
This second round creates a simple, clean frame without adding a complicated decorative edging.
The cream border visually connects all four cream stripes and softens the stronger accent colors.
Pattern Notes or Stitch Notes
Turning-chain rule
The beginning ch 1 does not count as a stitch.
The first real stitch of each row is a single crochet made into the same stitch at the base of ch 1.
Stitch count
Every body row contains:
104 stitches.
Every row begins with:
sc
Every row ends with:
dc
Main repeat
*1 sc in next st, 1 dc in next st; rep across.
Row notes
The body is worked back and forth in rows.
Turn after every body row.
The border is worked in joined rounds around the completed blanket.
Right side and wrong side
Because the body is turned after each row, the texture looks attractive from both directions.
Choose the surface you prefer as the right side before adding the border.
Keep the right side facing up when attaching the border yarn.
Size adjustment notes
To change the width, use an odd-number starting chain.
The pattern requires an even number of working stitches because the two-stitch repeat is:
sc, dc.
Since the first stitch is made in the second chain from the hook, an odd starting chain produces an even working-stitch count.
Examples:
- Ch 81 → 80 working stitches.
- Ch 91 → 90 working stitches.
- Ch 105 → 104 working stitches.
- Ch 121 → 120 working stitches.
For a custom width:
- Make an odd-number foundation chain.
- Crochet a small number of rows.
- Measure the relaxed fabric.
- Continue until the blanket reaches your preferred length.
Remember that changing the dimensions changes yarn requirements.
Common Beginner Mistakes
1. The blanket gets narrower
Likely cause: Skipping the first or last true stitch.
Fix: Mark the first stitch of each row and remember that the last stitch should always be a double crochet.
2. The blanket gets wider
Likely cause: Working into the chain 1 as though it were an extra stitch.
Fix: The turning chain does not count. Maintain 104 actual stitches.
3. A row ends with single crochet instead of double crochet
Likely cause: One stitch was added, skipped, or duplicated somewhere.
Fix: Stop before turning. Count the entire row and correct the error.
4. The foundation edge is much tighter than the rest
Likely cause: Tight foundation chains.
Fix: Chain more loosely or temporarily use a slightly larger hook for the foundation only.
5. The stripe transition has an obvious bump of the old color
Likely cause: The final stitch was completely finished with the old yarn.
Fix: Introduce the new color when two loops remain on the hook during the last double crochet.
6. The side border ruffles
Likely cause: Too many single crochet stitches were worked into the row ends.
Fix: Remove the affected section and use fewer stitches.
7. The side border pulls inward
Likely cause: Too few stitches along the side.
Fix: Add slightly more stitches while keeping the spacing consistent.
8. The yarn tails show through the cream stripes
Likely cause: Dark tails were woven behind a much lighter color.
Fix: Weave each tail within the nearest matching-color section whenever possible.
How to Customize This Crochet Project
Change the yarn
Suitable possibilities include:
- Soft acrylic.
- Cotton blends.
- Washable wool blends where appropriate.
- Other baby-focused yarns suitable for the intended recipient and climate.
Changing yarn thickness may substantially change dimensions and fabric weight, so make a swatch first.
The Craft Yarn Council’s standardized yarn-weight system can help you identify broad weight categories when substituting yarn.
Make a solid-color blanket
Use one yarn for all 108 rows.
The texture remains visible because it comes from the alternating stitch heights rather than from color changes.
A solid blanket also means fewer ends to weave in.
Try three colors
A simple option:
- Rows 1–36: Sage.
- Rows 37–72: Cream.
- Rows 73–108: Sage.
Or:
- 12 rows peach.
- 12 rows cream.
- Repeat.
Make wider stripes
Instead of changing every 12 rows, try:
- 18-row blocks.
- 24-row blocks.
- Two large color sections.
- One narrow accent stripe in the middle.
Keep notes so both halves remain balanced when making a symmetrical design.
Change the border
Possible beginner-friendly options include:
- One single crochet round.
- Two single crochet rounds.
- A contrasting-color final round.
- Reverse single crochet after mastering the basic version.
- A small picot border for a more decorative look.
For your first blanket, a simple border is usually easier to keep flat.
Make a stroller-size version
Reduce the starting chain while keeping it odd.
Work until the blanket reaches the preferred length.
Measure the intended stroller or use case rather than relying only on a generic size name.
Make a larger toddler blanket
Increase the starting chain while keeping it odd.
Continue the row repeat until you reach the desired length.
Buy additional yarn before starting because dye lots can sometimes vary between production batches.
Gift ideas and use cases
A handmade crochet baby blanket can be used as:
- A baby-shower gift.
- A supervised tummy-time mat.
- A stroller blanket when appropriate.
- A nursery accent.
- A photography prop under adult supervision.
- A keepsake gift.
Important baby sleep safety note
The American Academy of Pediatrics advises keeping loose blankets and other soft bedding out of an infant’s sleep area because of suffocation, entrapment, and strangulation risks. A handmade baby blanket should therefore not be placed loose in a crib or bassinet for infant sleep. Follow current safe-sleep guidance from pediatric authorities and use the blanket only in age-appropriate, supervised contexts.
Finishing Instructions
Fastening off
After the final border stitch:
- Join with a slip stitch.
- Cut the yarn, leaving approximately 6 inches.
- Pull the tail completely through the active loop.
- Tighten gently.
Weaving in the final ends
Thread each tail through a blunt tapestry needle.
Work through several nearby stitches on the wrong side.
Change direction at least once.
Avoid pulling tightly enough to distort the fabric.
Trim the remaining tail close to the crochet surface once secure.
Blocking
Heavy blocking is usually unnecessary for a straightforward baby blanket, but gentle shaping can improve the final presentation.
Lay the blanket flat.
Smooth the corners and edges.
Check that:
- The rectangle is reasonably square.
- The border lies flat.
- No corner twists.
- No side is visibly stretched.
Use only a blocking method suitable for your yarn fiber.
Never apply excessive heat to synthetic yarn.
Washing and care
Follow the washing instructions printed on the exact yarn label.
Before gifting the blanket, consider including care information for the recipient.
Inspect the finished piece occasionally for:
- Loose yarn tails.
- Damaged stitches.
- Snags.
- Excessive stretching.
Repair loose areas before continued use.
Quick Printable-Style Summary
Project: Easy Color-Block Crochet Baby Blanket
Skill level: Beginner / Easy
Finished size: Approximately 30.5 × 36.5 inches
Yarn: #4 worsted-weight yarn
Approximate yardage: 1,100–1,300 yards total
Hook: 5.5 mm / I-9
Stitches: Ch, sc, dc, sl st
Gauge: Approximately 14 sts × 12 rows = 4 inches in pattern
Starting method
With dusty teal:
Ch 105.
Row 1
Sc in second ch from hook.
Dc in next ch.
*Sc in next ch, dc in next ch; rep across.
104 sts.
Main repeat
Ch 1. Turn.
Sc in same st at base of ch 1.
Dc in next st.
*Sc in next st, dc in next st; rep across.
104 sts.
Color sequence
Rows 1–12: Dusty teal
Rows 13–24: Warm cream
Rows 25–36: Soft peach
Rows 37–48: Warm cream
Rows 49–60: Muted sage
Rows 61–72: Warm cream
Rows 73–84: Gentle mustard
Rows 85–96: Warm cream
Rows 97–108: Dusty teal
Border
Round 1: Sc evenly around, working 3 sc in every corner.
Round 2: Sc in every stitch, working 3 sc in each center corner stitch.
Finishing
Fasten off.
Weave in all tails.
Gently shape or block if necessary.
Follow yarn-label care instructions.
FAQ
Is this crochet baby blanket pattern suitable for absolute beginners?
Yes, provided you are comfortable learning the chain, single crochet, and double crochet. The entire body uses one repeating sequence of alternating single and double crochet stitches.
Making a small practice swatch before beginning the full blanket is strongly recommended.
What is the easiest crochet stitch for a beginner baby blanket?
There is no single universal answer, but simple stitches and short repeats are usually easier to memorize. This pattern alternates single crochet and double crochet, both of which are standard fundamental stitches. The Craft Yarn Council includes both among standard crochet abbreviations and basic crochet instruction resources.
Can I make this baby blanket in one color?
Yes.
Use one yarn for all 108 rows, then add the border in the same color or a contrast color.
No other pattern changes are required.
Why does my crochet blanket keep getting narrower?
The most likely cause is accidentally skipping the first or last true stitch.
Remember:
- Chain 1 does not count.
- Work the first sc into the same stitch at the base of chain 1.
- The final true stitch should be a dc.
- Maintain 104 stitches per row.
Use locking stitch markers until you can easily recognize the edges.
Can I make the baby blanket bigger?
Yes.
Use any odd-number foundation chain.
Then repeat the main row until the desired length is reached.
Remember that a larger blanket requires more yarn.
What yarn is best for a beginner crochet baby blanket?
Look for a yarn that:
- Feels pleasant for the intended use.
- Has visible stitch definition.
- Is easy for you to handle.
- Meets your preferred care requirements.
- Is available in enough yardage for the complete project.
A smooth worsted-weight yarn is generally easier for beginners to see than highly fuzzy novelty yarn.
Can a baby sleep with this crochet blanket in the crib?
Current American Academy of Pediatrics guidance says loose blankets and other soft bedding should be kept out of an infant’s sleep space. Do not place a loose handmade blanket in a crib or bassinet for infant sleep; follow current pediatric safe-sleep recommendations.
Conclusion
A first crochet baby blanket does not need a complicated stitch pattern to feel special.
This design is intentionally based on one repeat:
Single crochet. Double crochet. Repeat.
Once you understand where the first stitch belongs, how to recognize the end of the row, and how to maintain 104 stitches, the body becomes a relaxing repetition rather than a complicated pattern to decode.
Take your time with the foundation chain.
Count the early rows.
Mark your first stitch when necessary.
Check that every row ends with a double crochet.
Change colors only during the final movement of the previous row’s last stitch.
Then finish everything with two simple rounds of cream single crochet.
The result is a practical handmade blanket with visible texture, modern symmetrical stripes, and enough repetition to help a beginner become genuinely more confident with basic crochet.





