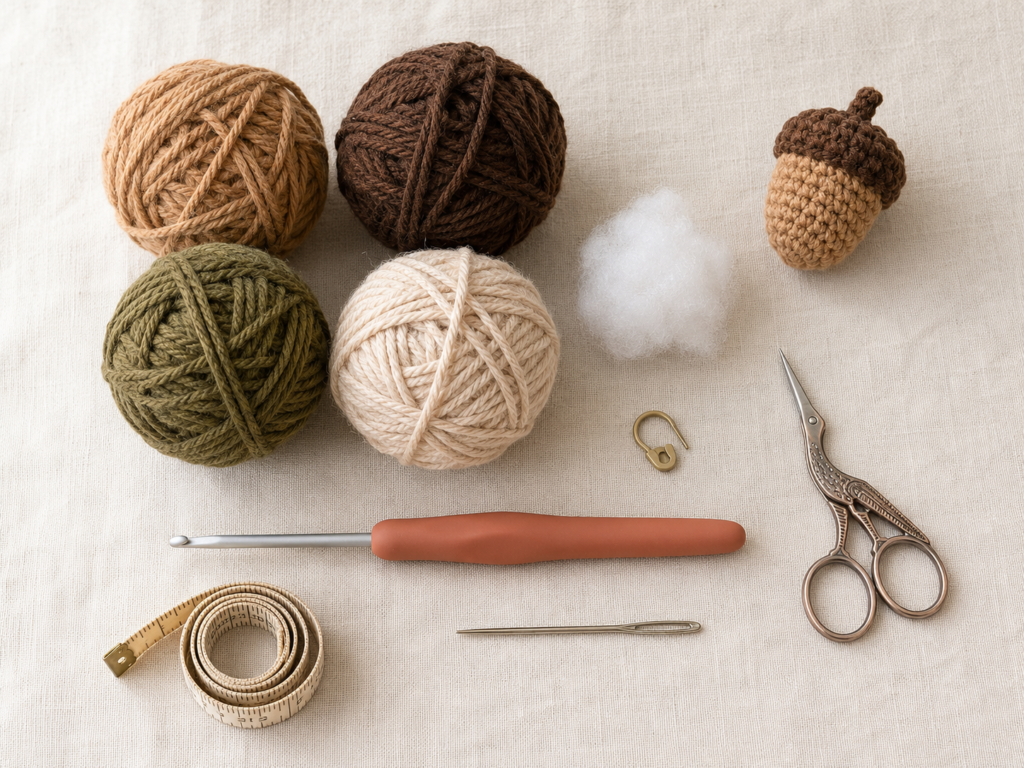
A tiny crochet acorn is one of those projects that feels satisfying almost immediately. You can make one in an evening, use leftover yarn from another project, and practice several important amigurumi techniques without committing to a large stuffed animal with twenty separate pieces to sew together.
This beginner-friendly crochet acorn pattern is worked almost entirely in one piece. You will begin at the pointed bottom with a magic ring, increase to create the rounded body, work several even rounds, taper the upper section slightly, change to a dark contrasting color, add a simple ridged cap, stuff the acorn, close the top, and finish with a tiny crocheted stem.
The result is a compact stuffed acorn approximately 3.5 inches tall, including the stem, when made with worsted-weight yarn and a 3.5 mm hook.
This is an excellent practice project for anyone who wants to improve at:
- Magic rings.
- Crocheting in continuous spirals.
- Reading stitch counts.
- Using a stitch marker.
- Increasing.
- Invisible decreasing.
- Working in back loops and front loops.
- Changing yarn colors.
- Stuffing small amigurumi shapes.
- Closing a final opening neatly.
The original tutorial below uses U.S. crochet terminology. The Craft Yarn Council’s abbreviation standards define the common terms used here, including sc for single crochet, sl st for slip stitch, inc for increase, dec for decrease, BLO for back loop only, FLO for front loop only, and rnd for round.
What You’ll Learn
By the time your acorn is finished, you will know how to:
- Start a three-dimensional crochet project with a magic ring.
- Crochet tight single crochet stitches suitable for stuffing.
- Increase from 6 to 12, 18, and 24 stitches.
- Maintain a fixed stitch count through straight body rounds.
- Create a smooth invisible decrease.
- Change from the body color to the cap color.
- Use BLO and FLO rounds to add simple texture.
- Stuff an amigurumi evenly without stretching the fabric.
- Close a six-stitch opening with a tapestry needle.
- Crochet and attach a simple stem.
- Customize an acorn for garlands, ornaments, keychains, wreaths, or autumn décor.
Materials You’ll Need
For one medium crochet acorn:
- Approximately 20–25 yards of worsted-weight yarn in caramel beige for the body.
- Approximately 10–15 yards of worsted-weight yarn in deep chestnut brown for the cap.
- A small amount of golden-tan or dark brown yarn for the stem.
- 3.5 mm / E-4 crochet hook.
- Small amount of polyester fiberfill.
- Locking stitch marker.
- Blunt tapestry needle.
- Small embroidery scissors.
- Optional measuring tape.
Worsted-weight yarn belongs to the medium category in the Craft Yarn Council’s standard yarn-weight system, although exact thickness can vary by manufacturer and yarn construction. The Council also notes that recommended hook and gauge ranges are guidelines rather than absolute rules.
For amigurumi, this tutorial deliberately uses a relatively small 3.5 mm hook with worsted yarn so the fabric remains dense enough to help conceal stuffing.
Finished Size
Using worsted-weight yarn and a 3.5 mm hook, the finished acorn should measure approximately:
3–3.5 inches / 7.5–9 cm tall, including the stem.
Approximately 2–2.25 inches / 5–5.7 cm at its widest point.
The exact result depends on your yarn, hook, tension, and stuffing.
Gauge and Tension
Exact gauge is not essential for this small decorative project.
What matters more is creating a fabric with:
- No large gaps between stitches.
- No visible stuffing.
- Enough flexibility to insert a hook comfortably.
- Consistent stitch size.
- A body that holds its shape without becoming rigid.
If stuffing is visible through the stitches, try:
- Reducing the hook size by 0.5 mm.
- Crocheting with slightly firmer tension.
- Adding less stuffing rather than stretching the fabric.
Do not pull every stitch as tightly as possible. Excessive tension makes decreases difficult and can cause wrist or hand discomfort.
Crochet Abbreviations Used
This tutorial uses U.S. crochet terminology:
- ch = chain.
- sc = single crochet.
- sl st = slip stitch.
- st/sts = stitch/stitches.
- rnd/rnds = round/rounds.
- inc = single crochet increase: work 2 sc in the same stitch.
- inv dec = invisible single crochet decrease.
- BLO = back loop only.
- FLO = front loop only.
- rep = repeat.
- RS = right side.
- WS = wrong side.
The standardized U.S./U.K. terminology differs significantly in some stitches; notably, a U.S. single crochet corresponds to a U.K. double crochet.
Before You Start
Use a stitch marker
The acorn body is worked in continuous rounds. You do not join each round with a slip stitch.
Place a locking marker in the first stitch of every round and move it upward as you work.
Without a marker, it is very easy to crochet one extra stitch or stop one stitch too early.
Count at the end of every increase and decrease round
The most important counts are:
- 6 stitches.
- 12 stitches.
- 18 stitches.
- 24 stitches.
- 18 stitches.
- 12 stitches.
- 6 stitches.
A small mistake early in an amigurumi project can change the shape dramatically.
Understand the right and wrong sides
The smooth outer surface is the right side.
The surface where yarn tails and bumps are more visible is the wrong side, which remains inside the finished acorn.
If your work begins curling with the wrong side outward, simply push the center gently so the right side faces outside.
How to avoid stuffing showing through
The most common causes of visible fiberfill are:
- Hook too large.
- Tension too loose.
- Excessive stuffing.
- Stretching the final piece aggressively.
Add stuffing in small wisps rather than one large ball.
Choosing colors
For a realistic acorn:
- Body: caramel, tan, oatmeal, warm beige.
- Cap: dark brown, chestnut, taupe.
- Stem: golden brown or dark brown.
For modern fall décor, try:
- Rust body + oatmeal cap.
- Mustard body + olive cap.
- Cream body + sage cap.
- Terracotta body + mocha cap.
- Dusty blue body + deep brown cap.
The visual consistency of the generated tutorial photography will use warm caramel beige for the body, deep chestnut for the cap, and golden tan for the stem.
Step-by-Step Crochet Tutorial
Step 1: Make the Magic Ring and Begin the Pointed Base
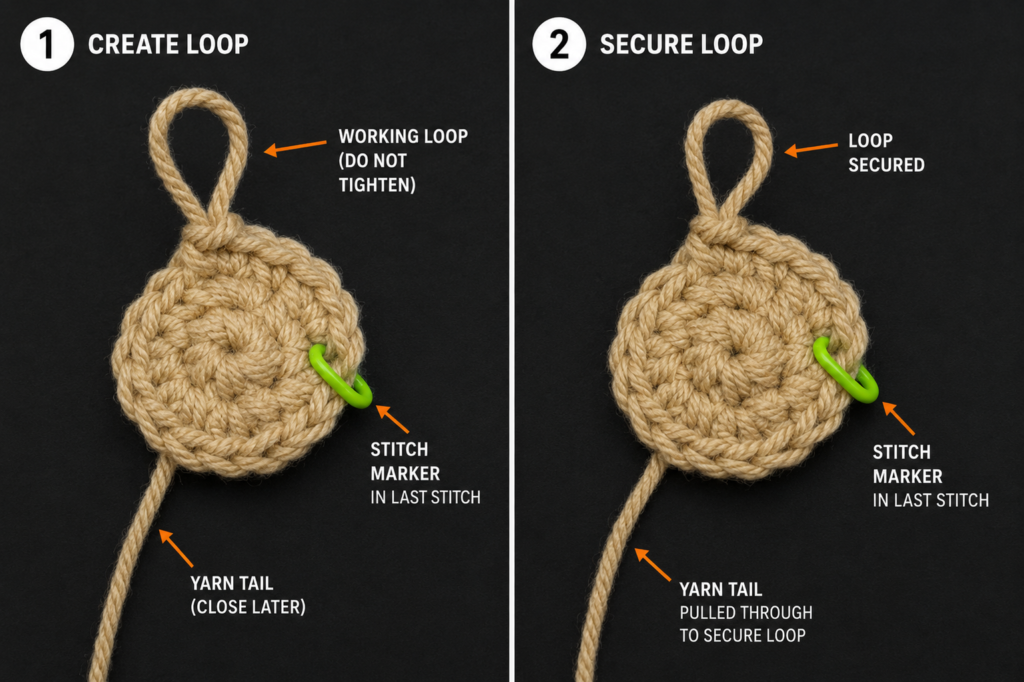
With caramel beige yarn, make a magic ring.
Round 1
Work:
6 sc into the magic ring.
Do not join.
Pull the starting tail carefully until the center closes.
Stitch count: 6
Place a stitch marker in the first single crochet.
Round 2
Work:
Inc in each stitch around.
This means making 2 single crochet stitches in every stitch from Round 1.
Stitch count: 12
The beginning will still look quite small. That is correct.
Beginner tip:
After completing Round 1, pull the magic-ring tail firmly enough to close the hole, but do not yank so hard that the yarn breaks.
Common mistake to avoid:
Crocheting into the same stitch repeatedly without moving around the round.
After every increase, move to the next actual stitch from the previous round.
Step 2: Increase to the Full Width of the Acorn
Continue with caramel beige.
Round 3
Work:
*Sc in next st, inc in next st; rep from * around.
Stitch count: 18
Round 4
Work:
*Sc in next 2 sts, inc in next st; rep from * around.
Stitch count: 24
Lay the work briefly on the table.
It may look like a shallow cup rather than a perfectly flat circle. That is acceptable because this is a three-dimensional project.
Beginner tip:
Count the stitches before moving on. You need exactly 24.
A helpful counting method is to identify six groups of four stitches.
Common mistake to avoid:
Adding increases randomly because the fabric looks slightly curved.
Follow the mathematical increase pattern and trust the stitch count. A gentle curve is expected.
Step 3: Build the Smooth Acorn Body
Now stop increasing.
Rounds 5–9
Work:
Sc in each of the 24 stitches around.
Stitch count after every round: 24
After two or three rounds, the work will stop looking flat and begin growing into a small cup.
After Round 9, the sides should be clearly established.
Do not stuff yet. The open top is still large and easy to work through.
Beginner tip:
At the end of each round, look at the stitch marker before continuing.
The next stitch immediately after your final stitch should be the marked first stitch of the new round.
Common mistake to avoid:
Accidentally working two stitches into one stitch near the marker.
This often happens when the transition between continuous rounds is difficult to see. Count regularly.
Step 4: Taper the Upper Body with Invisible Decreases
The natural acorn shape should be full through the lower body and slightly narrower beneath the cap.
Round 10
Work:
*Sc in next 2 sts, inv dec over next 2 sts; rep from * around.
Stitch count: 18
How to make the invisible decrease
- Insert the hook under the front loop only of the next stitch.
- Without yarning over, insert the hook under the front loop of the following stitch.
- You now have three loops on the hook.
- Yarn over.
- Pull through the first two loops.
- Yarn over again.
- Pull through the remaining two loops.
This creates one stitch from two previous stitches.
Round 11
Work:
Sc in each of the 18 stitches around.
Stitch count: 18
The top of the caramel body should now be noticeably narrower but still open enough for stuffing later.
Beginner tip:
Invisible decreases are easier when the stitches are not excessively tight. Use the pointed tip of your hook to locate each front loop.
Common mistake to avoid:
Working a regular sc2tog through both loops.
A regular decrease works, but it is often more visible on the outer surface. For the smoothest amigurumi finish, use the front loops.
Step 5: Change to Chestnut Yarn for the Acorn Cap
Now change from caramel beige to deep chestnut brown.
Do not cut the caramel yarn until the color change is complete.
At the last stitch of Round 11:
- Insert your hook into the final stitch.
- Yarn over with caramel.
- Pull up a loop.
- You now have two caramel loops on the hook.
- Drop the caramel yarn.
- Yarn over with chestnut brown.
- Pull the chestnut yarn through both loops.
The last stitch is completed, but the new color is ready for the next round.
Cut the caramel yarn, leaving a 4–5 inch tail.
Push both yarn tails into the inside of the acorn.
Beginner tip:
Do not tie a large bulky knot at the color change. A secure woven tail inside the stuffed project is usually neater.
Common mistake to avoid:
Changing color after completing the whole stitch with caramel.
This causes the first chestnut stitch to appear one stitch later than intended.
Step 6: Crochet the Textured Ridged Cap
The acorn body is smooth. The cap should look different so the finished project has more visual contrast.
This original version creates texture with alternating loop-only rounds.
Round 12 — BLO ridge foundation
With chestnut yarn:
Sc BLO in each of the 18 stitches around.
Stitch count: 18
Working through only the back loops leaves the unused front loops visible as a horizontal ridge.
Round 13 — FLO texture
Work:
Sc FLO in each of the 18 stitches around.
Stitch count: 18
Round 14 — BLO texture
Work:
Sc BLO in each of the 18 stitches around.
Stitch count: 18
You should now see subtle raised ridges around the chestnut cap.
Round 15
Work normally through both loops:
Sc in each stitch around.
Stitch count: 18
The cap is now tall enough for the final shaping.
Beginner tip:
Before inserting the hook, look at the top of the stitch. You should see a V.
- The loop closest to you is the front loop.
- The loop farther from you is the back loop.
Common mistake to avoid:
Alternating between front and back loops accidentally within the same round.
Choose the correct loop at the start and check every few stitches.
Step 7: Stuff the Acorn Evenly
Now stop crocheting briefly.
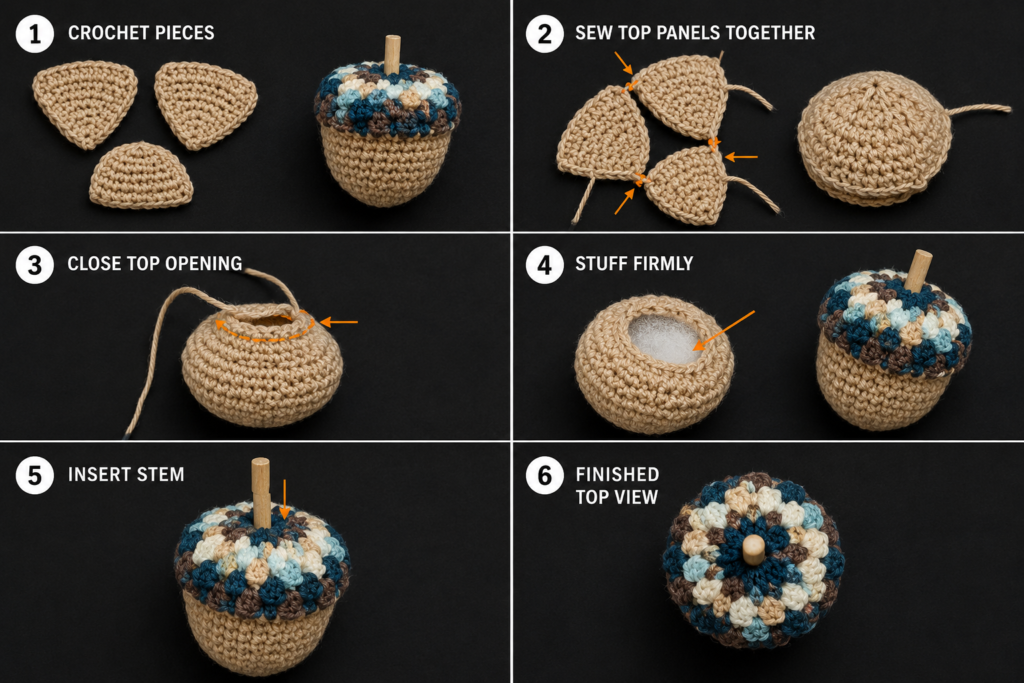
Pull off a small wisp of fiberfill.
Insert it into the pointed bottom of the acorn.
Add another small amount.
Continue gradually.
Use the blunt end of your crochet hook or the handle of a tapestry needle to guide stuffing into the narrow lower point.
The acorn should feel firm enough to retain its shape but not so hard that the stitches stretch apart.
Pay special attention to three areas:
The pointed bottom
Push a small amount of filling into the lowest point.
The widest part of the body
Add enough stuffing to create a rounded, smooth silhouette.
The upper cap
Leave a little room for additional stuffing after the next decrease round.
Beginner tip:
Turn the acorn in your hands as you stuff it.
Check every side.
If one side appears flat, add a tiny wisp of fiberfill to that specific area.
Common mistake to avoid:
Pushing one large ball of stuffing into the body.
Large clumps can create hard lumps and empty pockets.
Step 8: Decrease and Close the Top
Resume crocheting with chestnut brown.
Round 16
Work:
*Sc in next st, inv dec over next 2 sts; rep from * around.
Stitch count: 12
Pause and inspect the stuffing.
Add a final small amount if necessary.
Round 17
Work:
Inv dec around.
Stitch count: 6
Cut the chestnut yarn, leaving approximately an 8-inch tail.
Pull the yarn completely through the active loop.
Thread the tail onto a blunt tapestry needle.
Pass the needle through the front loop only of each of the six remaining stitches.
Pull gently.
The hole should close like a small drawstring.
Insert the needle through the center of the closed hole and bring it out through the side of the cap.
Pull lightly to hide the tail.
Trim close to the surface.
The yarn end should disappear back into the stuffing.
Beginner tip:
Before closing the final six stitches, check the shape one last time. Adding more stuffing afterward will be difficult.
Common mistake to avoid:
Sewing randomly back and forth across the final hole.
Passing through the front loops in order creates a cleaner, more controlled closure.
Step 9: Crochet the Tiny Stem
With golden-tan yarn:
Ch 6.
Beginning in the second chain from the hook:
Sl st in each of the next 5 chains.
Fasten off, leaving a 6-inch tail for sewing.
The result should be a narrow, slightly flexible crocheted stem.
Position one end directly over the closed center of the cap.
Thread the sewing tail onto a tapestry needle.
Pass through the lower end of the stem and through several strong stitches at the center of the cap.
Repeat two or three times until secure.
Bring the tail through the body and out at another point.
Pull gently and trim.
The yarn tail should disappear inside.
Beginner tip:
Do not attach the entire stem flat against the cap. Sew only the lower end so most of the stem can stand naturally.
Common mistake to avoid:
Making the stem extremely tight and rigid.
Keep the starting chain relaxed enough to work the slip stitches comfortably.
Pattern Notes or Stitch Notes
Starting method
This acorn begins with a magic ring and six single crochets.
A magic ring allows the center to be pulled closed.
Beginners who dislike magic rings can make:
Ch 2, then work 6 sc in the second chain from the hook.
The opening may be slightly more visible.
Turning-chain rule
There are no turning chains in the body or cap because the acorn is worked in continuous rounds.
The stem is the only element worked along a foundation chain.
Stitch counts
The complete count progression is:
- Round 1: 6.
- Round 2: 12.
- Round 3: 18.
- Round 4: 24.
- Rounds 5–9: 24.
- Round 10: 18.
- Round 11: 18.
- Rounds 12–15: 18.
- Round 16: 12.
- Round 17: 6.
Repeat pattern
The increase rounds follow a simple six-section structure:
- 6 to 12: increase in every stitch.
- 12 to 18: one sc, one increase.
- 18 to 24: two sc, one increase.
The first decrease round reverses the 24-stitch increase logic:
Two sc, one invisible decrease.
Continuous rounds
Do not join with a slip stitch at the end of each round.
Move directly into the first stitch of the next round.
Move the stitch marker after beginning each new round.
Right side and wrong side
The smooth outer surface is the right side.
Yarn tails should remain inside the project whenever possible.
Size adjustments
The safest way to change the size while maintaining the original stitch counts is to change yarn weight and hook size.
Smaller mini acorn
Try:
- DK yarn.
- 2.75–3 mm hook.
Larger acorn
Try:
- Bulky yarn.
- A hook suitable for producing a dense stuffed fabric.
Remember that changing yarn weight affects finished size, yarn usage, and the amount of stuffing needed. The Craft Yarn Council’s yarn-weight system provides standard categories, while noting that hook and gauge recommendations are general guidelines.
Common Beginner Mistakes
1. Losing the beginning of the round
Problem: The stitch count changes unexpectedly.
Cause: Working in spirals without a marker.
Fix: Place a locking marker in the first stitch of every round.
Move it immediately after making the first stitch of the new round.
2. The pointed bottom is too flat
Problem: The acorn looks like an egg rather than an acorn.
Possible cause: Too much stuffing was pushed aggressively into the bottom.
Fix: Use only a small amount in the lowest point and concentrate more filling in the wider central section.
3. Fiberfill is visible through the stitches
Problem: White stuffing appears between crochet stitches.
Possible causes:
- Hook is too large.
- Tension is too loose.
- Acorn is overstuffed.
Fix: Reduce stuffing first. For the next acorn, consider using a slightly smaller hook.
4. The body becomes wider every round
Problem: Your acorn grows like a bowl.
Cause: Accidental increases.
Fix: After reaching 24 stitches, work exactly one sc in each stitch through the straight rounds.
Count frequently.
5. The invisible decreases leave large holes
Problem: The upper shaping looks loose.
Possible causes:
- The hook entered both loops rather than front loops.
- Tension relaxed excessively.
- Stuffing is pushing outward too strongly.
Fix: Work through the two front loops and reduce overstuffing.
6. The cap does not look textured
Problem: The chestnut section resembles the smooth body.
Cause: Both loops were used in all cap rounds.
Fix: Follow the loop sequence carefully:
- Round 12: BLO.
- Round 13: FLO.
- Round 14: BLO.
- Round 15: both loops.
7. The acorn is lumpy
Problem: The silhouette has hard bumps and flat areas.
Cause: Stuffing was added in large clumps.
Fix: Remove it before final closure and reinsert in small wisps.
8. The stem keeps falling over
Problem: The stem is attached too loosely.
Fix: Sew through the base of the stem and central cap stitches several times, but leave most of the stem free.
How to Customize This Crochet Project
Change the yarn fiber
Cotton
Cotton creates clear stitches and a firm, natural-looking surface.
Acrylic
Acrylic is widely available and often offers more color options.
Wool blend
A wool blend can create a soft, rustic autumn look.
Very fuzzy yarn is more difficult for beginners because it hides individual stitches.
Change the colors
Traditional woodland
- Tan body.
- Dark brown cap.
- Brown stem.
Modern neutral
- Oatmeal body.
- Taupe cap.
- Cream stem.
Autumn jewel tones
- Rust body.
- Deep olive cap.
- Mustard stem.
Soft cottage palette
- Dusty rose body.
- Sage cap.
- Oatmeal stem.
Playful colors
Make each acorn in a different combination:
- Mustard and brown.
- Teal and cream.
- Terracotta and oatmeal.
- Olive and gold.
- Burgundy and taupe.
Turn the acorns into a garland
Make 7–11 acorns.
Crochet a long chain.
Leave approximately 4–6 inches between motifs.
Sew each acorn securely to the chain through its cap.
For a richer fall garland, alternate:
- Acorn.
- Crochet leaf.
- Wooden bead.
- Acorn.
- Small pumpkin.
Keep the components securely attached, especially when displayed around children.
Make an ornament
Before closing the top, add a hanging loop.
You can use:
- Crochet chain.
- Cotton cord.
- Ribbon.
- Jute twine.
For a fully crocheted loop, attach yarn to the cap, chain 20–25, and secure the end near the starting point.
Make a keychain or bag charm
Use DK yarn for a smaller acorn.
Attach a keyring securely through several cap stitches.
A decorative item intended for a bag will experience more friction and pulling than a stationary ornament, so reinforce attachment points carefully.
Use acorns for fall table décor
Make a collection in several natural shades.
Display them in:
- A wooden bowl.
- A small basket.
- A decorative tray.
- Around an autumn candle arrangement, while keeping yarn items safely away from open flames.
- Beside crocheted pumpkins and leaves.
Add a face
For a kawaii-style acorn, embroider:
- Two eyes.
- A small smile.
- Tiny blush marks.
For children’s toys, embroidered facial features avoid detachable plastic parts.
Make a larger decorative acorn
Use bulky yarn and an appropriately sized hook that still produces dense fabric.
Keep the same stitch counts.
The result will be substantially larger without rewriting the pattern.
Change the cap texture
After mastering the basic version, experiment with:
- All BLO rounds.
- Surface slip stitches.
- Bobble stitches.
- Puff stitches.
- Contrasting stripes.
The simple alternating BLO/FLO version is recommended for beginners because it adds texture without introducing a complicated stitch.
Finishing Instructions
Fastening off
For the final top closure:
- Cut the yarn with an 8-inch tail.
- Pull it completely through the active loop.
- Thread onto a tapestry needle.
- Pass through the front loops of the six remaining stitches.
- Pull gently to close.
Weaving in ends
Most ends can be hidden inside the stuffed piece.
For an exposed tail:
- Thread it onto a tapestry needle.
- Insert through the crochet fabric.
- Bring the needle out approximately one inch away.
- Pull gently.
- Trim close to the surface.
- Massage the fabric so the cut end disappears inside.
Final shaping
Roll the finished acorn gently between your palms.
Then use your fingers to define:
- The pointed lower tip.
- The rounded central body.
- The slightly narrower upper area.
- The textured cap.
Do not pull aggressively.
Blocking
Traditional wet blocking is usually unnecessary for this small stuffed project.
Finger-shaping is normally sufficient.
The stem can be dampened lightly and positioned if it curls excessively, provided the yarn’s care instructions allow it.
Washing and care
Always check the care instructions for your actual yarn.
For a small stuffed decorative piece, gentle spot cleaning is usually the least disruptive approach.
Allow the acorn to dry completely before storage.
Avoid storing damp fiberfill, which can retain moisture.
Safety Note
For a purely decorative adult craft project, the small size is generally convenient.
For items intended for babies or young children, avoid loose detachable embellishments, beads, buttons, or poorly secured components. A small stuffed acorn can present a size-related hazard depending on its dimensions and construction, so it should not automatically be treated as an infant toy.
Quick Printable-Style Summary
Project: Easy Crochet Acorn
Tutorial type: Amigurumi / Pattern-Style Tutorial
Skill level: Beginner to Easy
Finished size: Approximately 3–3.5 inches tall.
Yarn: Worsted-weight cotton, cotton blend, or smooth acrylic.
Hook: 3.5 mm / E-4.
Other materials: Fiberfill, stitch marker, tapestry needle, scissors.
Stitches: Chain, slip stitch, single crochet, increase, invisible decrease, BLO, FLO.
Starting method: Magic ring with 6 sc.
Body
- Rnd 1: 6 sc in magic ring. (6)
- Rnd 2: Inc around. (12)
- Rnd 3: *Sc 1, inc; rep around. (18)
- Rnd 4: *Sc 2, inc; rep around. (24)
- Rnds 5–9: Sc around. (24)
- Rnd 10: *Sc 2, inv dec; rep around. (18)
- Rnd 11: Sc around. (18)
Change to chestnut brown.
Cap
- Rnd 12: Sc BLO around. (18)
- Rnd 13: Sc FLO around. (18)
- Rnd 14: Sc BLO around. (18)
- Rnd 15: Sc through both loops around. (18)
Stuff gradually.
- Rnd 16: *Sc 1, inv dec; rep around. (12)
- Rnd 17: Inv dec around. (6)
Fasten off and close the remaining six stitches.
Stem
With golden-tan yarn:
- Ch 6.
- Sl st in second ch from hook and each remaining ch.
- Fasten off with a sewing tail.
- Sew securely to the center of the cap.
Finishing
Shape gently with your fingers and hide all yarn tails securely.
FAQ
Is this crochet acorn pattern suitable for beginners?
Yes. It uses basic single crochet, standard increases, invisible decreases, a simple color change, and loop-only stitches. The most challenging parts for a complete beginner are likely to be the magic ring and invisible decrease, but both techniques are repeated in small, manageable sections.
Can I make the acorn without a magic ring?
Yes.
Ch 2 and work 6 single crochets into the second chain from the hook.
Continue with Round 2 normally.
The starting hole may be slightly more visible than with a tightly closed magic ring.
What yarn is best for a crochet acorn?
Smooth cotton, cotton-blend, or acrylic yarn is easiest for clearly seeing stitches.
Worsted-weight yarn creates a small decorative acorn with the 3.5 mm hook used here. Changing yarn thickness changes the final dimensions. The Craft Yarn Council provides standardized yarn-weight categories, while emphasizing that recommended hook sizes and gauges are guidelines.
Why can I see stuffing through my crochet stitches?
The usual reasons are:
- Hook too large.
- Loose tension.
- Excessive stuffing.
Try removing a little stuffing first.
For your next acorn, use a slightly smaller hook if necessary.
How can I make the crochet acorn larger?
The simplest method is to use thicker yarn and an appropriate hook while retaining the same stitch counts.
You can also redesign the stitch count, but increasing the number of rounds requires careful shaping to preserve the acorn proportions.
Can I make a no-sew version?
This pattern is almost entirely one piece, but the small stem is sewn to the cap.
To eliminate that seam, you could pull a new strand of yarn through the central top closure and crochet a short chain directly from the cap, then slip stitch back down the chain and secure the yarn internally.
What can I make with several crochet acorns?
Good uses include:
- Autumn garland.
- Fall wreath.
- Bowl filler.
- Table decoration.
- Hanging ornament.
- Backpack charm.
- Gift topper.
- Thanksgiving place decoration.
- Woodland nursery décor kept outside children’s reach where appropriate.
The selected research source similarly presents crochet acorns as suitable for autumn décor, garlands, wreaths, and seasonal arrangements.
Conclusion
A small crochet acorn is an ideal project when you want to practice amigurumi techniques without spending days on a complicated toy.
The entire shape develops logically:
First, six stitches form the pointed base. Increases create the rounded body. Straight rounds add height. A decrease round narrows the top. A clean yarn change introduces the darker cap. Alternating back-loop and front-loop rounds add simple texture. Then stuffing, decreases, a neat closure, and one small stem complete the project.
The first acorn may take an hour or more while you carefully count every stitch. The next one will probably feel much faster.
Make one in realistic caramel and chestnut. Then try oatmeal and sage, mustard and mocha, rust and cream, or a full basket of mixed autumn colors.
Save the tutorial for your fall crochet list, and use the same small project to practice magic rings, increases, invisible decreases, color changes, amigurumi stuffing, and finishing techniques.





