A crochet vest is one of the best first garments to make when you are ready to move beyond scarves, washcloths, and blankets.
There are no sleeves to shape. You do not have to manage several pieces at once. And with a thoughtfully designed construction, most of the garment can be made with the same simple stitch repeated row after row.
This beginner crochet vest pattern uses half double crochet for the main fabric, simple one-stitch decreases to form the V-neck, and narrow crochet edging around the waist, armholes, and neckline.
The construction is deliberately straightforward:
- Crochet one front panel.
- Divide it at the center.
- Shape the two sides of the V-neck.
- Crochet one rectangular back panel.
- Seam the shoulders.
- Seam the sides while leaving openings for the arms.
- Add the finishing edges.
There is no complicated armhole shaping in the main panels. The straight sides make the project easier to count, easier to resize, and easier to understand visually.
The pattern includes nine sizes from XS through 5XL.
The Craft Yarn Council identifies 5 mm as a U.S. H-8 crochet hook, although the hook you actually use should be the one that allows you to obtain the stated gauge.
What You’ll Learn
By completing this crochet vest, you will practice how to:
- Make and measure a garment gauge swatch.
- Choose a vest size using finished measurements.
- Crochet a long foundation chain without twisting it.
- Work even half double crochet rows.
- Count stitches accurately.
- Keep side edges straight.
- Divide one front panel into two neckline sections.
- Make
hdc2togdecreases. - Shape a simple V-neck.
- Match a rectangular back panel to the completed front.
- Block garment pieces before assembly.
- Seam crochet shoulders and sides.
- Control the size of an armhole opening.
- Add attached back-loop crochet ribbing.
- Finish a neckline without excessive puckering.
- Customize vest width, length, neckline depth, and colors.
Materials You’ll Need
For this original crochet vest pattern:
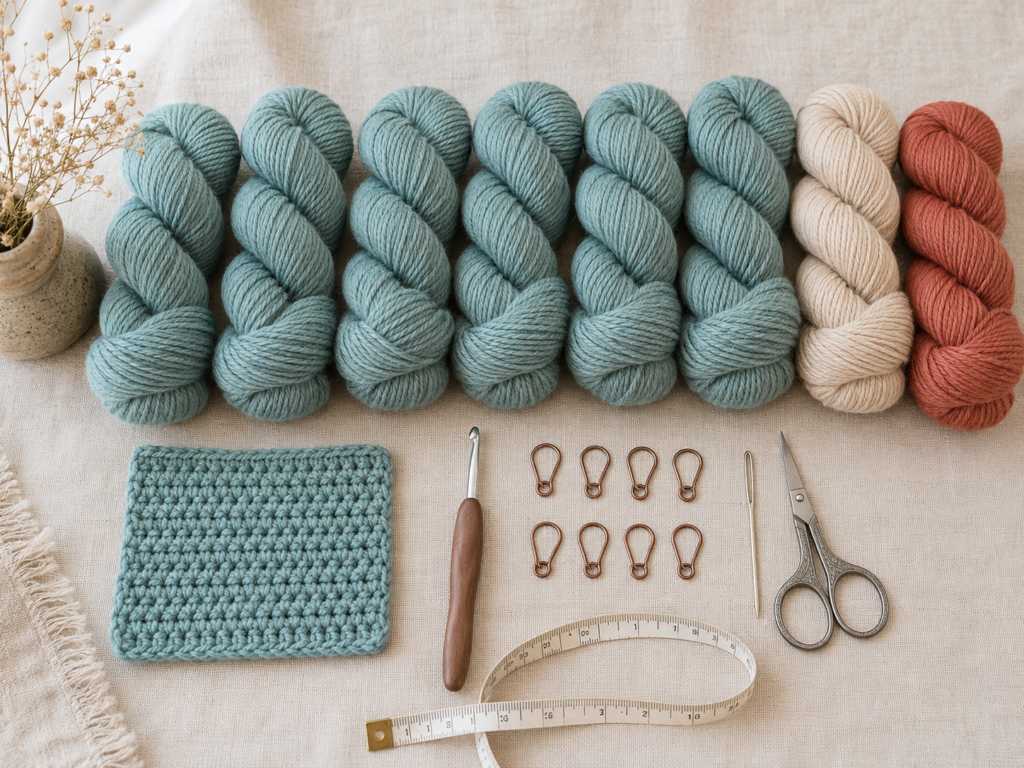
- Worsted-weight category 4 yarn.
- Approximately 650–1,600 yards depending on size, length, fiber, gauge, and modifications.
- 5 mm / H-8 crochet hook, or size required to obtain gauge.
- Scissors.
- Blunt tapestry needle.
- Flexible measuring tape.
- At least 6 locking stitch markers.
- Rustproof blocking pins.
- Blocking mats or several folded clean towels.
- Optional smaller 4.5 mm hook for firmer ribbing.
The Craft Yarn Council’s yarn-weight system classifies yarn by thickness category and provides general gauge and hook ranges, but actual garment gauge can vary with yarn construction, fiber, hook, and personal tension.
Approximate yarn amounts
| Size | Approximate yardage |
|---|---|
| XS | 650 yd |
| S | 725 yd |
| M | 825 yd |
| L | 925 yd |
| XL | 1,050 yd |
| 2XL | 1,175 yd |
| 3XL | 1,300 yd |
| 4XL | 1,450 yd |
| 5XL | 1,600 yd |
Buy extra yarn when adding significant length, changing the neckline, enlarging the armholes, or working very deep ribbing.
Finished Sizes
The vest is designed with approximately 2–4 inches of positive ease for a relaxed fit.
| Size | Recommended body bust | Approx. finished bust | Approx. finished length |
|---|---|---|---|
| XS | 30–32″ | 34.25″ | 19.5″ |
| S | 34–36″ | 37.75″ | 20.5″ |
| M | 38–40″ | 42.25″ | 21.5″ |
| L | 42–44″ | 45.75″ | 22.5″ |
| XL | 46–48″ | 50.25″ | 23.75″ |
| 2XL | 50–52″ | 53.75″ | 24.5″ |
| 3XL | 54–56″ | 58.25″ | 25.75″ |
| 4XL | 58–60″ | 61.75″ | 26.75″ |
| 5XL | 62–64″ | 66.25″ | 28″ |
Choose your size based primarily on the finished bust measurement and the amount of ease you prefer.
For a fitted vest, choose a finished measurement close to your actual bust.
For a relaxed layering vest, allow approximately 2–4 inches of extra circumference.
Gauge
14 half double crochet stitches × 11 rows = 4 inches / 10 cm after blocking.
Gauge is especially important for clothing.
For example, a small difference of only half a stitch per inch can become several inches across the full circumference of a vest.
Make a swatch larger than 4 × 4 inches so you can measure the center area without including distorted edge stitches.
How to adjust your gauge
If you have too many stitches in 4 inches, your stitches are too small. Try a larger hook.
If you have too few stitches in 4 inches, your stitches are too large. Try a smaller hook.
The Craft Yarn Council also recommends checking crochet gauge rather than assuming a hook size alone guarantees the required dimensions.
Crochet Abbreviations Used
This tutorial uses standard U.S. crochet terminology:
- ch = chain
- hdc = half double crochet
- hdc2tog = half double crochet two together
- sc = single crochet
- sl st = slip stitch
- st/sts = stitch/stitches
- rep = repeat
- BLO = back loop only
- RS = right side
- WS = wrong side
The Craft Yarn Council notes that standard abbreviation lists reflect U.S. crochet terminology.
U.S./U.K. terminology note
This article uses U.S. crochet terms.
A U.S. half double crochet is called a half treble crochet in standard U.K. terminology.
Special Stitch: Hdc2tog
A half double crochet two together decreases two stitches into one.
- Yarn over.
- Insert the hook into the next stitch.
- Yarn over and pull up a loop.
- Yarn over.
- Insert the hook into the following stitch.
- Yarn over and pull up a loop.
- Yarn over and pull through all five loops on the hook.
One stitch has been decreased.
Before You Start
Turning chain
At the beginning of each main-fabric row:
Ch 1 and turn.
The ch 1 does not count as a stitch.
Work the first hdc into the first true stitch.
How to keep the edges straight
At the end of every row:
- Count your stitches.
- Identify the final true stitch.
- Do not accidentally crochet into the turning chain.
- Place a marker in the first and final stitch when necessary.
Straight edges matter because they become your side seams.
How to avoid curling
Slight curling in a new crochet panel is normal.
Severe curling usually points to one of three problems:
- Foundation chain too tight.
- Uneven tension.
- Gauge mismatch.
A relaxed foundation chain and proper blocking usually solve mild curling.
How to choose colors
For a modern vest, try:
- Dusty teal body + oatmeal ribbing.
- Cream body + sage ribbing.
- Rust body + camel ribbing.
- Charcoal body + ivory ribbing.
- One solid color throughout.
The tutorial prompts consistently use dusty teal for the main fabric and oatmeal for edging, with a very small muted-terracotta accent.
Step-by-Step Crochet Tutorial
Step 1: Choose Your Size, Swatch, and Make the Foundation Chain
Do not skip the gauge swatch.
Crochet a square using your main yarn and 5 mm hook. Wash or block the swatch in the same way you plan to treat the finished vest.
When it is dry, measure the center.
Your goal is:
14 hdc × 11 rows = 4 inches.
Once the gauge is correct, begin the front panel.
Starting chain
Ch:
61 (67, 75, 81, 89) (95, 103, 109, 117)
for sizes:
XS (S, M, L, XL) (2XL, 3XL, 4XL, 5XL)
Row 1
Hdc in the second ch from the hook and in every remaining chain.
Your stitch count is:
60 (66, 74, 80, 88) (94, 102, 108, 116) sts
Ch 1 and turn.
Beginner tip:
Count the foundation chain twice before starting Row 1.
Correcting the chain takes a few seconds. Discovering a missing stitch after ten inches of fabric can cost hours.
Common mistake to avoid:
Do not count the active loop on your hook as a chain.
The Craft Yarn Council’s beginner pattern-reading guidance similarly distinguishes the active hook loop from completed crochet stitches when counting.
Step 2: Crochet the Lower Front Panel
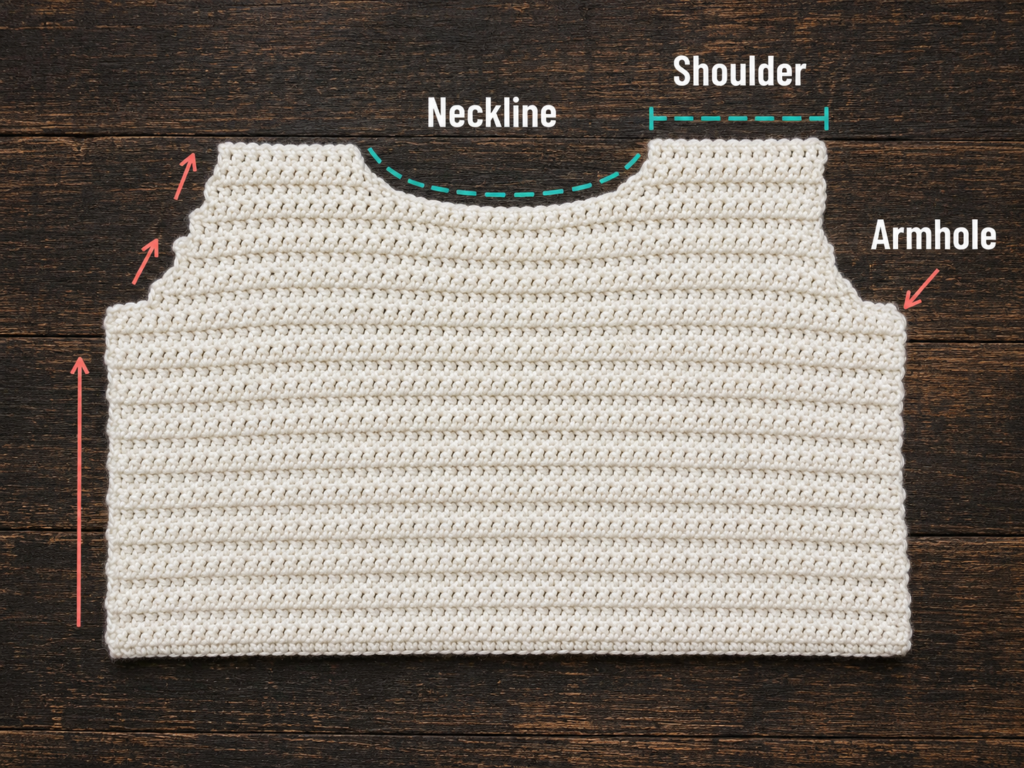
From Row 2 onward:
Ch 1, turn, hdc in every stitch across.
Maintain:
60 (66, 74, 80, 88) (94, 102, 108, 116) sts
Continue until the panel measures approximately:
13 (13.5, 14, 14.5, 15) (15.5, 16, 16.5, 17) inches
from the foundation edge.
Measure with the fabric lying naturally flat.
Do not stretch it.
This lower rectangular section covers the body from the hem to the starting point of the V-neck.
Beginner tip:
Write the stitch count for your size on a small piece of paper and keep it beside you.
After every four or five rows, count again.
Common mistake to avoid:
Do not assume that an edge that looks straight has the correct stitch count. Crochet fabric can hide one lost stitch surprisingly well.
Step 3: Divide the Front Panel for the V-Neck
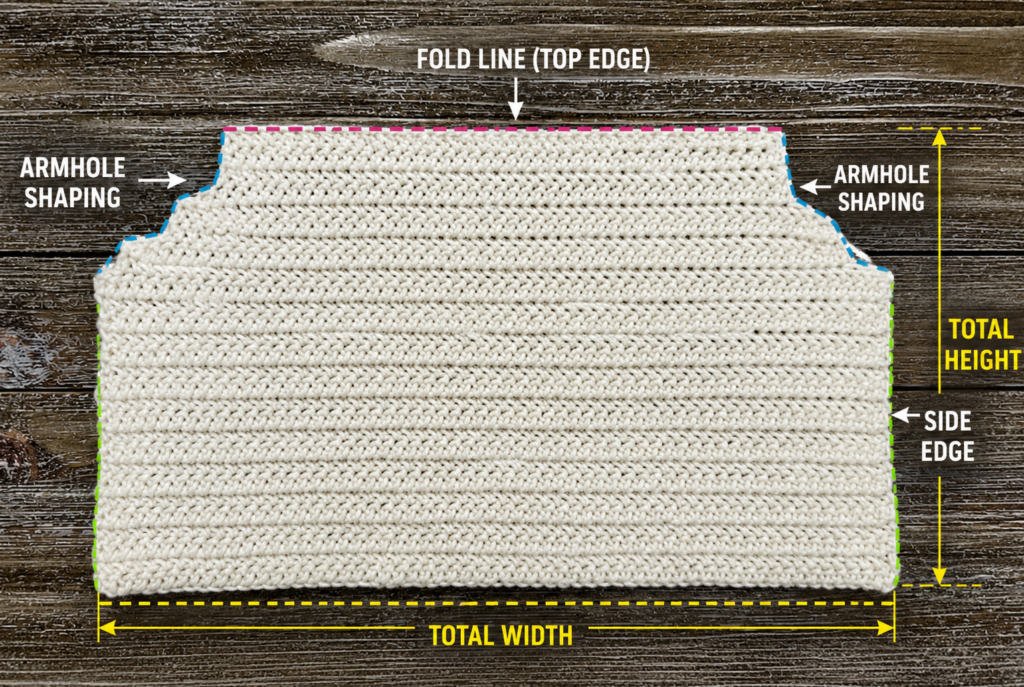
You will now work the two sides of the front separately.
The original stitch count is divided equally:
30 (33, 37, 40, 44) (47, 51, 54, 58) stitches per side
Place a marker exactly at the center division.
With the RS facing you, crochet across only the first half.
Do not work into the stitches belonging to the second half.
Turn.
The inactive half can wait on the same panel without a separate stitch holder because crochet stitches do not unravel unless the yarn itself is pulled out.
Beginner tip:
Before continuing, count the worked section and the unworked section separately.
Together, they should equal your original front-panel stitch count.
Common mistake to avoid:
Do not accidentally place one center stitch into both sections.
Each original stitch belongs to one side only.
Step 4: Shape the First Shoulder
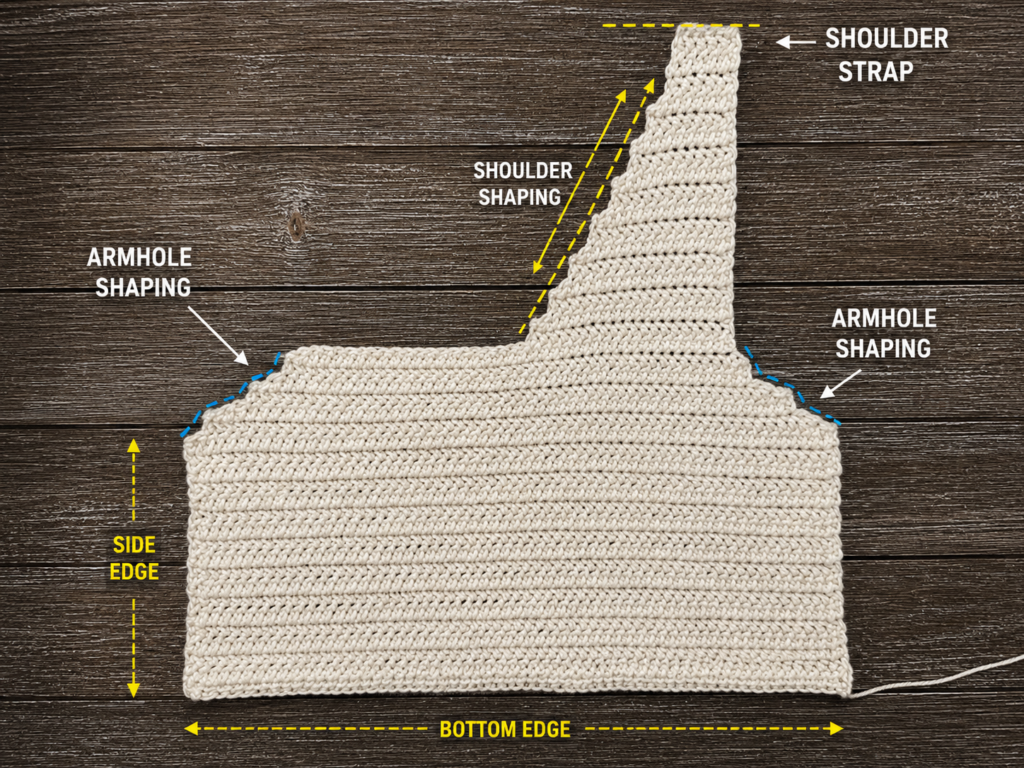
The first shoulder begins with:
30 (33, 37, 40, 44) (47, 51, 54, 58) sts
You will decrease one stitch at the neckline edge on every row.
First decrease row
You are beginning at the neckline edge.
Ch 1 and turn.
Hdc2tog over the first two stitches.
Hdc in every remaining stitch across.
One stitch has been decreased.
Next decrease row
Ch 1 and turn.
Hdc across until two stitches remain.
Hdc2tog over the final two stitches.
You have again decreased one stitch at the neckline edge.
Repeat these two decrease rows until the shoulder contains:
12 (14, 16, 18, 20) (22, 24, 26, 28) sts
Fasten off.
The number of shaping rows required is:
18 (19, 21, 22, 24) (25, 27, 28, 30)
because one stitch is removed on every row.
Beginner tip:
Mark the neckline edge with a colored stitch marker.
When you turn the work, it is easy to become disoriented and decrease at the armhole edge accidentally.
Common mistake to avoid:
Do not decrease on both edges.
Only the edge facing the center of the future V-neck should narrow.
Step 5: Shape the Second Shoulder
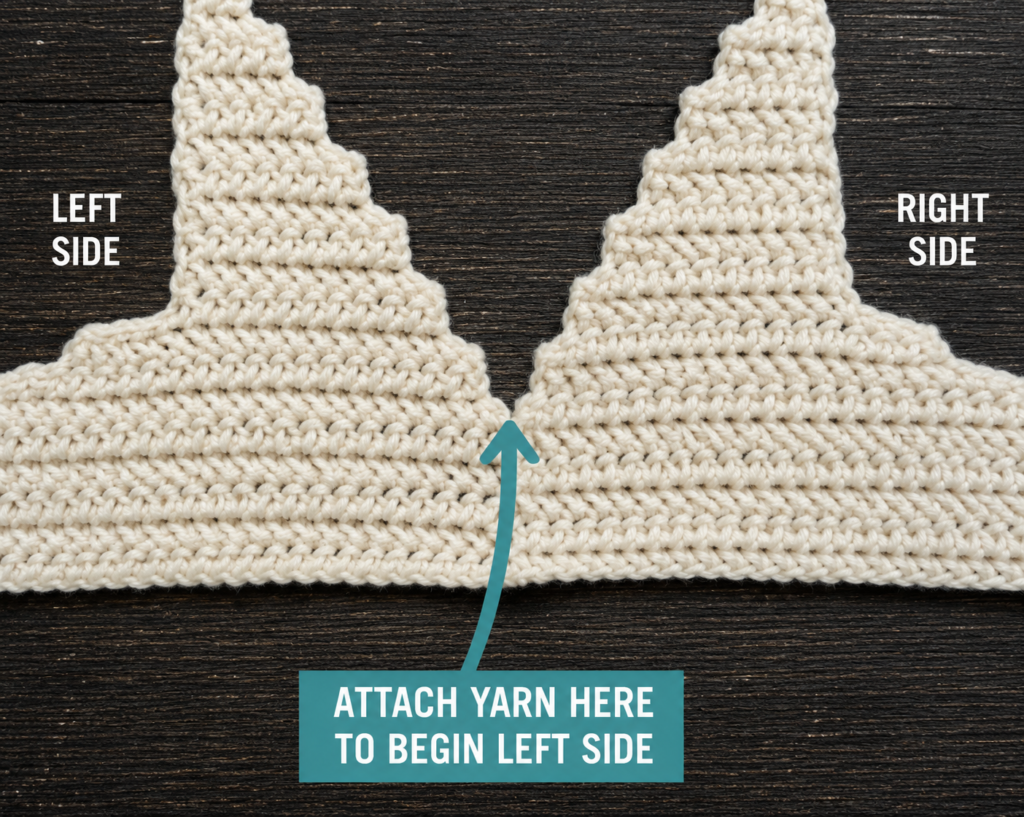
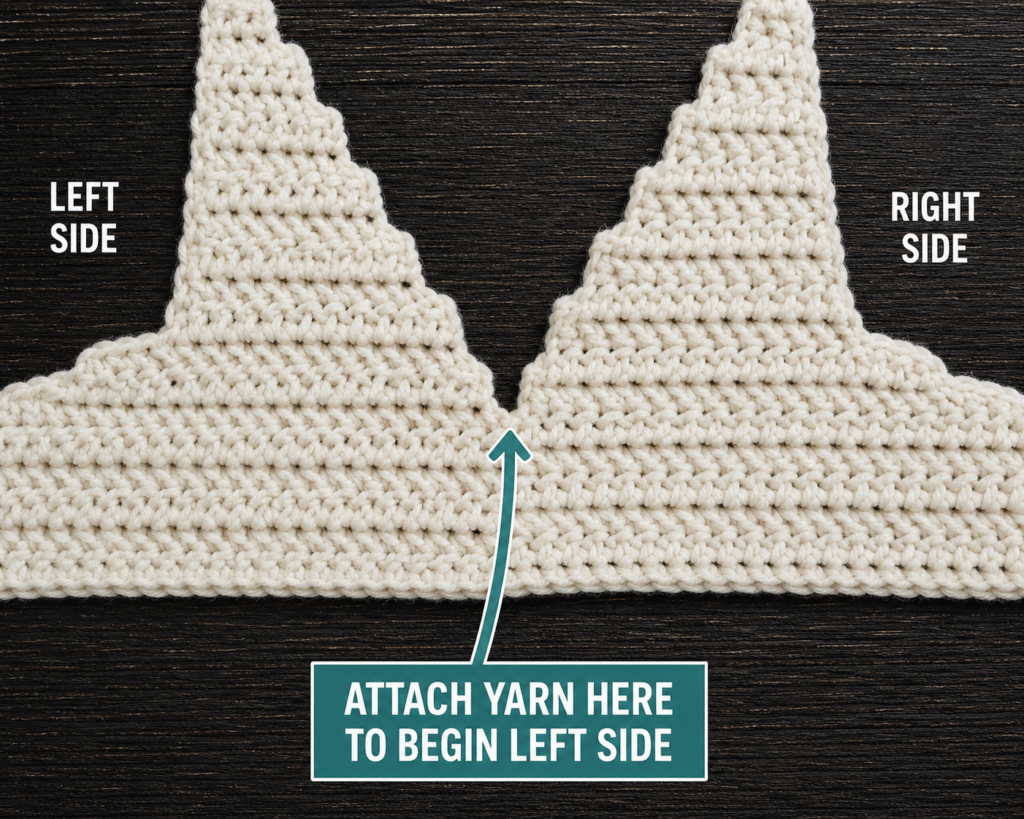
Return to the unworked half of the front panel.
With the RS facing, join your yarn at the center V-neck edge.
Work hdc in each stitch across to the outside edge.
Turn.
Now mirror the previous shoulder.
On one row, the decrease will fall at the end.
On the next row, it will fall at the beginning.
Continue decreasing exactly one stitch at the neckline edge on every row until you have the same final shoulder count as the first side:
12 (14, 16, 18, 20) (22, 24, 26, 28) sts
Fasten off.
Lay the entire panel flat.
Check:
- Both shoulders contain the same number of stitches.
- Both V-neck diagonals are approximately equal.
- Both shoulders finish on the same horizontal level.
Beginner tip:
Count the rows from the point where the panel divided. Both neckline sides should have the same number.
Common mistake to avoid:
Do not judge symmetry while holding the panel in the air. Lay it on a flat surface first.
Step 6: Crochet the Rectangular Back Panel
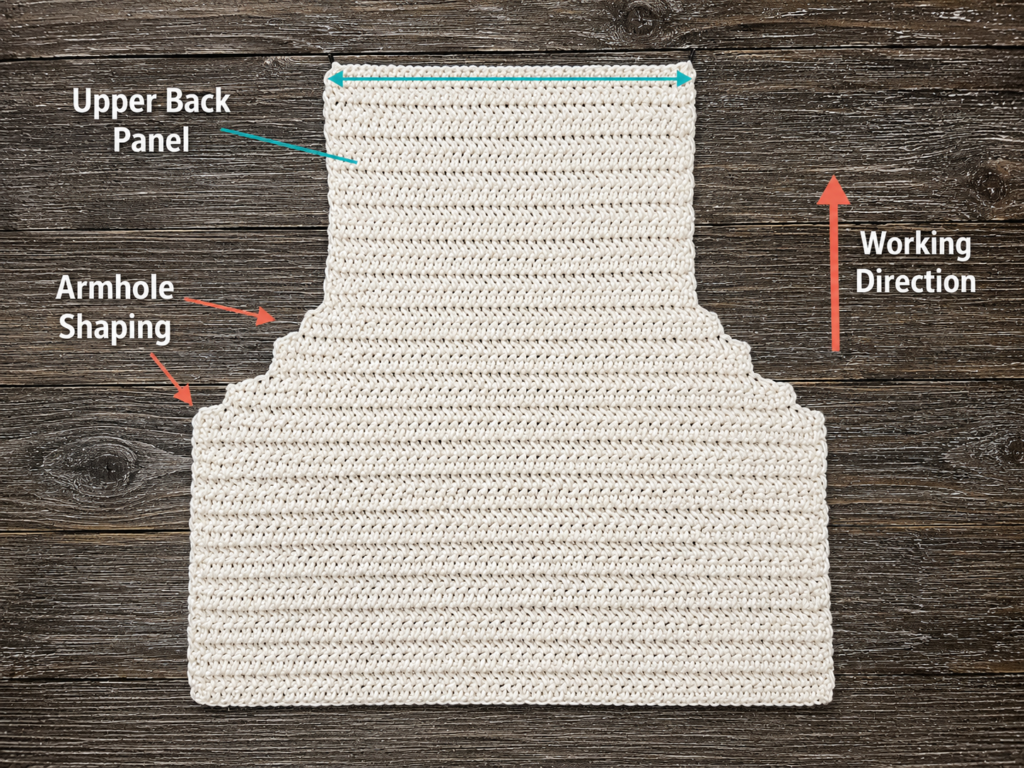
The back is easier.
Make the same starting chain used for your front:
61 (67, 75, 81, 89) (95, 103, 109, 117)
Row 1
Hdc in second ch from hook and every remaining chain.
Count:
60 (66, 74, 80, 88) (94, 102, 108, 116) sts
Following rows
Ch 1, turn.
Hdc in every stitch across.
Continue until the back panel has the same total number of rows and same finished length as the front panel at the shoulders.
The back is intentionally rectangular.
When the shoulders are seamed, the central unseamed portion of the upper back becomes the back-neck opening.
Beginner tip:
Instead of relying only on a ruler, lay the back beside the completed front every few inches.
This quickly shows whether the panels are matching in length.
Common mistake to avoid:
Do not stretch one panel when comparing it with the other.
Step 7: Block the Two Panels Before Seaming
Blocking before assembly makes the edges easier to align.
Check your yarn label before exposing the yarn to water, steam, or heat.
For wet blocking:
- Gently soak the panels according to the fiber’s care requirements.
- Remove excess water without twisting.
- Lay each panel flat.
- Shape gently to the intended dimensions.
- Pin if necessary.
- Let dry completely.
Do not stretch the panels aggressively.
The purpose is to relax and even the fabric, not force it several sizes larger.
Beginner tip:
Measure both panels after blocking, not only before.
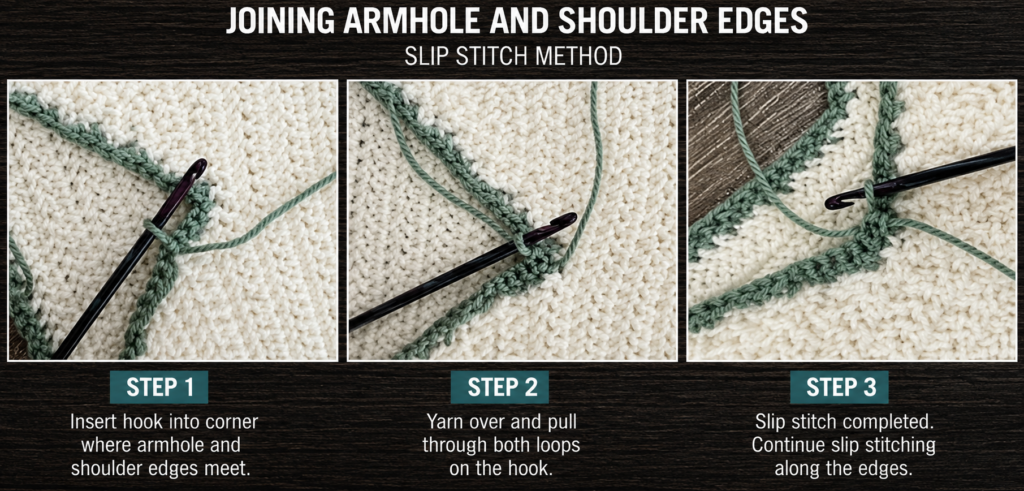
Step 8: Seam the Shoulders
Place the front and back panels together.
For a hidden seam, place right sides facing each other.
Align the outer shoulder edges.
Sew together:
12 (14, 16, 18, 20) (22, 24, 26, 28) shoulder stitches
on each side.
The unseamed center of the rectangular back becomes the back neckline.
You can use:
- Whip stitch.
- Mattress stitch.
- Slip-stitch seam.
For beginners, a loose whip stitch is usually easiest.
Do not pull the sewing yarn excessively. A rigid shoulder seam can distort the drape.
Beginner tip:
Place a marker through both layers at the beginning and end of each shoulder before sewing.
Common mistake to avoid:
Do not accidentally sew across the entire upper edge of the back panel. The middle must remain open for your head and neckline.

Step 9: Seam the Sides and Leave the Armholes Open
Try the joined shoulders over your body carefully or compare the garment with a vest that fits well.
Measure down from each shoulder.
Leave approximately this much open for each armhole:
7.5 (8, 8.5, 9, 9.5) (10, 10.5, 11, 11.5) inches
Place a marker through both front and back layers at that point.
Begin the side seam at the lower hem and sew upward only to the marker.
Repeat on the second side.
Before weaving in the seam tails, try on the vest.
Ask:
- Can you move your arms comfortably?
- Is the armhole deep enough?
- Is it too open?
- Are both sides equal?
The advantage of this simple construction is that armhole depth can be adjusted before the seam is permanently finished.
Beginner tip:
Make the first side seam temporarily with contrasting scrap yarn. Try on the vest, adjust if necessary, and then sew permanently with matching yarn.
Common mistake to avoid:
Do not make one armhole significantly deeper than the other. Measure from the same shoulder reference point on both sides.
Step 10: Add the Lower Ribbing
The lower ribbing is worked in warm oatmeal in this sample.
You can use the same dusty-teal yarn for a monochrome vest.
Set-up round
With the vest right side out, join the contrast yarn near one side seam along the bottom edge.
Ch 1.
Work sc evenly around the complete lower edge.
Join with a sl st.
The exact stitch count is less important than keeping the edge flat.
Too many stitches can make the edge flare.
Too few can make it pull inward.
Create the attached ribbing
From the set-up round:
Ch 9.
Sc in second ch from hook and across.
You now have 8 sc.
Sl st into the next two set-up-round stitches.
Turn.
Skip the two anchoring slip stitches.
Work 8 sc BLO back across the ribbing.
Ch 1 and turn.
Work 8 sc BLO toward the vest again.
Anchor into the next two available base stitches with slip stitches.
Repeat around the complete lower edge.
When the ribbing reaches the beginning, fasten off with a long tail and sew the two short ends together.
Beginner tip:
Every ribbing row should always contain eight stitches.
Common mistake to avoid:
Do not accidentally crochet into the anchoring slip stitches when working back across the ribbing.
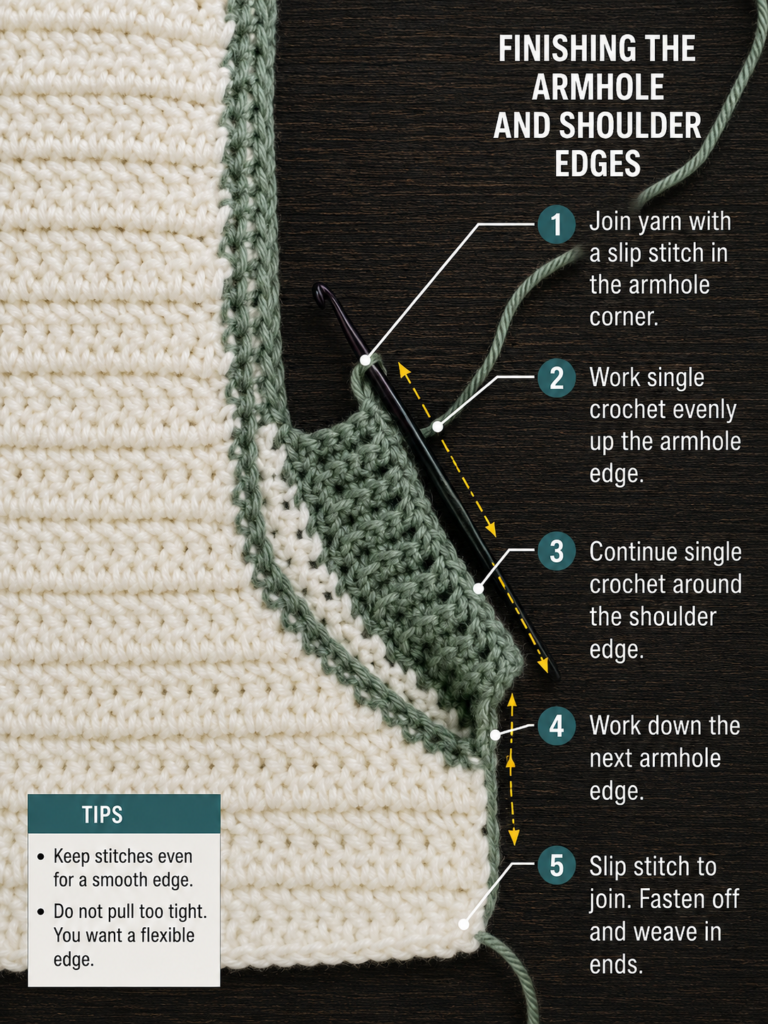
Step 11: Finish the Armholes
You have two options.
Option A: Simple armhole edging
This is the easiest choice.
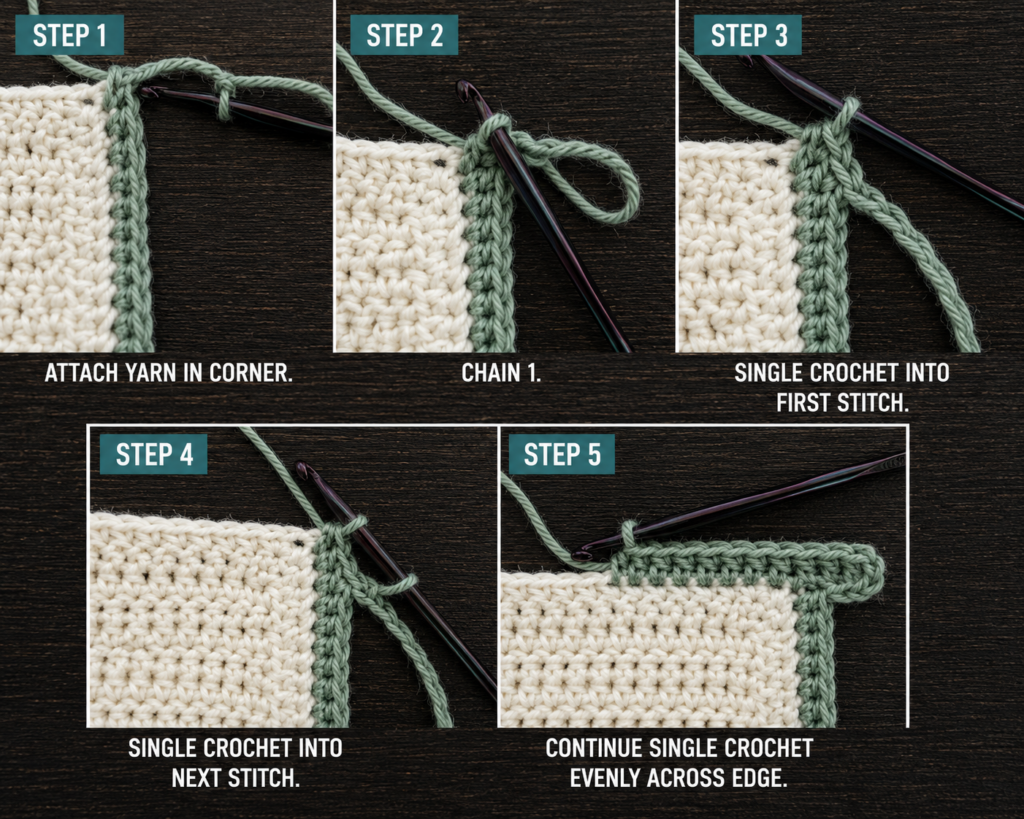
Join oatmeal yarn at the underarm seam.
Round 1: Ch 1 and sc evenly around the armhole. Join with sl st.
Round 2: Ch 1 and sc BLO in each stitch around. Join.
Fasten off.
Repeat for the second armhole.
Option B: Narrow attached ribbing
For a more defined edge, use the same technique as the waist ribbing but begin with:
Ch 5
Then work:
4 sc per ribbing row.
Attach the ribbing around the complete opening.
Do not pull tightly.
The finished armhole should lie flat without squeezing the upper arm.
Beginner tip:
Count how many set-up stitches you work around the first armhole and repeat approximately the same count on the second.
Common mistake to avoid:
Placing too many stitches along the vertical edges can create ruffles. Too few can make the armhole pucker.
Step 12: Finish the V-Neck
The neckline edge should be neat without being stiff.
For the simplest version:
Join oatmeal yarn at one shoulder seam.
Round 1
Ch 1.
Work sc evenly around:
- Back neckline.
- First diagonal V edge.
- Lowest V point.
- Second diagonal V edge.
At the lowest V point, work sc3tog across three nearby stitches if necessary to help the edging follow the sharp angle.
Join with sl st.
Round 2
Ch 1.
Work sc BLO around.
At the lowest V point, decrease again if the edging begins to flare.
Join and fasten off.
Alternatively, experienced beginners can add narrow four-stitch attached ribbing around the neckline.
The critical rule is simple: the neckline must lie flat.
Beginner tip:
Pause after every few inches and place the neckline flat on the table. Correct puckering before completing the entire edge.
Common mistake to avoid:
Do not add excessive stitches at the bottom of the V. This can make the point bulge outward.
Pattern Notes or Stitch Notes
Turning-chain rule
The ch 1 at the beginning of a half double crochet row does not count as a stitch.
Work into the first actual stitch.
Main stitch count
Front and back panel counts:
60 (66, 74, 80, 88) (94, 102, 108, 116) sts
Front-panel division
Each side begins with:
30 (33, 37, 40, 44) (47, 51, 54, 58) sts
Final shoulder counts
Each finished shoulder contains:
12 (14, 16, 18, 20) (22, 24, 26, 28) sts
Repeat pattern
For the main body:
Ch 1, turn, hdc in every stitch across.
For neckline shaping:
Decrease exactly one stitch at the neckline edge on every row.
Right side and wrong side
The main half-double-crochet fabric is relatively similar on both sides, but choose one surface as the RS and remain consistent during seaming and finishing.
Size adjustment notes
The vest is easy to customize because the body construction is primarily rectangular.
For more width, add stitches to both panels.
For additional length, add rows before dividing the front panel.
For a deeper V-neck, divide the front panel earlier.
For a shallower V-neck, divide later.
For larger armholes, leave more of the side seam open.
For smaller armholes, sew farther upward.
Common Beginner Mistakes
1. Skipping the gauge swatch
Problem: The finished vest is unexpectedly too small or too large.
Fix: Make and block a genuine gauge swatch before committing to the garment.
2. Losing stitches at the row edges
Problem: The body panels become gradually narrower.
Fix: Mark the first and final stitch and count regularly.
3. Decreasing at the wrong edge
Problem: The shoulder narrows from both the neck and armhole sides.
Fix: Mark the center V-neck edge with a contrasting stitch marker.
4. Unequal neckline sides
Problem: One shoulder is longer or wider.
Fix: Keep written notes showing the number of rows and final stitches on the first side, then duplicate them on the second.
5. Making the foundation chain too tight
Problem: The lower edge pulls inward even after blocking.
Fix: Remake the chain more loosely or use a hook one size larger for the chain only.
6. Seaming too tightly
Problem: The shoulders or sides feel rigid.
Fix: Allow the sewing yarn to sit securely without cinching the crochet fabric.
7. Making the armholes uneven
Problem: One opening sits lower than the other.
Fix: Measure from the same shoulder point and mark both sides before sewing.
8. Picking up too many edging stitches
Problem: The neckline or armholes ruffle.
Fix: Remove the edging and use fewer, more evenly distributed stitches.
9. Picking up too few edging stitches
Problem: The edge puckers and pulls inward.
Fix: Add more evenly spaced stitches.
How to Customize This Crochet Project
Change the yarn
A smooth worsted-weight yarn gives good stitch visibility.
Possible fibers include:
- Wool blends for warmth.
- Acrylic for easy care and broad color choice.
- Cotton blends for a cooler feel.
- Merino blends for softness.
Always remake the gauge swatch when changing yarn.
Change the colors
Try:
- One solid color.
- Contrast ribbing.
- Color-blocked front and back.
- Thin stripes.
- School colors.
- Neutral earth tones.
- Pastel shades.
A beginner-friendly approach is to keep the body solid and use one contrasting color only for the edging.
Make the vest longer
Add more rows before the V-neck divide.
Remember that increasing body length also increases yarn requirements.
Make a cropped vest
Begin the V-neck earlier or shorten the rectangular body section.
Check your preferred finished length before shaping the neckline.
Change the V-neck depth
For a deeper neckline, begin splitting the front earlier.
For a shallower neckline, crochet more full-width rows before the split.
The number of decrease rows must still be sufficient to reach your final shoulder count.
Change the ribbing
Possible border styles include:
- Simple single crochet.
- Back-loop-only single crochet rounds.
- Attached vertical ribbing.
- Crab stitch.
- Contrasting slip-stitch edging.
Add texture
Once comfortable with the construction, the same panel concept can be adapted with:
- Moss stitch.
- Herringbone half double crochet.
- Lemon peel stitch.
- Extended single crochet.
- Simple mesh sections.
Always swatch because a different stitch will change both width and row height.
Gift and styling ideas
A handmade vest can be:
- Layered over a T-shirt.
- Worn over a button-down shirt.
- Styled with jeans.
- Made in school colors.
- Given as a handmade birthday gift.
- Crocheted in neutral colors for a minimalist wardrobe.
Finishing Instructions
Fastening off
After your final stitch:
- Cut the yarn with a 6–8 inch tail.
- Pull the tail completely through the active loop.
- Tighten gently.
Weaving in ends
Using a tapestry needle:
- Pass the tail beneath several stitches on the wrong side.
- Reverse direction.
- Pass through several more stitches.
- Trim only after the yarn feels secure.
Avoid bulky knots wherever possible.
Final blocking
After all seaming and edging are finished:
- Check the yarn’s care label.
- Wash or dampen appropriately.
- Shape the vest gently.
- Align the shoulders.
- Smooth the V-neck.
- Match the armholes.
- Let the vest dry completely.
Do not hang a wet crochet garment, as the weight of the water may distort it.
Washing and care
Care depends on the specific fiber.
Follow the yarn manufacturer’s instructions.
When uncertain, gentle hand washing, minimal agitation, and flat drying are generally safer for a handmade garment than aggressive washing or high heat.
Quick Printable-Style Summary
Project: Easy V-Neck Crochet Vest
Skill level: Easy / Advanced Beginner
Sizes: XS–5XL
Yarn: Worsted weight, category 4
Hook: 5 mm / H-8, or size needed to obtain gauge
Gauge: 14 hdc × 11 rows = 4″
Main stitches: ch, hdc, hdc2tog, sc, sl st, sc BLO
Front panel
Starting chain:
61 (67, 75, 81, 89) (95, 103, 109, 117)
Main stitch count:
60 (66, 74, 80, 88) (94, 102, 108, 116)
Crochet evenly until:
13 (13.5, 14, 14.5, 15) (15.5, 16, 16.5, 17) inches
Divide equally for V-neck.
Each front half begins with
30 (33, 37, 40, 44) (47, 51, 54, 58) sts
Decrease one stitch at neckline edge every row until each shoulder contains:
12 (14, 16, 18, 20) (22, 24, 26, 28) sts
Back panel
Use the same starting chain and full stitch count as front.
Work in hdc until the panel matches the front’s finished shoulder height.
Assembly
Seam shoulders.
Seam sides while leaving approximately:
7.5 (8, 8.5, 9, 9.5) (10, 10.5, 11, 11.5) inches
open for armholes.
Finishing
Add:
- Lower ribbing.
- Armhole edging.
- V-neck edging.
Weave in all ends and block.
FAQ
Is a crochet vest a good beginner garment?
Yes, particularly when the construction uses simple flat panels and uncomplicated stitches. This version avoids sleeve construction and shaped armhole decreases, making it more approachable than many full sweaters.
What is the best stitch for a beginner crochet vest?
Half double crochet is a useful choice because it creates fabric faster than single crochet while remaining easier to identify and count than many textured stitch patterns.
How much yarn do I need for a crochet vest?
The amount varies considerably with size, yarn thickness, gauge, vest length, stitch pattern, and ribbing. This tutorial estimates approximately 650–1,600 yards across sizes XS–5XL.
Can I make this vest with cotton yarn?
Yes, provided your yarn creates the stated gauge and suitable fabric. Cotton can behave differently from wool or acrylic, so make and wash a gauge swatch before starting the garment.
How do I make my crochet vest wider?
Add stitches equally to both the front and back starting chains.
The finished bust circumference increases by approximately twice the amount added to one panel.
How do I make the V-neck less deep?
Work additional full-width front-panel rows before dividing the stitches.
Remember that you must still allow enough vertical space to complete the required neckline decreases.
Why is my vest neckline ruffling?
You may have picked up too many stitches around the neckline or failed to decrease sufficiently at the lowest point of the V.
Remove the edging and try again with fewer stitches.





