A handmade pencil pouch is one of those crochet projects that is small enough to finish without losing momentum but useful enough to become part of your everyday routine. Instead of spending days working on a large blanket or garment, you can turn a simple foundation chain and basic single crochet stitches into a sturdy case for pencils, pens, markers, crochet hooks, makeup brushes, or other small supplies.
This crochet pencil pouch pattern is designed for beginners who already know how to make a chain and single crochet but want to learn how to turn those basic skills into a practical finished project. The body is crocheted in one seamless piece around the starting chain, so there are no side seams to sew. You will also learn how to identify the opposite side of your foundation chain, work continuously in rounds, keep your stitch count steady, change colors for simple stripes, and finish the pouch with an optional zipper and lining.
The most important part of this project happens at the beginning. Instead of crocheting a rectangle and sewing the sides afterward, you will work across one side of your foundation chain, rotate the piece, and continue along the other side. That creates a narrow seamless tube that gradually grows upward into the finished pouch.
The tutorial below uses US crochet terminology. Standard US crochet abbreviations such as ch, sc, sl st, and st follow commonly used industry terminology.
What You’ll Learn
By completing this crochet pencil pouch, you will practice:
- Making and counting a foundation chain.
- Identifying the underside loops of the chain.
- Working single crochet along both sides of a starting chain.
- Crocheting in continuous rounds without turning.
- Using a stitch marker correctly.
- Keeping a constant stitch count.
- Creating optional horizontal stripes.
- Adjusting the width and height of a pencil pouch.
- Fastening off and weaving in yarn ends.
- Hand-sewing an optional zipper.
- Adding an optional fabric lining.
Project Details
Skill level: Beginner to confident beginner
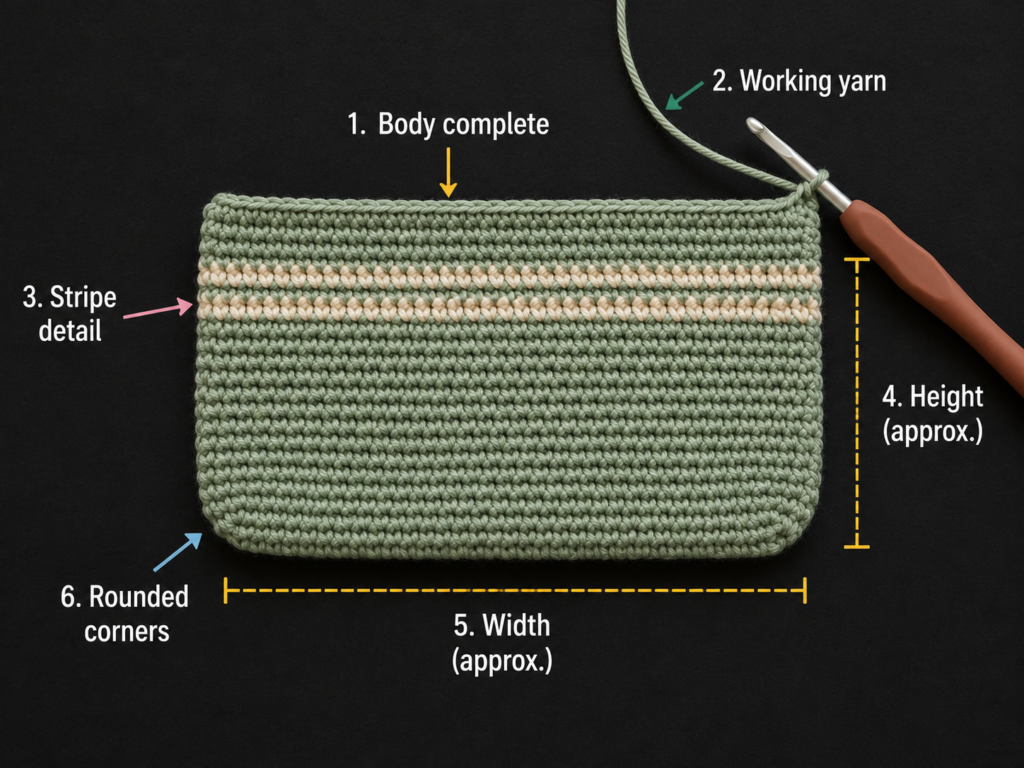
Finished size: Approximately 8.25 inches wide × 3.75 inches tall
Estimated time: 2.5–4 hours
Construction: Seamless body worked in continuous rounds around a foundation chain
Terminology: US crochet terms
Suggested yarn: DK or light worsted cotton
Hook: 4.0 mm
Approximate yarn needed: 70–90 yards total, depending on size and tension
The Craft Yarn Council classifies light yarn as weight category 3. Its standard recommended hook range is generally 4.5–5.5 mm, but this particular project deliberately uses a slightly smaller 4 mm hook to help produce a firmer, denser fabric that better contains pens and pencils.
Materials You’ll Need
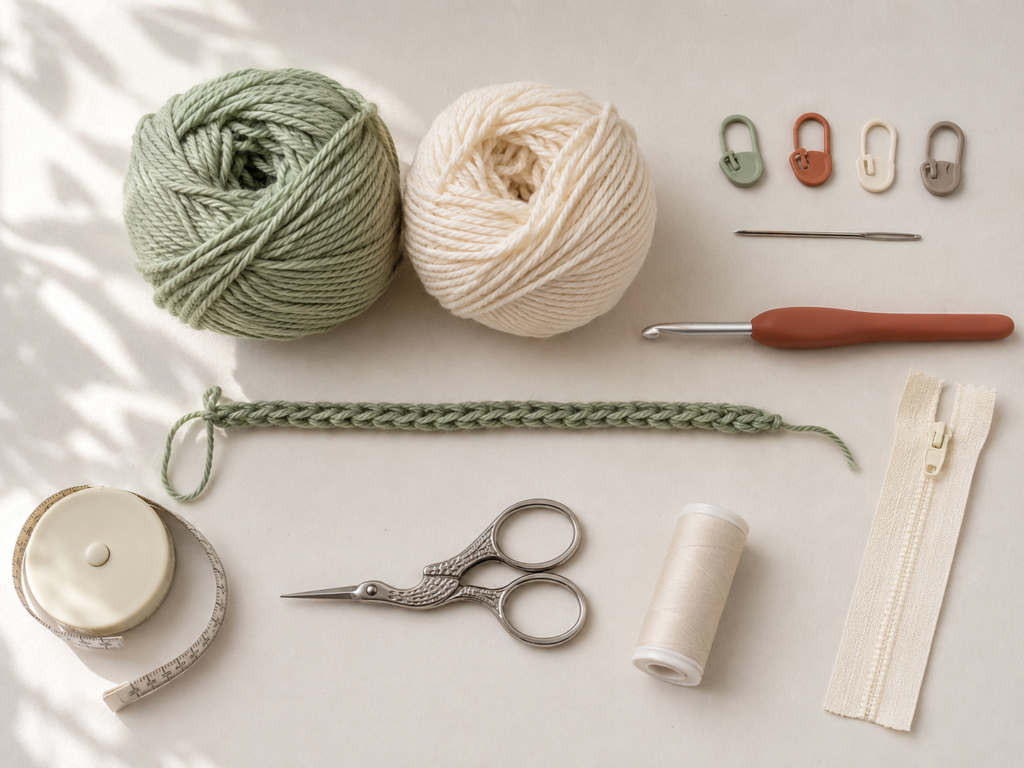
- Approximately 70–90 yards of DK or light worsted cotton yarn.
- Main color: soft sage green.
- Contrast color: warm cream.
- 4.0 mm crochet hook.
- Locking stitch marker.
- Yarn or tapestry needle.
- Small embroidery scissors.
- Measuring tape.
- Optional 8-inch zipper.
- Sewing needle and strong matching thread for zipper installation.
- Optional lightweight cotton fabric for lining.
- Optional straight pins or sewing clips.
Cotton is particularly practical for a small pouch because it usually creates clear stitch definition and a relatively structured fabric. A smooth yarn will also make it easier for a beginner to see each individual single crochet.
Crochet Abbreviations Used
- ch = chain
- sc = single crochet
- sl st = slip stitch
- st = stitch
- sts = stitches
- rnd = round
- rep = repeat
This tutorial uses US terminology. In UK terminology, a US single crochet is called a double crochet.
Gauge and Finished Size
Suggested gauge: Approximately 17 single crochet stitches × 19 rounds = 4 inches or 10 cm.
Exact gauge is not critical because this is not a fitted garment. However, your gauge affects whether standard pencils fit comfortably.
The sample pouch is designed to measure approximately:
- Width: 8.25 inches or 21 cm.
- Height: 3.75 inches or 9.5 cm.
Before beginning, place your longest pencil beside a measuring tape. Most standard pencils should fit an approximately 8-inch-wide case, but longer art supplies or crochet hooks may need additional starting chains.
Before You Start
How to count your foundation chain
After making the chain, do not count the loop currently sitting on your hook. Count only the completed V-shaped chains below it.
For this pattern, you will make 36 chains.
How to identify the back bumps
A chain looks like a row of V shapes from the front. Turn it over and you will see a line of small horizontal bumps running along the back.
You can work your first stitches through these back bumps for a clean-looking edge. More importantly for this construction, you should understand where the unused loops are because you will rotate the work and crochet along the opposite side of the chain.
How to keep your edges straight
Because the pouch is worked continuously in rounds, you do not need turning chains. The most important habit is moving your stitch marker after every round.
Place the marker in the first stitch of each new round. When you reach it again:
- Count the round as complete.
- Remove the marker.
- Crochet the first stitch of the next round.
- Put the marker into that new first stitch.
How to prevent curling
A slight curl during the first few rounds is normal. Do not automatically add stitches to make the piece lie flat. The pouch is supposed to become a three-dimensional tube.
Severe curling usually comes from very tight tension. Relax your grip and make sure the hook can move comfortably through each stitch.
Step-by-Step Crochet Tutorial
Step 1: Make the Foundation Chain
Using the sage-green yarn and your 4 mm crochet hook:
Ch 36.
Do not pull the chains tightly. You should be able to insert the hook into every chain without forcing it.
The finished width depends on this starting chain, so stop and measure if you need a larger or smaller pouch. The chain should be slightly shorter than the final flat width because the crocheted fabric will add some length.
Beginner tip
Lay the chain flat before continuing. Make sure it is not twisted.
Common mistake to avoid
Do not count the active loop on the hook as one of your 36 chains.
Step 2: Crochet Across the First Side
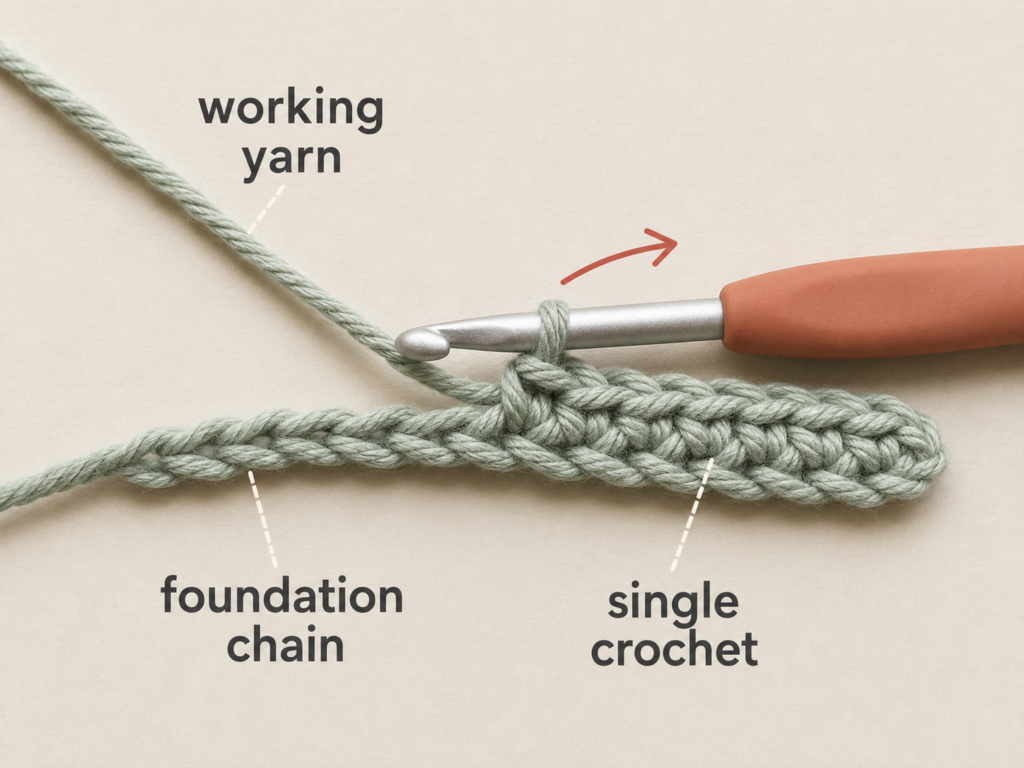
Insert the hook into the second chain from the hook.
Work 1 sc in each chain across.
You should have:
35 sc.
Do not turn your work.
This is the point where this project begins to differ from a conventional flat rectangle. Instead of making a turning chain and returning across the row, you are about to rotate the strip and crochet along the other side of the original foundation chain.
Beginner tip
Count your stitches before continuing. Fixing a missing stitch now is much easier than discovering it after several complete rounds.
Common mistake to avoid
Avoid accidentally working two single crochets into one chain unless the pattern specifically tells you to increase. You need exactly one stitch per chain across this first side.
Step 3: Rotate and Crochet Along the Opposite Side
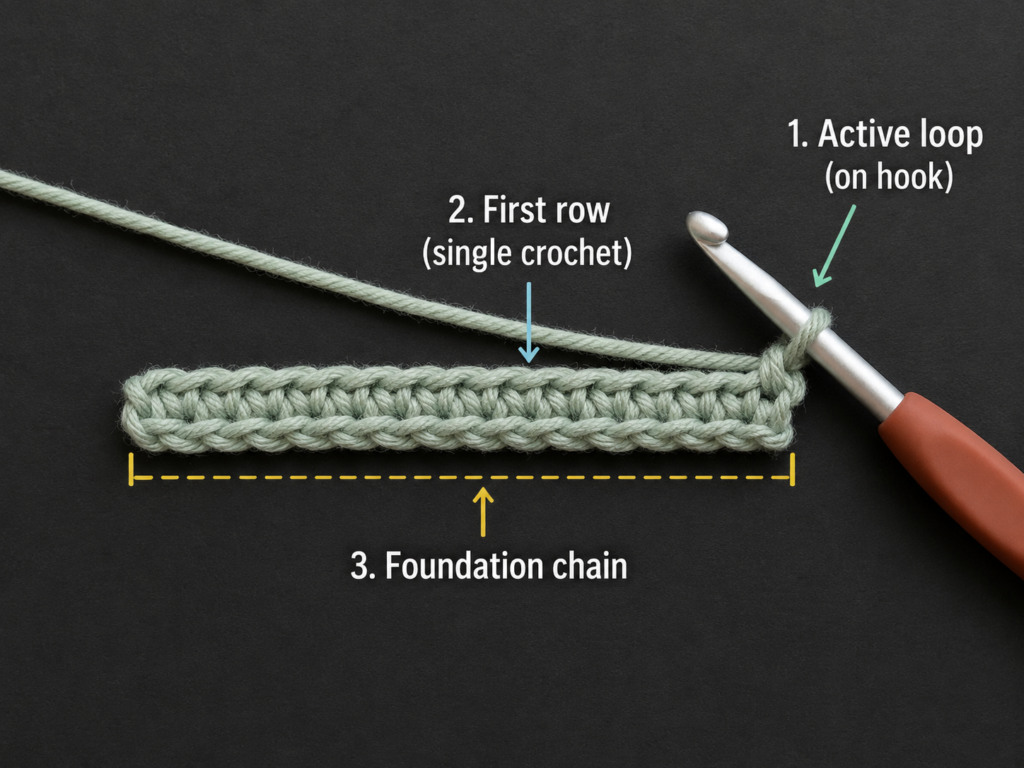
Do not turn as you would at the end of a normal row.
Instead, rotate the narrow strip so the unused underside loops of the original foundation chain face you.
Work 1 sc into each available loop across the opposite side.
You should add another:
35 sc.
Your complete first round now contains:
70 sc total.
Place a locking stitch marker into the first stitch of the round.
Your piece may look narrow, slightly curved, or almost like a long flattened oval. That is correct.
Beginner tip
Use the tail from your starting chain as a visual landmark. It can help you recognize where the beginning and end of the first round meet.
Common mistake to avoid
The most common error here is accidentally crocheting into the stitches you just made instead of the remaining loops of the original foundation chain. Pause and look closely before inserting the hook.
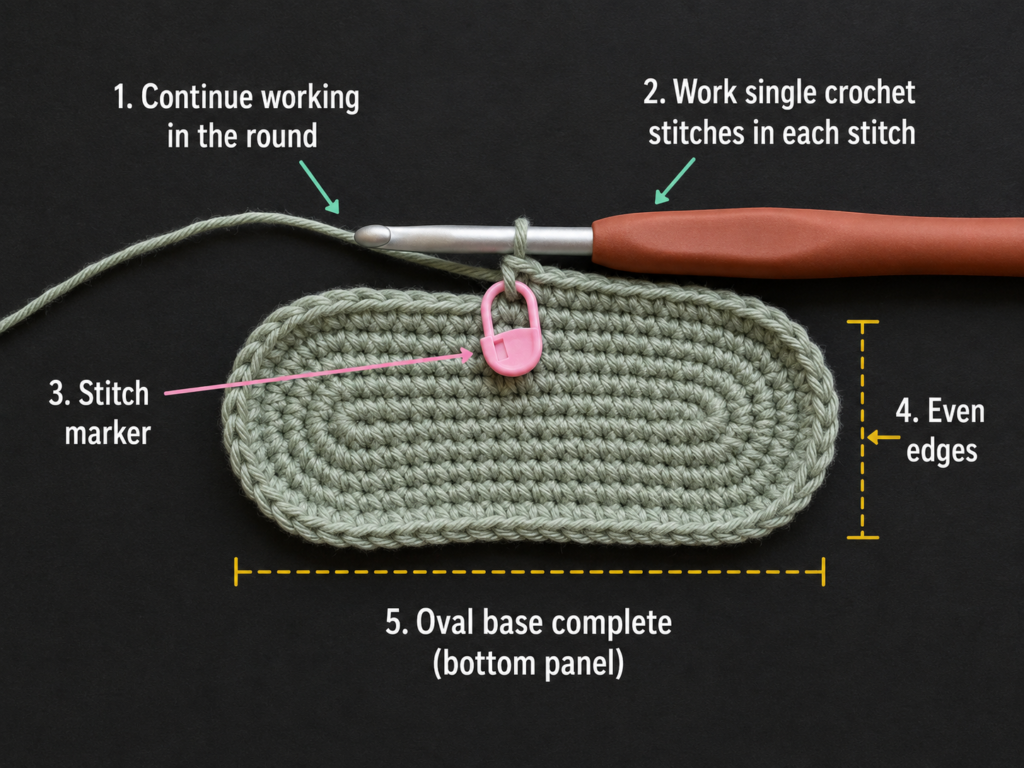
Step 4: Complete the First Round and Check Your Stitch Count
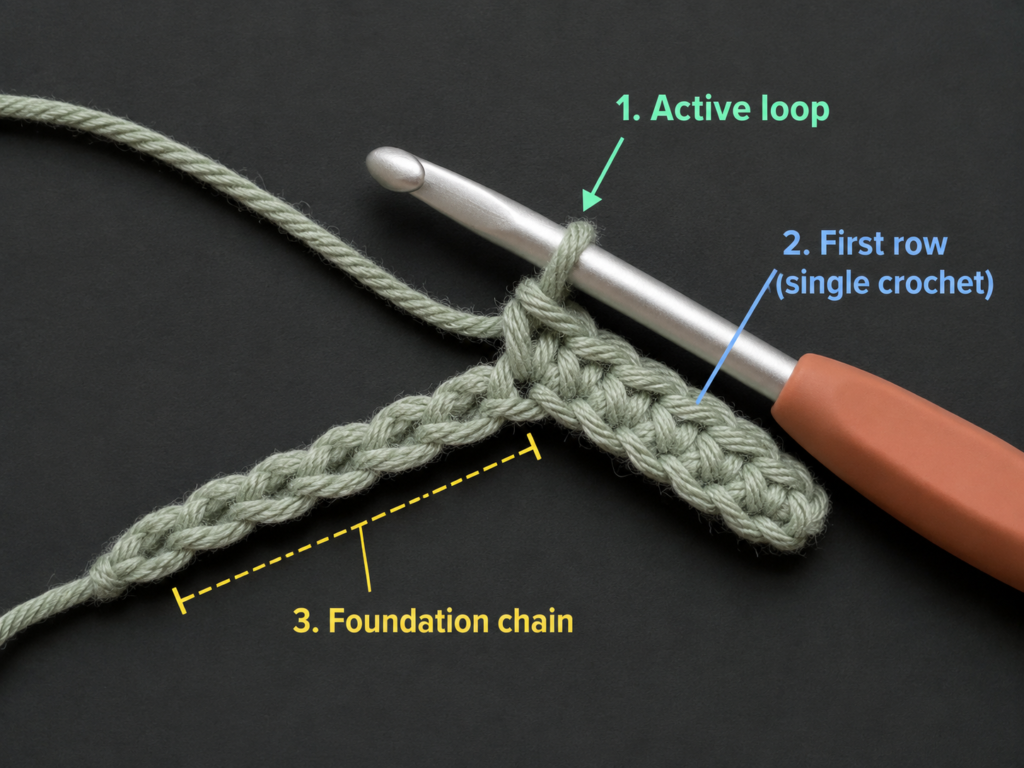
Once you have worked along both sides of the foundation chain, count every stitch around the piece.
You should have:
70 sc.
Do not join with a slip stitch unless you prefer joined rounds. For the smoothest beginner construction, this tutorial continues in a spiral.
Insert your hook directly into the first stitch of the previous round and work the first single crochet of Round 2.
Move your stitch marker into that stitch.
Beginner tip
The marker is more reliable than trying to visually identify the start of a round later.
Common mistake to avoid
Do not add an extra stitch at either narrow end unless instructed. An accidental increase every round will make the pouch flare outward.
Step 5: Continue the Pouch in Continuous Single Crochet Rounds
For the standard-size pouch:
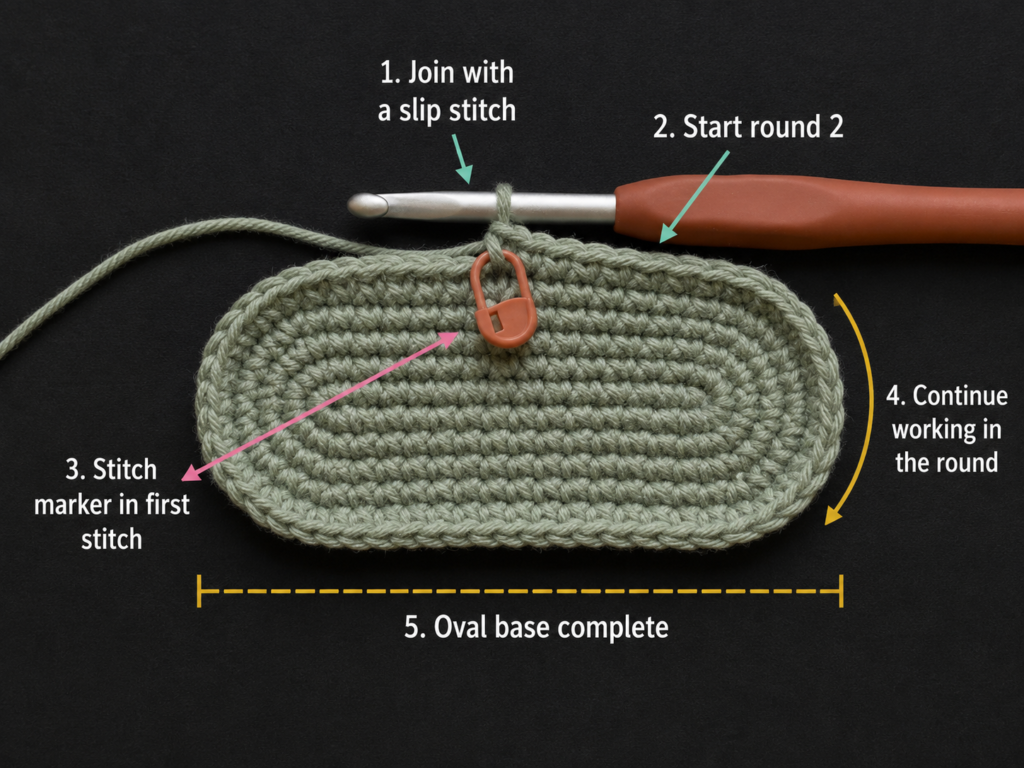
Rounds 2–18: Sc in every stitch around. Maintain 70 sc per round.
Do not turn.
Do not make a turning chain.
Do not join unless you deliberately want visible joined rounds.
Simply continue in a spiral, moving the marker every time you begin a new round.
After several rounds, the piece should naturally begin to look like a narrow tube.
Optional stripe schedule
For a sage-green and cream sample:
- Rounds 1–4: Sage green.
- Rounds 5–6: Warm cream.
- Rounds 7–10: Sage green.
- Rounds 11–12: Warm cream.
- Rounds 13–18: Sage green.
This gives you two clean contrast stripes without making the color-changing process too complicated for a beginner.
How to change color neatly
On the final single crochet before the new color begins:
- Insert the hook into the next stitch.
- Yarn over with the current color.
- Pull up a loop.
- Before completing the stitch, drop the old color.
- Yarn over with the new color.
- Pull the new color through both loops.
The new shade is now ready for the next stitch.
Beginner tip
Count every few rounds. You do not need to count all 70 stitches after every single round, but regular checks prevent a small error from becoming a noticeably crooked pouch.
Common mistake to avoid
Do not confuse the marked first stitch with the stitch before it. Always move the marker immediately after making the first stitch of a new round.
Step 6: Keep the Narrow Ends Smooth
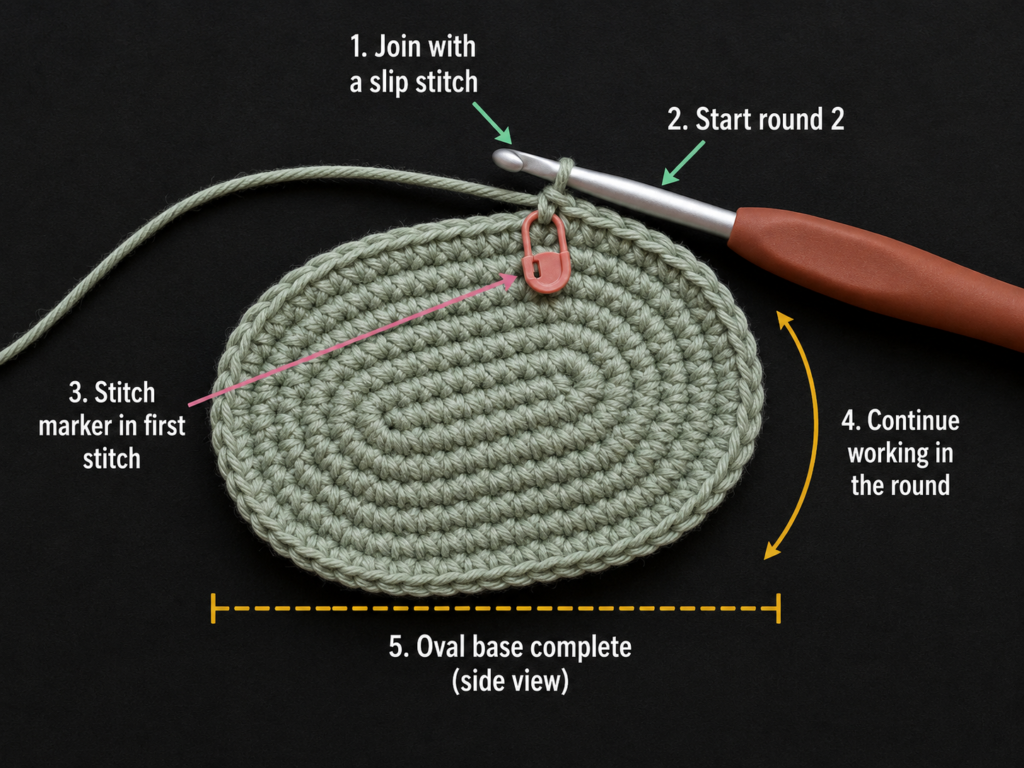
As you work around the pouch, the two narrow ends can be confusing because there is no sharp corner. Treat every stitch exactly the same.
Work:
1 sc in each st around.
Do not automatically add extra stitches at the ends.
If your stitch count remains at 70 and your tension is consistent, the tube should stay approximately the same width from bottom to top.
Beginner tip
Flatten the pouch gently every few rounds. The narrow ends should appear similar in width and shape.
Common mistake to avoid
If one end is wider than the other, check for accidental increases. A common cause is working two stitches into the same stitch at the point where the fabric curves.
Step 7: Continue Until the Pouch Reaches the Right Height
After Round 18, gently flatten the crochet tube and measure from the bottom fold to the top opening.
The sample should be approximately 3.75 inches tall.
Need more room for markers or thick pens? Add additional single crochet rounds.
Want a slim case for only a few pencils? Stop earlier.
The easiest way to customize height is to add or remove complete rounds while maintaining 70 stitches around.
Beginner tip
Place your actual pencils inside before fastening off. Make sure the opening is wide enough and the pouch is tall enough for the supplies you plan to carry.
Common mistake to avoid
Do not assume all pencils, markers and crochet hooks are the same length. Measure the intended contents first.
Step 8: Finish the Crochet Shell
When the pouch reaches the desired height:
- Complete the final stitch.
- Work one slip stitch into the next stitch to reduce the visible height difference created by spiral rounds.
- Cut the yarn, leaving a tail of approximately 6 inches.
- Yarn over and pull the tail completely through the loop.
- Use a tapestry needle to weave the end securely through several stitches on the wrong side.
If you have changed colors, weave in every remaining yarn end before installing the zipper.
Gently shape the pouch with your hands.
Do not stretch it aggressively.
Step 9: Add an Optional Zipper
A zipper creates a secure pencil case, but you can also leave the opening unfastened or adapt the project with a button loop.
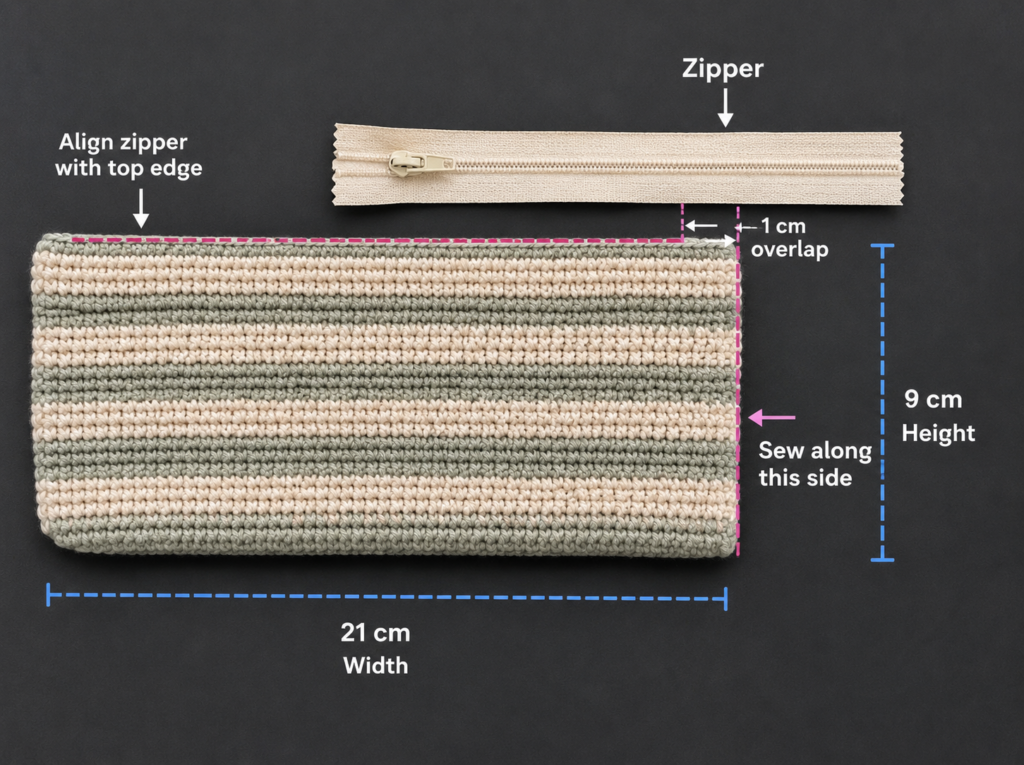
For a standard sample, use an approximately 8-inch zipper.
Position the zipper
Open the zipper.
Turn the crochet pouch inside out.
Center one side of the zipper tape along one inside edge of the opening. The zipper teeth should sit just above the crochet edge so they can move freely.
Use sewing clips or pins to hold it temporarily.
Hand-sew the first side
Thread a sewing needle with strong matching thread.
Using small, even stitches, sew through:
- The zipper tape.
- A controlled section of the crochet fabric near the upper edge.
Avoid sewing so close to the zipper teeth that the slider becomes obstructed.
Sew the second side
Align the opposite side carefully before securing it permanently.
Close the zipper temporarily and check that:
- The ends align.
- The pouch does not twist.
- One side is not stretched more tightly than the other.
Then reopen the zipper and stitch the second side securely.
Beginner tip
Baste the zipper with large temporary stitches before making your final small stitches. The temporary thread can be removed when you are satisfied with the alignment.
Common mistake to avoid
Do not stretch the crochet fabric while sewing. A stretched edge may become wavy after the zipper is attached.
Pattern Notes and Stitch Notes
Starting chain
The standard sample begins with:
Ch 36.
First round
- 35 sc along the first side.
- 35 sc along the opposite side.
- 70 sc total.
Main repeat
Sc in every st around without turning.
Stitch count
Maintain:
70 sc per round.
Turning-chain rule
There is no turning chain because the pouch is worked continuously in spiral rounds.
Right side and wrong side
The visible exterior is the right side.
The inside of the pouch is the wrong side.
Size adjustment
To make the pouch wider, add chains to the foundation.
Because each extra foundation chain receives one stitch on each side, every additional chain adds two stitches to the total circumference.
For example:
- Add 2 foundation chains → add 4 total stitches around.
- Add 4 foundation chains → add 8 total stitches around.
To change height, simply add or subtract complete rounds.
Common Beginner Mistakes
1. Losing count in the foundation chain
Problem: The first side has fewer than 35 stitches.
Fix: Count before rotating the work. It is much easier to correct the first side immediately.
2. Working into the wrong loops on the second side
Problem: The second half of the base looks bulky or uneven.
Fix: Make sure you are working into the unused loops of the original foundation chain, not back into the completed single crochet stitches.
3. Adding accidental increases at the narrow ends
Problem: The pouch becomes wider as it grows.
Fix: Maintain exactly one single crochet per stitch. You should have 70 stitches in every standard round.
4. Forgetting to move the stitch marker
Problem: You cannot identify where a new round begins.
Fix: Move the marker as soon as you make the first stitch of every new round.
5. Pulling the yarn too tightly
Problem: The fabric becomes stiff, difficult to crochet, and narrower than expected.
Fix: Relax your hands and let the hook control loop size.
6. Making color changes in the wrong place
Problem: Stripe transitions look scattered.
Fix: Always change color at the same round boundary, preferably just before working the marked first stitch.
7. Sewing the zipper while stretching the pouch
Problem: The top edge becomes rippled.
Fix: Let the crochet fabric rest naturally while pinning and sewing.
How to Customize This Crochet Project
Change the yarn
A smooth cotton yarn creates a structured pouch with clearly defined stitches.
You can also try:
- Cotton-acrylic blends.
- Light worsted acrylic.
- Recycled cotton.
- Mercerized cotton.
Avoid very fuzzy yarn for your first pouch because the individual stitches are more difficult to see.
Change the colors
Try:
- Sage green and cream.
- Dusty pink and ivory.
- Navy and white.
- Terracotta and beige.
- Rainbow stripes.
- School colors.
- One solid neutral shade.
Change the size
For longer crochet hooks or art pencils, increase the starting chain.
For a small coin pouch, reduce the chain.
For a makeup-brush case, make the body taller.
Add surface texture
After mastering the original single crochet version, experiment with:
- Back-loop-only rounds.
- Waistcoat stitch.
- Moss stitch on a flat-panel adaptation.
- Surface crochet.
- Simple embroidery.
Add a lining
A fabric lining can stop sharpened pencils from pressing directly against the crochet stitches.
Cut two fabric pieces slightly larger than the flattened pouch interior, sew them together around three sides, insert the lining, turn the raw upper edge inward, and hand-stitch it neatly under the zipper.
Add a decorative zipper pull
Attach:
- A small yarn tassel.
- A simple crocheted leaf.
- A small pom-pom.
- A bead-free yarn loop.
For an item intended for a very young child, avoid small detachable decorations that could become choking hazards.
Gift ideas and uses
This pouch can hold:
- School pencils.
- Colored pencils.
- Pens.
- Crochet hooks.
- Makeup brushes.
- Small art supplies.
- Travel accessories.
- Charging cables.
Finishing Instructions
Fastening off
After your last round, work one slip stitch into the next stitch, cut the yarn, and pull the end completely through the final loop.
Weaving in ends
Use a tapestry needle to weave every tail through the wrong side of several neighboring stitches.
Change direction once or twice for extra security.
Trim the remaining yarn close to the fabric without cutting the actual crochet stitches.
Blocking
Heavy blocking is generally unnecessary for this project.
When the shell looks slightly uneven:
- Dampen it lightly.
- Shape it gently by hand.
- Lay it flat to dry.
Do not aggressively stretch the fabric because this can affect zipper alignment.
Washing and care
Always follow the care instructions printed on the yarn label. The Craft Yarn Council also maintains standardized care-symbol guidance for handmade fiber projects.
When giving a handmade pouch as a gift, saving the original yarn label—or providing equivalent fiber and care information—is helpful for the recipient.
Quick Printable-Style Summary
Skill level: Beginner to confident beginner
Finished size: Approximately 8.25 × 3.75 inches
Materials: DK or light worsted cotton yarn, 4 mm hook, stitch marker, scissors, tapestry needle, optional 8-inch zipper, matching thread and optional lining fabric
Stitches: Chain, single crochet, slip stitch
Starting method: Ch 36
Round 1:
Sc in second ch from hook and every remaining chain across: 35 sc. Rotate without turning. Work 1 sc in each unused loop along the opposite side: 35 sc. Total: 70 sc.
Rounds 2–18:
Sc in every st around. Do not turn. Maintain 70 sc.
Optional stripes:
Change colors at selected round boundaries.
Finishing:
Slip stitch once, fasten off, weave in all ends, shape gently, and hand-sew an optional zipper and lining.
FAQ
Is this crochet pencil pouch pattern suitable for complete beginners?
It is best for a beginner who already knows how to chain and single crochet. The most unfamiliar part may be working along both sides of the foundation chain, but the tutorial breaks that process into separate visual steps.
Can I make the pencil pouch without a zipper?
Yes. Leave the opening unfastened for a simple supply sleeve, or adapt the top with a button loop, drawstring channel, or flap.
What yarn is best for a crochet pencil pouch?
A smooth cotton or cotton-blend yarn is a practical option because it creates visible stitches and a relatively firm fabric. A tightly spun yarn is easier for beginners to work with than a fuzzy or novelty yarn.
How do I make the pencil pouch longer?
Add more chains to the beginning.
Remember that every additional foundation chain creates one stitch on the first side and another on the opposite side, adding two stitches to the total round.
How do I make the pouch taller?
Continue working additional single crochet rounds before fastening off.
Why is my crochet pencil pouch getting wider?
You are probably making accidental increases. Count your stitches and confirm that the standard version remains at exactly 70 stitches per round.
Do I need to line a crochet pencil pouch?
No. A lining is optional. It can, however, give the pouch a more finished interior and create an additional barrier between pointed pencils and the crochet fabric.
Conclusion
This crochet pencil pouch pattern turns three basic techniques—a foundation chain, single crochet, and continuous rounds—into a genuinely useful finished project. The seamless body eliminates side-seam construction, while the optional stripes, lining, zipper and sizing adjustments give you plenty of ways to make the pouch your own.
The most important beginner checkpoint is the first round. Take your time when working across the first side of the chain, rotate the strip carefully, and make sure you crochet into the unused foundation loops on the opposite side. Once that base is complete and your 70-stitch count is correct, the rest of the body becomes a simple repetition of single crochet rounds.
Save the tutorial for your next small crochet project, and use the same seamless construction method later for hook cases, makeup pouches, travel organizers and other handmade accessories.





