There is something especially charming about Halloween decorations made from yarn and everyday household items. A plain glass mason jar might not look particularly exciting on its own, but add a handmade crochet sleeve and a tiny pointed witch hat, and suddenly it becomes a whimsical decoration for your kitchen shelf, Halloween party table, or autumn craft display.
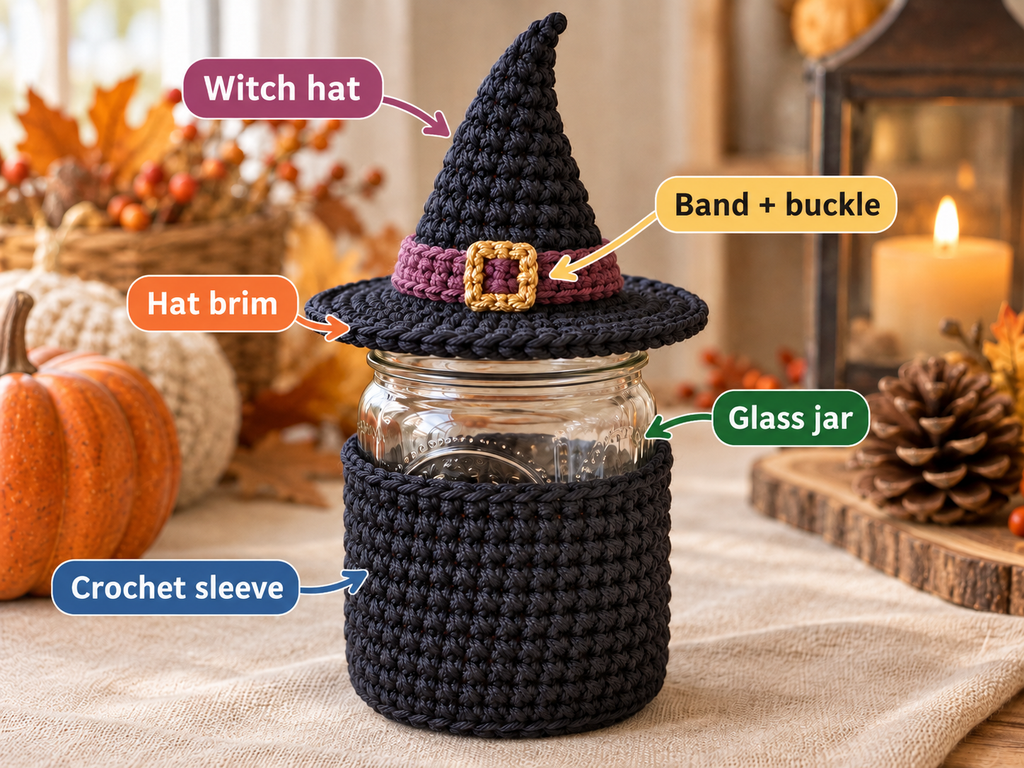
This crochet witch hat jar cozy pattern turns an ordinary glass jar into a little piece of handmade Halloween magic. The design combines a fitted crochet jar cover with a removable miniature witch hat, finished with a contrasting purple band and a small golden buckle.
If you have been learning single crochet and want to make something beyond a simple square, this is a lovely next project. You will practice working in the round, increasing stitches to make flat and tapered shapes, crocheting through specific loops, and adding simple finishing details.
The project is divided into manageable steps, with clear stitch counts and planned photographs to help you recognize how your work should look as it develops.
Best of all, you do not need complicated stitches or special equipment. Most of the pattern uses basic single crochet, making it suitable for confident beginners who are comfortable holding a hook and identifying stitches.
What You’ll Learn
By the end of this tutorial, you will know how to:
- Crochet a flat circular base that fits beneath a mason jar.
- Turn a flat crochet circle into an upright sleeve.
- Work consistent single crochet rounds without accidentally adding stitches.
- Make a miniature pointed witch hat with a recognizable tapered shape.
- Create a flared hat brim using front-loop crochet.
- Add a decorative hat band and embroidered buckle.
- Adjust the project for different jars and customize your Halloween colors.
Project Overview
Skill level
Confident beginnerTime required
2–4 hoursJar size
Approx. 16 fl oz / 473 mLHook
4.0 mm
The sample is intended for a straight-sided mason jar with an approximately 3-inch (7.6 cm) body diameter and approximately 4–5-inch (10–13 cm) body height. Actual sizes vary by jar manufacturer. The crochet sleeve is fitted to your particular jar rather than jar capacity alone.
The completed project consists of two independent pieces: a protective decorative sleeve for the jar body and a pointed hat that rests over the opening.
Because the hat is removable, you can also use it as a miniature Halloween ornament when the jar is not on display.
Materials You’ll Need
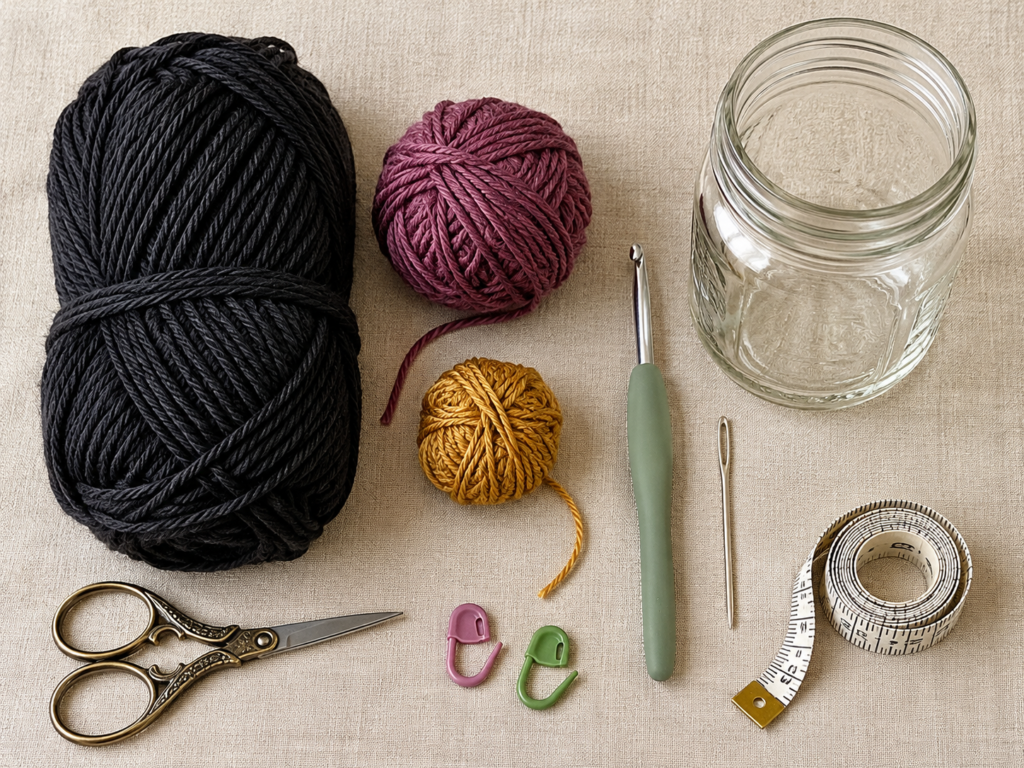
Gather everything before beginning so you can work through the project without interruptions.
Yarn
For the main design, choose approximately 80–120 yards of medium-weight (#4) cotton yarn in charcoal black. Use another 10–20 yards of dusty-plum purple cotton yarn for the band, plus a small scrap of antique-gold yarn for the buckle.
Cotton works particularly well because it creates clear stitch definition, has relatively little stretch, and gives the miniature hat a firmer appearance.
You can use acrylic yarn for a decorative version, but you may notice a softer brim and more flexibility in the finished jar sleeve.
Tools
- 4.0 mm (G/6) crochet hook
- Sharp scissors
- Blunt-tipped tapestry needle
- At least two removable stitch markers
- Flexible measuring tape
- One clean, empty glass mason jar
- Optional straight pins for temporarily holding the decorative band
- Optional additional cotton yarn for an edging or bow
Choosing the Right Mason Jar
A straight-sided jar is easiest to fit with crochet because its circumference stays relatively consistent from bottom to top.
A jar with strongly curved shoulders may need a shorter sleeve or a few decreases near the upper edge.
For your first attempt, choose a jar that stands securely, has no chips or cracks, and is comfortable to handle.
Crochet Abbreviations Used
This pattern uses US crochet terminology.
| Abbreviation | Meaning |
|---|---|
| MR | Magic ring |
| ch | Chain |
| sc | Single crochet |
| sl st | Slip stitch |
| st / sts | Stitch / stitches |
| rnd | Round |
| inc | Increase — 2 single crochet stitches in one stitch |
| BLO | Back loop only |
| FLO | Front loop only |
| rep | Repeat |
In UK terminology, the US single crochet stitch is known as double crochet. This distinction matters when following tutorials from different countries.
Welcome to the Craft Yarn Council
How to Make a Single Crochet
Insert your hook beneath the two top loops of the next stitch. Yarn over and pull up a loop. You will now have two loops on the hook.
Yarn over again and pull through both loops.
You have completed one single crochet.
How to Make an Increase
Work one single crochet into the next stitch. Without moving to the following stitch, work a second single crochet into that same stitch.
You have increased the number of stitches by one.
Understanding Front and Back Loops
Look at the top of a completed crochet stitch. You should see a small V.
The strand of the V nearest you is the front loop. The strand farther away is the back loop.
Working through only one loop changes how the fabric folds, which is particularly useful for the sleeve base and the witch hat brim.
Before You Start
Check Your Crochet Tension
The most important measurement in this project is not the number printed on the jar label. It is the actual diameter and circumference of the glass.
For the sample stitch counts, aim for approximately 16 single crochet stitches across 4 inches (10 cm) using medium-weight cotton and a 4.0 mm hook.
This is a working target for the original design, not a gauge verified by a finished sample.
Make a small square of single crochet, measure across the center without stretching, and adjust your hook if necessary.
If you have more than 16 stitches in 4 inches, your fabric is tighter and your finished sleeve may be smaller. Try a slightly larger hook.
If you have fewer stitches, your fabric is looser and may need a smaller hook.
Count Your Stitches Carefully
When crocheting in continuous rounds, place a stitch marker in the first stitch of each round.
Move it upward as the work progresses.
Do not mistake the loop currently on your hook for a completed stitch. Count the V-shaped stitch tops around the fabric.
Understand the Construction
The jar sleeve begins at the bottom with a flat circular base. Once the base is large enough, you work one round through the back loops and continue upward without increasing.
The witch hat is made separately. It begins at its pointed top, widens gradually into a hollow cone, and finishes with an outward-projecting circular brim.
The two pieces are never stitched together.
Keep the Yarn Comfortable
Try not to pull every stitch as tightly as possible. Cotton does not stretch as much as some acrylic yarns, so very tight crochet may make the sleeve difficult to slide over the jar.
At the same time, stitches that are too loose can make the finished cozy sag.
Aim for small, consistent stitches that move easily along your hook.
Step-by-Step Crochet Tutorial
Part 1: Crochet the Mason Jar Sleeve
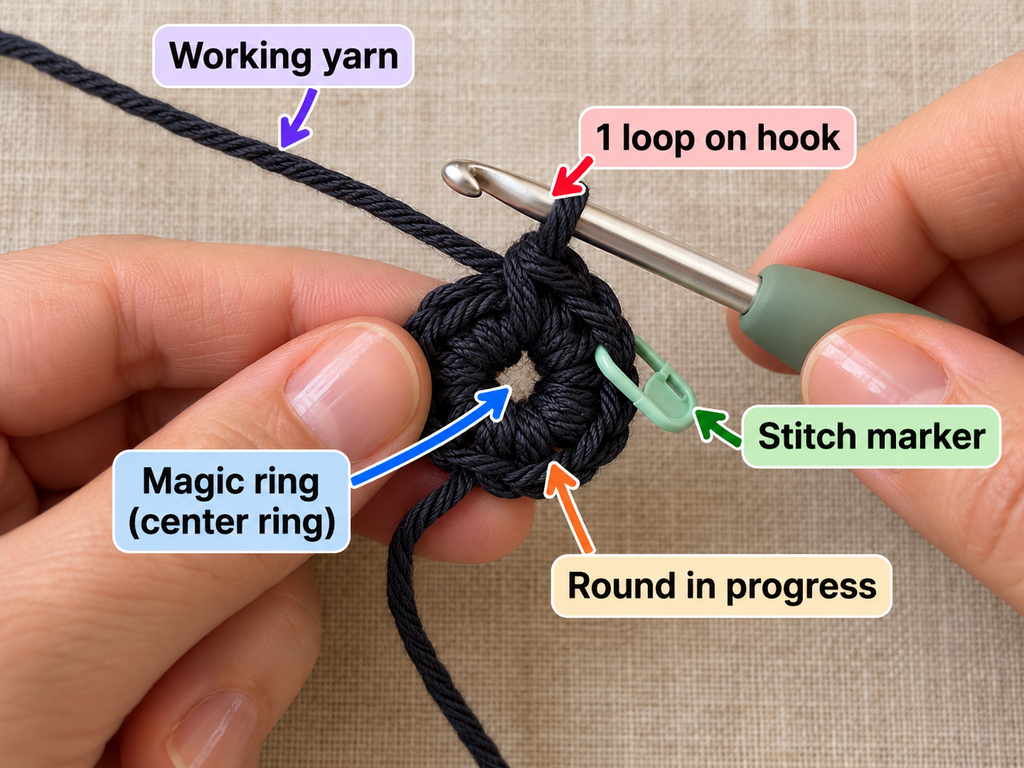
Step 1: Create the Magic Ring
Begin with your charcoal-black cotton yarn.
Make a magic ring by wrapping the yarn into an adjustable loop. Insert your hook through the loop, catch the working yarn, and draw up a loop.
Work six single crochet stitches into the center of the ring.
Gently pull the starting tail until the center closes.
Round 1: 6 sc in MR. (6 sts)
Place a removable stitch marker into the first single crochet to mark the beginning of your round.
Your work should resemble a small, compact flower-shaped circle rather than a flat strip.
If the ring seems difficult to hold, pinch the middle between your thumb and index finger while making the stitches.
Beginner tip: Leave a long enough starting tail to weave securely into the finished base.
Common mistake to avoid: Do not crochet into the empty center of the ring after completing Round 1. From now on, work into the stitches of the previous round.
Step 2: Crochet a Flat Circular Base
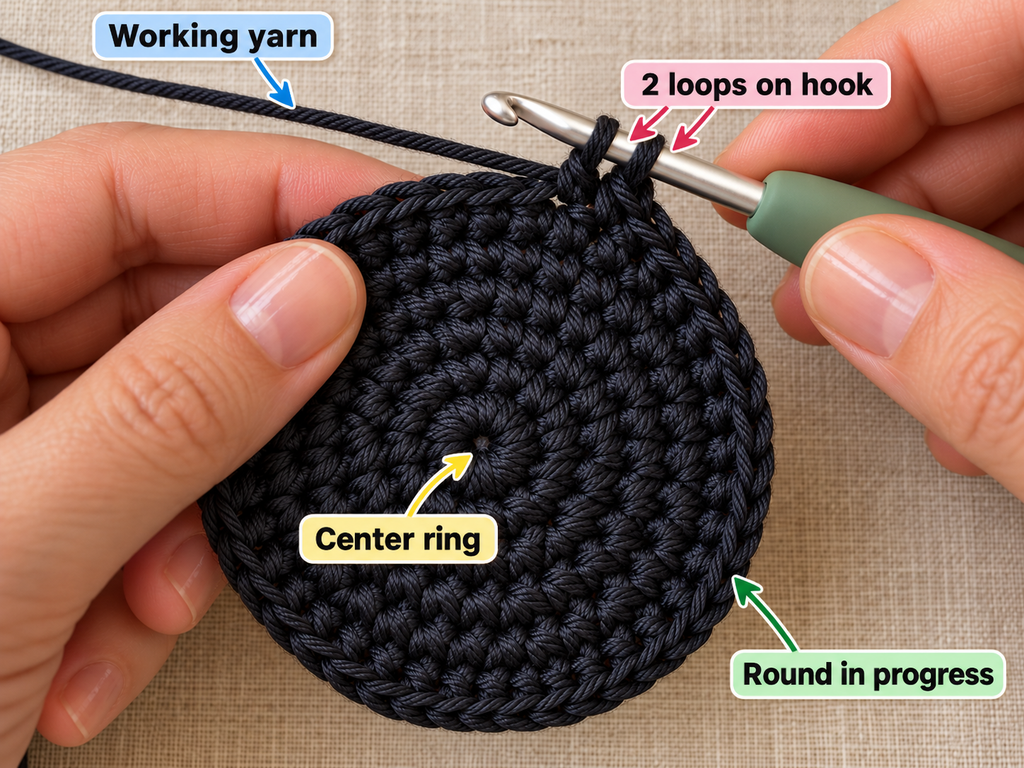
Now expand the small circle by adding evenly spaced increases.
The goal is to make a base that sits comfortably underneath your jar without curling or forming a bowl.
Work the following rounds:
| Round | Instructions | Stitch Count |
|---|---|---|
| 2 | Inc in every stitch | 12 |
| 3 | (1 sc, inc) repeat 6 times | 18 |
| 4 | (2 sc, inc) repeat 6 times | 24 |
| 5 | (3 sc, inc) repeat 6 times | 30 |
| 6 | (4 sc, inc) repeat 6 times | 36 |
Each round adds six stitches.
After completing Round 6, lay your crochet circle flat on the table and place the jar on top.
The circle should cover the flat bottom of the jar, reaching close to its outer edge without extending into a wide loose flange.
With the suggested gauge, 36 stitches correspond to an approximate circumference of 9 inches, which gives a nominal diameter near 2.9 inches. The actual crocheted shape may differ, so measuring the fabric is more reliable than calculating its size from stitch counts alone.
If your jar is smaller, you may need to stop after Round 5. If it is larger, continue with another increase round using the same basic six-increase method.
Beginner tip: Spread your increases around the entire round instead of concentrating them in one area.
Common mistake to avoid: If your circle begins cupping inward, check whether you skipped increases or are crocheting too tightly. If the edges ripple, you may have added too many stitches for your tension.
Step 3: Turn the Base into a Jar Sleeve
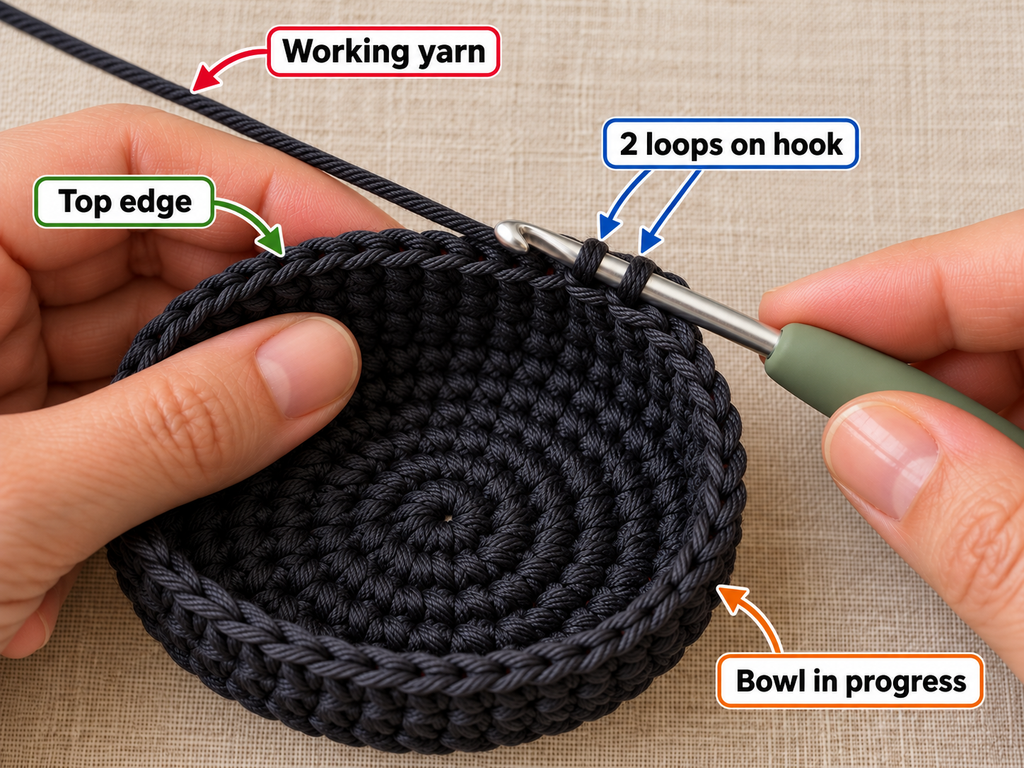
Once your circular base is the correct diameter, stop increasing.
For the next round, work one single crochet into the back loop only of each stitch.
Round 7: Sc in BLO of every stitch around. (36 sts)
This creates a visible ridge around the bottom of your sleeve.
The ridge encourages the fabric to turn upward instead of continuing to spread outward.
After completing the round, gently bend the crocheted fabric upward with your fingers. You should begin to see a shallow cylindrical shape forming.
Beginner tip: Look closely at each stitch before inserting your hook. Only the back half of the V should sit on your hook.
Common mistake to avoid: Accidentally working through both loops will not destroy the project, but it reduces the defined transition between the bottom and the sides.
Step 4: Build the Sides of the Sleeve
Continue working in single crochet, this time through both loops of every stitch.
Rounds 8–21: Sc in every stitch around. (36 sts per round)
You should have 14 rounds of ordinary single crochet above the back-loop turning round.
Do not make any increases or decreases.
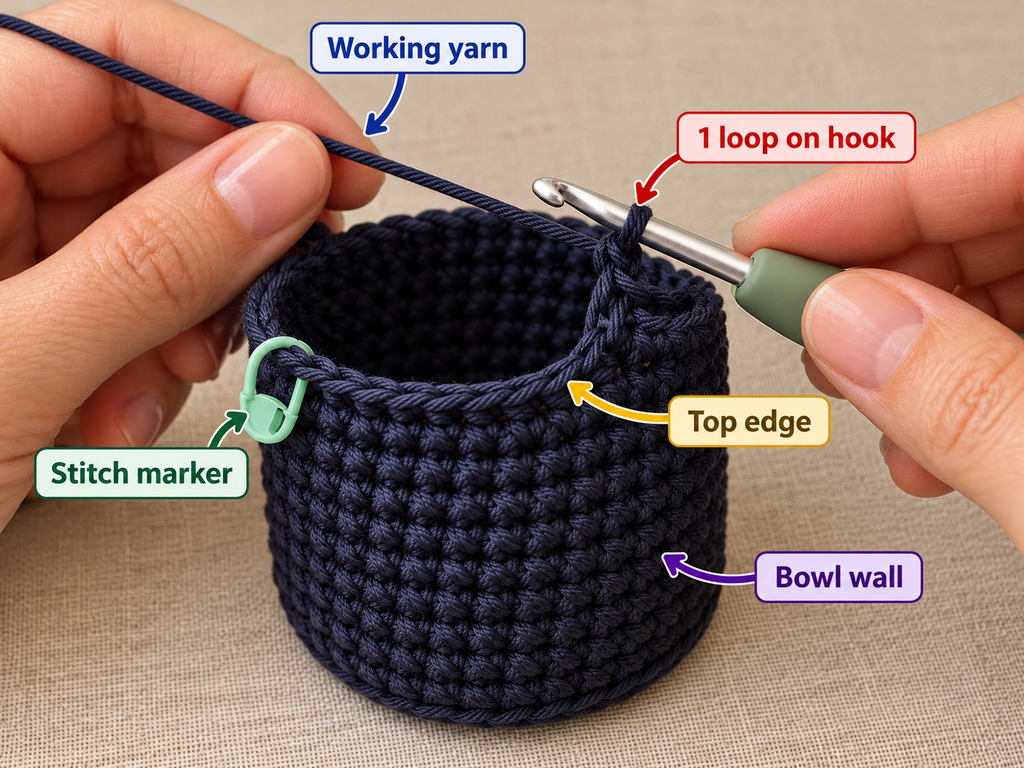
As you crochet, the fabric should develop into a tube with roughly vertical sides.
Because you are working in continuous rounds, the stitches will form a subtle spiral. That is normal and will not noticeably affect the finished jar cozy.
Stop occasionally to count your stitches.
If you accidentally work an extra stitch into the same place, the tube may begin getting wider. If you miss a stitch, it may narrow and become difficult to pull over the jar.
If your chosen jar is taller, you can add more rounds later.
Beginner tip: Keep your stitch marker at the beginning of every round. It is much easier to track your progress now than to count a long stack of rows afterward.
Common mistake to avoid: Avoid tightening the last stitch of each round more than the others. Uneven tension can create visible vertical ridges or irregular areas in the fabric.
Step 5: Test the Jar Cozy Fit
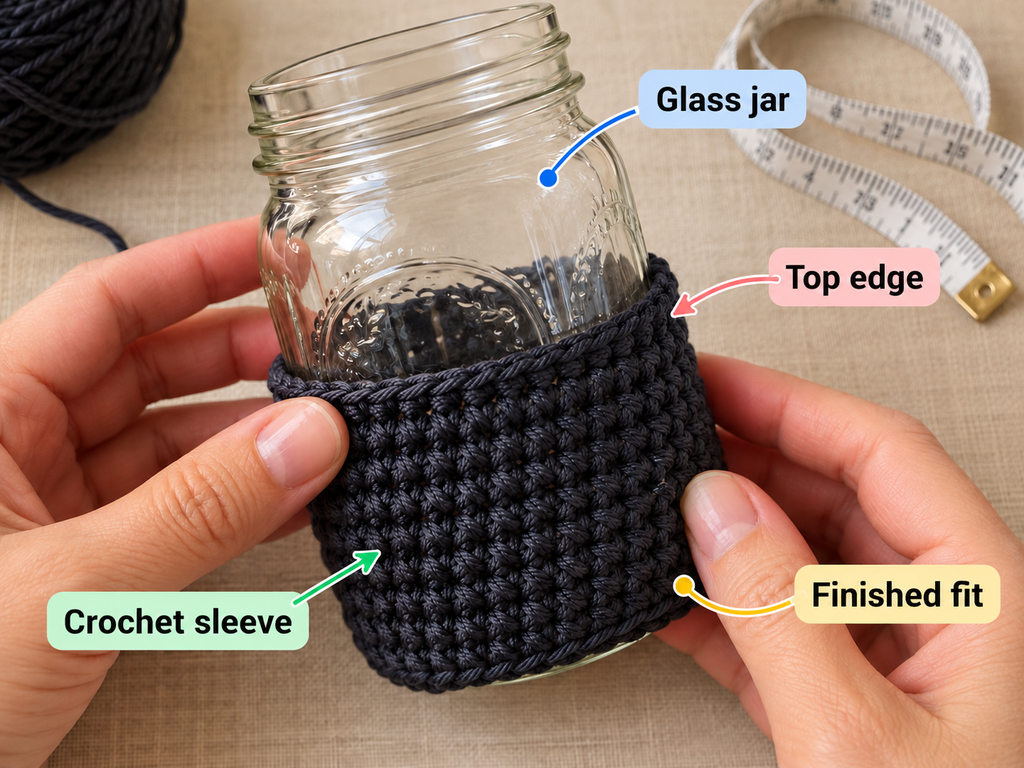
Before fastening off, slide the sleeve over your glass jar.
It should fit snugly around the bottom and sides without requiring force.
A small amount of stretch is acceptable, especially with cotton yarn, but the sleeve should not distort significantly.
Check three things: the base lies flat, the body does not have loose folds, and the upper edge stays below the jar’s neck or shoulder.
If the sleeve is too short, remove it from the jar and add more single crochet rounds.
If it is loose around the entire body, consider remaking the base with fewer stitches or using a slightly smaller hook.
If it is just a little tight, try washing and gently shaping a test swatch before deciding to start over. Do not force a rigid jar into a sleeve that is substantially undersized.
For the sample design, a finished sleeve height of roughly 3.5–4 inches is a reasonable starting target, depending on the jar.
Beginner tip: Fit-check before cutting the yarn. Adjusting the height is easy while your working yarn is still attached.
Common mistake to avoid: Do not stretch the crochet aggressively while it is on the glass jar. Too much force may distort the stitches or cause the jar to slip.
Step 6: Finish the Upper Edge
Once you are satisfied with the height, finish the sleeve with a simple edge.
Work one final round of single crochet through both loops.
Round 22: Sc in every stitch around. (36 sts)
After the last single crochet, work a slip stitch into the next stitch to smooth the transition.
Cut the yarn, leaving a tail approximately 6 inches long.
Draw the tail through your last loop and pull gently to secure the work.
Use your tapestry needle to weave the end through several stitches on the inside of the sleeve.
If you would like a little purple detail, you can embroider a short line of purple running stitches near the top rather than adding a full extra crocheted round.
This keeps the top edge compact and minimizes bulk around the glass.
Set the completed sleeve aside.
Your next task is to make the removable pointed witch hat.
Part 2: Crochet the Mini Witch Hat Topper
Step 7: Start the Point of the Witch Hat
Using charcoal-black yarn, make another magic ring.
This time, work four single crochet stitches into the ring rather than six.
The smaller starting circle helps create a sharper point.
Round 1: 4 sc in MR. (4 sts)
Round 2: Sc in every stitch. (4 sts)
Round 3: Inc in every stitch. (8 sts)
Round 4: Sc in every stitch. (8 sts)
Pull the beginning tail to close the top securely, but avoid pulling so hard that the yarn breaks.
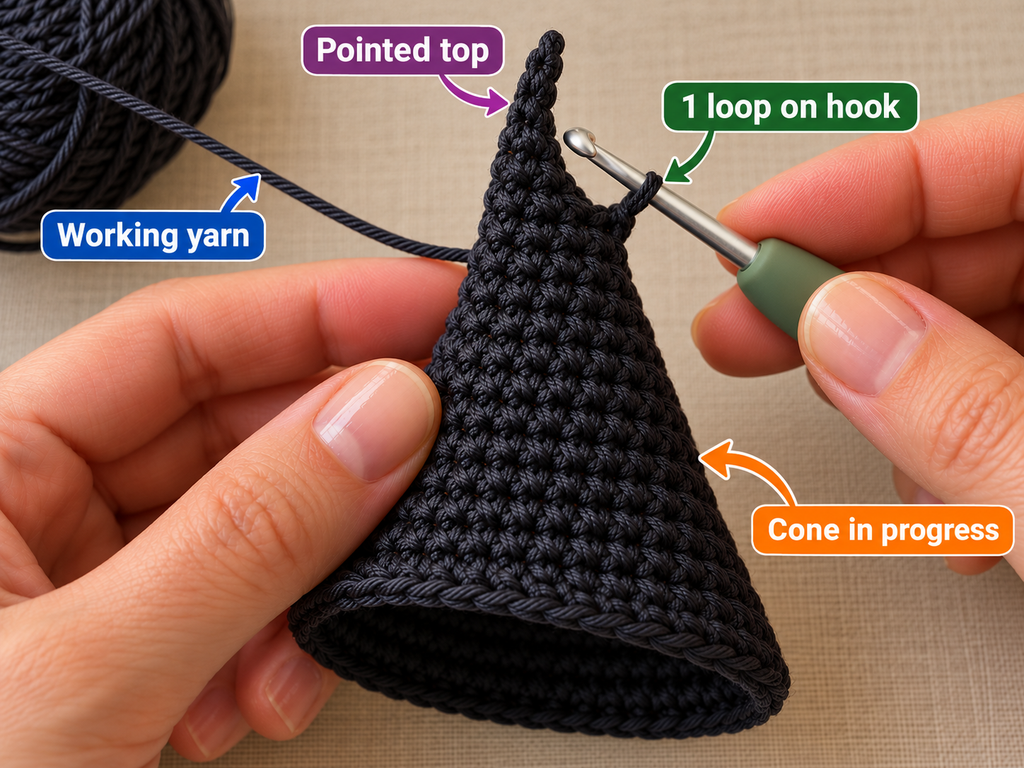
The project may look like a tiny rounded nub at this stage. That is perfectly normal.
Continue with the next increase rounds and it will gradually become a pointed cone.
Unlike the jar sleeve, you do not want a flat circle. The hat should grow taller as its circumference expands.
Beginner tip: When working with only four stitches, hold the piece between your fingertips and turn it gently as you crochet.
Common mistake to avoid: Do not add extra increases between the specified rounds. Too many increases make the top round and squat rather than pointed.
Step 8: Shape the Witch Hat Cone
The next rounds gradually widen the hat.
Rather than adding stitches in every round, alternate an increase round with a plain round.
This creates a taller, more tapered shape.
Work the following sequence:
| Round | Instructions | Total Stitches |
|---|---|---|
| 5 | (1 sc, inc) × 4 | 12 |
| 6 | Sc around | 12 |
| 7 | (2 sc, inc) × 4 | 16 |
| 8 | Sc around | 16 |
| 9 | (3 sc, inc) × 4 | 20 |
| 10 | Sc around | 20 |
| 11 | (4 sc, inc) × 4 | 24 |
| 12 | Sc around | 24 |
| 13 | (5 sc, inc) × 4 | 28 |
| 14 | Sc around | 28 |
| 15 | (6 sc, inc) × 4 | 32 |
| 16 | Sc around | 32 |
| 17 | (7 sc, inc) × 4 | 36 |
| 18 | Sc around | 36 |
| 19 | (8 sc, inc) × 4 | 40 |
By Round 19, the hat should resemble a small hollow cone with a pointed tip and a noticeably wider opening.
You may need to gently shape it with your fingers to see the correct silhouette.
Do not stuff the hat. Leaving it hollow keeps it lightweight and allows the pointed top to bend naturally.
If the cone seems too short for your preferred style, add one or two plain single crochet rounds before starting the brim.
If it seems too wide for your jar, stop at a smaller stitch count and adjust the brim increases accordingly.
Beginner tip: After each increase round, check that exactly four new stitches have been added.
Common mistake to avoid: Be careful not to make the final increase in the first stitch of the next round. The stitch marker will help identify the correct stopping point.
Step 9: Crochet the Wide Witch Hat Brim
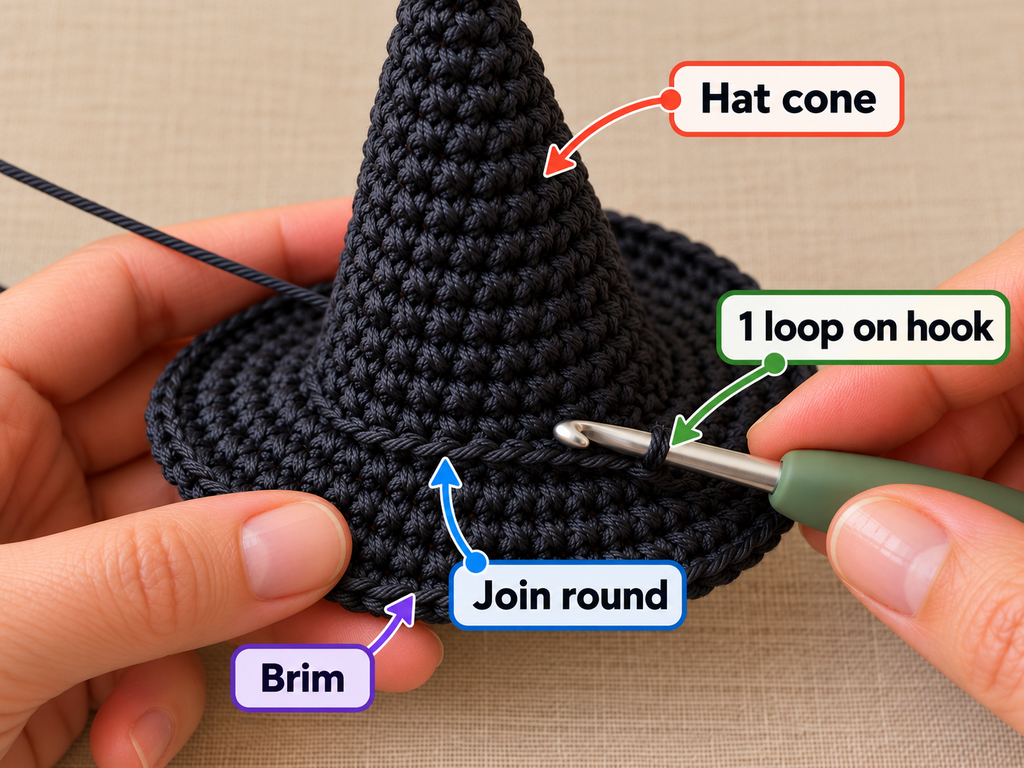
The brim is what transforms a simple crocheted cone into a recognizable witch hat.
To create it, change direction using front-loop-only crochet.
Start at the bottom edge of your completed cone.
Brim Round 1: Working in FLO, repeat (4 sc, inc) eight times. (48 sts)
The fabric should begin folding outward rather than continuing downward.
Brim Round 2: Working through both loops, repeat (5 sc, inc) eight times. (56 sts)
Brim Round 3: Repeat (6 sc, inc) eight times. (64 sts)
Brim Round 4: Sc in every stitch around. (64 sts)
Your brim should now extend outward around the cone.
If the brim seems slightly wavy, place it on the table and smooth it with your hands.
Small variations in tension can create a soft, uneven edge, which can actually look charming on a witch hat.
However, if the brim forms dramatic ruffles, you may have added too many stitches or be working more loosely than expected.
If the brim cups upward, more increases or a looser hook tension may be needed.
For a clean finish, slip stitch into the next stitch, fasten off, and weave the tail into the underside of the brim.
Beginner tip: Work the first brim round slowly. The front-loop transition determines how neatly the brim extends from the cone.
Common mistake to avoid: Do not keep working only in the front loops for every brim round. The first round uses FLO; the remaining rounds use both loops.
Step 10: Add the Purple Witch Hat Band
Now give your hat a little personality.
Using dusty-plum purple yarn, crochet a narrow flat strip.
Row 1: Ch 37. Starting in the second chain from the hook, work 36 sc. (36 sts)
Row 2: Ch 1, turn, and work 36 sc. (36 sts)
Fasten off, leaving a generous tail.
Wrap the strip around the lower part of the cone, just above the brim.
The length is a starting point rather than an exact guaranteed fit. If it is too short, remake it with additional chains. If it overlaps too much, remove a few starting chains.
The band should sit smoothly without squeezing the cone.
Bring the two short ends together and sew them using the yarn tail. You can then secure the band to the hat with two or three small hidden stitches.
Try to position the seam at the back.
A thin purple band creates a lovely contrast against the dark crochet.
If you prefer a more traditional Halloween look, you could use bright orange or pumpkin-colored yarn instead.
Beginner tip: Check the band around the completed cone before sewing its ends together.
Common mistake to avoid: Do not attach the band too tightly. Pulling it firmly can flatten the cone and create an unattractive indentation.
Step 11: Embroider a Little Gold Buckle
The buckle is small, but it gives the hat its classic storybook appearance.
Thread a tapestry needle with a short length of antique-gold cotton yarn.
Find the front center of the purple band.
Using simple straight embroidery stitches, outline a small rectangle.
Aim for a buckle approximately 0.5–0.75 inch wide, depending on the size of your hat.
Begin with one vertical stitch, then make a horizontal stitch across the top. Complete the opposite side and lower edge to close the rectangle.
If you would like a thicker buckle, repeat the outline once.
You can also add one short gold stitch across the center to suggest the buckle’s fastening pin.
Keep the embroidered stitches flat enough that they do not pull the purple band out of shape.
On the inside of the band, secure the yarn by weaving it through several existing stitches.
Beginner tip: Use a tapestry needle with a blunt point. It is easier to pass beneath crochet strands without splitting them.
Common mistake to avoid: Avoid pulling the gold yarn too tightly. This can make the buckle look narrow or distort the stitches beneath it.
Step 12: Assemble Your Witch Hat Jar Cozy
Now that the sleeve and hat are complete, you can put your Halloween decoration together.
Place the clean, dry glass mason jar on a stable surface.
Gently slide the black crochet sleeve upward from the bottom of the jar until its base is fully seated and its sides sit smoothly around the glass.
Make sure the upper edge is even.
Next, place the witch hat over the jar opening.
The cone remains above the jar while the brim rests on or around the upper edge, depending on your jar and final hat measurements.
The removable hat acts as a decorative topper rather than a secure lid.
If you are using the jar to hold candy or small items, remove the hat whenever access is needed.
Your completed project should have a consistent black crochet texture, a narrow purple accent, and a small gold buckle.
The contrast between the soft yarn and the clear glass is what makes this little Halloween decoration so appealing.
Beginner tip: Rotate the hat until the embroidered buckle faces the same direction as the front of your display.
Common mistake to avoid: Do not glue the hat permanently to the glass unless you specifically want a fixed decoration. Keeping it removable makes the jar easier to clean and reuse.
Pattern Notes and Stitch Counts
This crochet project uses continuous rounds for the two main black pieces and turned rows for the purple decorative band.
A continuous round means that you work directly into the first stitch of the following round without joining with a slip stitch.
Your marker identifies where each round begins.
The sleeve has a planned final circumference of 36 stitches. The witch hat cone widens to 40 stitches before the brim begins. The brim then grows to 64 stitches.
| Part | Construction | Key Count |
|---|---|---|
| Sleeve base | Flat circle, 6 increases per round | 36 sts after Round 6 |
| Sleeve transition | Back-loop-only single crochet | 36 sts |
| Sleeve body | Plain single crochet rounds | 36 sts per round |
| Witch hat tip | 4 sc in magic ring | 4 sts |
| Witch hat cone | 4 increases on alternate rounds | 40 sts after Round 19 |
| Witch hat brim | Three increase rounds, one plain round | 64 sts |
| Purple band | Two turned rows of single crochet | 36 sc per row |
Turning Chain Rules
The purple band uses a chain-one turning chain. This chain does not count as a stitch.
After turning, insert the hook into the first actual stitch rather than skipping it.
Right Side and Wrong Side
For the sleeve and hat, keep the side with the clean, outward-facing V stitches visible on the exterior.
If your piece naturally curls with the wrong side outward, gently turn it before it becomes too large.
Both the outer and inner surfaces are usable, but consistency makes the finished project look neater.
How to Adjust the Size
If you use a different jar, compare its outer diameter with the crochet base before beginning the sides.
For the sleeve, keep adding flat-circle increase rounds until you reach the required diameter. Then work the back-loop transition and continue in plain rounds.
For the hat, check the circumference of the lower cone before making the brim. You want the hat to cover the opening without disappearing inside the jar.
If a wider hat is required, add one or more cone increase rounds, distributing four additional stitches evenly. Then design the brim with regularly spaced increases appropriate to the new stitch count.
For different yarn or jar sizes, the written counts may need adjustment.
Common Beginner Mistakes and How to Fix Them
1. The Crochet Base Will Not Stay Flat
If the base turns into a bowl before you reach the intended size, your work may be too tight or missing increases.
Recount the stitches at the end of the round. Compare them with the pattern table.
If the count is correct but the circle still curves noticeably, test a slightly larger crochet hook.
A little curling may settle when the fabric is shaped, but a deeply cupped base usually requires an adjustment.
2. The Jar Sleeve Gets Wider as You Crochet
This generally happens when an extra stitch is added accidentally.
You may be inserting your hook into the same stitch twice at the start of a round.
Use a stitch marker and count every round until you are comfortable recognizing the stitch positions.
If the tube already contains several incorrect rounds, unravel back to the last correct stitch count and continue from there.
3. The Sleeve Is Too Tight
Cotton crochet has limited elasticity compared with some other fibers.
If the sleeve will not slide comfortably over the jar, avoid pulling or forcing it.
Measure the base and check whether you selected an appropriate hook.
For a substantial fit problem, remake the base with an additional increase round or a more suitable gauge.
4. The Witch Hat Looks Like a Dome
A rounded dome usually means the cone is growing in circumference too quickly for its height.
Check that the increases were worked only on the specified rounds.
For a taller, sharper hat, add plain rounds between some increase rounds.
Try not to manipulate the fabric into a point using extreme tension. Correct shaping should come primarily from the stitch construction.
5. The Brim Looks Like a Ruffle
Too many increases can cause the fabric to ripple dramatically.
A slightly playful brim is suitable for a witch hat, but large uncontrolled waves may prevent it from sitting neatly over the jar.
Count your stitches after every increase round.
If the count is correct and the ruffling is still excessive, consider removing the last increase round or changing your hook size.
6. The Hat Band Slides Out of Position
A loose band may move upward or downward when the hat is handled.
Before fastening it permanently, pull the band gently into place and check the fit.
Use a few discreet stitches to anchor it at the front and back.
7. The Gold Buckle Looks Crooked
A crooked buckle is usually easier to correct before securing the final yarn tail.
Remove the embroidery and mark the desired rectangle lightly with removable pins.
Stitch the vertical sides first, then the top and bottom.
Keep the gold yarn tension even.
8. The Hat Keeps Falling Off the Jar
The brim may be too small to rest on the jar opening, or the jar may have a rounded upper shoulder.
Measure the opening and adjust the brim accordingly.
For display stability, choose a jar with a relatively level upper lip.
Remember that this crochet hat is a decorative cover, not a locking lid.
How to Customize Your Crochet Witch Hat Jar Cozy
One of the nicest features of this project is how easily you can change its appearance without learning a completely different pattern.
Try Different Halloween Colors
For a classic witch-inspired decoration, black and purple work beautifully together.
If you prefer something brighter, try charcoal-black yarn with an orange hat band and a pale-yellow buckle.
A deep forest-green hat with a black band gives the project a more whimsical woodland feel.
For soft pastel Halloween decor, use lavender yarn with a cream-colored band.
Just remember that the stitch details may be easier for beginners to see in lighter yarn.
Add a Decorative Border
A row of slip stitches around the top edge of the sleeve creates a simple finished look.
You could also add a contrasting purple slip-stitch border.
Keep the border narrow so it does not interfere with the sleeve’s fit.
Change the Hat Shape
For a slightly crooked witch hat, gently bend the upper point after finishing.
A soft cotton cone may hold a modest bend, especially if the stitches are firm.
For a taller hat, add plain rounds between the cone increase rounds.
For a wider brim, work additional increase rounds, checking carefully that the fabric remains close to flat.
Make a Matching Halloween Set
Once you have completed one jar cozy, try making two or three in different colors.
A trio of coordinating jars looks lovely on a mantel or an autumn-themed shelf.
You could make one black-and-purple witch hat, one black-and-orange version, and one dark-green version.
Using the same jar shape and yarn weight will give the collection a coordinated appearance.
Use the Jar for Different Decorations
A finished crochet witch hat jar cozy can work as:
- A Halloween candy jar with a removable topper.
- A holder for wrapped sweets.
- A seasonal shelf or mantel decoration.
- A handmade gift for a crochet-loving friend.
- A Halloween party table accent.
- A container for lightweight craft accessories.
For wrapped food, keep it in the clean glass jar and avoid direct contact with the crochet topper.
Finishing Instructions
Good finishing makes even a simple crochet project look more carefully made.
First, examine the sleeve and hat for loose yarn tails.
Thread each tail through a tapestry needle and weave it through several nearby stitches on the wrong side of the fabric.
Change direction once or twice to help the tail remain secure. Trim any excess yarn carefully.
Next, check the brim. Gently arrange the stitches with your fingertips so the edge lies evenly.
If the brim curves or curls slightly, lightly dampen it and lay it flat to dry, following the yarn label’s care directions.
Do not apply high heat directly to synthetic fibers.
For cotton, a gentle wet blocking process can help the brim settle into a more even shape. Avoid stretching it so much that the lower cone no longer fits the jar.
Let every crocheted piece dry fully before putting it on the glass.
If your hat band has shifted during handling, reposition it and add another small securing stitch.
Finally, wipe the jar clean, allow it to dry, and assemble your decoration.
Washing and Care
Handwashing is a practical choice for a small project with embroidered details.
Use cool water and a mild detergent suitable for the yarn.
Gently press excess water out with a towel rather than wringing or twisting the crochet.
Lay the components flat and reshape them while damp.
Store the hat and sleeve separately when they are not being used.
Important Safety Note
This design is intended for decoration rather than heat protection. Do not use it with candles, open flames, hot glass, or heated appliances.
If you want to create a glowing Halloween display, use a cool-running battery-operated LED light designed for enclosed decorative use, with sufficient ventilation and no heating risk.
Keep loose accessories and small decorative items away from young children.
The hat is a removable decorative topper and should not be treated as a secure closure for food storage.
Quick Printable-Style Pattern Summary
Crochet Witch Hat Jar Cozy — Quick Pattern
Skill level: Confident beginner
Materials: #4 cotton yarn in black, purple, and gold; 4.0 mm hook; scissors; tapestry needle; stitch marker; mason jar.
Stitches: MR, ch, sc, sl st, inc, BLO, FLO.
Jar sleeve
- R1: 6 sc in MR. (6)
- R2–6: Increase evenly by 6 each round. (12, 18, 24, 30, 36)
- R7: BLO sc around. (36)
- R8–21: Sc around. (36)
- R22: Sc around, sl st, finish. (36)
Witch hat
- R1: 4 sc in MR. (4)
- R2: Sc around. (4)
- R3: Inc around. (8)
- R4: Sc around. (8)
- R5–18: Alternate four evenly distributed increases with one plain round, increasing from 12 to 36 stitches.
- R19: (8 sc, inc) × 4. (40)
- Brim R1: FLO (4 sc, inc) × 8. (48)
- Brim R2: (5 sc, inc) × 8. (56)
- Brim R3: (6 sc, inc) × 8. (64)
- Brim R4: Sc around. (64)
Hat band: Ch 37, work 36 sc; ch 1, turn, work 36 sc. Sew around cone.
Finishing: Embroider a gold buckle, weave in ends, check the fit, and place the removable hat on the jar.Sample sizing only. Check gauge and fit against your actual jar before fastening off. Pattern instructions are an original proposed construction and have not been physically sample-tested.
Copy quick pattern
Frequently Asked Questions
1. Is this crochet witch hat jar cozy suitable for beginners?
Yes, it is designed for confident beginners who already know how to chain and make single crochet stitches.
The trickiest techniques are the increases and the front-loop-only brim round, but both are straightforward when you follow the stitch counts.
If you have previously crocheted a small circle or simple amigurumi project, you should find this pattern approachable.
2. What kind of yarn works best for a Halloween jar cozy?
Medium-weight cotton yarn is an excellent option because it offers good stitch definition and a relatively firm finished fabric.
Cotton also works well for creating small decorative details.
Acrylic yarn can be used for a lightweight decoration, but the witch hat brim may be softer.
Always check the suggested hook size and consider making a gauge swatch if the jar fit is important.
3. Can I make this crochet jar cozy without a magic ring?
Yes. As an alternative, chain two and work the required starting single crochet stitches into the second chain from the hook.
This is often easier for beginners who have trouble holding an adjustable ring.
You may have a slightly larger center hole, but it will usually be hidden beneath the jar or at the pointed tip of the hat.
4. How do I make the pattern fit a larger mason jar?
Measure the diameter of the jar’s base and crochet a flat circle that matches it.
Continue the increase sequence until you reach the required size.
Then work the back-loop transition and build the side walls without increasing.
You will also need to adjust the witch hat cone and brim if the jar has a wider opening.
5. Can I use a crochet witch hat jar cozy as a candle holder?
Do not use this crochet cover with a real flame or hot candle. Yarn is combustible, and covering glass can create additional safety concerns.
A cool-running battery-operated decorative LED light may provide a similar Halloween atmosphere without an open flame, provided it is used according to its instructions.
6. Why does my crochet witch hat brim curl?
Curling can happen when your stitches are too tight, the brim has too few increases, or the yarn behaves differently from the sample assumptions.
Check your stitch counts first.
You can also try gentle blocking, or experiment with another evenly distributed increase round if the brim cups upward.
If the brim ruffles outward excessively, you may need fewer increases instead.
7. Can I make several of these as handmade Halloween gifts?
Absolutely. Small seasonal crochet decorations are especially suitable for making in matching sets.
Try combining different hat-band colors or choosing jars of the same size to simplify the process.
For gifts, include a short care note explaining that the crochet pieces are removable and should be kept away from heat and open flames.
Conclusion
A crochet witch hat jar cozy is a satisfying way to turn a few basic stitches into something decorative, practical to display, and unmistakably Halloween-inspired.
The simple jar sleeve gives you practice crocheting flat circles and straight sides, while the miniature witch hat introduces the fun of shaping a cone and creating a flared brim.
Once you have completed your first one, experiment with different yarn colors, hat sizes, and buckle details to make a set that matches your Halloween decor.
Save this tutorial for your next autumn crochet session, or try making a coordinating pumpkin jar cozy to display beside your little witch hat.





