
Math and crochet might seem like an unusual combination, but these little yarn symbols are a fun way to bring handmade details into a classroom, homework corner, or teacher’s gift.
If you have leftover cotton yarn and know how to make a chain and single crochet stitch, you already have most of the skills needed for this project.
This easy crochet math symbol applique pattern shows you how to make four familiar mathematical signs: a plus sign, a minus sign, an equals sign, and a multiplication sign.
Instead of working complicated shapes or changing stitches constantly, we’ll crochet simple rectangular strips and arrange them into recognizable symbols. This method keeps the pattern beginner-friendly while giving you control over the finished size and shape.
You can sew the appliques onto pencil pouches, tote bags, classroom banners, notebook covers, or crocheted learning mats. They also make cute decorations for back-to-school projects.
The instructions below use US crochet terminology and include stitch counts, assembly directions, finishing tips, and image placements for each important stage.
What You’ll Learn
By the end of this tutorial, you’ll know how to:
- Crochet small, straight strips using single crochet.
- Keep your stitch counts consistent across several pieces.
- Join crocheted strips without bulky seams.
- Make four different math symbols using the same basic technique.
- Adjust the size of your appliques for different projects.
- Finish and attach appliques neatly to fabric or crochet surfaces.
The most important technique is learning how to arrange simple crochet pieces into clear shapes. Once you understand that idea, you can experiment with other symbols, letters, and geometric decorations.
Materials You’ll Need
For this project, gather the following supplies:
- DK-weight cotton yarn in four colors.
- One 3.5 mm crochet hook.
- Small sharp scissors.
- A blunt tapestry needle for sewing.
- A measuring tape or small ruler.
- Stitch markers, optional but useful.
- Sewing pins or removable clips for positioning pieces.
- A flat surface for assembling your appliques.
You only need small amounts of yarn. This makes the project especially useful for leftover yarn from larger crochet projects.
For a matching classroom set, choose colors with similar brightness and yarn thickness. Mixing very thick yarn with thin cotton yarn can make the finished symbols look uneven.
Beginner tip: A light-colored yarn is usually easier to learn with because you can see the individual stitches. Dark navy or black yarn can hide the loops, particularly when working with small pieces.
Crochet Abbreviations Used
| Abbreviation | Meaning |
|---|---|
| ch | Chain |
| sc | Single crochet |
| sl st | Slip stitch |
| st / sts | Stitch / stitches |
| RS | Right side |
| WS | Wrong side |
This tutorial uses US terms. In UK terminology, US single crochet is called double crochet. The stitch itself is the same; only the name changes.
The abbreviations follow standard crochet pattern conventions.
Welcome to the Craft Yarn Council
Before You Start
Understanding the construction
Every math symbol in this project begins with a small rectangular crochet strip.
A rectangle is made by crocheting a foundation chain, working single crochet stitches across it, turning, and repeating the process for the required number of rows.
You will make either one or two strips depending on the symbol.
How the four symbols are assembled
Plus2 crossing strips
Minus1 horizontal strip
Equals2 parallel strips
Multiply2 diagonal strips
Simplified shape diagrams, not stitch-by-stitch crochet charts.
Gauge and tension
Exact gauge isn’t critical because these are decorative appliques rather than fitted garments.
However, consistent tension matters.
If you crochet tightly, your strips may become stiff and curl at the edges. If your stitches are too loose, the strips may stretch and lose their shape when sewn together.
Aim for firm but comfortable stitches.
You should be able to insert your hook into each stitch without forcing it through the yarn.
If your work curls noticeably, try a slightly larger hook or relax your tension.
Counting stitches correctly
One of the most common beginner mistakes is accidentally adding or removing stitches at the ends of rows.
For this pattern, the turning chain does not count as a stitch.
When you finish a row, make one chain, turn your work, and insert the hook into the first actual single crochet stitch.
Count your stitches after every row.
For example, if your strip should contain seven single crochet stitches, every row should have exactly seven.
This small habit will make assembling the finished math symbols much easier.
Right side and wrong side
Single crochet fabric has a slightly different appearance on each side.
For these appliques, either side can face outward.
Choose the side that looks neater to you, then keep that side facing upward when assembling the pieces.
If you are making a complete set, use the same approach for all four symbols so they look consistent.
Step-by-Step Crochet Math Symbol Applique Tutorial
We’ll begin with the basic strip and then use it to construct each mathematical sign.
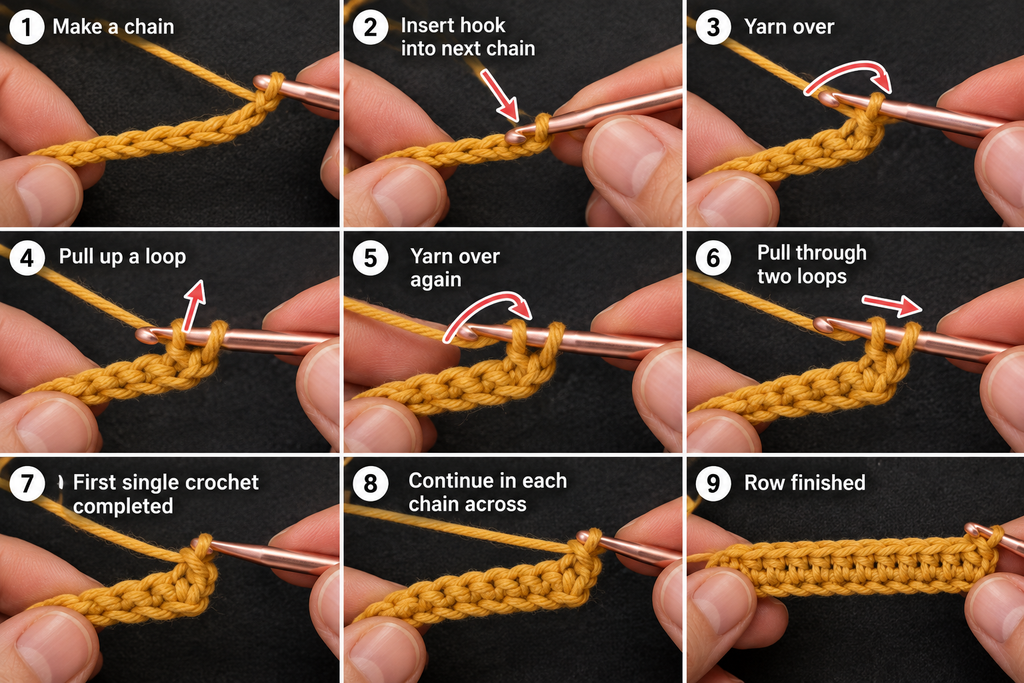
Step 1: Make the foundation chain
Start with your mustard yellow cotton yarn and a 3.5 mm crochet hook.
Make a slip knot and place it onto your hook.
Hold the yarn comfortably in your non-dominant hand and wrap it over the hook.
Pull the wrapped yarn through the loop already on your hook. This creates your first chain stitch.
Continue until you have eight chains.
You should now see a short chain with eight small V-shaped stitches.
Avoid pulling each chain too tightly. The chain needs enough flexibility for you to insert the hook into it during the next step.
Beginner tip: Count each completed chain as you work rather than trying to count the entire chain afterward.
Common mistake to avoid: Do not count the slip knot as a chain stitch.
Step 2: Crochet your first rectangular strip
Now we’ll turn that chain into a flat strip.
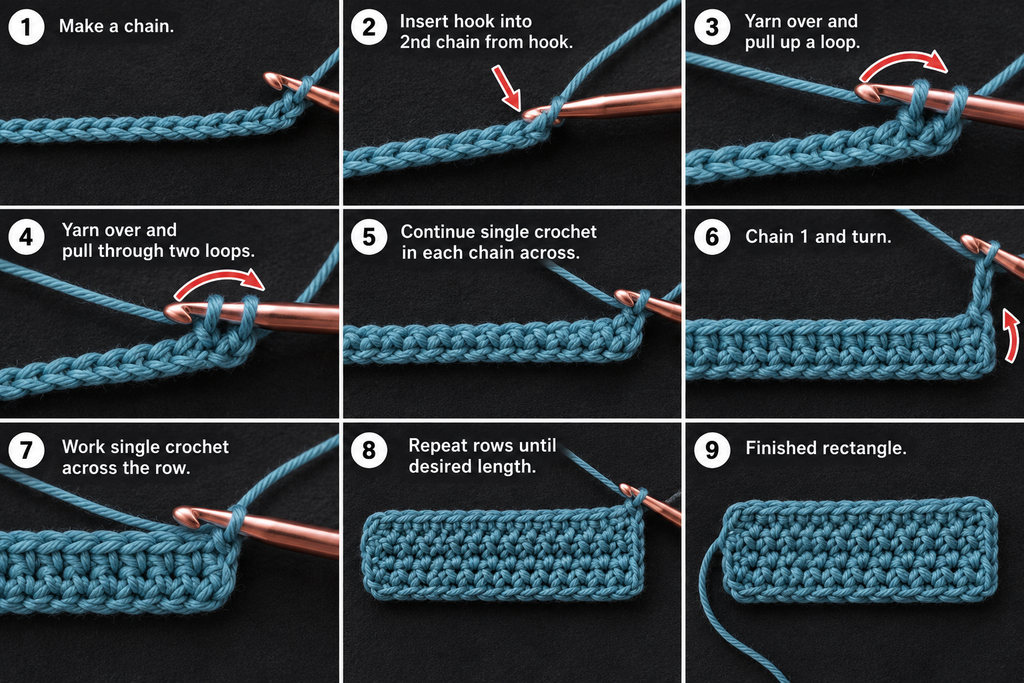
Insert your hook into the second chain from the hook.
Yarn over and pull up a loop. You should have two loops on your hook.
Yarn over again and pull through both loops.
You have completed one single crochet stitch.
Continue working one single crochet into each remaining chain.
At the end of the row, you should have seven single crochet stitches.
Row 1: Sc in the second ch from hook and in each ch across. (7 sc)
Row 2: Ch 1, turn. Sc in each st across. (7 sc)
Fasten off after Row 2, leaving a yarn tail long enough for sewing.
You now have a narrow rectangle measuring seven stitches long and two rows wide.
This will become the horizontal bar of your plus sign.
Beginner tip: Lay the strip flat after finishing the second row. If the rectangle looks wider at one end, count your stitches and check whether you accidentally worked into the turning chain.
Step 3: Make the vertical strip for the plus sign
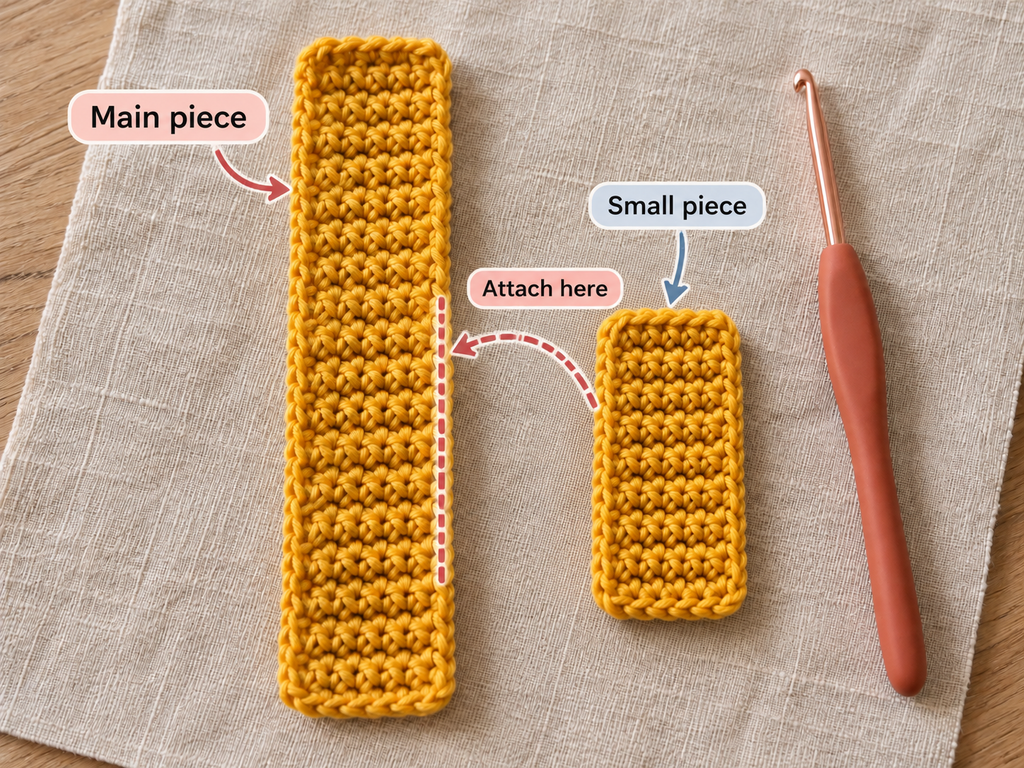
The plus sign needs a second rectangle.
Use the same mustard yellow yarn so both pieces match.
Make a slip knot and chain eight.
Work one single crochet into the second chain from the hook and into each remaining chain.
You should have seven stitches.
Chain one, turn, and work seven single crochet stitches across the next row.
Fasten off, leaving another sewing tail.
You now have two identical rectangles.
One will run horizontally, and the other will run vertically.
Place them on your work surface and check that they are approximately the same length and width.
If one strip looks noticeably longer, compare the stitch counts and tension.
Beginner tip: Crocheting both strips during the same session often helps maintain consistent tension.
Step 4: Assemble the crochet plus sign (+)
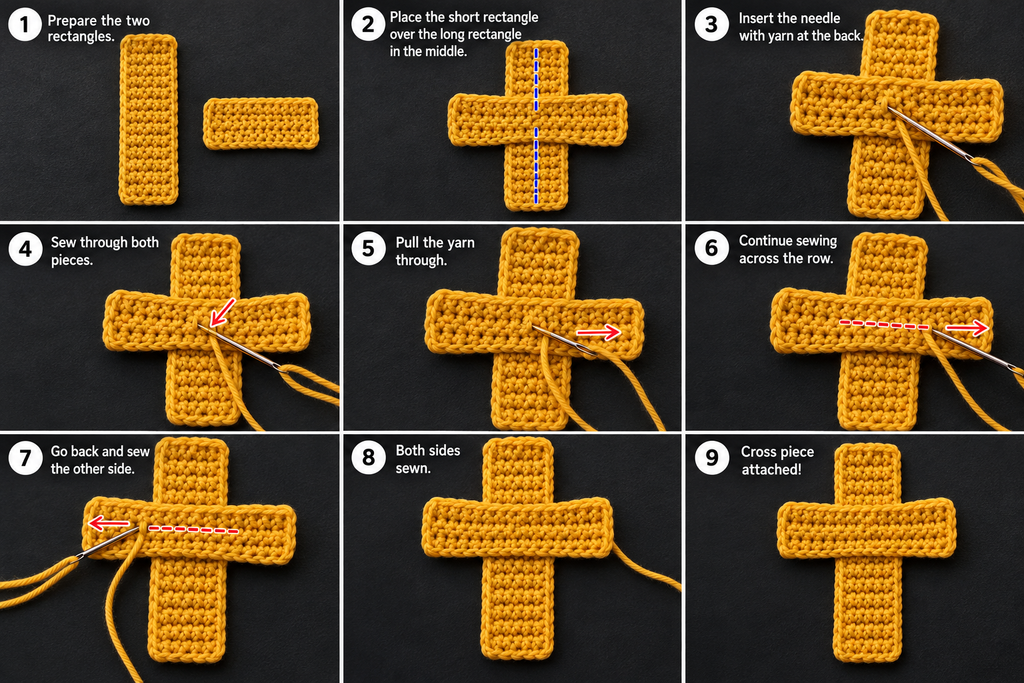
Place one rectangle horizontally on your work surface.
Lay the second rectangle vertically across the center of the first.
Adjust the position until the four arms appear balanced.
Each arm should extend a similar distance from the center.
Thread one yarn tail through your tapestry needle.
Carefully stitch through both layers at the center overlap.
Use several small stitches to hold the rectangles together securely.
Try to keep the sewing stitches hidden between the crochet loops.
Once the center is secure, turn the applique over and weave the yarn tail into the back.
Trim any excess yarn.
You now have a completed crochet plus sign.
Beginner tip: Before sewing, place a removable stitch marker through the overlapping center to keep the strips aligned.
Common mistake to avoid: Don’t pull the sewing yarn so tightly that the center puckers. The applique should remain flat.
Step 5: Crochet the minus sign (−)
The minus sign is the easiest symbol in this collection.
It requires only one horizontal rectangle.
Choose your dusty teal cotton yarn.
Foundation: Ch 8.
Row 1: Sc in the second ch from hook and each ch across. (7 sc)
Row 2: Ch 1, turn. Sc in each st across. (7 sc)
Fasten off and weave in both ends.
Lay the rectangle flat with its longest edge running horizontally.
Your minus sign is complete.
If you want the minus sign to look slightly wider than the other symbols, add two or three chains to the foundation and work the same number of single crochet stitches across each row.
For example, chain eleven to make a ten-stitch-long strip.
Keep the width at two rows so it remains visually consistent with the rest of your collection.
Beginner tip: The minus sign is an excellent practice piece before making the more complicated symbols.

Step 6: Crochet the equals sign (=)
The equals sign uses two matching horizontal strips.
Choose coral pink yarn.
For the first strip:
Foundation: Ch 8.
Row 1: Sc in second ch from hook and each ch across. (7 sc)
Row 2: Ch 1, turn. Sc across. (7 sc)
Fasten off.
Repeat the same instructions to make a second identical rectangle.
Lay both strips horizontally on your work surface.
Position one above the other, leaving a small, even gap between them.
Make sure the left and right edges line up.
The gap is important because it makes the symbol recognizable.
For a freestanding applique, the two bars must be attached to a backing, such as felt, fabric, or a crocheted rectangle. Without a backing or connecting stitches, they remain two separate pieces.
For a pencil pouch or tote bag, position the strips directly on the fabric and sew around their edges using matching yarn or thread.
Beginner tip: Use a ruler to check that both strips are parallel before attaching them.
Common mistake to avoid: Don’t place the strips too close together. If they touch, the symbol may look like one thick horizontal bar.
Step 7: Crochet the multiplication sign (×)
The multiplication symbol uses two diagonal strips.
Choose cream cotton yarn.
Crochet two matching rectangles using the same basic pattern.
For each strip:
Foundation: Ch 8.
Row 1: Sc in second ch from hook and each ch across. (7 sc)
Row 2: Ch 1, turn. Sc in each st across. (7 sc)
Fasten off, leaving a long sewing tail on one strip.
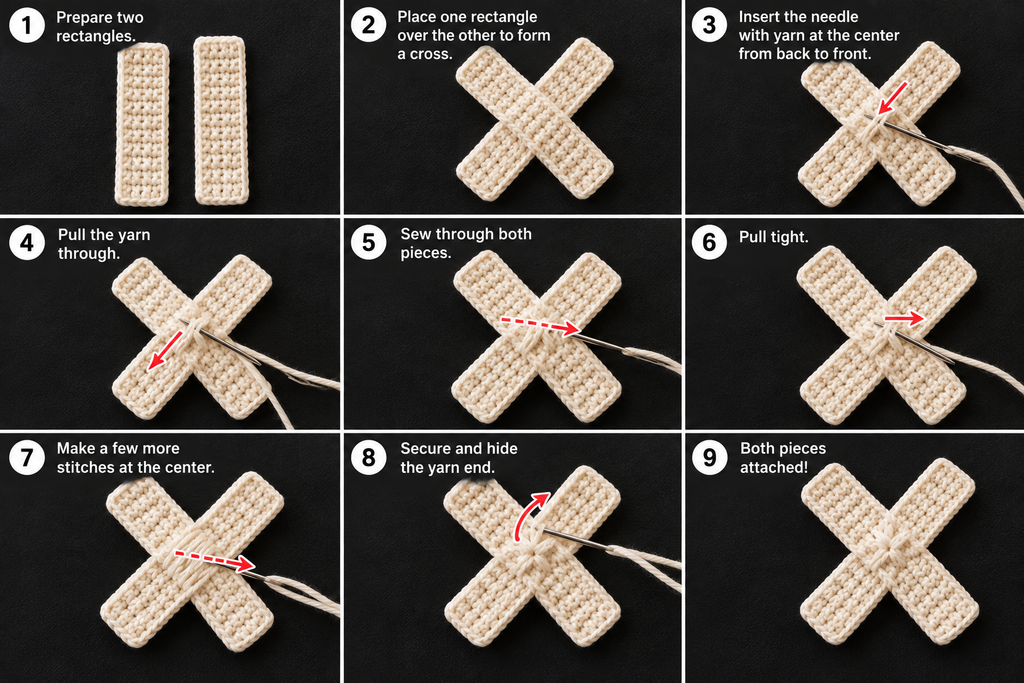
Lay the first rectangle diagonally, running from the upper left to the lower right.
Position the second rectangle across it, running from the lower left to the upper right.
The two strips should cross in the center, forming an X.
Adjust the angles until the four arms look balanced.
Thread your tapestry needle and sew through both layers at the center.
Use several small stitches to keep the pieces secure.
Weave in the remaining yarn tails.
Beginner tip: Lay your finished plus sign beside the multiplication sign while assembling. This helps you see the difference between a straight cross and a diagonal cross.
Common mistake to avoid: Avoid placing one strip almost vertically. The multiplication sign should have four clearly diagonal arms.

Pattern Notes and Stitch Counts
Here is a quick reference for making the four symbols.
| Symbol | Pieces | Pattern per piece | Assembly |
|---|---|---|---|
| Plus (+) | 2 | Ch 8, 2 rows of 7 sc | Cross at 90° |
| Minus (−) | 1 | Ch 8, 2 rows of 7 sc | No joining needed |
| Equals (=) | 2 | Ch 8, 2 rows of 7 sc | Attach as parallel bars |
| Multiplication (×) | 2 | Ch 8, 2 rows of 7 sc | Cross diagonally |
Each rectangular piece uses fourteen single crochet stitches in total, excluding the foundation chain and turning chain.
The turning chain never counts as a stitch.
All strips are worked in rows, not rounds.
There are no increases or decreases.
For each rectangle, the stitch count stays at seven throughout both rows.
This consistency makes the pattern easy to memorize.
If you want to make multiple classroom sets, crochet all the strips first and assemble the symbols afterward. Working in batches can save time and help maintain consistent sizes.
Common Beginner Mistakes and How to Fix Them
1. Uneven rectangle edges
If one end of your strip is wider than the other, you may have accidentally added an extra stitch.
Fix: Count the stitches after every row. Remember that the turning chain does not count as a stitch.
2. Curled or twisted strips
Small crochet pieces sometimes curl when the foundation chain is too tight.
Fix: Make the foundation chain more loosely or use a slightly larger hook for the chain only.
3. Different strip lengths
Even with the same stitch count, two strips may look different if your tension changes.
Fix: Crochet slowly and keep a consistent grip on the yarn. Measure the strips before sewing.
4. Bulky centers
Joining two crocheted rectangles creates overlapping layers.
Fix: Use only enough sewing stitches to secure the center. Avoid adding unnecessary knots or wrapping yarn repeatedly around the overlap.
5. Crooked equals sign
The two horizontal bars can shift while you sew them to a backing.
Fix: Use removable markers or sewing pins to hold the strips parallel before attaching them.
6. Multiplication sign looks like a plus sign
If the diagonal strips are positioned too upright, the multiplication sign may resemble a regular cross.
Fix: Rotate both strips until the four arms create a clear X shape.
7. Visible yarn tails
Short yarn tails may work their way out of the stitches.
Fix: Leave tails long enough to weave through several stitches on the back, changing direction when possible.
How to Customize Your Crochet Math Symbols
One of the best things about this project is how easily you can adapt it.
You can change the yarn, colors, dimensions, and finishing style without learning a completely different technique.
Choose different yarn colors
Bright primary colors are perfect for kindergarten and elementary school decorations.
For a softer classroom theme, try sage green, cream, dusty rose, and pale yellow.
If you’re making a gift for a math teacher, choose colors that match the classroom or school theme.
You can also make every symbol in the same color for a coordinated minimalist look.
Make larger symbols
To create larger math appliques, increase the foundation chain length.
For example, chain fifteen and work fourteen single crochet stitches across each row.
Add more rows if you want wider bars.
A larger plus sign might use two rectangles that are fourteen stitches long and three rows wide.
When enlarging the pattern, make sure all strips within one symbol have matching dimensions.
Make smaller symbols
For miniature appliques, use fingering-weight cotton and a smaller hook suited to the yarn.
You can also reduce the foundation chain to six chains, producing five single crochet stitches per row.
These tiny symbols work well on bookmarks, small zipper pouches, or decorative patches.
Add a decorative border
For a more finished appearance, work slip stitches or single crochet stitches around the outer edges of each rectangle before assembling.
This creates a slightly thicker border and can help define the shapes.
If you add borders, make all strips using the same method so their dimensions remain consistent.
Experiment with texture
The basic pattern uses single crochet because it creates a firm, relatively flat fabric.
You can experiment with half double crochet for a softer, slightly taller stitch texture.
However, changing stitches may affect the proportions of your symbols.
Always make a small sample before crocheting an entire set.
Use the appliques for classroom crafts
These math symbols can be used in many educational projects.
Try sewing them onto a handmade classroom banner, decorating a math-themed tote bag, or adding them to a felt activity board.
You could also make several sets in different colors and arrange them around numbers on a learning mat.
For an interactive board, attach the symbols securely to larger fabric pieces. Avoid small detachable parts for children who may put objects in their mouths.
Finishing Instructions
Fastening off
After completing the final row of each strip, cut the working yarn, leaving a tail approximately six inches long if the piece will be sewn to another strip.
Pull the yarn tail completely through the loop on your hook and tighten gently.
This secures the final stitch.
Weaving in ends
Thread the yarn tail through a blunt tapestry needle.
Turn the applique to its wrong side.
Insert the needle under several nearby stitches and pull the yarn through.
Change direction and weave through a few more stitches.
Trim the remaining tail carefully.
Avoid pulling the yarn so tightly that the applique changes shape.
Blocking the appliques
Blocking is optional, but it can help small crochet shapes lie flat.
For cotton yarn, lightly dampen the applique and place it on a clean towel or blocking mat.
Gently adjust the edges with your fingers.
For the plus and multiplication signs, check that the arms are evenly positioned.
Allow the pieces to dry completely before attaching them to your final project.
Always follow the care recommendations for your specific yarn.
Attaching the symbols
For a permanent attachment, sewing is usually the simplest option.
Place the finished symbol onto your chosen fabric or crochet surface.
Use matching yarn or sewing thread to make small stitches around the edges.
For the equals sign, sew each horizontal bar separately, keeping the spacing consistent.
For the other symbols, secure the center and outer edges so the applique does not lift or twist.
If you want to attach a symbol to a bag that will be washed regularly, reinforce the stitching around the outer edges.
Washing and care
Cotton appliques are generally suitable for gentle washing, but the finished project’s care requirements should guide your method.
If the applique is attached to another fabric, follow the most delicate care instructions among the materials used.
Lay the item flat to dry when possible.
Avoid aggressive wringing, which can distort the small crochet shapes.
Finished Crochet Math Symbol Collection
Your finished collection should include four distinct shapes.
The plus sign has four straight arms.
The minus sign is one horizontal bar.
The equals sign contains two evenly spaced horizontal bars.
The multiplication sign forms an X with four diagonal arms.
Arrange the symbols side by side to compare their proportions.
If you are making a coordinated set, check that the strip widths and stitch textures look similar.
Small handmade variations are normal, but the shapes should remain easy to recognize.
Quick Printable-Style Pattern Summary
Crochet Math Symbol Applique Pattern Copy
Skill level: Beginner
Materials: DK cotton yarn, 3.5 mm hook, scissors, tapestry needle.
Stitches: Chain and single crochet.
Basic strip: Chain 8, work 7 single crochet stitches across for 2 rows.
Plus sign: Two strips crossed at right angles.
Minus sign: One horizontal strip.
Equals sign: Two parallel strips attached to a backing.
Multiplication sign: Two strips crossed diagonally.
Finishing: Sew overlapping pieces, weave in yarn tails, block lightly if necessary.
Frequently Asked Questions
Is this crochet math symbol applique pattern suitable for beginners?
Yes. The pattern uses only basic chains and single crochet stitches. The most challenging part is arranging and sewing the strips together, but the process is simple enough for beginners who have practiced making small rectangles.
What yarn is best for crochet math symbols?
Smooth cotton yarn is an excellent choice because it provides clear stitch definition and helps the symbols maintain their shape. DK-weight cotton works well for small appliques, although you can use other yarn weights with an appropriate hook.
How long does it take to crochet one math symbol?
A simple minus sign may take around ten minutes once you’re comfortable with single crochet. Symbols that require two strips and sewing may take fifteen to twenty-five minutes. Beginners may need more time.
Can I make these math symbols without sewing?
The minus sign requires no assembly. For the plus and multiplication signs, sewing the strips together is the easiest beginner-friendly method. You could experiment with crocheting the strips together, but that would require a different construction approach.
How do I attach crochet math symbols to a tote bag?
Position the applique on the bag and secure it with sewing pins or clips. Use a tapestry needle and matching yarn to stitch around the edges. For a fabric bag, ordinary sewing thread may be easier to work with.
Can I use these appliques for children’s educational activities?
Yes. They can decorate classroom learning mats, number displays, and teaching materials. Attach small pieces securely, and avoid using loose, detachable appliques with young children who might put them in their mouths.
Can I make division and other math symbols?
Absolutely. A division symbol can be made using a horizontal crochet strip and two small crocheted circles positioned above and below it. You could also experiment with greater-than signs, less-than signs, and number appliques. Those designs require additional shaping or assembly instructions beyond this four-symbol beginner pattern.
Conclusion
These little crochet math symbols are a simple way to turn leftover yarn into useful handmade decorations.
By learning one basic rectangular strip pattern, you can create four different mathematical signs without complicated stitch changes or shaping techniques.
Start with the minus sign if you’re new to crochet, then move on to the plus, equals, and multiplication signs as your confidence grows.
Once you’ve finished your first set, try different colors and sizes or sew the appliques onto a handmade classroom accessory.
Save this crochet math symbol applique pattern for your next back-to-school craft session or teacher gift project.





