A library card is one of those little things that always seems to disappear at the wrong moment. It slips between receipts, hides at the bottom of a tote bag, or gets tucked into the pages of a book and forgotten.
A handmade crochet card holder gives it a proper home.
This easy crochet library card holder pattern is a small, practical project you can finish without using complicated stitches or working with several pieces of fabric. It’s perfect for beginners who want to make something useful after learning how to crochet a chain and single crochet stitches.
The design is simple: you’ll crochet one long rectangle, fold the bottom upward to create a pocket, sew the sides closed, and turn the remaining fabric into a short flap. A wooden button and crochet loop provide a neat finishing touch.
Because it uses only a small amount of cotton yarn, this is also a lovely project for using leftovers from blankets, dishcloths, and other handmade accessories.
You can make one for yourself, tuck it into a teacher appreciation gift, or create a matching set for a book-loving friend.
Throughout this tutorial, I’ll explain every stage, including the foundation chain, crochet rows, folding, seaming, button placement, and final finishing. You’ll also find helpful beginner tips and photo placements so you can follow the construction from start to finish.
What You’ll Learn
By making this little card pouch, you’ll practice:
- Creating an even crochet foundation chain and rectangular fabric panel.
- Working single crochet stitches with consistent tension.
- Counting rows and keeping the edges straight.
- Folding a rectangle to form a card-sized pocket.
- Joining side edges with a neat yarn seam.
- Adding a short flap with a crochet button loop.
- Attaching a wooden button and weaving in yarn ends.
- Adjusting the finished size for different cards.
This is a useful next project after a beginner crochet washcloth or coaster, because the stitches are familiar but the finished result introduces simple accessory construction.
Materials You’ll Need
You don’t need much yarn for a small card holder. In fact, this pattern is ideal for using the end of a cotton yarn ball left over from another project.
Supplies
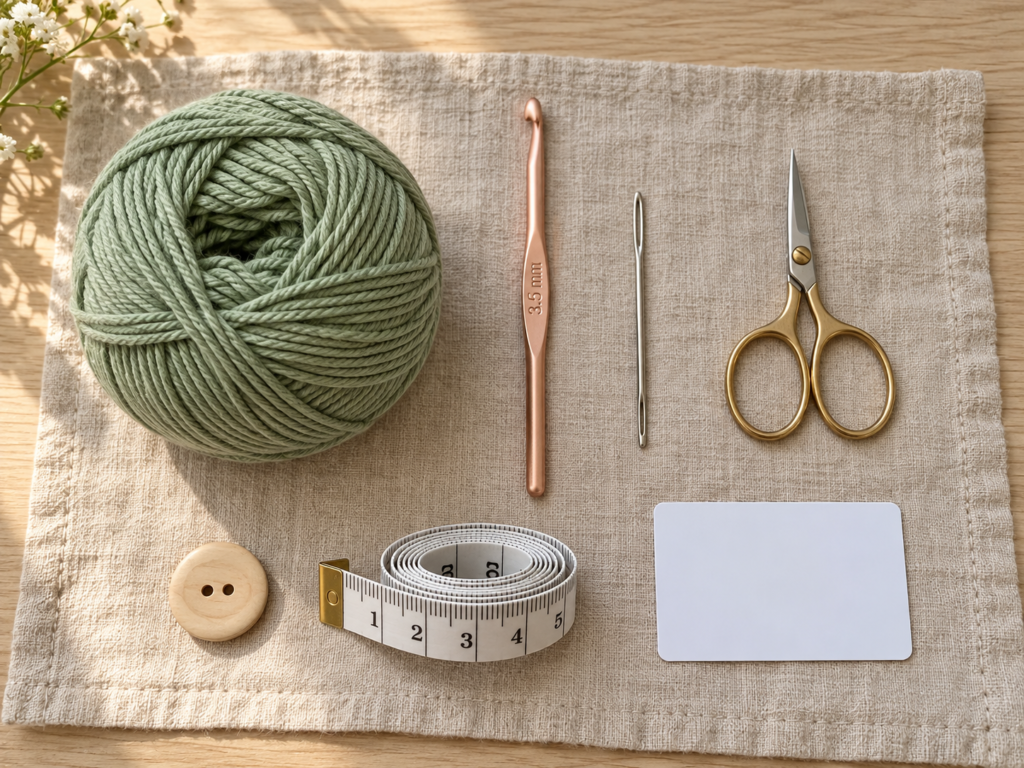
- DK-weight cotton yarn, approximately 20–30 yards.
- 3.5 mm crochet hook.
- One small wooden button, around 12–15 mm wide.
- Blunt tapestry needle.
- Small scissors.
- Measuring tape or ruler.
- Two stitch markers or sewing clips.
- One standard library card for checking the size.
For the tutorial photographs, I’m using sage green cotton yarn, a rose-gold crochet hook, and a natural wooden button. These colors give the finished holder a simple, cozy appearance that suits a book-themed accessory.
Cotton is my first choice because it has good stitch definition, holds its shape fairly well, and is less fuzzy than many acrylic yarns.
A smooth cotton blend also works nicely. Avoid extremely fluffy or stretchy yarn for your first attempt because it makes counting stitches and measuring the pocket more difficult.
Crochet Abbreviations Used
| Abbreviation | Meaning |
|---|---|
| ch | Chain |
| sc | Single crochet |
| sl st | Slip stitch |
| st / sts | Stitch / stitches |
| rep | Repeat |
| RS | Right side |
| WS | Wrong side |
This pattern uses US crochet terminology. If you’re familiar with UK patterns, remember that US single crochet is called UK double crochet.
The turning chain in this project does not count as a stitch.
Before You Start
Check your library card dimensions
Most standard plastic library cards are about the same size as a bank card, measuring approximately 3.37 × 2.13 inches (85.6 × 54 mm).
Some libraries issue larger paper cards, folded membership cards, or laminated cards in unusual sizes.
Measure your own card before you begin.
For a typical plastic card, aim for a pocket interior approximately 3.5–3.7 inches (8.9–9.4 cm) wide, with enough room to insert and remove the card comfortably.
The finished holder should be slightly larger than the card itself, especially if you plan to store two or three cards together.
Understand the folded construction
Unlike a small pouch crocheted in continuous rounds, this holder starts as one flat rectangle.
The lower section is folded upward, creating the front pocket.
The middle section becomes the back panel.
The upper four rows remain free and fold forward to create a short flap.
Gauge and tension
For a suggested starting gauge, aim for approximately 18 single crochet stitches and 20 rows over four inches (10 cm), measured on a washed or relaxed sample.
Gauge can vary with yarn and hook size, so the recommended stitch count is a starting point rather than a guarantee of the finished dimensions.
Your stitches should be fairly firm. A loose, open fabric could allow the card corners to catch between stitches.
At the same time, avoid crocheting so tightly that your rectangle curls.
If you notice the edges pulling inward, relax your grip on the working yarn or try a slightly larger hook.
How to count stitches
After every row, count the V-shaped loops across the top edge of your fabric.
The pattern uses seventeen single crochet stitches per row.
Your turning chain does not count as a stitch, so you should always insert the hook into the first actual stitch after turning.
Using a stitch marker on the first and last stitch of each row can make this easier.
Step-by-Step Crochet Library Card Holder Tutorial
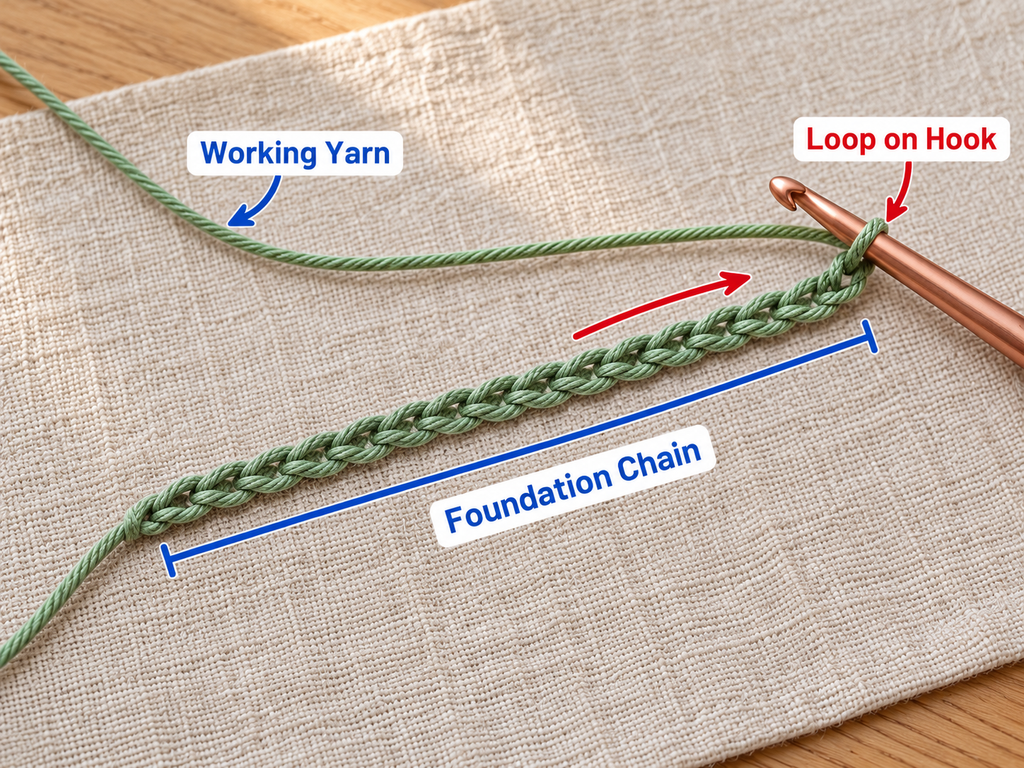
Step 1: Crochet the foundation chain
Begin with your sage green DK cotton yarn and 3.5 mm crochet hook.
Make a slip knot and place it on your hook.
Wrap the yarn over the hook and pull it through the loop to make your first chain stitch.
Continue making chains until you have eighteen.
Foundation: Ch 18.
Keep your foundation chain relaxed and even.
It shouldn’t feel stiff, and you should be able to see each individual V-shaped chain clearly.
Once you’ve finished, lay the chain flat and count your stitches carefully.
Beginner tip: If you tend to make tight foundation chains, use a 4 mm hook for the chain and switch back to 3.5 mm for the first row.
Common mistake to avoid: Do not count the slip knot or the live loop on your hook as part of the eighteen chains.
Step 2: Work the first row of single crochet
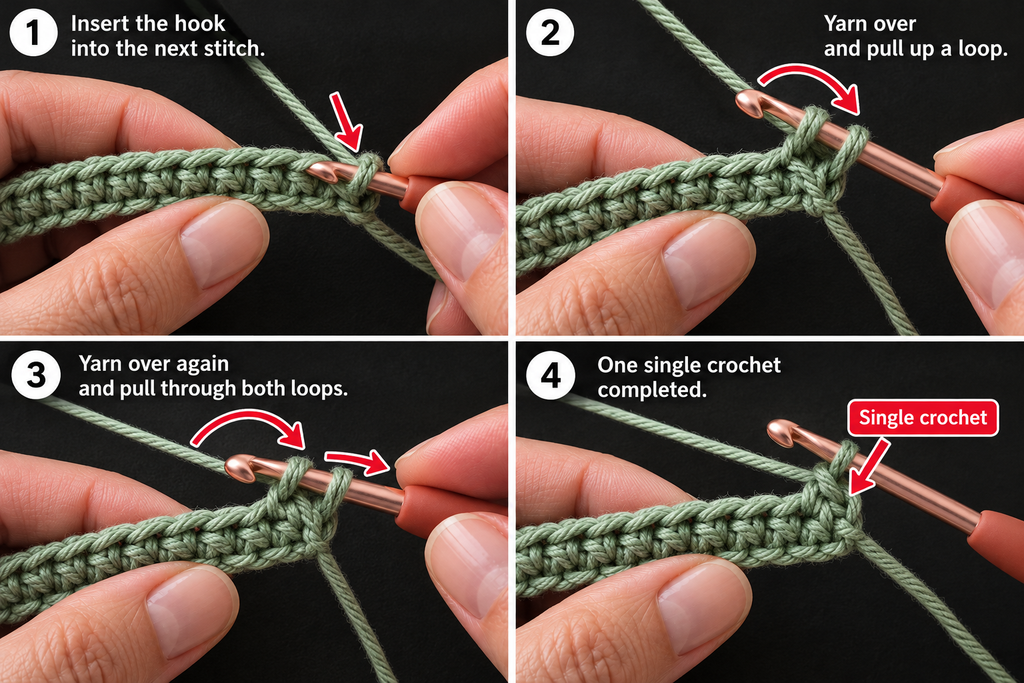
Now turn the foundation chain into the first row of fabric.
Insert your hook into the second chain from the hook.
Yarn over and draw up a loop. There should be two loops on your hook.
Yarn over again and pull through both loops.
You’ve completed your first single crochet stitch.
Continue working one single crochet into each remaining chain.
Row 1: Sc in second ch from hook and each ch across. (17 sc)
Count the stitches when you reach the end.
You should have seventeen single crochet stitches.
If you have sixteen or eighteen, check whether you skipped a chain or accidentally worked two stitches into the same chain.
Beginner tip: Turn the chain slightly toward yourself if you’re having trouble seeing where the hook should enter.
Step 3: Build the rectangular fabric
At the end of Row 1, chain one and turn your work.
Insert your hook into the first single crochet stitch.
Work one single crochet in every stitch across the row.
Row 2: Ch 1, turn, sc in each st across. (17 sc)
Repeat the same instructions for each subsequent row.
Rows 3–12: Ch 1, turn, sc in each st across. (17 sc per row)
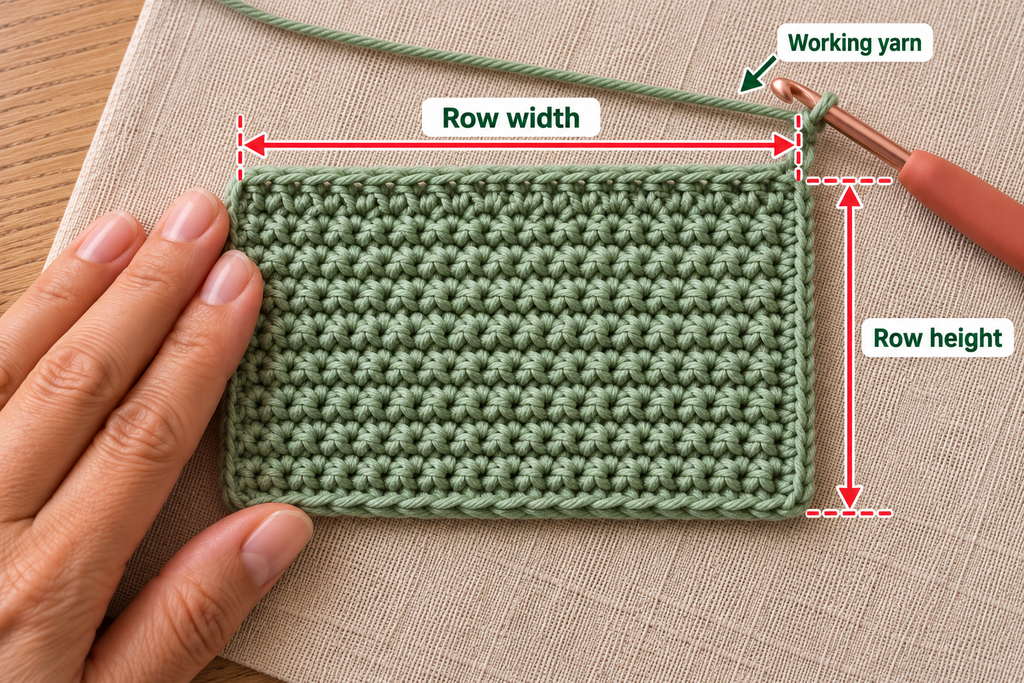
You should now have a small rectangular panel.
Lay it flat on your work surface.
The left and right edges should be fairly straight, and each row should have the same number of stitches.
Beginner tip: Place a stitch marker in the first stitch of each row while you’re learning. Remove it and move it to the next row as you work.
Common mistake to avoid: Working into the turning chain can accidentally increase your stitch count. Always count seventeen stitches across.
Step 4: Keep the single crochet texture even
Continue working the same single crochet row pattern.
Insert your hook under both top loops of each stitch unless otherwise specified.
Yarn over, pull up a loop, yarn over again, and draw through both loops.
Repeat across the row.
As your rectangle gets longer, pay attention to the texture.
You want a smooth fabric with small, even stitches and no large gaps.
If one stitch looks much taller than its neighbors, check your tension.
If the top edge becomes wavy, make sure you aren’t adding extra stitches.
Rows 13–20: Ch 1, turn, sc in each st across. (17 sc per row)
At this point, your rectangle should be long enough to fold slightly, although you shouldn’t assemble the pocket yet.
Beginner tip: Check the width against your actual library card. The crochet panel needs to be wider than the card because the side seams will take up a little space.
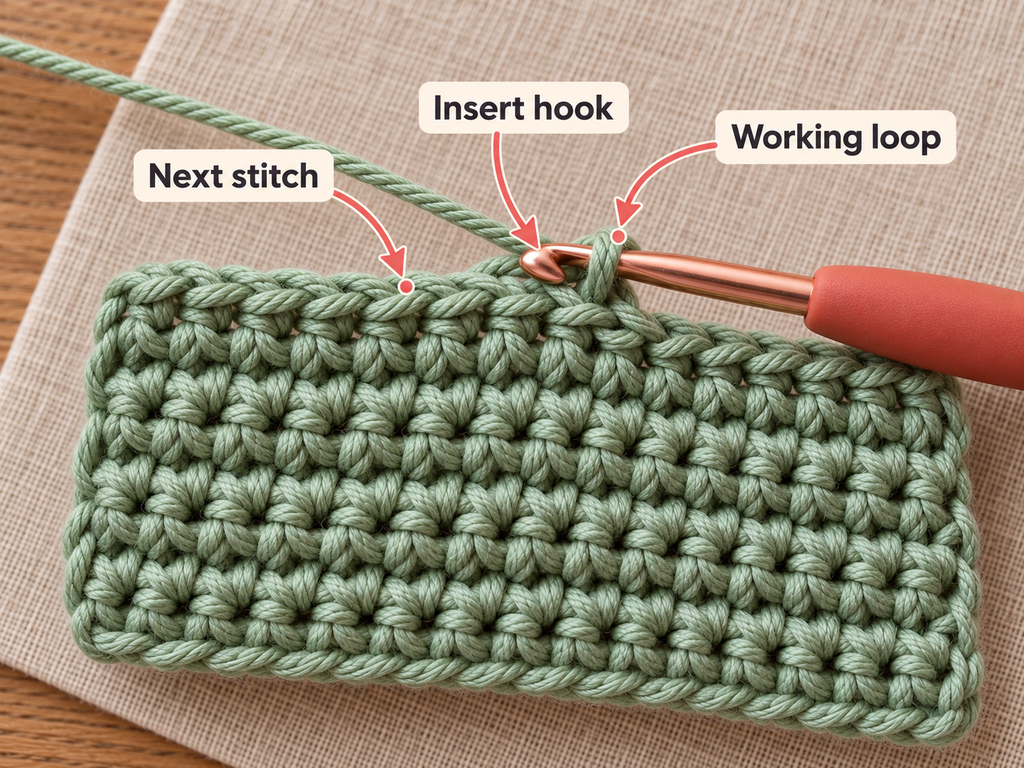
Step 5: Complete the long crochet rectangle
Continue crocheting until you have thirty-four rows in total.
Rows 21–34: Ch 1, turn, sc in each st across. (17 sc per row)
Fasten off after Row 34, leaving a yarn tail for finishing.
You should now have one long rectangular panel made entirely from single crochet.
The piece has seventeen stitches across and thirty-four rows from bottom to top.
Before folding, lay it on a flat surface and gently smooth the edges.
With the suggested gauge, the panel is approximately 3.8 inches wide and 6.8 inches long. Your actual measurements may differ.
If your panel is too narrow for your card, remake it using additional foundation chains. If it’s too short for the planned fold, add rows.
It’s much easier to correct the size now than after sewing the side seams.
Beginner tip: Place your card horizontally over the rectangle before assembly. There should be a little room at the left and right edges.
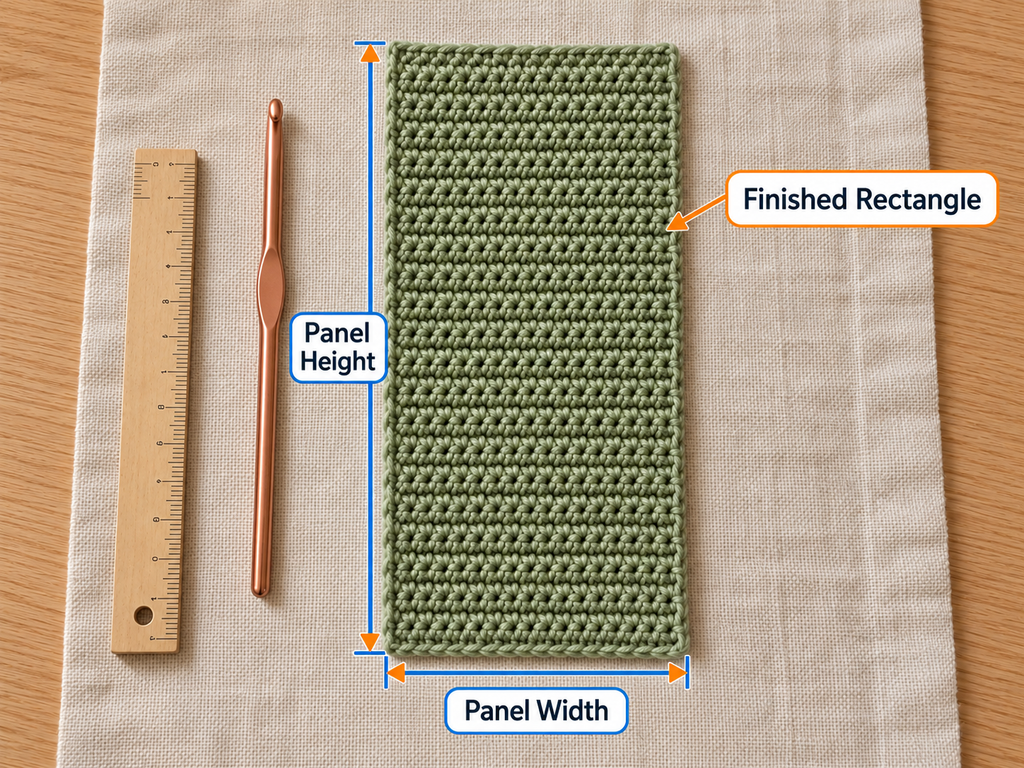
Step 6: Fold the rectangle to create the pocket
This is where your flat crochet fabric begins to look like a card holder.
Lay the rectangle vertically with the side you prefer facing down.
Identify the bottom edge, where you worked your foundation chain.
Fold the bottom section upward approximately fifteen rows.
Align the left and right side edges carefully.
The folded section becomes the front of the pocket, while the fabric behind it becomes the back.
The remaining upper section includes about four rows that can fold forward over the opening as a short flap.
Use stitch markers or removable clips to hold the side edges together.
Place your library card inside the folded pocket to check the size.
Make sure the card can slide in and out without forcing it.
If the pocket is too tight, don’t sew it yet. Adjust the fold or increase the width of the panel.
Beginner tip: The front and back layers should line up evenly. If the bottom fold sits crooked, reposition it before joining the sides.
Common mistake to avoid: Don’t sew the upper opening closed. Only the two side edges of the folded pocket need to be joined.

Step 7: Sew the side seams
Cut a length of matching sage green cotton yarn.
Thread it through your tapestry needle.
Starting at one lower corner of the folded pocket, insert the needle through the edges of both layers.
Use small whipstitches to join the two pieces of fabric together.
Continue sewing upward until you reach the top edge of the folded front section.
Secure the yarn and weave in the tail.
Repeat the same process on the other side.
Make sure both seams feel secure, especially near the upper corners where the card will be inserted and removed frequently.
The bottom edge does not need sewing because it is already folded.
Check the opening before fastening off completely.
Insert your card and remove it a few times.
If it catches on a seam, check for overly tight stitches or yarn tails inside the pocket.
Beginner tip: Work small, regular sewing stitches rather than wrapping the yarn tightly around the fabric edges. This gives the finished holder a neater shape.

Step 8: Make the crochet button loop
Now we’ll add a small loop to the short upper flap.
Fold the flap forward over the pocket opening.
Find the center of its free edge.
Join the sage green yarn at that position with a slip stitch.
Chain approximately six stitches to begin a small loop.
Bring the chain back toward the same attachment point, forming a rounded loop.
Secure it with a slip stitch, then fasten off.
Before weaving in the yarn tails, check whether the loop fits over your wooden button.
The button should pass through the loop without excessive stretching, but the loop shouldn’t be so large that the flap comes undone on its own.
If the loop is too tight, undo it and add another chain stitch or two.
If it is too loose, make a shorter chain.
The exact chain length depends on your button size and crochet tension.
Beginner tip: Test the loop around your button several times before securing the yarn ends. A well-sized loop makes the holder easier to open and close.

Step 9: Sew on the wooden button
Fold the flap down over the front of the card holder.
Allow the loop to hang naturally.
Mark the spot where the loop reaches the front pocket.
This is where your button should be placed.
Thread a tapestry needle with strong matching yarn or sewing thread.
Insert the needle from the inside of the front pocket and bring it through to the outside.
Pass the needle through one buttonhole, then back through the other.
Repeat several times until the button feels secure.
Avoid tightening the stitching so much that the button presses deeply into the crochet fabric.
Fasten the thread on the inside of the pocket and weave in the remaining ends.
Close the flap by slipping the crochet loop over the button.
Check that the button holds the flap securely.
Beginner tip: Position the button with the actual library card inside the holder. This helps you see how the finished pocket will sit when it contains a card.
Common mistake to avoid: Don’t sew the button too close to the pocket opening. Leave enough distance for the flap to close smoothly.
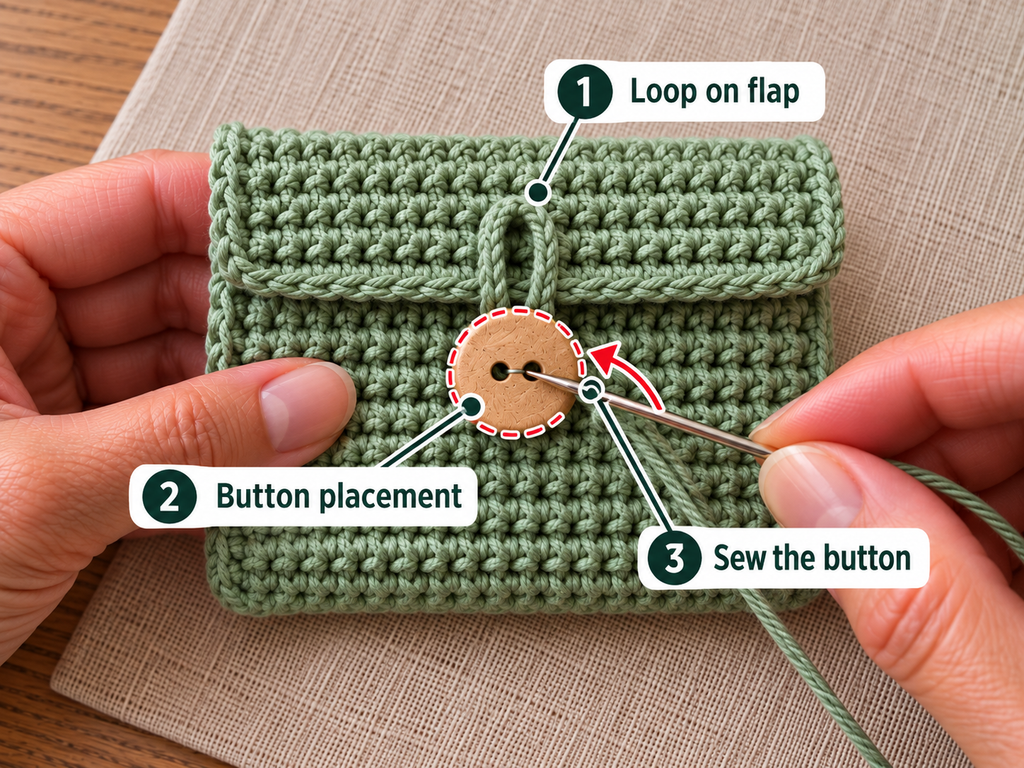
Pattern Notes and Stitch Counts
The basic card holder is constructed from one rectangle with seventeen single crochet stitches per row.
| Part | Instructions | Stitch count |
|---|---|---|
| Foundation | Ch 18 | 18 chains |
| Row 1 | Sc in 2nd ch from hook and across | 17 sc |
| Rows 2–34 | Ch 1, turn, sc across | 17 sc per row |
| Pocket fold | Fold up approximately 15 rows | No new stitches |
| Side seams | Whipstitch both sides | Sewing only |
| Closure loop | Ch approximately 6 and attach | Adjust to button |
The full flat panel contains 578 single crochet stitches before seaming and adding the closure loop.
Turning chain rule
The chain one at the beginning of each new row is used only to bring the yarn to the correct height.
It does not count as a stitch.
Row repeat
From Row 2 onward, the repeat is always the same: chain one, turn, and work seventeen single crochet stitches across.
Right side and wrong side
Single crochet fabric has a similar appearance on both sides.
Choose whichever side you prefer as the outside of the finished holder.
Keep the seams neatly positioned so that rough sewing ends remain inside.
Size adjustments
If your yarn is thinner or your stitches are smaller, you may need more foundation chains.
If you’re using thicker yarn, fewer chains may be enough.
Adjust the rectangle width before beginning the long body section, and check the pocket depth before seaming.
Common Beginner Mistakes and Easy Fixes
1. The holder is too narrow for the card
This usually happens when the crocheted width is smaller than expected or the seams take up too much space.
Fix: Measure your card and gauge before starting. Allow a little additional width for the side seams.
2. The rectangle has uneven edges
You may be missing the final stitch of certain rows or accidentally working into the turning chain.
Fix: Count seventeen stitches at the end of every row and mark the first and last stitches.
3. The fabric curls inward
Tight tension can cause the edges to pull inward, especially at the foundation chain.
Fix: Relax your yarn tension and try a slightly larger hook if necessary. Light blocking may help with mild curling.
4. The pocket is crooked
The folded front may not be aligned correctly with the back panel.
Fix: Lay the piece flat and align both side edges before sewing. Use clips or stitch markers to hold the fold in position.
5. The card catches inside the pocket
Loose yarn tails, thick seams, or a narrow opening can make card removal difficult.
Fix: Secure the yarn tails neatly, keep seams compact, and test the pocket before final finishing.
6. The button loop is too loose
A loose loop may slip off the button while the holder is being carried.
Fix: Remove a chain stitch or choose a slightly larger button.
7. The flap doesn’t close neatly
A flap that is too short may pull against the button, while one that is too long may bunch up.
Fix: Check the flap’s length before attaching the button. Adjust the flap fold and closure position to suit your finished measurements.
How to Customize Your Crochet Library Card Holder
Use different yarn colors
Sage green gives this project a calm, natural appearance, but you can easily change the color to match your style.
Cream, dusty pink, terracotta, mustard yellow, and muted blue are all lovely choices.
For a children’s library card holder, try brighter colors such as coral, turquoise, or sunshine yellow.
You can also make the flap in a contrasting color by changing yarn during the final four rows.
Make a striped card holder
To add stripes, change yarn color every four or six rows.
This gives the rectangular fabric a playful appearance without changing the pattern construction.
When changing colors, leave enough yarn to weave in the ends securely.
For a beginner project, I recommend using only two colors so that finishing doesn’t become overwhelming.
Add a decorative border
A simple slip stitch border can make the upper edge of the flap look neater.
You can also work a row of single crochet around the exposed flap edge before making the button loop.
Avoid adding bulky borders to the folded side edges, because those areas will already contain seams.
Adjust the pocket size
You can make the pouch wider or taller for larger paper library cards, gift cards, or small membership cards.
Increase the number of foundation chains to add width.
Increase the number of rows to add length.
For a larger holder, keep enough fabric at the top for a protective flap and make sure the pocket is deep enough to hold the card securely.
Try different button styles
A natural wooden button looks lovely with cotton yarn.
You could also use a small colorful plastic button or a flat decorative button.
Choose a button without sharp edges and sew it securely.
If the holder is intended for a young child, avoid loose small embellishments that could present a choking hazard.
Make a library-themed gift set
A crochet card holder pairs beautifully with other handmade accessories.
You could create a small gift set containing a crochet bookmark, a reusable book sleeve, and a matching library card pouch.
It would make a thoughtful present for a librarian, teacher, book club member, or friend who loves visiting the library.
Finishing Instructions
Even though the main crochet work is complete, taking a few extra minutes to finish the holder carefully will help it last longer.
Fastening off
After the final crochet row or button loop, cut the working yarn with a tail of several inches.
Pull the yarn completely through the final loop on your hook.
Tighten gently to secure it.
Avoid pulling so tightly that the surrounding stitches become distorted.
Weaving in ends
Turn the holder to its inside surface.
Thread each loose tail through a blunt tapestry needle.
Pass the needle under several nearby single crochet stitches, taking care not to push through to the visible front.
Change direction and weave through a few more stitches to help secure the tail.
Trim the remaining yarn only after it feels firmly anchored.
Blocking the card holder
Blocking is optional, but it can improve the shape if the edges are slightly uneven.
Lightly dampen the cotton pouch and gently press it into a neat rectangular shape.
Allow it to dry on a flat towel, keeping the pocket opening unobstructed.
Do not stretch the fabric excessively. Stretching can make the pouch too loose for the card.
Washing and care
Hand washing is a sensible choice for a small accessory with a wooden button.
Use cool or lukewarm water and a mild detergent suitable for the yarn.
Press out excess moisture gently and lay flat to dry.
Avoid soaking untreated wooden buttons for long periods.
Always follow the care instructions on the yarn label, especially if using a cotton blend.
Final fit check
Insert your library card into the pocket.
The card should slide in smoothly, sit securely within the pouch, and leave the opening accessible.
Close the flap and fasten the button loop.
Shake the holder gently over a soft surface to check whether the card remains inside. This is a basic fit test, not a guarantee against cards falling out during use.
If the card feels loose, you may need a tighter gauge or a smaller pocket.
If it feels too snug, avoid forcing the card into the fabric because this can stretch the stitches and seams.
Your Finished Crochet Library Card Holder
Once all the yarn tails are secured, your handmade card holder is ready to use.
It should have a compact rectangular shape, straight side seams, a neatly folded flap, and a wooden button on the front.
The sage green cotton stitches give it a soft handmade appearance, while the small pocket makes it practical for everyday use.
You can carry it inside a handbag, school backpack, or book tote.
It also makes a lovely handmade addition to a gift for someone who enjoys reading.
[IMAGE SLOT 12 — Finished card holder] Copy prompt
Completed sage green crochet library card holder with wooden button and partially inserted card · Source: Final result · finished-crochet-library-card-holder.jpg
Quick Printable-Style Pattern Summary
Crochet Library Card Holder — Pattern Card Copy pattern
Skill level: Easy beginner
Finished size: Target approximately 3.75 × 2.75 inches, closed, depending on gauge.
Materials: DK cotton, 3.5 mm hook, wooden button, tapestry needle, scissors.
Stitches: Chain, single crochet, slip stitch.
Foundation: Chain 18.
Main pattern: 17 single crochet stitches across for 34 rows.
Construction: Fold lower 15 rows upward, sew sides, fold top four rows into a flap.
Closure: Adjustable chain loop and sewn button.
Finishing: Weave in all ends, gently shape, and test with an actual library card.
Frequently Asked Questions
Is this crochet library card holder pattern beginner-friendly?
Yes. The main fabric uses single crochet stitches, making it suitable for beginners who already know how to chain, turn, and work basic crochet rows. The assembly introduces simple folding and sewing techniques.
What size should a crochet library card holder be?
A holder for a standard plastic card should be slightly larger than the card, usually around 3.5–3.9 inches wide. The exact finished size depends on the thickness of your yarn, crochet tension, and seam allowance. Always measure your own card before finishing.
Can I use acrylic yarn instead of cotton?
Yes. Acrylic yarn can work, but choose a smooth yarn with limited stretch. Cotton is generally preferable for a small, structured accessory because it gives clearer stitches and often holds its shape better.
How much yarn do I need?
A small library card holder generally uses only a modest amount of yarn. Approximately 20–30 yards of DK cotton is a reasonable planning allowance, although the exact amount varies with gauge, project size, and any added decorations.
Can I make this crochet card holder without a button?
Yes. You can leave the button off and use the holder as an open-top pocket, although a closure is useful for protecting the card. You could also experiment with a fabric snap, provided it is attached securely and doesn’t damage the crochet.
Can I store more than one card inside?
Usually, yes, depending on your yarn and gauge. If you plan to carry several plastic cards, test the fit before seaming. You may need to make the holder slightly wider or allow more room inside the pocket.
Is a crochet card holder a good handmade gift?
Absolutely. It is inexpensive to make, easy to personalize, and useful for everyday life. You can pair it with a crochet bookmark, a small book bag, or a bookstore gift card to create a thoughtful book-themed present.
Conclusion
This easy crochet library card holder pattern is a lovely little project for turning leftover cotton yarn into something genuinely useful.
The construction is straightforward: crochet a rectangle, fold it into a pocket, sew the sides, and add a button closure.
Even if you’re relatively new to crochet, the repeated single crochet rows make this a relaxing project that also helps improve stitch consistency and tension.
Once you’ve finished your first holder, try making another in a different color or personalizing one as a gift for a teacher, librarian, or book-loving friend.
Save this tutorial for your next quick crochet session, and consider making a matching bookmark to complete your handmade reading accessories.





