When the first cooler evenings arrive, fall crochet projects become especially satisfying. The colors get warmer, the yarn gets cozier, and small handmade decorations can quickly change the feeling of a room.
This beginner-friendly ribbed pumpkin is an ideal place to start.
You do not need to crochet complicated rounds or constantly count increases and decreases. The pumpkin begins as a simple flat rectangle. Once that rectangle is finished, you sew its short edges together, gather the bottom, add stuffing, close the top, shape the pumpkin into sections, and finish it with a crocheted stem and leaf.
The selected visual reference source uses the same basic beginner-friendly principle of transforming a ribbed rectangle into a three-dimensional pumpkin, although the new tutorial below has its own stitch, yarn, dimensions, row count, stem, leaf, colors, and finishing method.
This is the kind of project that works well when you want a finished result without committing to a blanket or garment. One pumpkin can decorate a bookshelf or Thanksgiving table. Three can make an autumn centerpiece. A collection in several sizes and colors can fill a basket, mantel, or entryway tray.
Better still, this original version is designed to teach useful crochet skills as you work.
What You’ll Learn
By the end of this fall crochet tutorial, you will know how to:
- Make an even foundation chain.
- Work half double crochet stitches.
- Identify the front and back loops of a stitch.
- Crochet through the back loop only.
- Build a straight-edged ribbed rectangle.
- Check project proportions before assembly.
- Sew crochet fabric into a tube.
- Gather an opening with running stitches.
- Control stuffing density.
- Close a stuffed crochet form securely.
- Shape a pumpkin into six defined sections.
- Make a simple crocheted stem.
- Crochet a small two-sided leaf.
- Weave in ends and finish neatly.
The Craft Yarn Council describes basic projects as those primarily using basic stitches, while easy projects may add simple stitch patterns or shaping. Because this pumpkin combines a basic stitch pattern with straightforward assembly and shaping, Beginner to Easy is an appropriate classification.
Materials You’ll Need
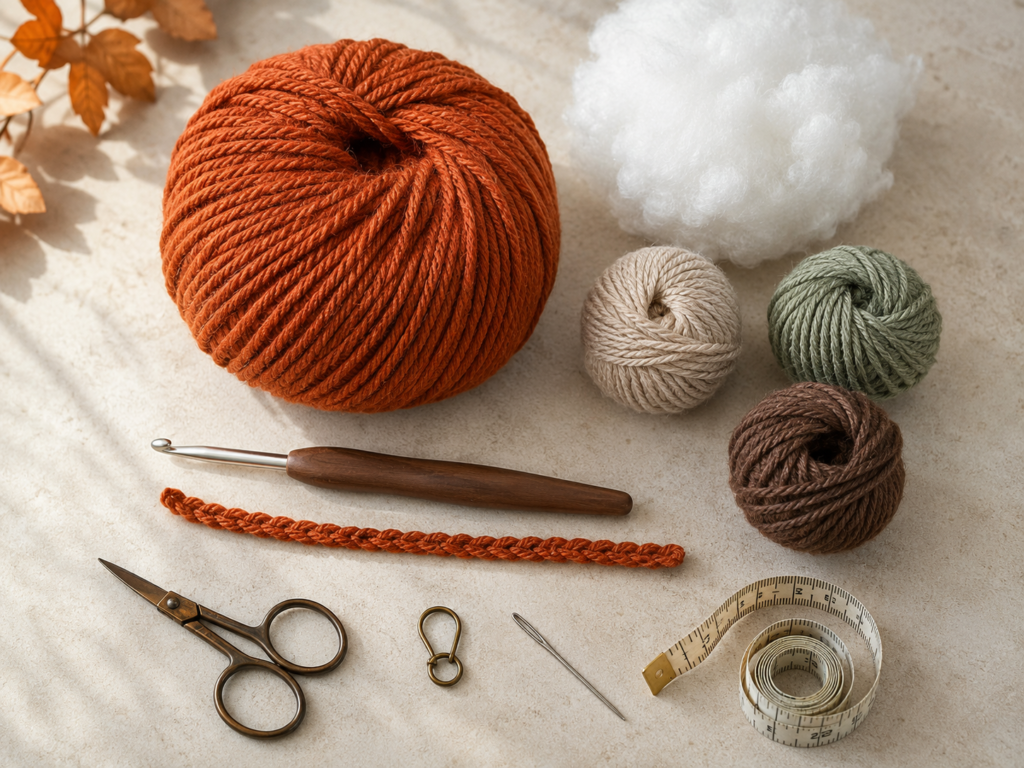
For one medium pumpkin measuring approximately 5.5 inches wide and 3.5 inches high, gather:
- Approximately 100–130 yards / 91–119 meters of medium-weight #4 yarn in burnt pumpkin orange.
- Approximately 10 yards of warm walnut-brown yarn for the stem.
- Approximately 8 yards of muted sage-green yarn for the leaf.
- Small amount of oatmeal yarn or twine for optional shaping accents or a bow.
- 4.0 mm / G-6 crochet hook.
- Polyester fiberfill.
- Blunt tapestry needle with a large eye.
- Small embroidery scissors.
- Measuring tape.
- Optional locking stitch marker.
- Optional rustproof pins for light blocking.
The Craft Yarn Council’s Standard Yarn Weight System categorizes worsted, afghan, and aran yarns within the medium-weight category. Yarn within the same numbered category is not necessarily perfectly interchangeable, so the finished dimensions may vary with fiber, construction, hook size, and individual tension.
Finished Size
Using the suggested yarn and hook:
Approximate finished width: 5.5 inches / 14 cm.
Approximate finished height without stem: 3.5 inches / 9 cm.
Approximate finished height with stem: 4.5 inches / 11.5 cm.
Your exact result may differ slightly because crochet tension, yarn structure, stuffing amount, and shaping pressure all affect the final dimensions.
Gauge and Tension
Exact gauge is not critical for this decorative project.
A useful approximate gauge for the flat rectangle is:
15 hdc BLO stitches × 12 rows = approximately 4 inches / 10 cm.
What matters more is creating:
- A fabric dense enough to hide most of the white stuffing.
- A rectangle that lies reasonably flat.
- Even ribbing from the first row to the last.
- Straight side edges.
Before continuing past Row 6, stretch the swatch gently between your fingers.
Large visible holes usually mean that:
- Your hook is too large for the yarn.
- Your tension is unusually loose.
- The yarn itself has a very open structure.
For a stuffed pumpkin, a relatively firm crochet fabric usually creates the cleanest result.
Crochet Abbreviations Used
This tutorial uses U.S. crochet terminology:
- ch = chain
- sc = single crochet
- hdc = half double crochet
- sl st = slip stitch
- st/sts = stitch/stitches
- rep = repeat
- BLO = back loop only
- RS = right side
- WS = wrong side
These abbreviations are consistent with the Craft Yarn Council’s standardized list. In standard terminology, a U.S. single crochet corresponds to a U.K. double crochet, while a U.S. half double crochet corresponds to a U.K. half treble.
Before You Start
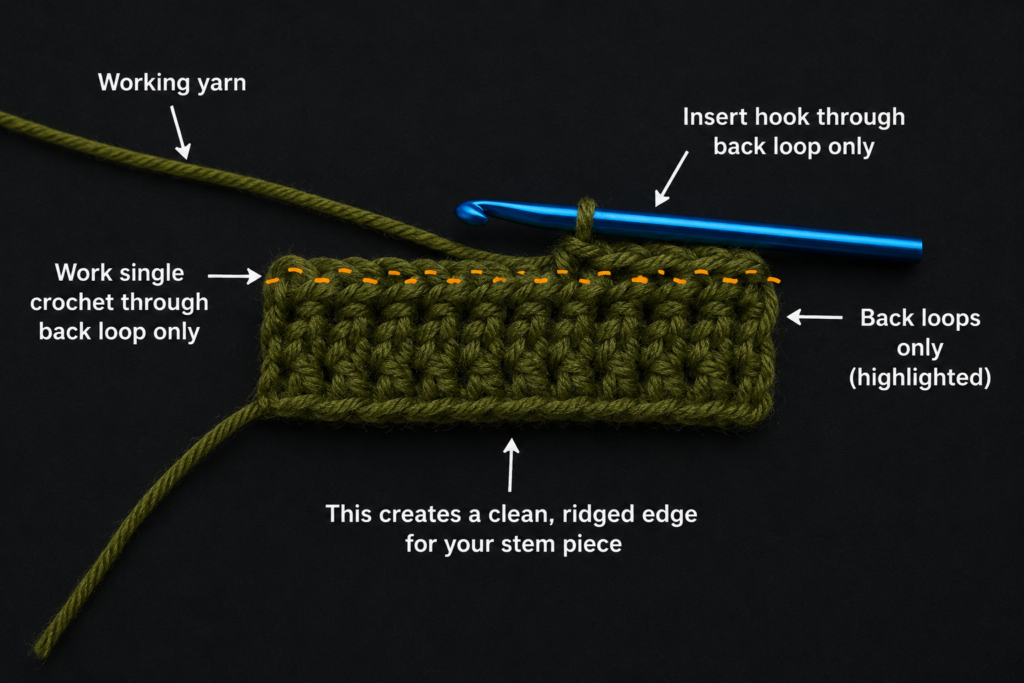
How to identify the back loop
Look at the top of a completed crochet stitch.
You should see a small V shape.
That V has two loops:
- The loop closest to you is the front loop.
- The loop farther away from you is the back loop.
For the pumpkin rectangle, beginning with Row 2, insert the hook beneath only the back loop.
Leaving the front loop untouched creates a visible horizontal ridge. When many rows are placed side by side, those ridges become the pumpkin’s vertical ribs.
How to keep your stitch count correct
This original pattern uses:
20 hdc stitches in every row.
After each row, count to 20 before turning.
If the rectangle slowly becomes narrower, you are probably missing the final stitch.
If it gradually becomes wider, you may be accidentally crocheting into the turning chain.
How to keep the edges straight
A clean rectangle makes the assembly much easier.
At the beginning of every new row:
- Ch 1.
- Turn.
- Identify the first actual stitch immediately beside the turning chain.
- Work one hdc BLO in that stitch.
At the end of the row, do not stop before the final visible stitch.
How to avoid curling
Mild curling is normal, especially during the first several rows.
Severe curling may indicate:
- Foundation chain tension is too tight.
- Row tension is much looser than chain tension.
- Hook size is too small.
- Stitches have been accidentally added or skipped.
If the first chain is extremely tight, restart it more loosely rather than fighting it for the entire project.
Choosing autumn colors
Traditional pumpkin orange is only one option.
Beautiful fall combinations include:
- Burnt orange + walnut brown + sage.
- Rust + oatmeal + olive.
- Mustard + dark brown + moss.
- Cream + camel + muted green.
- Brick red + taupe + forest green.
- Dusty terracotta + natural linen + eucalyptus.
For a coordinated pumpkin collection, keep the stem and leaf colors consistent while varying only the pumpkin bodies.
Step-by-Step Crochet Tutorial
Step 1: Make the Foundation Chain and First Row
With burnt pumpkin-orange yarn:
Ch 21.
Do not make the chain extremely tight.
Row 1
Starting in the second chain from the hook, work:
1 hdc in each chain across.
You should have:
20 hdc stitches.
Turn.
To make one half double crochet:
- Yarn over.
- Insert the hook into the stitch.
- Yarn over.
- Pull up one loop.
- You now have three loops on the hook.
- Yarn over.
- Pull through all three loops.
At the end of the first row, your strip should measure approximately 5–6 inches wide, depending on yarn and tension.
Beginner tip:
Place a stitch marker into the first and final stitch of the row while you are learning. These are the two stitches beginners most often accidentally skip.
Common mistake to avoid:
Counting the loop already on the hook as one of the 21 chains.
The active loop on the hook never counts as a chain.
Step 2: Begin the Back-Loop-Only Ribbing
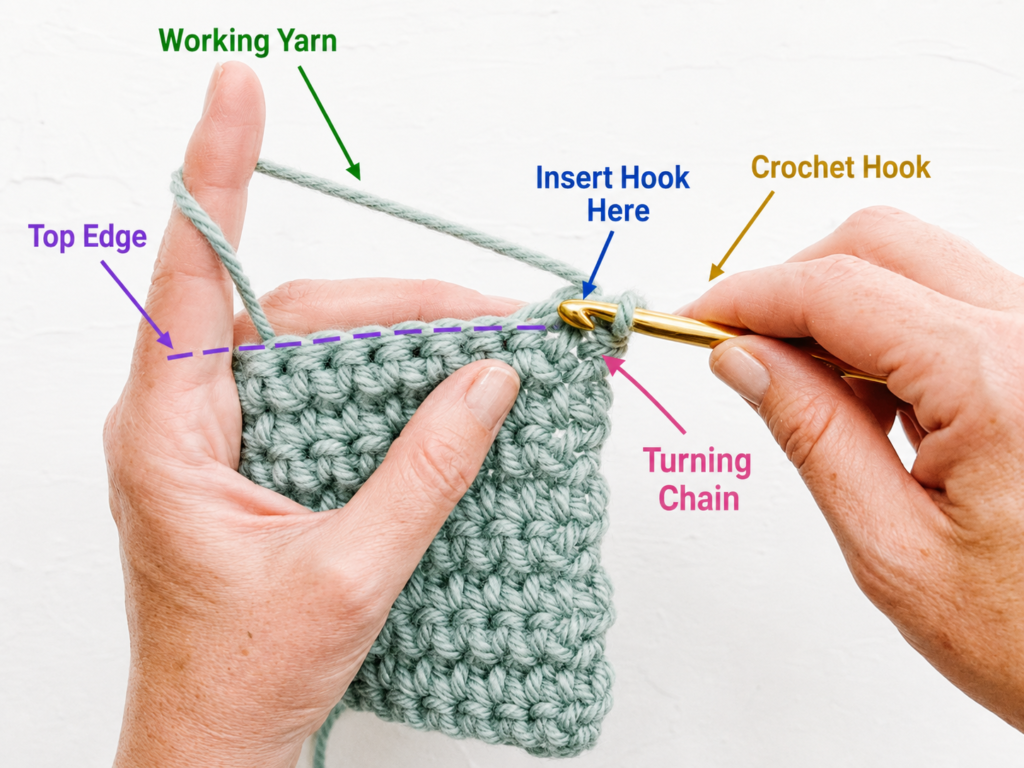
Row 2
Ch 1.
Turn.
Work:
1 hdc BLO in each of the 20 stitches across.
Turn.
Remember that the ch 1 does not count as a stitch.
To find the correct loop, look at the V on top of the next stitch and insert the hook through only the loop farthest away from you.
After completing Row 2, look at the front of your fabric. A narrow horizontal ridge should be visible between the rows.
That ridge is exactly what you want.
Beginner tip:
After inserting your hook, pause before making the stitch. Check that one unused loop remains visibly in front of the hook.
Common mistake to avoid:
Working through both top loops by habit.
A few ordinary hdc stitches will interrupt the continuous ribbing. Correct the mistake immediately when possible.
Step 3: Crochet the Complete Ribbed Rectangle
Repeat Row 2 until you have completed:
40 rows total.
Every row should contain:
20 hdc BLO stitches.
Your rectangle should now measure approximately:
6 inches wide × 13 inches long.
A slight difference is completely acceptable.
Lay the rectangle flat before continuing.
Check:
- Are both short ends approximately equal?
- Do you still have 20 stitches in the final row?
- Are the side edges reasonably straight?
- Does the fabric show strong parallel ribbing?
- Is there enough density to hide stuffing?
Leave a long tail of approximately 30 inches before fastening off.
This tail will be used for sewing.
Beginner tip:
Count rows by counting the raised ridges. Place the rectangle flat and gently spread the fabric so the ribs are easy to see.
Common mistake to avoid:
Making the rectangle too short.
A short rectangle produces a pumpkin that cannot expand comfortably into a full round shape. For this particular version, complete all 40 rows before assembly.
Step 4: Sew the Rectangle into a Tube
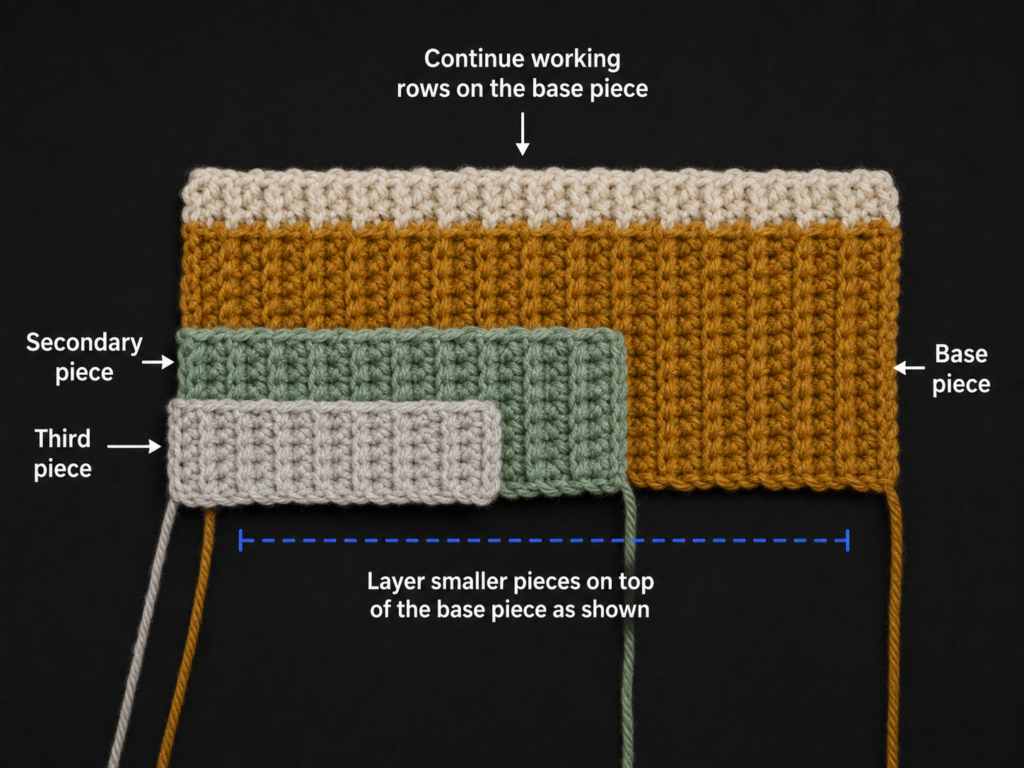
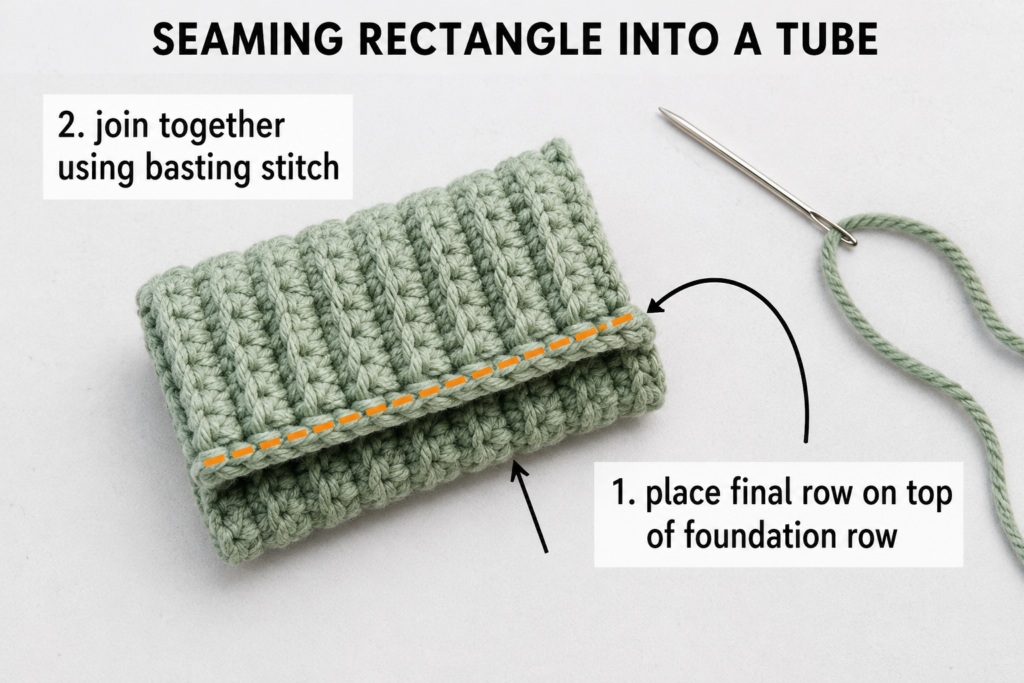
Place the rectangle flat.
Bring the two short edges together.
The first row and final row should meet.
Thread the long orange tail onto your tapestry needle.
Sew the two short edges together using small, secure stitches.
A simple mattress-style seam works well:
- Insert the needle through one edge.
- Move directly across to the corresponding stitch on the opposite edge.
- Pull gently.
- Continue along the entire short edge.
Do not pull the seam extremely tightly.
Your goal is a secure tube with enough flexibility to expand when stuffed.
After sewing, tie a small secure knot on the inside.
Do not cut every long tail yet; one can help with closing an end.
Beginner tip:
Match the stitches one-for-one as you sew. This prevents one edge from creeping farther ahead than the other.
Common mistake to avoid:
Twisting the rectangle before joining.
Lay it flat first, bring the two short ends directly together, and confirm that the ribbing runs continuously around the tube.
Step 5: Cinch the Bottom Closed
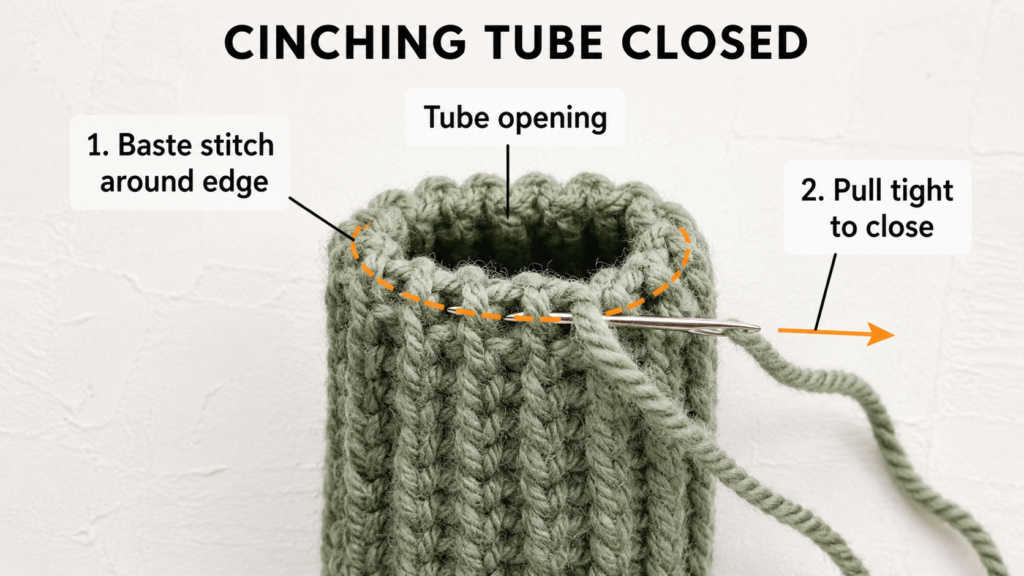
Turn the tube so the seam is facing you.
Thread a long strand of matching orange yarn through the tapestry needle if you do not already have a usable tail.
Starting near the seam, weave the needle in and out around one open edge.
Try to catch every row end or every other row end consistently.
Continue completely around the opening.
Now pull the yarn gradually.
The opening will gather inward.
Do not yank violently. Pull a little, redistribute the folds with your fingers, and pull again.
When the opening is almost completely closed:
- Pass the yarn through several opposite stitches.
- Pull firmly.
- Make two or three small securing stitches.
- Tie a secure knot.
- Hide the remaining tail inside the pumpkin tube.
The bottom should now be closed.
Beginner tip:
Use a strong length of yarn without weak or frayed sections. The gathering process puts considerable tension on the strand.
Common mistake to avoid:
Pulling with one sudden hard motion.
Gradual tightening distributes the gathers more evenly and reduces the chance of breaking the yarn.
Step 6: Add the Stuffing and Close the Top
Turn the pumpkin so the closed end sits at the bottom.
Begin adding polyester fiberfill in small pieces.
Do not push one enormous ball of stuffing into the center.
Instead:
- Add a small handful.
- Push some stuffing toward the outer walls.
- Add another small handful.
- Rotate the pumpkin.
- Continue until the entire shape feels evenly filled.
The pumpkin should be:
- Full.
- Rounded.
- Soft enough to shape.
- Firm enough that the fabric does not collapse.
Avoid making it rock-hard.
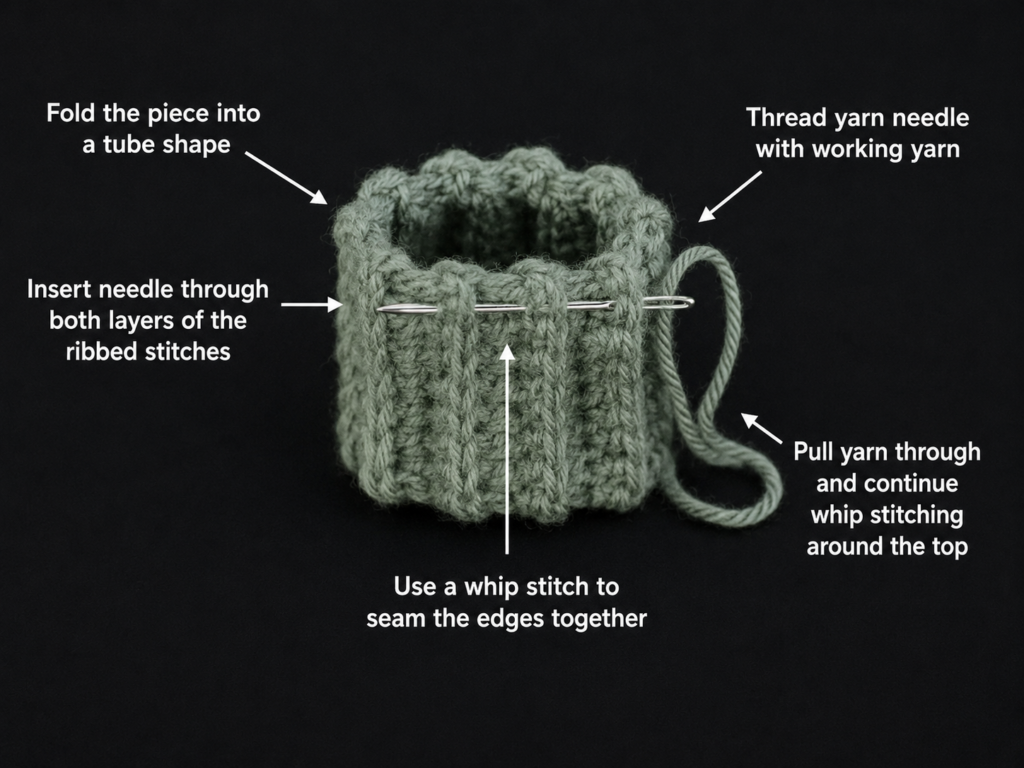
Now thread the second long tail onto your tapestry needle.
Work a running stitch around the upper opening exactly as you did at the bottom.
Before pulling completely closed, check the stuffing one final time.
Add a small amount if the upper shoulders look hollow.
Pull the opening closed.
Secure with several strong stitches.
Do not cut the yarn yet.
Beginner tip:
Massage the stuffing through the crochet fabric with your fingers. You can often correct a lumpy section without reopening the pumpkin.
Common mistake to avoid:
Overstuffing until the crochet stretches and white fiberfill shows through the stitches.
Stop before the ribbed fabric becomes excessively stretched.
Step 7: Shape the Pumpkin into Six Sections
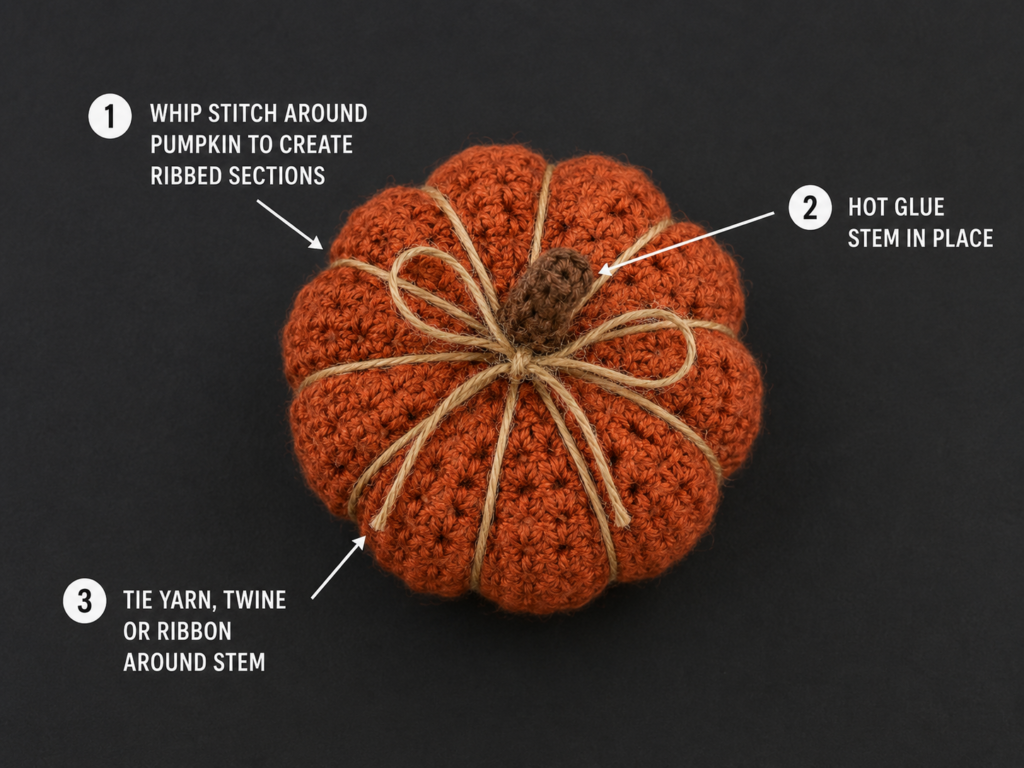
This step gives the pumpkin a more defined, sculpted appearance.
Cut approximately 60–70 inches of strong oatmeal yarn.
Thread it onto your tapestry needle.
Insert the needle through the bottom center and push it carefully through the stuffed pumpkin until it exits at the top center.
Leave approximately 8 inches of tail at the bottom.
Now bring the yarn down the exterior of the pumpkin, following one ribbed groove.
Insert the needle through the bottom center again.
Push it through to the top.
Pull gently.
The yarn will create a visible indentation.
Repeat this process until the pumpkin has six approximately even sections.
Think of the top as a clock:
- First division at 12 and 6.
- Then divide the remaining sides.
- Adjust visually rather than expecting mathematical perfection.
When all six sections look balanced, knot the working yarn securely to the beginning tail.
Hide the ends inside the pumpkin.
Beginner tip:
Do not fully tighten the first section immediately. Create all six divisions first, then adjust their tension one at a time.
Common mistake to avoid:
Pulling one section much tighter than the others.
Uneven tension can make the pumpkin lean or distort into an irregular shape.
Step 8: Crochet the Pumpkin Stem
With walnut-brown yarn:
Ch 7.
Row 1
Starting in the second chain from the hook:
Sc in each chain across.
6 sc.
Ch 1 and turn.
Row 2
Work:
1 sc BLO in each of the 6 stitches.
Fasten off, leaving an 18-inch sewing tail.
Roll the small rectangle tightly from one short side to the other, creating a compact stem.
Thread the tail onto the tapestry needle.
Sew through the rolled layers several times to prevent them from opening.
Position the stem over the center of the pumpkin.
Sew its bottom securely to several surrounding pumpkin stitches.
Do not rely on only one attachment point.
Beginner tip:
A slightly crooked stem often looks more natural than a perfectly upright cylinder.
Common mistake to avoid:
Making the stem extremely large.
The stem should complement the pumpkin rather than dominate it.
Step 9: Crochet the Sage-Green Leaf
With sage-green yarn:
Ch 8.
Starting in the second chain from the hook, work along the first side:
- 1 sc.
- 1 hdc.
- 1 dc.
- 1 tr.
- 1 dc.
- 1 hdc.
- 1 sc.
Ch 1.
Rotate the foundation chain.
Working into the unused loops on the opposite side, repeat:
- 1 sc.
- 1 hdc.
- 1 dc.
- 1 tr.
- 1 dc.
- 1 hdc.
- 1 sc.
Join with a sl st near the first stitch.
Fasten off, leaving a long sewing tail.
Position the leaf beside the stem.
Angle it slightly rather than placing it perfectly horizontal.
Sew the base of the leaf to the pumpkin.
For more dimension, leave the pointed tip unattached.
Beginner tip:
Block the leaf gently between your fingers before sewing. A small amount of shaping can dramatically improve its symmetry.
Common mistake to avoid:
Missing the unused loops on the second side of the foundation chain.
Rotate the chain slowly and look for a clear line of unused loops.
Step 10: Add the Final Autumn Details
You can leave the pumpkin simple or add one restrained decorative accent.
Good options include:
- A small oatmeal twine bow.
- A narrow velvet ribbon.
- One tiny wooden bead.
- A second smaller crochet leaf.
- A short curly crochet vine.
For a simple curly vine:
- Ch 16 with sage yarn.
- Work 2 sc in each chain.
- The strip will curl naturally.
- Attach one end beside the stem.
Keep embellishments proportional.
The ribbed texture should remain the main visual feature.
Pattern Notes or Stitch Notes
Turning-chain rule
The ch 1 at the beginning of each row does not count as a stitch.
Your stitch count remains 20.
Stitch count
Every rectangle row contains:
20 hdc stitches.
The complete sample rectangle contains:
40 rows.
Repeat pattern
After Row 1:
Ch 1, turn, hdc BLO in each stitch across.
Repeat until 40 total rows are complete.
Row notes
The rectangle is worked back and forth in turned rows.
This is not a round-based pumpkin pattern.
Right side and wrong side
Because the pumpkin is heavily textured and formed into a three-dimensional object, the right-side/wrong-side distinction is less critical than it would be for a garment.
However, try to keep your seam positioned neatly toward the inside when assembling.
Size adjustment notes
The easiest way to create a different size is to alter both the foundation chain and the total number of rows.
Mini pumpkin
Try:
- Ch 13.
- 12 hdc per row.
- Approximately 26–28 rows.
Larger pumpkin
Try:
- Ch 29.
- 28 hdc per row.
- Approximately 54–58 rows.
These are starting suggestions rather than rigid formulas because yarn and tension can alter proportions.
Before seaming any custom size, wrap the rectangle loosely into a cylinder and judge whether it looks wide enough to create a full pumpkin body.
Common Beginner Mistakes
1. Accidentally skipping the final stitch
Problem: The rectangle becomes narrower with every few rows.
Fix: Place a stitch marker in the first and last stitches until you can identify them confidently.
2. Working through both loops
Problem: Some sections lose the ribbed appearance.
Fix: Pause before each stitch and confirm that the front loop remains unused.
3. Starting with a foundation chain that is too tight
Problem: One edge pulls inward and the rectangle curves.
Fix: Remake the chain more loosely or use a hook 0.5 mm larger for the chain only.
4. Inconsistent stitch count
Problem: The short edges do not align during seaming.
Fix: Maintain exactly 20 hdc in every row.
5. Pulling the seam too tightly
Problem: One section of the pumpkin develops a stiff vertical ridge.
Fix: Secure the seam without strangling the fabric.
6. Overstuffing the pumpkin
Problem: White fiberfill becomes visible through stretched stitches.
Fix: Remove a small amount and massage the remaining stuffing evenly toward the sides.
7. Understuffing
Problem: The pumpkin looks flat and collapses between sections.
Fix: Add small amounts until the shape feels full but still moldable.
8. Uneven shaping tension
Problem: One rib becomes much deeper than the others.
Fix: Establish all sections loosely before tightening any individual strand.
9. Attaching the stem at only one stitch
Problem: The stem flops or rotates.
Fix: Sew through several neighboring pumpkin stitches in different directions.
How to Customize This Crochet Project
Change the yarn
The medium-weight version is approachable for beginners, but the same construction concept can be adapted to other yarn weights.
A thinner yarn creates:
- Smaller stitches.
- A more delicate pumpkin.
- More compact fall decorations.
A bulky yarn creates:
- Faster growth.
- A plush texture.
- A larger statement pumpkin.
Remember that yarns within a single weight category can still behave differently, so changing yarn may change the dimensions and fabric density.
Create a neutral fall collection
Use:
- Oatmeal.
- Warm ivory.
- Mushroom taupe.
- Camel.
- Light gray.
- Muted sage.
Finish every pumpkin with the same brown stem for cohesion.
Create a traditional autumn collection
Use:
- Pumpkin orange.
- Deep rust.
- Mustard yellow.
- Brick red.
- Moss green.
- Warm chocolate brown.
Make the pumpkin taller
Increase the foundation chain while maintaining enough rows to wrap comfortably around the body.
A taller rectangle width produces a taller pumpkin.
Make the pumpkin wider and squatter
Add more rows without increasing the foundation chain.
This creates a wider circumference relative to the pumpkin height.
Change the texture
After mastering the basic version, experiment with another dense stitch:
- Single crochet BLO.
- Herringbone half double crochet.
- Waistcoat stitch.
- Alternating front-loop and back-loop rows.
- Textured post stitches for experienced crocheters.
Choose a relatively dense stitch so the stuffing remains hidden.
Change the number of sections
Try:
- Five large sections.
- Six balanced sections.
- Eight narrower sections.
Six sections are a useful beginner starting point because they are relatively easy to distribute visually.
Add a curly vine
With sage or brown yarn:
Ch 16–24.
Work 2 sc in each chain.
The piece should curl naturally.
Sew one end beside the stem.
Use the pumpkin as a place-card holder
For Thanksgiving:
- Make several mini pumpkins.
- Tie a small paper name tag around each stem.
- Place one at every table setting.
The selected primary source also demonstrates an individual crochet pumpkin as part of a Thanksgiving place setting, reinforcing this practical seasonal use.
Make a fall garland
Create several mini pumpkins and connect them with sturdy yarn or cord.
The primary reference article also illustrates small pumpkins arranged into an autumn garland.
Gift ideas and use cases
A finished pumpkin can work as:
- Autumn shelf décor.
- Thanksgiving table décor.
- A teacher gift.
- A hostess gift.
- A craft-fair item.
- A fall mantel accent.
- A seasonal office decoration.
- Part of a crochet pumpkin basket.
- A centerpiece.
- A place-card decoration.
Finishing Instructions
Fastening off
When finishing any crochet component:
- Cut the yarn, leaving the required sewing tail.
- Pull the cut end completely through the active loop.
- Tighten gently.
Do not cut important assembly tails too short.
Weaving in ends
Use a tapestry needle.
Pass each tail:
- Beneath several nearby stitches.
- Reverse direction.
- Pass beneath another set of stitches.
- Trim close to the fabric.
For a stuffed object, many tails can be securely hidden inside the pumpkin after being fastened.
Blocking
Heavy blocking is usually unnecessary for the completed stuffed pumpkin.
However, blocking the flat rectangle before assembly may help if:
- The edges curl severely.
- The rectangle is slightly distorted.
- The yarn responds well to blocking.
Always use a blocking method compatible with your specific yarn fiber.
Shaping
After the pumpkin is completely assembled:
- Place it on a flat surface.
- Press gently downward with both hands.
- Rotate.
- Adjust each rib with your fingers.
- Center the stem.
- Reposition the leaf.
Do not expect absolute symmetry. Slight differences give handmade pumpkins character.
Washing and care
Follow the manufacturer’s care instructions for the specific yarn used.
For a stuffed decorative object with sewn components, gentle spot cleaning is usually the least disruptive option unless the materials are specifically designed for washing.
Allow the pumpkin to dry completely before storing it.
Quick Printable-Style Summary
Project: Easy Ribbed Fall Crochet Pumpkin
Skill level: Beginner to Easy
Finished size: Approximately 5.5 inches wide × 3.5 inches high without stem
Yarn: Medium #4 worsted yarn
Main color: Burnt pumpkin orange
Accent colors: Walnut brown, sage green, oatmeal
Hook: 4.0 mm / G-6
Main stitches: Chain, half double crochet, single crochet, slip stitch, BLO
Starting method
Ch 21.
Row 1
Hdc in second chain from hook and every chain across.
20 hdc.
Rows 2–40
Ch 1, turn.
Hdc BLO in every stitch across.
20 hdc per row.
Assembly
- Fold short ends together.
- Sew into a tube.
- Gather bottom edge.
- Pull closed and secure.
- Add fiberfill.
- Gather upper edge.
- Pull closed and secure.
- Shape into six sections.
Stem
Ch 7.
Sc in second chain and across.
6 sc.
Work one additional BLO sc row.
Roll into a stem and sew securely.
Leaf
Ch 8.
Work along first side:
sc, hdc, dc, tr, dc, hdc, sc.
Ch 1.
Repeat on opposite side.
Finishing
Sew on stem and leaf.
Add optional bow or curly vine.
Shape gently.
FAQ
Is this fall crochet pumpkin suitable for a complete beginner?
Yes, provided you are comfortable making a chain and basic crochet stitches. The project begins as a flat rectangle rather than requiring complicated increases and decreases in the round. The primary visual source likewise presents rectangle-based pumpkin construction as particularly beginner-friendly.
Why is my crochet pumpkin rectangle getting narrower?
You are probably skipping the first or final stitch of some rows.
Count 20 stitches after every row and use markers in the edge stitches until you can recognize them easily.
Can I use acrylic yarn instead of cotton?
Yes. Acrylic, wool, cotton, and blends can all produce decorative pumpkins, although the exact texture, size, drape, and stitch definition will vary. Yarn-weight labels are useful guides but do not guarantee identical behavior among different yarns.
Why can I see the stuffing through my crochet stitches?
Possible reasons include:
- Hook is too large.
- Tension is very loose.
- Pumpkin is overstuffed.
- Yarn is too thin for the hook.
Try removing some stuffing or using a smaller hook on your next version.
Can I make the pumpkin without the shaping strands?
Yes.
The natural BLO ribbing already gives the pumpkin texture.
The external shaping strands create deeper, more obvious sections but are optional.
How do I make several matching pumpkins in different sizes?
Keep the same:
- Yarn family.
- Color palette.
- Stem style.
- Leaf style.
Then alter the foundation chain and number of rows.
A collection looks coordinated even when the pumpkins differ in exact size.
What colors are best for fall crochet patterns?
Traditional fall palettes often include orange, rust, mustard, olive, brown, cream, and red, but a neutral collection using oatmeal, taupe, camel, gray, and sage can create a more understated style.
The best color palette is ultimately the one that suits your décor or intended recipient.
Conclusion
Fall crochet patterns do not have to be large, complicated, or time-consuming to feel satisfying.
This ribbed pumpkin begins with one basic rectangle and gradually becomes a complete three-dimensional autumn decoration through a series of manageable steps: crochet, seam, gather, stuff, close, shape, and embellish.
The first pumpkin teaches the construction.
The second usually becomes faster.
By the third, you may already be planning a complete collection in burnt orange, cream, sage, mustard, and taupe.
That flexibility is one of the strongest features of the project. Change the yarn weight, foundation length, number of rows, stuffing amount, section count, leaf color, or stem style, and the same core technique can produce an entire handmade pumpkin patch.
Save the tutorial for your autumn project list, make one medium pumpkin first, and then use what you learned to create smaller or larger versions for a mantel, Thanksgiving table, fall garland, teacher gift, or seasonal centerpiece.





