Looking for crochet Christmas gifts that are quick, useful, and genuinely enjoyable to make? This easy Christmas coffee cup cozy is a lovely place to start.
It is the sort of small handmade present that works beautifully for a teacher, coworker, neighbor, coffee-loving friend, or anyone who appreciates a personal gift. You can make one in traditional Christmas colors, customize the yarn to match someone’s favorite shades, or crochet several and turn them into a coordinated gift set.
The best part? You don’t need complicated stitches or expensive supplies.
This beginner-friendly crochet Christmas gift uses mostly single crochet stitches. You will make a soft ribbed band, join the ends to form a sleeve, work a few simple rounds around the upper edge, and add a contrasting holiday stripe.
The result is a practical reusable coffee cup cozy with a subtle handmade texture.
In this tutorial, you’ll learn how to crochet the entire project step by step, including how to choose your yarn, count stitches, prevent common mistakes, change colors, and finish your cozy neatly enough to give as a gift.
Whether you’re making one Christmas present or preparing a whole basket of handmade gifts, this little crochet project is an approachable way to get started.
What You’ll Learn
By the end of this tutorial, you’ll know how to:
- Start a crochet project with a slip knot and foundation chain.
- Work tidy single crochet stitches.
- Create stretchy ribbed crochet fabric using the back loop only.
- Measure your work to fit a reusable coffee cup.
- Join a flat crochet strip without twisting it.
- Crochet around the edge of a ribbed band.
- Switch between two yarn colors neatly.
- Weave in yarn tails for a professional-looking finish.
- Customize your Christmas coffee cozy for different recipients.
Project Details
SKILL LEVEL
Beginner / Easy
TIME
45–75 minutes
YARN
Worsted weight (#4)
HOOK
5.0 mm (H/8)
FINISHED SIZE
Custom fit for a reusable cup
CONSTRUCTION
Ribbed band + joined rounds
This original pattern uses a starting band of 32 rows as a sample size. The correct number for your project depends on the cup’s circumference, yarn, and tension. Measure as you go instead of relying only on the suggested number.
Materials You’ll Need
You only need a small amount of yarn and a few basic crochet tools.
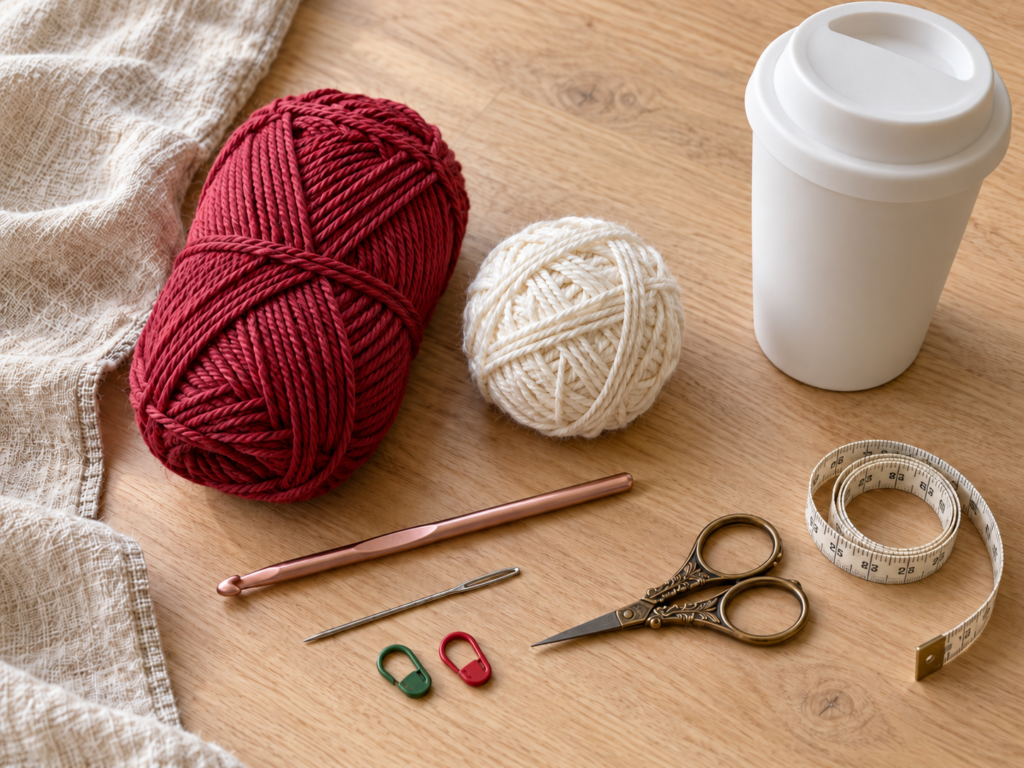
Yarn: Choose medium-weight (#4) smooth cotton or cotton-blend yarn. For this Christmas version, use dusty cranberry as the main color and warm ivory for the contrasting stripe. About 25–40 yards of yarn in total is a reasonable starting allowance, although usage will vary with cup size and tension.
Crochet hook: A 5.0 mm hook is a good starting point for the suggested yarn. If your stitches are unusually loose or stiff, adjust your hook size.
Additional supplies: Sharp scissors, a blunt yarn needle, two removable stitch markers, and a measuring tape. You’ll also need a reusable coffee cup for checking the fit.
A plain paper gift tag, kraft gift box, and cotton ribbon are optional if you’re planning to give the cozy as a Christmas present.
Choose smooth yarn with clearly visible stitches rather than highly fluffy or textured novelty yarn. It is easier for beginners to identify where to insert the hook and count each row correctly.
Crochet Abbreviations Used
This pattern uses US crochet terminology throughout.
| Abbreviation | Meaning |
|---|---|
| ch | Chain |
| sc | Single crochet |
| sl st | Slip stitch |
| st / sts | Stitch / stitches |
| BLO | Back loop only |
| rnd | Round |
| rep | Repeat |
A US single crochet is called a double crochet in UK terminology. Make sure you’re following US terms if you’re using a separate crochet stitch guide alongside this tutorial.
How to make a single crochet
Insert your hook into the indicated stitch, yarn over, and pull up a loop. You should now have two loops on your hook.
Yarn over again and draw the yarn through both loops.
You have completed one single crochet.
How to make a slip stitch
Insert your hook into the indicated stitch, yarn over, and pull the yarn through the stitch and the loop already on your hook in one movement.
Slip stitches are useful for joining pieces and closing rounds without adding much height.
What does back loop only mean?
Look at the top of a crochet stitch. You should see a small V shape with two strands.
The strand closest to you is the front loop. The strand farther away is the back loop.
When a pattern says BLO, insert your hook under only the back strand rather than both strands.
Working rows this way creates the raised ribbed texture that makes this coffee cup cozy more flexible and comfortable to hold.
Before You Start
Measure your cup
Coffee cups are not all identical.
Some reusable cups are straight-sided, while others become wider toward the top. Others have a pronounced taper near the base.
Measure the circumference of the cup where you want the cozy to sit.
For example, if the cup measures 9.5 inches around, your ribbed band may need to be approximately 8.5–9 inches long when relaxed, depending on how stretchy your crochet fabric is.
That difference helps the sleeve hold the cup rather than slide down.
However, these measurements are only a starting point. Cotton blends and tightly crocheted fabric do not stretch equally, so checking the actual cup is more reliable than using a fixed percentage.
Understand the gauge
Gauge means how many stitches and rows fit into a certain measurement.
For this small project, you don’t need to make a separate large gauge swatch. The ribbed band itself can act as your test piece.
After crocheting several rows, check the fabric.
Does it bend gently without feeling stiff? Can you see the ridges? Is the width suitable for the height of the cozy?
If the band is too narrow, change the foundation chain count. If it is too tight around the cup, make more rows. If it is too loose, remove a few rows.
Keep your tension comfortable
Avoid pulling every stitch extremely tight.
Tight stitches can make it difficult to insert your hook into the back loop and prevent the finished sleeve from stretching.
At the same time, very loose stitches may make the cozy slide down a smooth cup.
Aim for an even, gently flexible fabric.
Count stitches and rows
Each row of the ribbed band will contain eight single crochet stitches.
The turning chain does not count as a stitch.
After each row, count the eight V-shaped stitch tops. This will help keep your band the same width from beginning to end.
A removable stitch marker can also help you recognize the first and last stitch.
Choose a festive color combination
Cranberry red and warm ivory are lovely together, but they are not your only choices.
Forest green and cream feel classic. Sage and oatmeal are softer and more neutral. Navy and silver make a winter-inspired combination that works beyond Christmas.
For the clearest tutorial photographs, keep the main color consistent throughout and introduce the second color only during the stripe.
Step-by-Step Crochet Tutorial
The pattern below makes one reusable coffee cup sleeve with a ribbed lower section and a contrasting upper stripe.
Important: The row and round counts are an original sample specification. This pattern has not been physically sample-tested here, so measure and test-fit the cozy before making a gift batch.
Step 1: Make a Slip Knot
Begin with your dusty cranberry yarn.
Pull a short length of yarn from the skein, leaving approximately 5–6 inches for the starting tail.
Make a loop in the yarn, bring a small section of working yarn through the loop, and gently tighten it to form an adjustable slip knot.
Place the slip knot onto your 5.0 mm crochet hook.
Pull the working strand slightly so the loop fits comfortably around the hook shaft.
The loop should move easily along the smooth portion of the hook. You should not need to force it.
Beginner tip: The slip knot is only the starting point. Don’t count it as one of your foundation chains.
Common mistake to avoid: Tightening the slip knot against the narrow throat of the hook. This makes the first chain difficult to form. Adjust the loop around the thicker shaft instead.

Step 2: Crochet the Foundation Chain
With your slip knot on the hook, make a chain.
Yarn over by bringing your working yarn over the hook and pull it through the loop.
That makes your first chain stitch.
Continue this movement until you have nine chain stitches.
Try to keep all nine chains approximately the same size.
The chains should look like a little braided cord with visible V shapes on one side.
Don’t worry if your first few chains aren’t perfect. Consistency comes with practice.
Lay the foundation chain flat on your table and count each V shape, starting closest to your hook.
Beginner tip: If the first chain looks much tighter than the others, gently loosen it before moving to the next step.
Common mistake to avoid: Counting the loop currently sitting on your hook as an additional chain. The active loop is not part of the nine-chain foundation.

Step 3: Crochet the First Row
Now you will turn your foundation chain into a small strip of fabric.
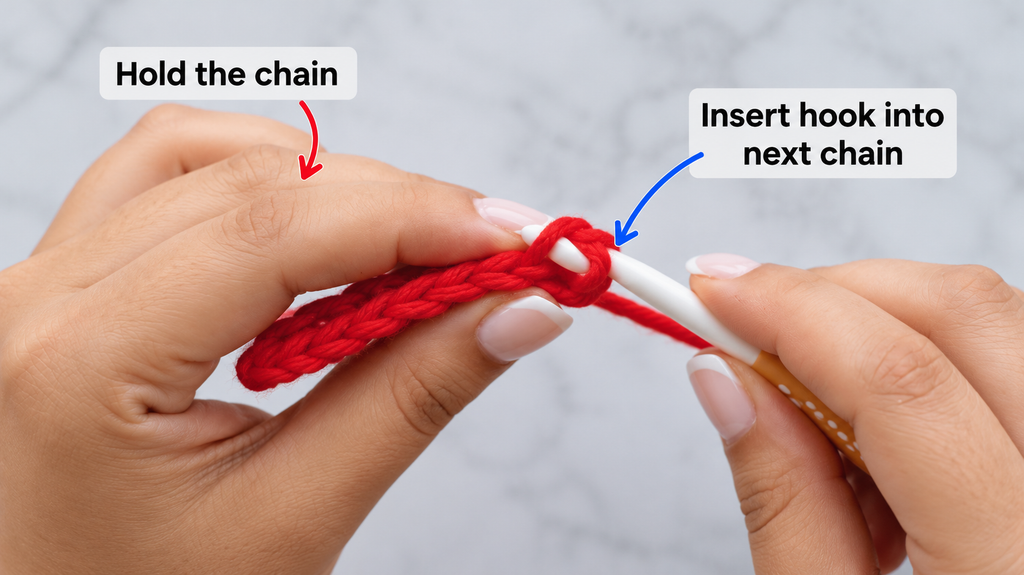
Insert your hook into the second chain from the hook.
Yarn over and draw up a loop. You should have two loops on your hook.
Yarn over again and pull through both loops.
You have made your first single crochet.
Continue working one single crochet into each remaining chain across the foundation.
By the time you reach the end, you should have eight single crochet stitches.
Count carefully before moving on.
This first row establishes the width of the ribbed lower band.
If you would prefer a taller ribbed section, begin a new sample with more foundation chains. If you’d like a narrower ribbed section, start with fewer chains.
Beginner tip: Hold the foundation chain close to the stitch you’re working. This helps keep the chain from twisting while you’re learning.
Common mistake to avoid: Skipping the final chain. It can be small and easy to miss, especially when your chain is tight. If you finish with only seven stitches, check the far end before continuing.

Step 4: Create the Ribbed Texture
This is where the cozy begins to develop its lovely stretchy texture.
At the end of the first row, make one chain stitch and turn your work.
The chain helps you reach the height needed to begin your next row. It does not count as a stitch.
Look carefully at the top of the first stitch.
Instead of inserting your hook through both loops, insert it through the back loop only.
Make one single crochet.
Continue working one single crochet through the back loop of each stitch across the row.
You should still have eight stitches.
At the end, chain one and turn.
Repeat the same process on every new row.
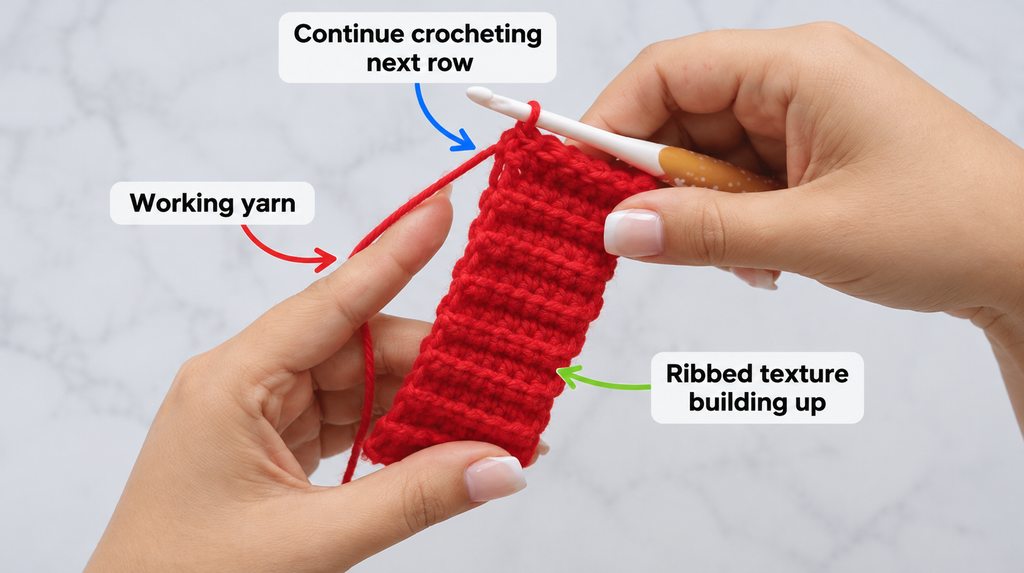
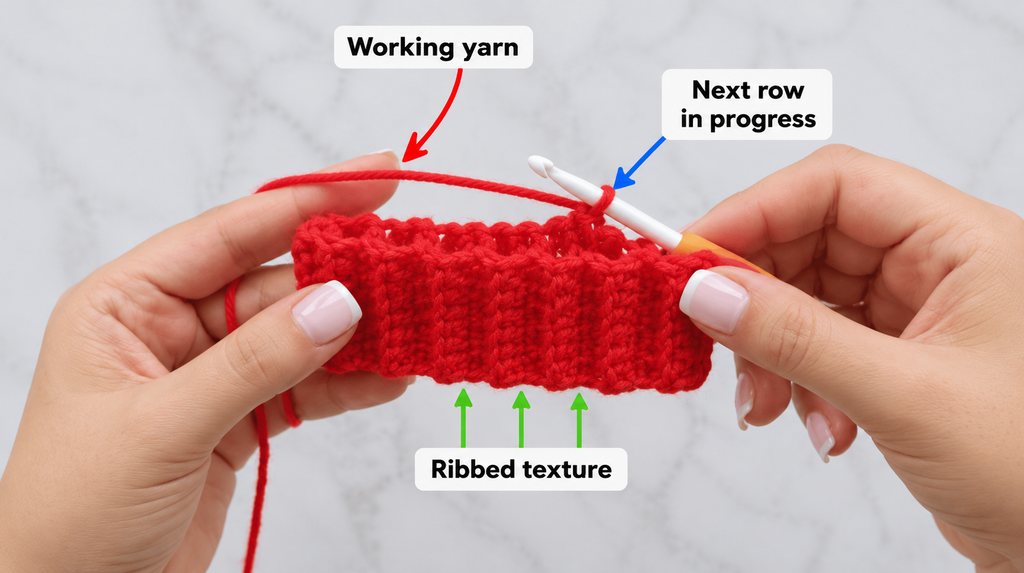
As your strip grows, you’ll notice little raised lines forming across the fabric. When the strip is later wrapped into a cylinder, these become the vertical ribs of the cup cozy.
For the sample pattern, work Rows 2–32 in BLO single crochet, keeping eight stitches in every row.
You can stop earlier or continue longer if your cup requires a different circumference.
Beginner tip: Use your fingernail or the hook tip to gently separate the front and back loops before inserting your hook.
Common mistake to avoid: Accidentally crocheting through both loops in the middle of a BLO row. If the ribbing suddenly looks flatter, check your stitch placement.
Step 5: Check the Length of Your Band
After you’ve made several rows, pause and look at your fabric.
It should resemble a long narrow rectangle with raised ridges running across it.
The rectangle should feel flexible rather than rigid.
Continue until your strip is long enough to fit around your reusable coffee cup.
The 32-row sample may produce a relaxed circumference around 8.5–9 inches with some yarns and tension, but this is not guaranteed.
Wrap the strip around your cup at the position where it will be worn.
Hold the two short ends together.
Does it fit comfortably? Is the ribbing stretched only slightly? Can the band sit at the intended height without being forced?
If yes, you’re ready for the next step.
If the ends do not meet without overstretching, add a few more rows.
If the strip overlaps significantly and feels loose, remove rows until the fit improves.
Try to finish with the working yarn positioned conveniently for joining.
Beginner tip: Check the fit while the cup is empty and at room temperature. The goal is to make a sleeve that can slide on and off comfortably.
Common mistake to avoid: Assuming every cup with the same height has the same circumference. Even a small change in width can affect how securely the cozy fits.

Step 6: Join the Ribbed Band Into a Circle
Now it’s time to transform your flat rectangle into a cup sleeve.
Bring the two short ends of the ribbed band together.
Make sure the strip is not twisted.
For a neat seam, place the ends together with the side you want to display facing inward. This lets you work the join and then turn the band right side out.
If your working yarn is at the joining corner, insert the hook through the corresponding stitch of each short end.
Yarn over and pull through all the loops to make a slip stitch.
Repeat along the short edges until all eight corresponding stitch positions have been joined.
The seam should be secure but not bulky.
Once the joining is complete, turn your work right side out.
You should now have a small, stretchy cylinder.
Take a moment to check its shape. The ribbing should run vertically around the cup when the sleeve is upright.
Beginner tip: Before starting the seam, use two stitch markers to hold the upper and lower corners together. This makes it easier to see that your edges are aligned.
Common mistake to avoid: Joining the edges while one end is rotated. A twist can make the sleeve impossible to fit correctly. Lay it flat and inspect the orientation first.
Step 7: Crochet Around the Upper Edge
Your ribbed band is complete. Next, you’ll build a short, smooth upper section that gives the cozy its finished shape.
With the band right side out, position your hook along the top edge.
You will be working into the ends of the ribbing rows rather than into the original foundation chain.
For the 32-row sample, aim to work one single crochet into the end of each row around the upper circumference.
This gives you 32 single crochet stitches for the first round.
If you changed the row count to fit your cup, aim for one stitch per row end unless you find that your fabric needs a small adjustment.
The key is to distribute stitches evenly.
Insert your hook into the first row-end position, yarn over, draw up a loop, yarn over again, and pull through two loops.
Repeat around the band.
As you crochet, the smooth section should emerge above the ribbing without dramatically pulling inward or flaring outward.
When you reach the end of the round, use a slip stitch to join to the first single crochet.
Chain one to prepare for the next round.
The joining slip stitch and starting chain do not count as body stitches.
Beginner tip: Place a stitch marker in the first single crochet of each round. This helps you identify exactly where the round ends.
Common mistake to avoid: Mistaking the joining slip stitch for an extra stitch. If you accidentally crochet into it, your stitch count may increase on every round.
Step 8: Build the Smooth Section
Continue using your cranberry yarn.
For Round 2 of the upper body, work one single crochet into each stitch around the sleeve.
You should have 32 stitches if you are following the sample count.
Join with a slip stitch and chain one.
Look at your sleeve from the side.
The new section should have a smoother surface than the ribbed lower band. That contrast adds interest without requiring a complicated decorative stitch.
You may notice that the new stitches look smaller than the ridges below. This is normal because the ribbed section is worked sideways in rows, while the upper section is crocheted around the sleeve.
Before continuing, place the cozy on the cup again.
If the upper section is too tight, you may have crocheted too tightly into the row ends. If it flares dramatically, you may have added extra stitches around the edge.
Making this correction now is much easier than discovering a fit problem after weaving in the ends.
Beginner tip: Maintain the same hook size throughout the project unless you’ve confirmed that your upper-round tension differs substantially.
Common mistake to avoid: Adding an accidental extra stitch at the seam. Keep the first stitch of the round marked and count before joining.
Step 9: Add the Christmas Color Stripe
Now comes the little detail that turns your everyday crochet cup cozy into a festive Christmas gift.
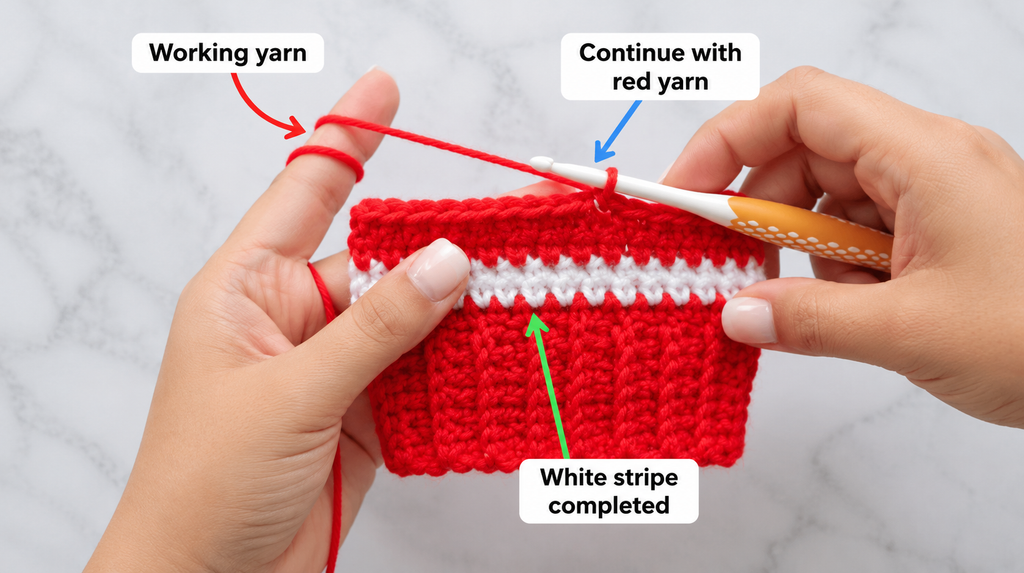
For the next round, change from dusty cranberry to warm ivory.
To make a clean color change, begin the final single crochet of the previous round with the cranberry yarn.
Insert your hook, yarn over, and pull up a cranberry loop.
You should have two cranberry loops remaining on your hook.
Instead of finishing with cranberry, yarn over using ivory and pull the ivory through both loops.
Your working yarn is now ivory.
Join the round as usual, chain one, and begin the next round.
Round 3: With ivory, work one single crochet into each stitch around. Join with a slip stitch. Keep the stitch count at 32.
The ivory row creates a crisp horizontal accent against the cranberry background.
As you move around the sleeve, keep your yarn ends on the inside. You can weave them in later rather than creating bulky knots.
Beginner tip: Leave a 5–6 inch ivory tail when introducing your new color. This gives you enough yarn to secure it neatly during finishing.
Common mistake to avoid: Simply tying a large knot between the colors. A bulky knot may feel uncomfortable against a cup and can work loose after washing.

Step 10: Finish the Upper Edge
Once the ivory stripe is complete, switch back to cranberry using the same color-change method.
Work another full round of single crochet.
Round 4: One single crochet in each stitch around using cranberry. Join and chain one.
Round 5: Work one more round of cranberry single crochet. Join to the first stitch.
Your cozy should now have a textured lower band, a smooth upper section, and a narrow ivory stripe.
Check the height against your cup.
The sleeve should cover a comfortable grip area without reaching so close to the lid that it interferes with drinking.
If you want a slightly taller cozy, add another round or two before fastening off. Remember to check the cup’s taper; the sleeve should remain secure.
For a cleaner upper edge, you can also work one optional round of loosely made slip stitches. This is a decorative choice rather than a requirement.
Don’t pull slip stitches tightly, or the opening may lose its flexibility.
Beginner tip: Run your fingers along the finished upper edge. It should be smooth, comfortable, and flexible enough to slide over the cup.
Common mistake to avoid: Crocheting extra stitches into the joining slip stitches. This can make the finished rim flare outward unevenly.
Pattern Notes and Stitch Counts
The written sample uses the following structure.
| Section | Instructions | Count |
|---|---|---|
| Foundation | Chain 9 | 9 chains |
| Ribbing Row 1 | Sc in second chain and across | 8 sc |
| Ribbing Rows 2–32 | Ch 1, turn, sc BLO across | 8 sc per row |
| Join | Join short edges with slip stitches | 8 joining positions |
| Body Round 1 | Sc once in each ribbing row end | 32 sc |
| Body Round 2 | Sc around in cranberry | 32 sc |
| Body Round 3 | Sc around in ivory | 32 sc |
| Body Round 4 | Sc around in cranberry | 32 sc |
| Body Round 5 | Sc around in cranberry | 32 sc |
| Finish | Fasten off, weave ends, test fit | — |
Turning chain rule: The chain one made before each flat row does not count as a stitch.
Round joining rule: The joining slip stitch and initial chain one are not counted as stitches.
Repeat notes: Each ribbing row repeats eight back-loop-only single crochet stitches. Each smooth body round uses one single crochet in every stitch.
Right side and wrong side: Either surface of the ribbing can be displayed, but choose the appearance you prefer before joining. Keep the seam on the inside of the sleeve.
Size adjustment: The ribbing row count controls the circumference, while the foundation chain length controls the depth of the ribbed portion. The number of upper rounds controls the additional height.
Common Beginner Mistakes and How to Fix Them
Small crochet projects are wonderful for practicing because mistakes are easier to spot and correct.
Here are seven problems you might encounter while making your Christmas cup cozy.
1. The ribbed strip gets narrower
This usually means you’ve missed the last stitch on one or more rows.
Count eight single crochet stitches after every row. If you’ve lost a stitch, undo the affected row and work the missing stitch before continuing.
2. The ribbing looks uneven
You may have accidentally worked through both loops instead of the back loop only.
Check the top of the stitch before inserting your hook. Consistent BLO stitching creates the most regular raised ridges.
3. The cup cozy is too loose
You may have made too many ribbing rows or crocheted with unusually loose tension.
If you haven’t joined the band yet, remove a few rows and test again.
If the sleeve is already complete, it may be easier to make a new smaller cozy than to add a tight border that changes its shape.
4. The cup cozy is too tight
A sleeve that must be stretched aggressively over the cup may distort the stitches or become difficult to remove.
Add a few ribbing rows before joining, or try a larger hook if your stitches are very firm.
5. The upper edge flares outward
Extra stitches can make the upper body look wider than the ribbing.
Check that your first body round has approximately one stitch per ribbing row end and that you haven’t added stitches into the joining slip stitches.
If the fabric has a pronounced flare, undo the affected round and redistribute the stitches.
6. The color stripe looks jagged
Joined crochet rounds can have a small visible step where the round begins and ends.
Place this join toward the back of the sleeve, and change colors consistently. You can reduce its visibility, although completely seamless color transitions require more advanced techniques.
7. The yarn tails keep appearing
Very short yarn tails are difficult to secure.
Leave adequate length, weave them through several stitches in one direction, then change direction through neighboring stitches.
Trim only after the fabric has been gently stretched and the tails remain secure.
How to Customize Your Crochet Christmas Gifts
One of the most enjoyable parts of making crochet Christmas presents is choosing details that make each gift feel personal.
You can use the same basic pattern for many different recipients without having every cozy look identical.
Try different Christmas yarn colors
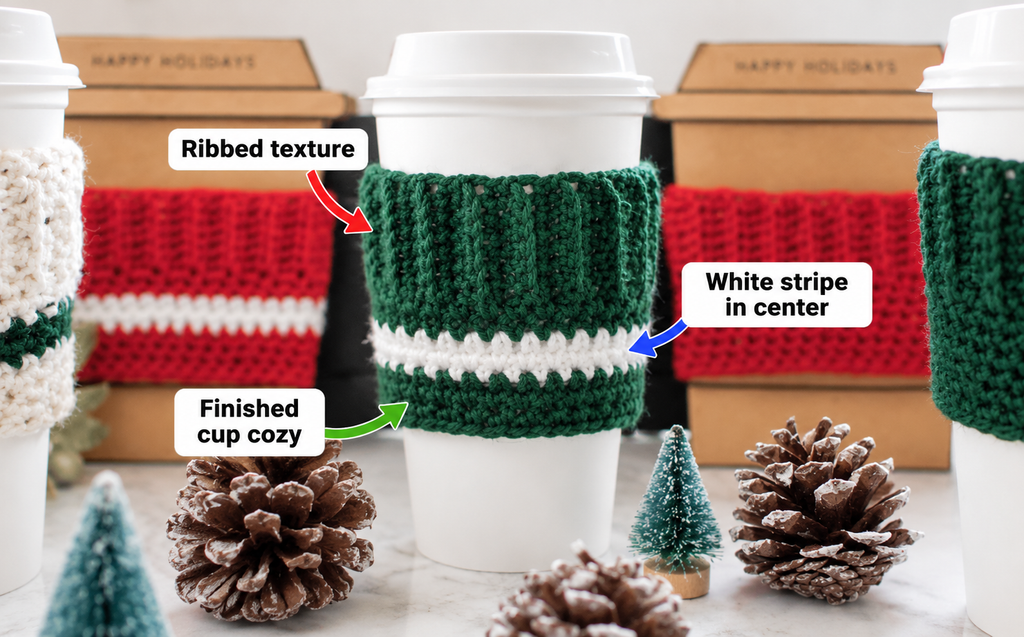
For a traditional look, use forest green with an ivory stripe or bright red with snow-white trim.
For someone who prefers neutral colors, choose oatmeal, taupe, cream, or warm gray.
If you love soft vintage Christmas decorations, dusty rose and sage green are beautiful choices.
Keep both yarns the same weight so the stripe does not create a noticeably different thickness.
Make a matching gift set
Instead of giving one cozy, crochet two or three coordinating pieces.
You could make one cranberry, one forest green, and one cream-colored cozy, all featuring a similar contrasting stripe.
Tie them together with cotton ribbon and include a simple card explaining how to wash them.
A matching set is particularly useful for a couple or a coffee-loving household.
Change the size
To make the cozy fit a wider reusable cup, add more rows to the ribbed band.
For a slimmer cup, make fewer rows.
If you’d prefer a taller grip area, begin with more foundation chains or add additional upper rounds.
Always measure your cup and avoid extending the sleeve over the lid or another area where it may interfere with safe handling.
Add a simple border
A neat round of slip stitches can make the upper edge look more finished.
You could also change to ivory for a final single crochet border if you prefer a more pronounced contrast.
Avoid thick borders that make the sleeve uncomfortable to grip.
Experiment with texture
The ribbed band is already textured, but you can make the upper section more interesting with subtle variations.
For example, you could work a round through the back loops only to create a horizontal ridge.
This is an easy detail that changes the look without requiring a completely new crochet stitch.
Make the gifts personal
Choose the recipient’s favorite colors instead of traditional Christmas shades.
A coffee drinker might love a neutral cozy for everyday use. A teacher might appreciate one in school colors. A family member who loves green could receive a set in several shades of sage and evergreen.
Simple, thoughtful color choices can make a small handmade gift feel much more special.
Finishing Instructions
Fasten off
Once you’re happy with the height and fit, cut the working yarn, leaving a tail approximately 6 inches long.
Yarn over and pull the yarn tail completely through the final loop.
Gently tighten to secure the last stitch.
Avoid pulling so hard that the upper edge puckers.
Weave in the yarn ends
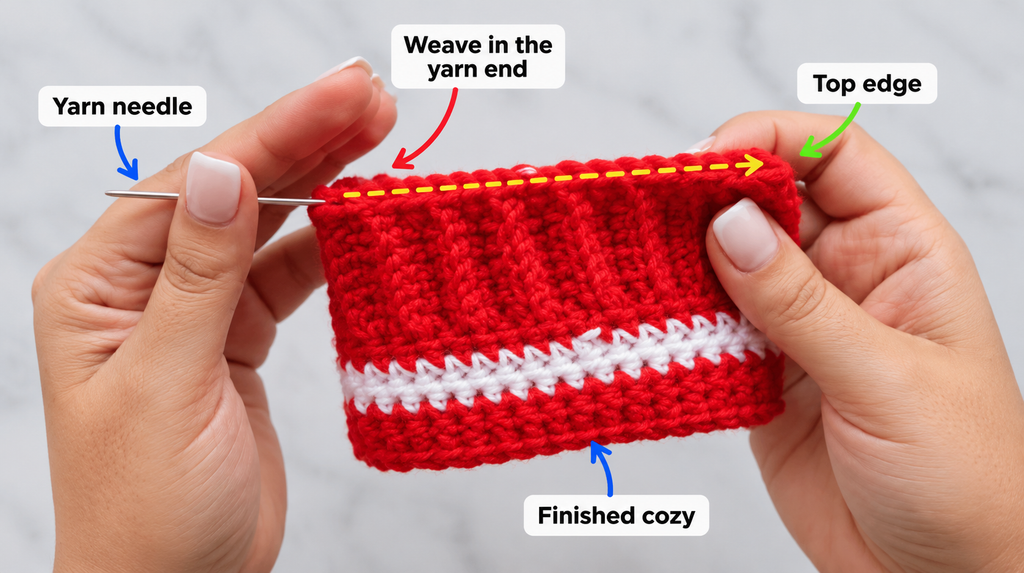
Thread a loose yarn tail through a blunt tapestry needle.
Turn the cozy wrong side out.
Weave the tail through the backs of several nearby stitches, following the natural direction of the fabric.
Change direction and weave through a few more stitches to help secure the tail.
Repeat for the other yarn ends, including the starting tail and the ends from the color change.
When all tails feel secure, trim the excess yarn.
Check the final shape
Turn your cozy right side out.
Gently stretch the ribbing with your fingers and smooth the upper edge.
Slide the cozy over your empty reusable cup.
It should sit comfortably without twisting, pulling too tightly, or sliding down easily.
If the seam is visible, rotate it toward the back of the cup.
Blocking and washing
Blocking is usually optional for a small ribbed cup sleeve.
If your fabric looks slightly uneven, you can lightly dampen it and reshape it by hand.
Allow it to dry completely before using or gifting.
Follow the yarn manufacturer’s washing instructions. Smooth cotton can often be washed gently, but care instructions vary depending on the blend, dye, and construction.
A reusable cup sleeve should not be microwaved with the cup, and it should be removed if it gets too close to a heat source.
Remember that a crocheted sleeve is not heatproof protection. It can reduce direct contact with part of the cup but does not guarantee safety from hot drinks or spills. Test the fit and temperature carefully.
Package your finished Christmas present
A simple coffee cup cozy becomes an attractive holiday gift with thoughtful presentation.
Slide the cozy around a clean reusable cup, then add a ribbon or small gift tag.
You could also pair it with a coffee shop gift card, individually packaged tea bags, or a small bag of coffee beans.
For an inexpensive neighbor or teacher gift, place the cozy and card inside a kraft gift box with a little tissue paper.
If you’re making several for family members, vary the colors so everyone can identify their own.
More Easy Crochet Christmas Gifts to Try Next
Once you’ve finished your first coffee cup cozy, there are several other small Christmas projects that use similar beginner skills.
Crochet coasters: Make simple circular or square coasters in festive colors and bundle four together as a practical gift set.
Crochet washcloths: Use soft cotton yarn and basic stitches to make reusable washcloths. Pair them with a handmade soap for an inexpensive Christmas present.
Crochet bookmarks: A small flat crochet bookmark uses very little yarn and makes a thoughtful stocking stuffer for someone who loves reading.
Crochet gift card holders: A tiny crocheted envelope or pouch is a creative way to present a gift card. It’s also a useful beginner project for practicing seams.
Crochet Christmas ornaments: Small stars, trees, and snowflakes add a handmade touch to the Christmas tree or gift wrapping.
Crochet ear warmers: A simple crocheted headband uses many of the same ribbing techniques as this cup cozy and makes a practical cold-weather present.
All these projects are well suited to small gift baskets, especially when you choose matching colors or use the same type of yarn.
Quick Printable-Style Pattern Summary
Easy Christmas Coffee Cup Cozy
Original beginner sample pattern • US crochet terms
Skill level: Beginner
Materials: Worsted cotton yarn in cranberry and ivory, 5.0 mm hook, tapestry needle, scissors, stitch markers, measuring tape.
Stitches: Chain, single crochet, BLO single crochet, slip stitch.
Starting chain: Ch 9.
Ribbed band: Sc 8 across first row. Ch 1, turn. Work Rows 2–32 in BLO sc (8 sc per row), or adjust rows to fit the cup.
Join: Slip stitch the short ends together without twisting.
Body: One sc into each row end along the upper edge (32 sc for the sample). Join each round with sl st; beginning ch 1 does not count as a stitch.
Color sequence: Round 1 cranberry, Round 2 cranberry, Round 3 ivory, Round 4 cranberry, Round 5 cranberry.
Finishing: Fasten off, weave in ends, gently shape and check fit on a room-temperature cup. Copy quick pattern
Frequently Asked Questions About Crochet Christmas Gifts
1. What are the easiest crochet Christmas gifts for beginners?
Some of the easiest options are coffee cup cozies, basic coasters, washcloths, bookmarks, simple scarves, and small gift card holders.
Projects that use mostly single crochet or double crochet are especially suitable for beginners because they don’t require learning many different techniques at once.
A coffee cozy is a good first Christmas project because it uses a small amount of yarn and can be finished relatively quickly.
2. How long does it take to crochet a Christmas coffee cup cozy?
A beginner may need around 45–75 minutes, depending on their experience and how frequently they stop to check stitches or measure the fabric.
Someone comfortable with single crochet and ribbing may complete a similar project more quickly.
If you’re making several as presents, create one sample first, confirm the fit, and then use it as a reference for the remaining gifts.
3. What yarn is best for crochet Christmas gifts?
The best yarn depends on the item you’re making.
For coasters, washcloths, and cup cozies, cotton or cotton-blend yarn is often practical because it offers good stitch definition and can be washable.
For scarves, hats, and blankets, soft acrylic, wool, and suitable blends can also work well.
Always choose a yarn that matches how the finished gift will be used and cared for.
4. Can I make this crochet cozy without knowing advanced stitches?
Yes. You only need to know how to chain, single crochet, slip stitch, and work into the back loop.
The color change may feel unfamiliar at first, but it follows the same basic motion as completing a single crochet stitch.
You can also make the entire cozy in one color if you would prefer to practice the construction before trying the stripe.
5. How do I make a crochet coffee cup cozy bigger or smaller?
Adjust the number of ribbing rows to change the circumference of the sleeve.
Add rows for a larger cup or remove rows for a smaller cup.
To change the height of the ribbed section, adjust the foundation chain. To change the height of the smooth section, work additional or fewer rounds.
Always measure the actual cup before finishing.
6. Are crochet Christmas gifts inexpensive to make?
They can be, particularly when you already own basic crochet tools.
Small projects such as cup cozies, coasters, bookmarks, and ornaments use relatively little yarn.
Using leftover yarn from larger projects can help reduce costs further, provided the remaining yarn is suitable for the intended use.
For a gift that feels more substantial, package several coordinating small projects together.
7. Can I sell finished crochet Christmas cup cozies?
A finished handmade product made from your own work can generally be sold, subject to applicable laws and any relevant third-party rights.
Use your own photographs and original branding. Do not copy someone else’s product photographs, packaging artwork, or copyrighted written pattern.
If you plan to sell cup cozies, test the sizing, secure all ends carefully, and provide accurate material and care information.
Conclusion
Handmade Christmas presents don’t need to be large or complicated to feel special.
This easy crochet coffee cup cozy combines simple stitches, soft ribbing, and a small festive color detail to create a practical gift that beginners can enjoy making.
Once you’ve made your first one, changing the size or yarn colors becomes much easier. Before long, you may find yourself making matching sets for friends, family members, neighbors, and coworkers.
Save this Crochet Christmas Gifts tutorial for your holiday project list, and try making one sample before choosing the colors for your gift recipients.
A small crochet project, neatly finished and thoughtfully packaged, can be a lovely way to share something handmade at Christmas.





