Making your first pair of crochet socks can feel intimidating, especially when you reach the heel. A sock isn’t quite like a scarf or a blanket. It needs to wrap around your toes, follow the shape of your foot, and stay comfortably in place.
But you don’t need to master complicated sock techniques before making something wearable.
This easy crochet socks pattern uses a simple flat construction that lets you see the shape developing as you work. You’ll start at the heel, crochet the sole, shape the toe, work back along the top of the foot, and finish by sewing the pieces together.
The result is a pair of cozy handmade indoor socks that are perfect for relaxing at home, keeping warm on chilly mornings, or gifting to someone who loves handmade accessories.
The tutorial uses basic single crochet stitches with increases and decreases. You’ll also learn how to measure for a better fit, keep your edges even, and sew the sock without creating uncomfortable bulky seams.
If you already know how to chain and single crochet, you’re ready to learn the next steps.
What You’ll Learn
By the end of this crochet socks tutorial, you’ll know how to:
- Start a crochet sock with a simple foundation chain.
- Make basic single crochet rows.
- Shape the heel using decreases and increases.
- Create a flat sole that matches your foot measurements.
- Crochet a rounded toe section.
- Work the top of the foot without joining rounds.
- Make a separate ankle cuff.
- Sew the pieces together neatly.
- Adjust the pattern for different foot lengths and widths.
- Finish and care for your handmade socks.
This project is an advanced-beginner pattern-style tutorial. The stitches are simple, but the shaping and assembly require attention.
The sample instructions below provide one starting size and measurement-based adjustments. Because the original variation has not been physically pattern-tested, make one sock and verify its fit before repeating it.
Materials You’ll Need
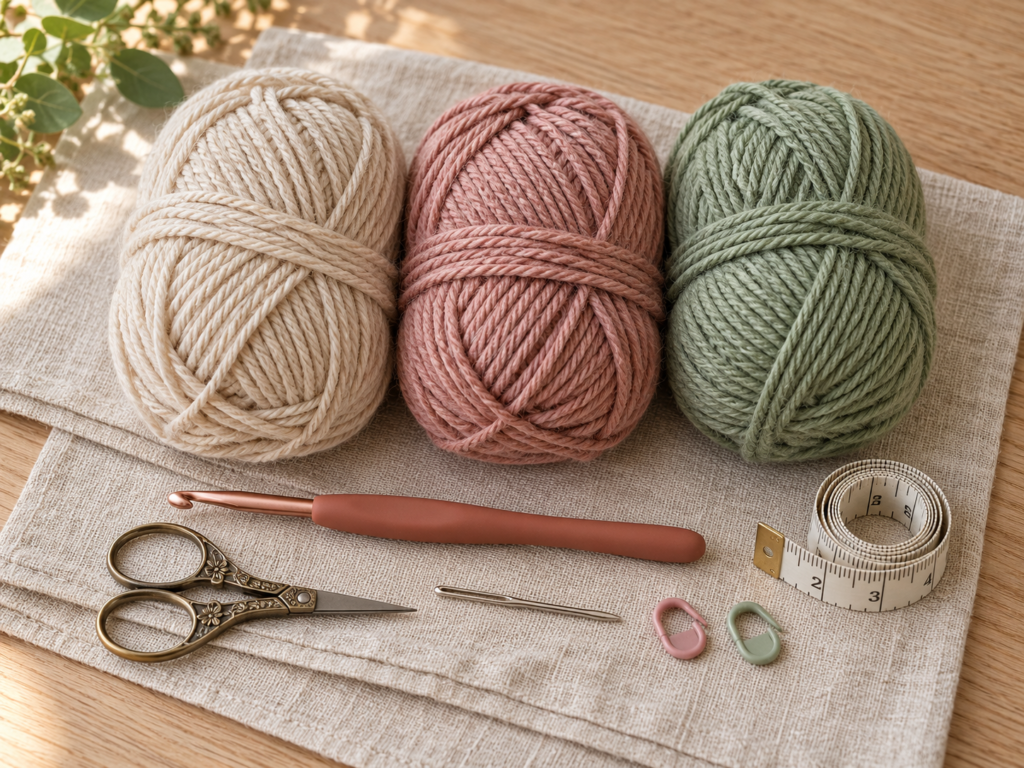
For the sample pair, gather the following supplies.
| Material | Recommendation |
|---|---|
| Main yarn | Approximately 200–250 yards of smooth worsted-weight (#4) yarn |
| Main color | Warm oatmeal beige |
| Contrast color A | Dusty rose for heels and toes |
| Contrast color B | Soft sage green for cuffs |
| Crochet hook | 5 mm (H/8) |
| Scissors | Small, sharp craft scissors |
| Yarn needle | Blunt tapestry needle for sewing |
| Stitch markers | At least two removable markers |
| Measuring tape | Flexible tape for checking foot size |
| Optional | Non-slip fabric grip product suitable for socks |
A soft acrylic/wool blend works well for a first pair of indoor socks because it is comfortable, easy to care for, and available in many colors.
For ordinary socks worn inside shoes, thinner sock yarn usually creates a less bulky fabric. This project is designed primarily for indoor slipper socks rather than close-fitting athletic footwear.
Choose yarn with a smooth surface for your first attempt. Fuzzy or eyelash-style yarn may feel wonderfully soft, but it makes it difficult to see where one crochet stitch ends and the next begins.
Crochet Abbreviations Used
This tutorial uses US crochet terminology.
| Abbreviation | Meaning |
|---|---|
| ch | Chain |
| sc | Single crochet |
| sl st | Slip stitch |
| st / sts | Stitch / stitches |
| rep | Repeat |
| sc2tog | Single crochet two together, a decrease |
| inc | Two single crochet stitches in the same stitch |
| RS | Right side |
| WS | Wrong side |
For readers familiar with UK terminology, US single crochet is called double crochet in the UK.
How to make a single crochet decrease
A single crochet decrease combines two stitches into one.
Insert your hook into the first stitch and draw up a loop. Insert your hook into the next stitch and draw up another loop. You should now have three loops on your hook.
Yarn over and draw through all three loops.
You’ve turned two stitches into one. This helps narrow the fabric along the heel or toe.
How to make an increase
Work two single crochet stitches into the same stitch.
Instead of producing one stitch, you now have two. This is how you’ll widen your heel and toe after finishing the narrow middle sections.
Before You Start
Measure your foot
Socks are much easier to adjust when you use measurements instead of relying on shoe size alone.
Measure these three areas:
- Foot length: From the back of the heel to the longest toe.
- Foot circumference: Around the widest part of the foot, usually across the ball of the foot.
- Ankle circumference: Around the place where the cuff should sit.
For this tutorial, the sample is intended as a starting point for an adult foot approximately 24–25 cm (9½–9¾ inches) long, with about 23–24 cm circumference.
These are design targets, not guaranteed finished measurements.
Check your gauge
Work a small square using single crochet with your chosen yarn and 5 mm hook.
For the example instructions, the assumed gauge is approximately:
- 14 single crochet stitches = 10 cm (4 inches)
- 14 rows = 10 cm (4 inches)
This means 17 stitches produce approximately 12 cm of flat fabric width.
When the upper and lower foot sections are joined, that creates a theoretical circumference near 24 cm before accounting for seams and stretch.
This is only a starting point. Your actual fabric may behave differently depending on your yarn, hook, and tension.
If the width is too large, decrease your stitch count. If it’s too small, increase the stitch count symmetrically and adjust the heel and toe shaping accordingly.
Understand the sock construction
Instead of starting with a tube, this design begins as a long, shaped strip.
Flat construction sequence
Original simplified construction guide, not to scale. The heel has additional shaping within its section. The ankle cuff is a separate piece attached during assembly.
You’ll crochet the heel, continue into the sole, work through the shaped toe, and then crochet back toward the ankle along the upper foot.
The toe acts as the turning point of the flat piece.
After adding the ankle section, the sock is folded and sewn together.
How to keep your edges straight
When crocheting rows of single crochet, chain one before turning your work. In this pattern, that turning chain does not count as a stitch.
Always place your first single crochet into the first actual stitch, not into the turning chain.
Put a stitch marker into the final stitch of a row if you have trouble identifying the edges.
Counting stitches is especially important when you begin increasing or decreasing. If your intended row has 15 stitches and you accidentally make 14, the next shaping row will not work correctly.
Right side and wrong side
Single crochet fabric often looks similar on both sides.
Choose the side you prefer to show on the outside of your socks and keep that preference consistent when assembling the pair.
The most important detail is to keep bulky knots and unfinished yarn ends away from the inside of the foot.
Step-by-Step Crochet Socks Tutorial
The following original sample starts with 17 single crochet stitches across the heel.
The sock is worked in rows unless otherwise stated.
Make two matching socks.
Step 1: Crochet the foundation and first heel rows
Using dusty-rose yarn, make a slip knot and chain 18.
Insert your hook into the second chain from the hook and work one single crochet into each chain across.
You should have 17 single crochet stitches.
Chain one and turn.
Work one single crochet into each stitch across for the next two rows.
After completing the foundation and two straight rows, your fabric should be a short rectangle.
Keep these opening rows relatively relaxed. Tight, hard crochet fabric may create an uncomfortable seam when the heel is eventually folded.
Beginner tip: Count the stitches after each row. You should have 17 stitches before beginning the heel decreases.
Common mistake to avoid: Working into the turning chain by accident. This adds an unwanted stitch and causes the fabric to gradually widen.

Step 2: Decrease to shape the heel
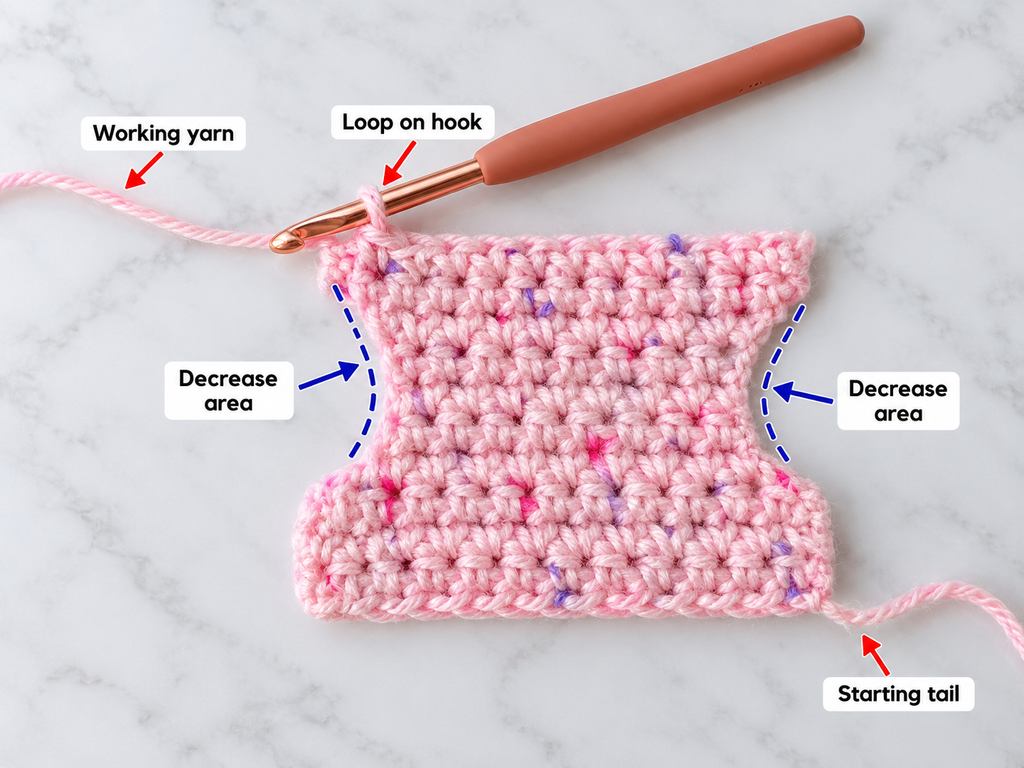
The next section narrows the heel toward its center.
This creates part of the curved shape that will eventually wrap around the back of your foot.
Work the following rows:
| Row | Instructions | Stitch count |
|---|---|---|
| 4 | sc2tog, sc 13, sc2tog | 15 |
| 5 | sc2tog, sc 11, sc2tog | 13 |
| 6 | sc2tog, sc 9, sc2tog | 11 |
| 7 | sc in every stitch | 11 |
| 8 | sc in every stitch | 11 |
Chain one and turn at the end of each row.
Notice how each decrease row removes one stitch from both outer edges.
By Row 6, your fabric should have narrowed from 17 stitches to 11.
Rows 7 and 8 create a short, straight section at the narrowest part of the heel.
Don’t worry if the heel looks unusually flat at this stage. The shaping becomes clearer after you increase again and fold the fabric.
Beginner tip: Place a removable marker in the first and final stitches of each row while learning decreases.
Common mistake to avoid: Pulling the yarn extremely tightly when making sc2tog. The narrower section should still feel soft and flexible.
Step 3: Increase to complete the heel
After narrowing the heel, work increases to restore the original width.
| Row | Instructions | Stitch count |
|---|---|---|
| 9 | 2 sc in first st, sc 9, 2 sc in last st | 13 |
| 10 | 2 sc in first st, sc 11, 2 sc in last st | 15 |
| 11 | 2 sc in first st, sc 13, 2 sc in last st | 17 |
Chain one and turn after Rows 9 and 10.
At the end of Row 11, the heel returns to its original width of 17 stitches.
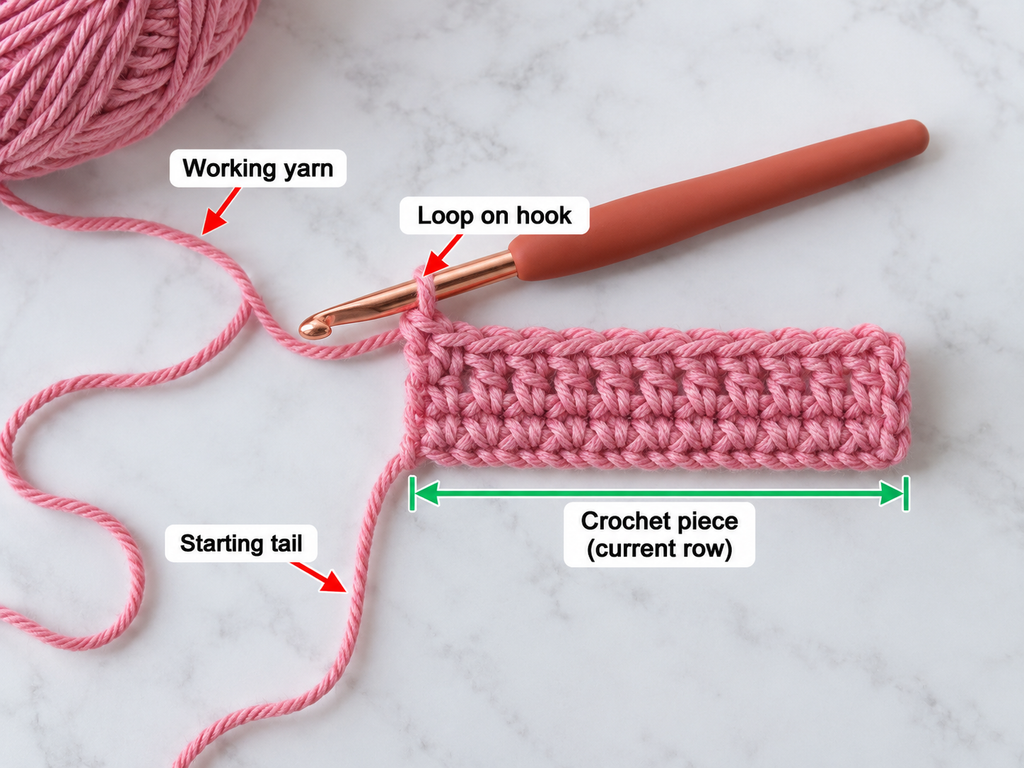
Your fabric should now resemble a shallow hourglass: wide at one end, narrower in the middle, and wide again at the opposite end.
This shape will be folded and seamed later to form the heel cup.
Lay your piece flat and inspect both edges. Each side should have a similar decrease-and-increase slope.
If one side looks significantly steeper, count the stitches and check that increases were made at both ends.
Beginner tip: Work slowly into the first and last stitches of the increase rows. They can be slightly more difficult to identify because they’re close to the turning edges.
Common mistake to avoid: Placing both increases on the same side. The heel should widen symmetrically.
Step 4: Crochet the bottom of the foot
Now it’s time to make the sole.
Change to warm oatmeal yarn. You can switch colors when finishing the last stitch of Row 11 so the new color begins cleanly on the following row.
Continue with single crochet.
Rows 12–31: Work one single crochet in each stitch across, maintaining 17 stitches per row.
Chain one and turn after each row, except when preparing to continue directly into the next section.
This creates 20 straight rows of foot fabric in the sample version.
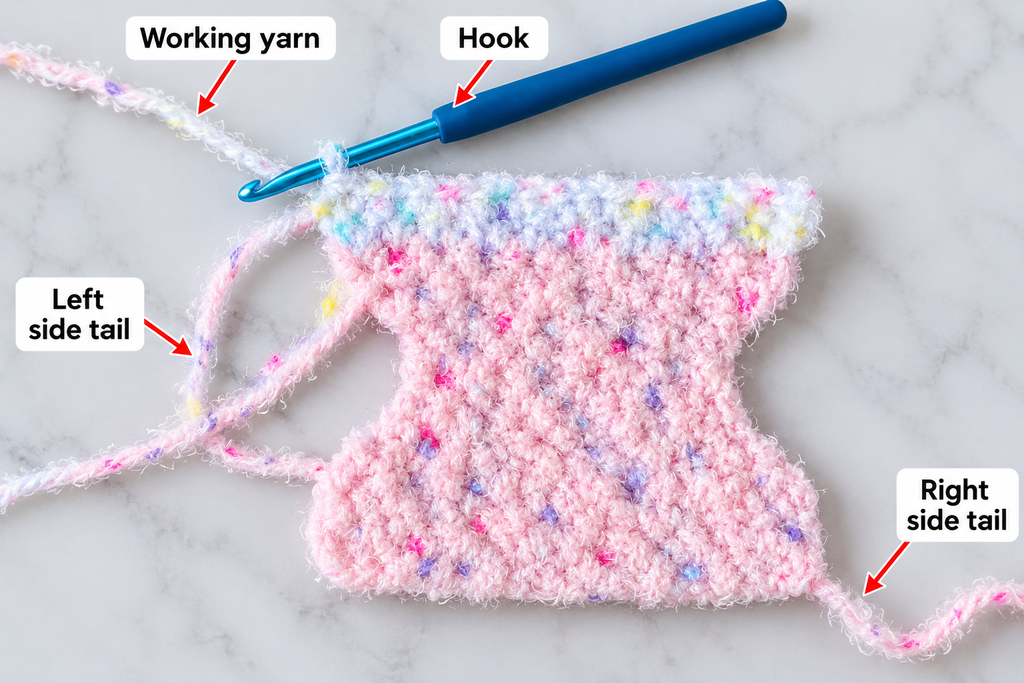
The heel and sole should now form one continuous piece.
Before continuing, place the fabric against your foot or a paper tracing of your foot.
The sole section is adjustable. The goal is to position the upcoming toe shaping at the correct place, not to force every crocheter to use exactly 20 rows.
If your foot is longer, add straight sole rows.
If your foot is shorter, remove some.
Beginner tip: Write down the number of straight sole rows used. You’ll need the same number for the top of the foot.
Common mistake to avoid: Stretching the fabric aggressively while measuring. You want comfortable stretch in the finished sock, but pulling the fabric excessively can produce a sock that feels too short.
Step 5: Check the foot length before shaping the toe
This is one of the most important fit checks in the entire project.
Lay the fabric flat with the heel at one end and the unfinished foot section extending outward.
Compare it with your foot measurement or with a correctly sized sock.
The straight sole should reach the area where the rounded toe shaping needs to begin.
Keep in mind that the heel and toe sections contribute length to the sock. You shouldn’t make the straight sole alone as long as your entire foot.
A practical way to check is to temporarily fold the heel section into position and hold the fabric against the underside of your foot.
Allow space for the toe section to turn around the front of the toes.
If the sock is too long, remove sole rows now.
If it is too short, add more straight rows before starting the toe.
The final fit can only be confirmed after folding and temporarily pinning the panels together, so treat this measurement as a checkpoint rather than a guarantee.
Beginner tip: Use a removable marker to identify the final sole row.
Common mistake to avoid: Assuming the number of rows in someone else’s pattern will automatically match your foot.
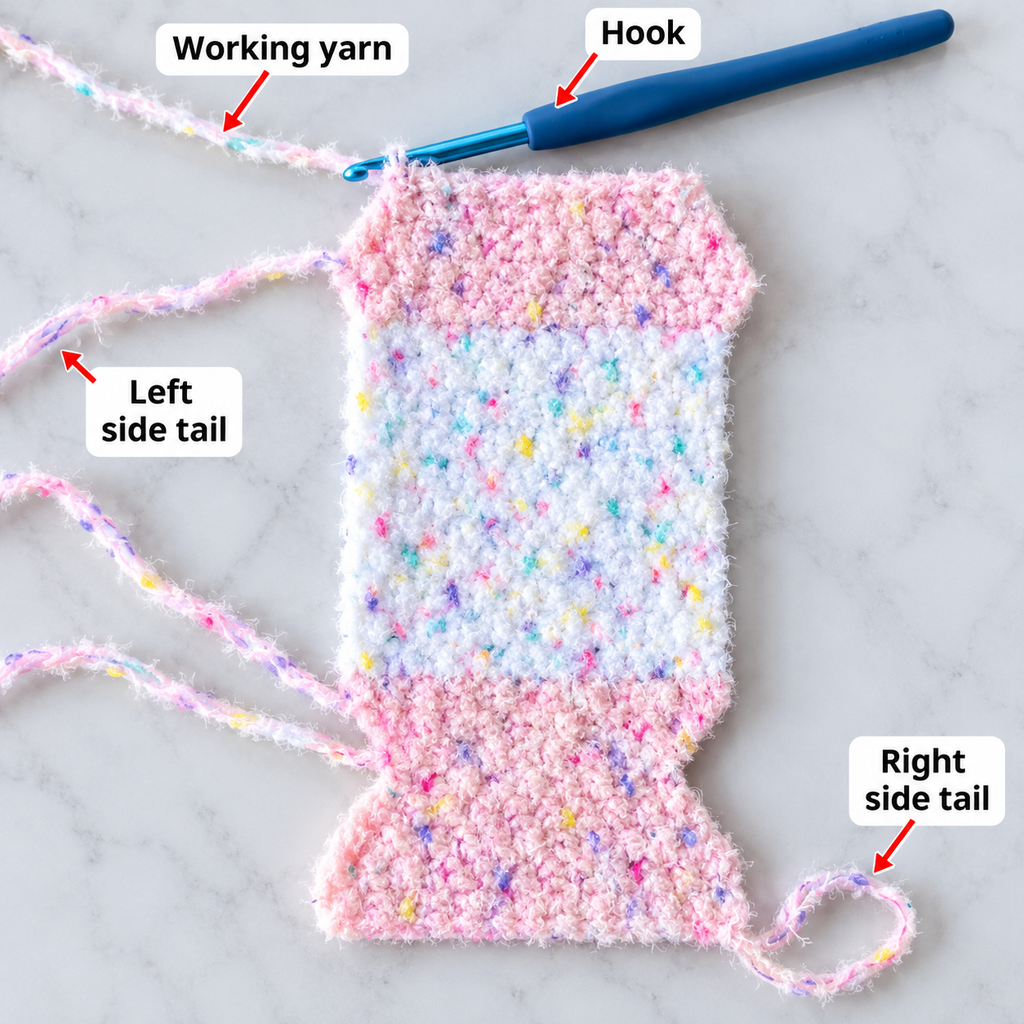
Step 6: Crochet the toe decreases
Change back to dusty-rose yarn.
You’re now working the rounded end of the sock, which will connect the sole to the upper foot.
Use the same general shaping principle as the heel: narrow the fabric, hold the narrow width briefly, and increase again.
Work these rows:
| Row | Instructions | Stitch count |
|---|---|---|
| 32 | sc in each stitch | 17 |
| 33 | sc in each stitch | 17 |
| 34 | sc2tog, sc 13, sc2tog | 15 |
| 35 | sc2tog, sc 11, sc2tog | 13 |
| 36 | sc2tog, sc 9, sc2tog | 11 |
| 37 | sc in each stitch | 11 |
| 38 | sc in each stitch | 11 |
Remember to chain one and turn after each row.
This creates the first half of the shaped toe.
The center section is narrower than the sole, giving the fabric a rounded profile when it folds.
Before moving on, fold the fabric gently around your toes without stretching it.
If the toe feels excessively narrow, you may need a wider base stitch count or fewer decreases in a customized version.
Beginner tip: Make your decrease stitches the same height and tension as your ordinary single crochet stitches.
Common mistake to avoid: Skipping a decrease because the toe already looks narrow. Follow the intended stitch count or make a deliberate size adjustment, rather than changing rows unpredictably.
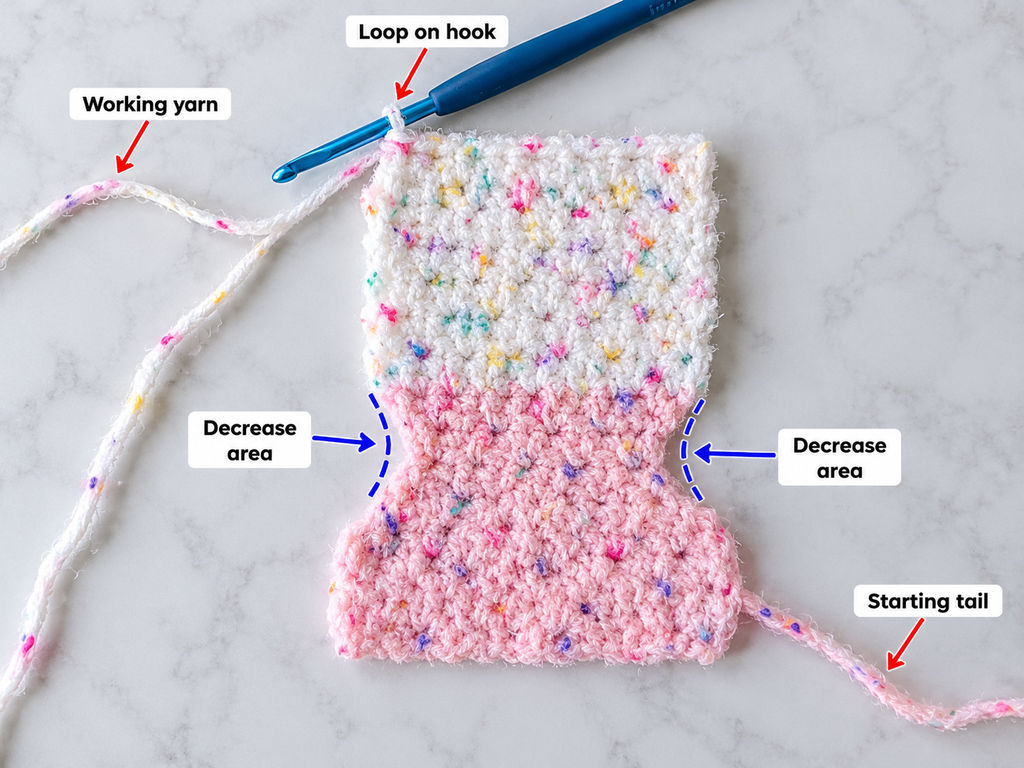
Step 7: Increase to finish the toe
Continue with dusty-rose yarn.
Work the following rows:
| Row | Instructions | Stitch count |
|---|---|---|
| 39 | 2 sc in first st, sc 9, 2 sc in last st | 13 |
| 40 | 2 sc in first st, sc 11, 2 sc in last st | 15 |
| 41 | 2 sc in first st, sc 13, 2 sc in last st | 17 |
The toe is now ready to transition into the upper-foot panel.
Fold your fabric gently at the narrower toe center so the new upper panel can return toward the heel.
Do not sew anything yet.
You should be able to see how the toe forms a curved front when the two long edges of the fabric are brought together.
The fold should be smooth rather than sharply creased.
At this point, the toe has returned to the same 17-stitch width as the sole.
Beginner tip: Place a marker in the center of the narrow toe section. It makes it easier to align the sock evenly later.
Common mistake to avoid: Increasing into a turning chain instead of the actual first or last stitch. This can create an uneven upper edge.
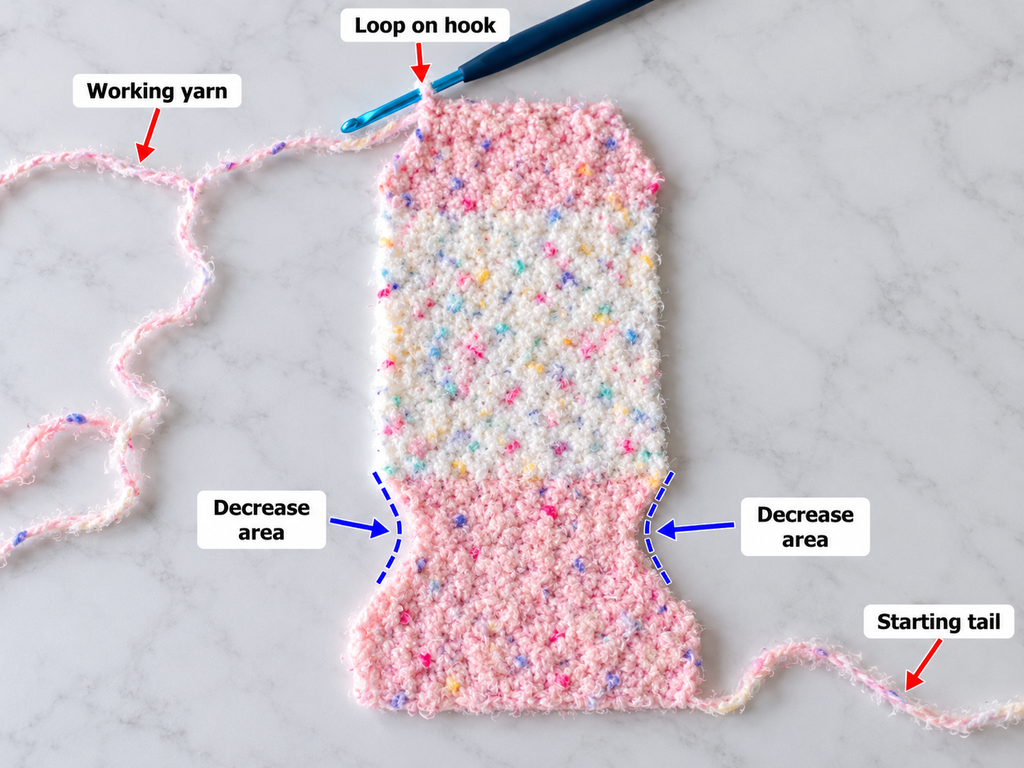
Step 8: Crochet the top of the foot
Switch back to warm oatmeal yarn.
You’ll now crochet the upper section that covers the top of your foot.
Rows 42–61: Work one single crochet in each stitch across, keeping 17 stitches per row.
Chain one and turn after each row, as usual.
For the sample, this produces 20 straight rows, matching the length of the sole panel.
If you adjusted the sole earlier, use the same number of rows here.
The important principle is that the top and bottom fabric edges should have corresponding lengths when folded.
Lay the project flat after completing the upper section.
You should see a long, unfolded piece with a dusty-rose heel at one end, oatmeal sole fabric, a matching dusty-rose toe section, and oatmeal upper-foot fabric returning toward the ankle.
This is a good time to temporarily pin the long edges together.
Try the shape against your foot or over a lightweight sock.
The panels should wrap comfortably around the foot without excessive bunching.
If the fabric is too tight over the instep, you may need a wider upper panel or an adjustment to the overall width. That is easier to fix before permanent sewing.
Beginner tip: Make the top panel the same length as the sole, then test the folded shape before fastening off permanently.
Common mistake to avoid: Adding unplanned extra rows to the upper panel. Different lengths can create puckering along the side seam.
Step 9: Make the ankle cuff
For the ankle section, create a separate rectangular piece in soft sage yarn.
Use the same 5 mm hook.
Foundation: Chain 39.
Row 1: Work one single crochet into the second chain from the hook and each chain across. You should have 38 stitches.
Rows 2–8: Chain one, turn, and work 38 single crochet stitches.
This creates a rectangular ankle band.
At the assumed gauge, the unseamed long edge measures roughly 27 cm (10½ inches), and the eight-row height is approximately 5.7 cm (2¼ inches).
The cuff should be long enough to surround the ankle opening, with enough room to slip over the heel.
Before sewing, wrap the cuff loosely around the ankle and check that the opening will also stretch over the heel and instep.
If necessary, add or remove stitches from the foundation to adjust the circumference.
For this beginner version, the cuff is simple single crochet rather than a highly elastic ribbed cuff.
If you prefer more stretch, you can experiment with a ribbed cuff using back-loop slip stitches, provided you measure the finished circumference carefully.
Position the center of one long edge of the cuff against the heel-side end of the sock body. The center of the cuff should align with the back of the heel, while the two free ends will ultimately meet above the front of the ankle.
Use markers to hold the center and side positions temporarily.
Beginner tip: Check that your cuff can pass over the widest part of your heel before attaching it.
Common mistake to avoid: Making the cuff fit your ankle measurement exactly but forgetting that it must also pass over your foot.

Step 10: Fold and sew the heel
The sock is now ready to become three-dimensional.
Before sewing permanently, use stitch markers to hold the fabric together and confirm that the toe, heel, and foot panels sit in the correct positions.
Fold the body at the toe, bringing the upper-foot panel over the sole.
Match the two long edges of the foot.
At the heel, fold the shaped section so its narrow center forms the back of the heel cup and the corresponding shaped edges meet.
Use a blunt tapestry needle and matching dusty-rose yarn to sew the heel edges with small whip stitches.
Work through aligned edge loops without pulling the yarn so tightly that the fabric puckers.
As you sew, gently shape the heel over your fingers to check that it creates a rounded cup instead of a flat lump.
Keep the seam even.
A soft, low-profile seam is particularly important at the heel because a thick ridge may rub against the foot.
If your first attempt feels bulky, undo the seam and try a slightly looser, flatter join.
Beginner tip: Sew the heel with the intended wrong side facing outward. You can turn the sock right-side out after the main seams are complete.
Common mistake to avoid: Twisting the heel while joining the edges. Make sure both side seams align naturally with the rest of the sock.
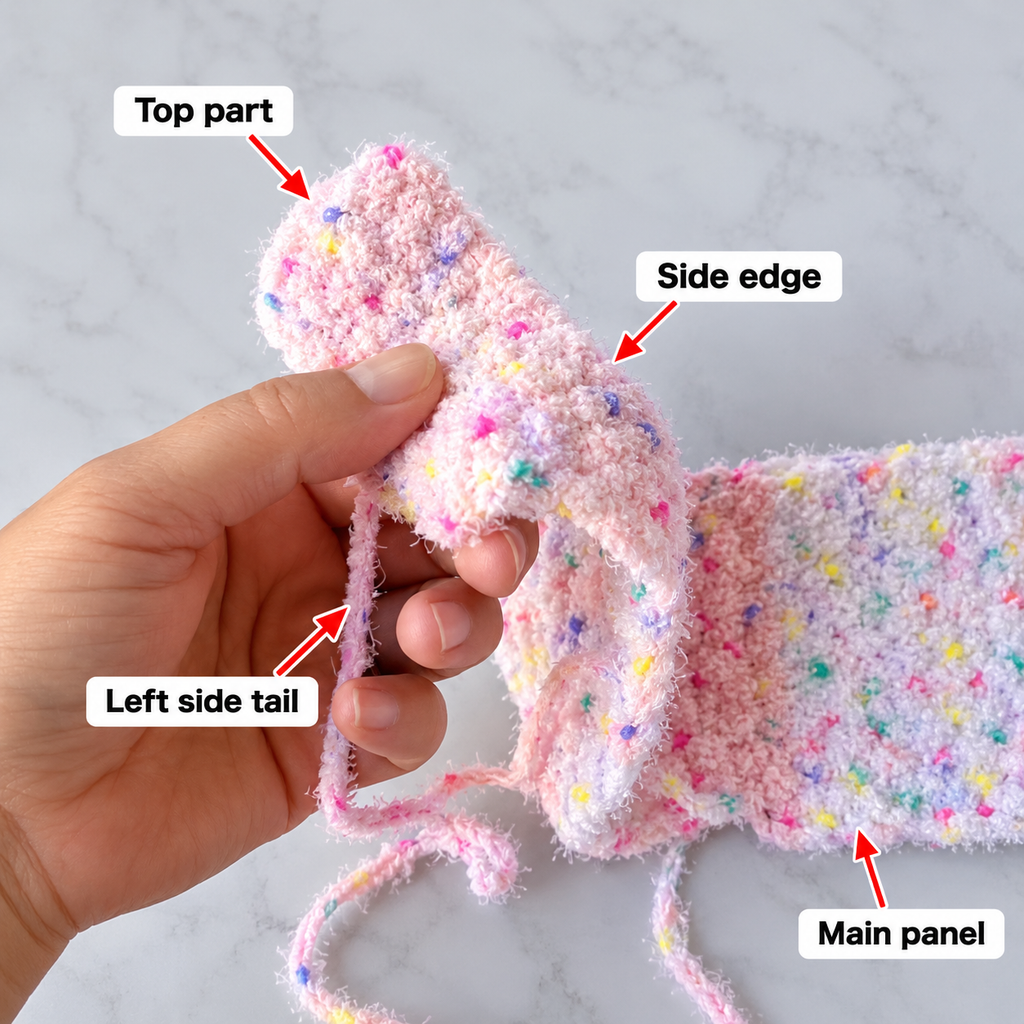
Step 11: Sew the foot and cuff together
Once your heel is secure, sew the long edges of the upper-foot panel to the matching edges of the sole.
Start near the toe and continue toward the ankle, keeping the two edges aligned.
Use small, even whip stitches.
Avoid tightening the seam too much. The finished foot should still have some flexibility.
Check the toe fold as you work. If one side gathers more than the other, stop and realign the fabric instead of forcing the seam to fit.
When the foot is closed, position the separate ankle band around the opening.
Attach its lower edge evenly around the opening, distributing the fabric so it does not bunch at the front.
Join the two short ends of the ankle band to complete the cuff.
At this stage, the opening should fit comfortably over the heel and sit without squeezing the ankle.
Because this sample is adjustable, minor fitting changes may be needed before finalizing the cuff join.
Try on the partially assembled sock while the cuff is temporarily marked, then remove it before making any permanent corrections.
Beginner tip: Use several removable markers around the opening to distribute the cuff evenly before sewing.
Common mistake to avoid: Stretching only the cuff or only the foot fabric while attaching them. Uneven tension can make the ankle opening ripple.
Step 12: Try on your crochet sock and repeat
Turn the sock right-side out.
Smooth the toe section, arrange the heel, and check that no yarn tails or thick seams are pressing against the foot.
Try the sock on.
Pay attention to three areas.
The toe: Your toes should have enough room to move without the fabric bunching.
The heel: The heel should cover the back of your foot without slipping underneath it.
The cuff: The opening should pass comfortably over the heel and should not squeeze your ankle.
If the fit needs a change, correct it now rather than hoping it will change dramatically after washing.
Once you’re happy with the first sock, make a second sock using the same stitch counts, row measurements, and assembly method.
For a matching pair, record any changes you made to the first sock.
Pattern Notes and Stitch Counts
The sample instructions follow this construction:
| Section | Rows | Width |
|---|---|---|
| Heel | 1–11 | 17 → 11 → 17 sts |
| Sole | 12–31 | 17 sts |
| Toe | 32–41 | 17 → 11 → 17 sts |
| Upper foot | 42–61 | 17 sts |
| Separate cuff | 8 rows | 38 sts |
The chain-one turning stitch does not count as a stitch.
The heel and toe shaping both use symmetrical end-of-row decreases and increases.
The sole and upper foot use the same number of straight rows.
There are no joined rounds in the main sock body.
Both the right and wrong sides of the single crochet fabric can look acceptable, but use the same orientation for both socks.
Adjusting for another foot length
Add or remove an equal number of straight rows from the sole and upper-foot sections.
For example, if you add four rows to the sole, add four rows to the upper-foot panel.
Do not automatically add extra rows to the heel or toe unless you also need to change their physical size.
Adjusting for wider feet
If your foot is wider, begin with more than 17 stitches.
For example, you could experiment with 19 stitches and keep the heel and toe shaping symmetrical.
Using three decrease rows on each side would narrow 19 stitches to 13 rather than 11.
Make corresponding adjustments to each decrease and increase row.
This is a grading suggestion, not a fully tested additional size.
Common Beginner Mistakes and How to Fix Them
1. The sock is too tight around the foot
The starting width may be too narrow or your gauge may be tighter than expected.
Make a gauge swatch and measure your foot circumference. Increase the width of both the sole and upper-foot panels consistently.
2. The sock is too long
You may have added too many straight foot rows.
Remove rows equally from the sole and upper panels before completing the seams.
3. One side of the heel looks uneven
This usually happens when a decrease or increase was missed.
Count the stitches in every shaping row and compare the two edges.
4. The toe has a sharp point
The narrow toe center may be too tight or the shaping may be too abrupt for your yarn.
Try a looser gauge or modify the decrease progression so the fabric curves more gently. Test the folded toe before sewing.
5. The side seams feel uncomfortable
Thick seams can be especially noticeable in crochet socks.
Use a neat, shallow joining method and keep the sewing tension relaxed. Position seam ridges away from pressure points wherever possible.
6. The cuff won’t fit over the heel
The ankle opening needs to stretch or be large enough to pass over the heel and instep, not merely fit around the ankle.
Increase the cuff circumference or use a more elastic cuff construction.
7. The two socks don’t match
Small changes to row counts and tension add up.
Write down the exact row count, yarn, hook, gauge, and any adjustments used for the first sock before beginning the second.
How to Customize This Crochet Socks Pattern
One of the nicest things about making socks yourself is being able to change their appearance without learning an entirely different project.
Try different yarn combinations
A neutral main color with colorful heels, toes, and cuffs creates an easy classic look.
For a softer style, use oatmeal, blush pink, and sage green.
For a more modern pair, try charcoal gray, dusty blue, and cream.
If you want brighter socks, use mustard yellow heels and cuffs with a warm white foot section.
Make the socks taller
A longer ankle section produces a cozier sock.
Add rows to the cuff height, and consider a slightly wider opening as the fabric rises toward the calf.
Always measure around the intended leg position before committing to a tall cuff.
Make shorter ankle socks
Reduce the height of the separate cuff.
A shorter cuff works especially well for simple indoor lounging socks.
Change the texture
Once you’re comfortable with the original, experiment with single crochet worked through the back loop.
This creates a ridged appearance.
Remember that stitch variations may change both gauge and elasticity, so you should recheck sizing before making a complete pair.
Add a decorative cuff edge
A contrasting single crochet edge can finish the cuff neatly.
Work evenly around the cuff opening, avoiding excessive tension.
You could also use a simple reverse single crochet edging if you’re comfortable with that technique.
Add non-slip soles
Crochet socks can slide on hardwood, laminate, and tile flooring.
If the socks are intended as slippers, use a suitable fabric grip treatment or another purpose-made non-slip solution, following the manufacturer’s application and curing directions.
Test the finished grip before walking on smooth floors. A crocheted sole alone should not be assumed to provide reliable traction.
Make matching gifts
Crochet socks make thoughtful gifts for birthdays, winter holidays, or handmade care packages.
For a coordinated set, crochet a simple headband or cozy scarf using the leftover yarn.
Make sure to confirm the recipient’s foot measurements before beginning the socks.
Finishing Instructions
Once both socks are assembled, inspect every seam and loose yarn end.
Fastening off
After the final stitch, cut the yarn and pull the tail completely through the remaining loop.
Give it a gentle tug to secure the stitch.
Avoid creating a large knot that could be uncomfortable against your foot.
Weaving in the ends
Thread a blunt tapestry needle with a yarn tail.
Weave it under several nearby stitches on the wrong side of the fabric.
Change direction once to help secure the tail.
Do not pull so tightly that the fabric gathers.
Trim the remaining yarn after it is secured.
Repeat for all heel, toe, foot, and cuff color changes.
Shape the socks
Smooth the socks with your hands.
Adjust the heels so they sit evenly and arrange the toe fabric so it curves naturally.
If your yarn allows it, gently dampen the finished socks and reshape them without overstretching.
Let them dry flat.
Washing and care
Always follow the care instructions for your particular yarn.
Some acrylic blends can be machine washed on a gentle cycle, while wool-containing yarns may require cooler water and more careful handling.
Avoid excessive heat, particularly with synthetic fibers.
Drying flat helps preserve the handmade shape and reduces unnecessary stretching.
Quick Printable-Style Crochet Socks Pattern Summary
Beginner Flat Crochet Socks Copy summary
| Skill level | Advanced beginner |
| Yarn | Worsted weight #4 |
| Hook | 5 mm |
| Foundation | Chain 18, work 17 sc |
| Heel | 17 → 11 → 17 sts |
| Sole | 20 straight rows, adjustable |
| Toe | 17 → 11 → 17 sts |
| Upper foot | Match sole row count |
| Cuff | 38 sc × 8 rows, adjustable |
| Finish | Fold, sew, weave ends, check fit |
Gauge and finished fit are approximate. Test one complete sock before using these counts for gifts or additional sizes.
Frequently Asked Questions About Crochet Socks
1. Are crochet socks easy for beginners?
Crochet socks are possible for beginners, especially if you already know how to chain and single crochet.
The most challenging parts are usually creating the correct shape and achieving a comfortable fit.
A flat-worked sock is a useful first project because you can examine the shape while crocheting and adjust the length before joining the fabric.
2. What is the best yarn for crochet socks?
It depends on how you plan to wear them.
Worsted-weight wool/acrylic blends work well for cozy indoor slipper socks.
For thinner socks worn inside shoes, consider fine sock yarn with good stretch and recovery.
Choose a yarn that feels comfortable against the skin and can withstand repeated washing.
3. Can I crochet socks without a magic ring?
Yes.
This tutorial doesn’t require a magic ring at all.
It begins with a standard foundation chain and works the sock flat.
Other crochet sock patterns may use a magic ring or an oval toe worked around both sides of a foundation chain.
4. How do I make crochet socks fit better?
Start by measuring the foot rather than guessing from shoe size.
Check the crochet gauge, work a sample, and try the partially assembled sock on before completing the seams.
Adjust the number of stitches for width and the number of straight foot rows for length.
Also ensure the cuff opening can pass over the heel.
5. Are crochet socks comfortable to wear inside shoes?
They can be, but thick worsted-weight crochet fabric and sewn seams may feel bulky inside fitted shoes.
For everyday shoe socks, thinner yarn, a denser but flexible fabric, and low-profile seams generally work better.
This sample is most suitable for indoor wear.
6. How much yarn do I need for a pair of crochet socks?
For this worsted-weight indoor sample, approximately 200–250 yards is a reasonable planning allowance.
The exact amount will depend on sock size, cuff height, yarn thickness, and crochet tension.
Larger socks and taller cuffs will require more yarn.
7. Why do my crochet socks stretch or lose their shape?
The yarn may have limited elasticity, the gauge may be too loose, or the cuff may not have enough stretch recovery.
Choose a suitable yarn, avoid overly loose stitches, and allow the finished socks to dry flat.
If the cuff becomes loose, consider replacing it with a ribbed version rather than making the entire sock smaller.
Conclusion
Crocheting a pair of socks is a rewarding way to move beyond basic scarves and simple rectangles.
The heel and toe shaping may seem unfamiliar at first, but each section uses the same basic ideas: crochet straight rows, decrease to narrow the fabric, and increase to widen it again.
Once you’ve made one sock and checked the fit, the second becomes much easier.
Start with smooth yarn so you can see your stitches clearly, keep track of your row counts, and make adjustments before sewing everything together.
Save this crochet socks pattern for your next cozy weekend project, and consider making a matching pair in different colors after you’ve found a fit you like.





