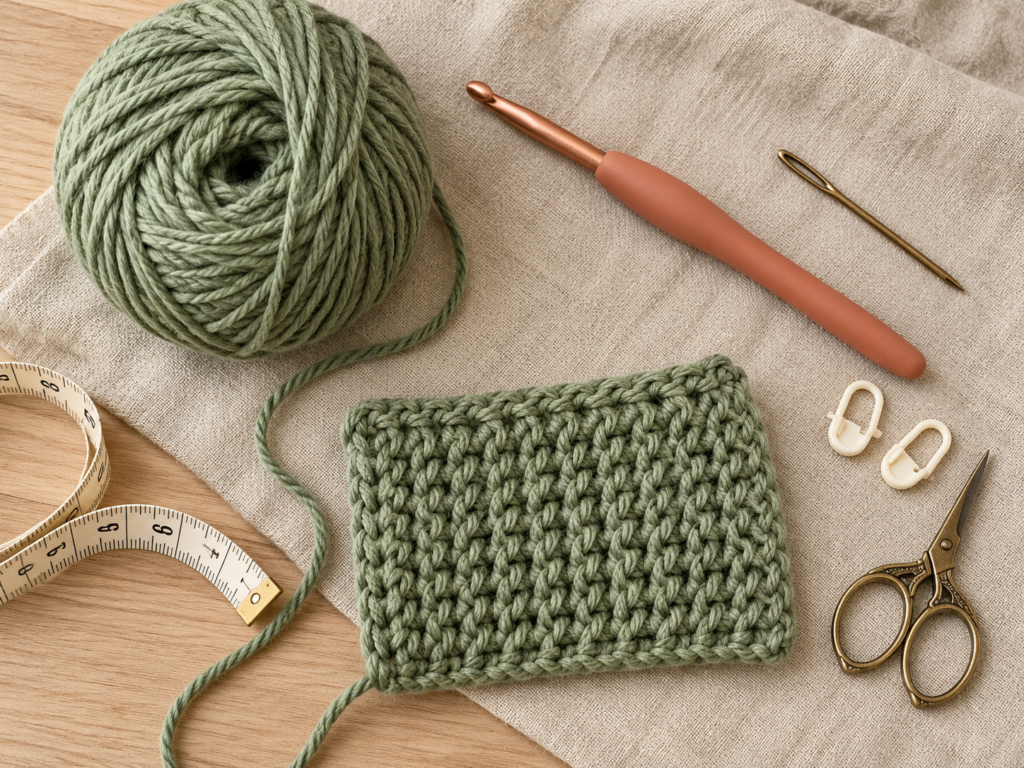
Looking for a cozy little crochet project that doesn’t take an entire weekend to finish? These easy crochet fingerless gloves are a lovely place to start. They’re soft, practical, and surprisingly simple to make—even if you’ve never crocheted anything wearable before.
The best part? You don’t need to know how to shape individual fingers or work complicated rounds. This free crochet fingerless gloves pattern starts with an ordinary rectangle. Once you’ve worked enough rows, you’ll fold the fabric, sew the side, and leave a small opening for your thumb.
That’s really all there is to the basic construction.
We’ll also add an easy ribbed texture using the back-loop-only single crochet stitch. It gives the gloves a slightly knitted appearance and allows the fabric to stretch comfortably around your hands.
I’ll walk you through the entire process, including how to make the starting chain, keep your edges straight, measure for the right fit, position the thumb opening, and finish your pair neatly.
Whether you’re making hand warmers for chilly mornings, a handmade gift, or your first crochet accessory, this is a beginner-friendly pattern worth keeping.
What You’ll Learn
By the end of this tutorial, you’ll know how to:
- Crochet a comfortable pair of fingerless gloves from two flat rectangles.
- Create stretchy ribbing with a simple single crochet variation.
- Adjust the glove length and width to fit your hands.
- Leave a correctly positioned opening for your thumb.
- Join the fabric without a bulky or uncomfortable seam.
- Finish the gloves so both pieces look like a matching pair.
Crochet Fingerless Gloves Pattern at a Glance
| Feature | Details |
|---|---|
| Difficulty | Beginner |
| Construction | Flat rectangles, seamed |
| Main stitch | Single crochet in back loop only |
| Yarn | Worsted weight #4 |
| Hook | 5.0 mm |
| Starting chain | 31 |
| Stitches per row | 30 |
| Starting row count | 26 rows per glove |
| Approximate length | 7–8 inches, depending on gauge |
| Thumb opening | Approximately 1.5–2 inches |
| Pieces required | 2 identical rectangles |
The pattern is written as an adjustable adult-medium starting size. Your exact measurements depend on yarn, hook, and tension, so the fit check is more important than following the suggested row count rigidly.
Materials You’ll Need
You only need a few basic crochet supplies to get started.
1. Worsted-weight yarn (#4)
Choose approximately 100–150 yards of soft worsted-weight yarn for the pair, allowing some extra for sizing adjustments. Smooth acrylic, merino wool, and washable wool-blend yarns are good choices.
For the sample design, we’ll use solid dusty sage green yarn. A solid color makes it easier to see the stitches and keeps the raised ribbing visible in the photographs.
2. A 5.0 mm crochet hook
A 5 mm hook is a practical starting point for many medium-weight yarns. If the fabric feels stiff or difficult to stretch, try a 5.5 mm hook. If the stitches are loose and gappy, try a 4.5 mm hook.
3. Yarn needle
A blunt tapestry needle is used for sewing the glove sides and weaving in yarn tails. Choose a needle with an eye large enough to accommodate your yarn.
4. Scissors
A small, sharp pair of scissors helps trim the ends neatly once the glove is finished.
5. Stitch markers
Two removable stitch markers help identify where the thumb opening begins and ends. They’re particularly helpful if this is your first time joining a crochet project.
6. Measuring tape
You’ll use it to check the length of your glove and the width of the fabric before joining.
Crochet Abbreviations Used
This pattern uses US crochet terminology.
| Abbreviation | Meaning |
|---|---|
| ch | Chain |
| sc | Single crochet |
| sl st | Slip stitch |
| st / sts | Stitch / stitches |
| BLO | Back loop only |
| rep | Repeat |
| RS | Right side |
| WS | Wrong side |
If you’re familiar with UK patterns, remember that a US single crochet is called a UK double crochet. The stitch itself is identical; only the name changes.
Before You Start
Check your gauge
Gauge describes how many stitches and rows fit into a particular measurement. It’s especially useful for wearable projects because even a small difference in tension can change the finished size.
For this adjustable design, a useful approximate target is 16–18 single crochet stitches across 4 inches, although the final fabric should be judged by actual fit and stretch.
Make a small swatch using the back-loop-only stitch before beginning if you’re unsure about your tension.
The 30-stitch row should be long enough to reach from just below your wrist to near your knuckles. Measure it before continuing. The finished length may vary considerably depending on your yarn and how tightly you crochet.
The rectangle’s other dimension—the accumulated row width—must stretch comfortably around your hand at its widest point.
Measure your hand
Wrap a measuring tape around your palm just below your knuckles, leaving out your thumb.
For example, if your hand measures 7.5 inches around, the crocheted rectangle may need to measure slightly less than that when relaxed, because the ribbing stretches.
Avoid subtracting a fixed amount without testing your fabric. Some yarns stretch more than others.
Understand the construction
This pattern is worked sideways.
The 30 stitches in each row determine the length from the wrist to the knuckles. The number of rows determines how far the rectangle wraps around your hand.
Once the rectangle fits, its first and last rows are joined to form a tube. A small unsewn section becomes the thumb opening.
This approach makes sizing easy because you can add or remove rows without rewriting a shaped glove pattern.
Choose the right side
Back-loop-only single crochet creates visible ridges on both sides of the fabric. You may choose whichever side you prefer to face outward.
If one side looks neater, use that as the right side of the first glove and repeat the same choice for the second.
Step-by-Step Crochet Fingerless Gloves Tutorial
Step 1: Make the foundation chain
Begin by making a slip knot and placing it on your 5.0 mm hook.
Hold the working yarn comfortably, without pulling it tightly around your fingers.
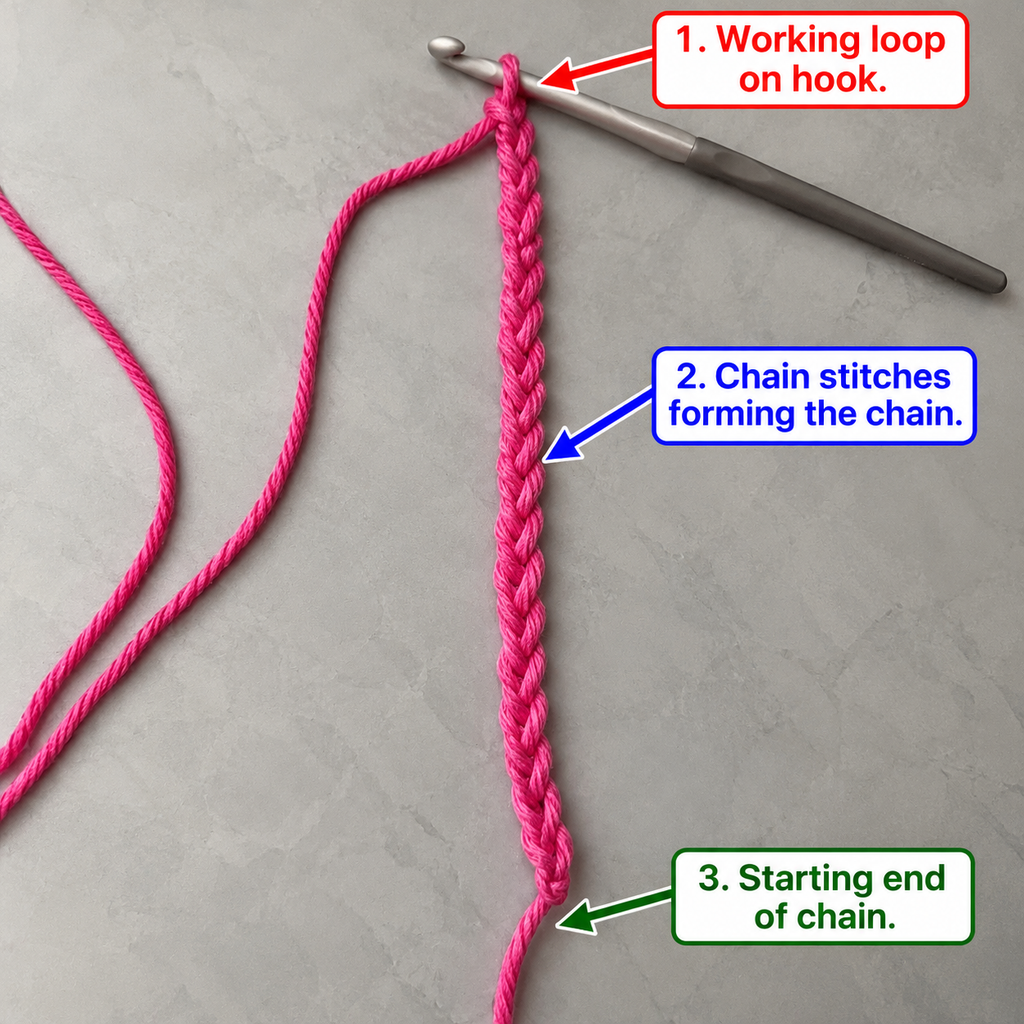
Make 31 chain stitches.
To make a chain, yarn over by bringing the working yarn over the hook, then pull it through the loop already on the hook. Repeat until you’ve made 31 chains.
Try to keep the chain even. If some chains are very tight and others are loose, your first row may curve or become difficult to work into.
Lay your chain on the table and count the little V-shaped stitches carefully. Do not count the active loop on your hook as an additional chain.
Beginner tip: Keep your first chain slightly relaxed. It should move freely along the shaft of the hook.
Common mistake to avoid: Pulling each chain so tightly that the hook barely fits through it. If the chain is too tight, undo it and begin again with looser tension or a hook one size larger for the foundation.
Step 2: Crochet the first row
We’ll now turn the foundation chain into a row of single crochet stitches.
Insert your hook into the second chain from the hook. The first chain is skipped because it provides the small turning height for the row.
Yarn over and pull up a loop. You should have two loops on your hook.
Yarn over again and pull through both loops. You’ve completed one single crochet.
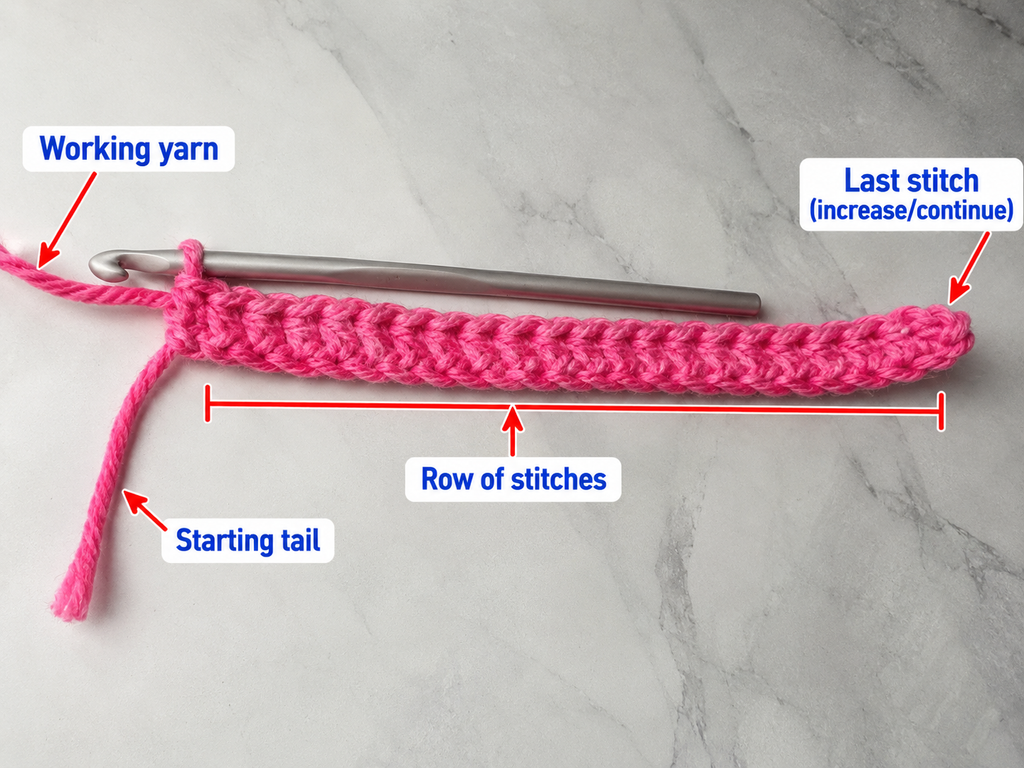
Continue making one single crochet in each remaining chain until you reach the end.
When you’ve finished, you should have 30 single crochet stitches.
Before moving on, count them. Counting the first row is important because it establishes the stitch number you’ll maintain throughout the rest of the project.
Your work will look like a long, narrow strip rather than a glove, and that’s exactly what it should look like at this stage.
Beginner tip: Put a stitch marker into the first and last stitches if you have trouble spotting the edges.
Common mistake to avoid: Crocheting into the first chain instead of the second, or missing the final foundation chain. Either can change your stitch count.
Step 3: Work the second row in the back loop only
This is where the ribbed texture begins.
Normally, when making a single crochet, you insert the hook underneath both loops at the top of the stitch.
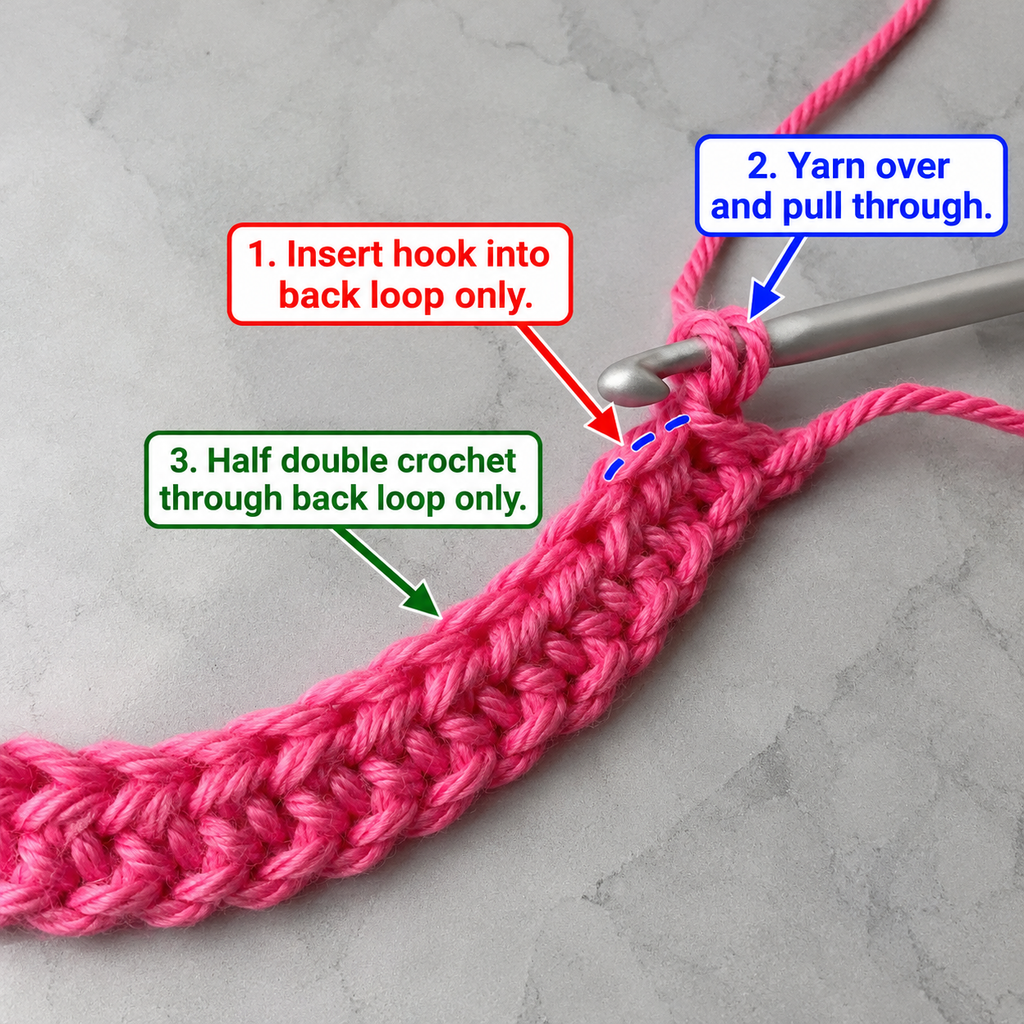
For this pattern, you’ll insert the hook under the back loop only.
Look closely at the top of your stitches. Each stitch resembles a small V. When the work is facing you, the loop farther away from you is the back loop.
Chain 1 and turn your work.
Insert the hook into the back loop of the first stitch. Yarn over, pull up a loop, yarn over again, and pull through both loops.
Repeat this process in every stitch across the row.
You should again finish with 30 stitches.
The turning chain does not count as a stitch, and you should not skip the first actual stitch of this row.
The ridges may not look dramatic yet. They become easier to see after several rows.
Beginner tip: Pause before inserting the hook into each stitch until you can clearly identify the front and back loops.
Common mistake to avoid: Accidentally switching between both loops and the back loop. This interrupts the ribbed pattern and creates uneven texture.
Step 4: Continue crocheting the ribbed rectangle
Now that you’ve learned the main stitch, you can settle into a simple repeat.
At the end of every row, chain 1 and turn.
Work one single crochet in the back loop of each stitch across.
Keep repeating this until you’ve completed approximately 26 rows in total, including the first row.
Your work should develop soft, raised ridges. These ridges will eventually run from the wrist toward the fingers when the gloves are worn.
At this point, concentrate on maintaining your stitch count rather than crocheting quickly.
Each row must still contain 30 stitches. If your rectangle becomes wider or narrower along its length, it’s worth checking whether you’ve missed or accidentally added an edge stitch.
You don’t need to stop at exactly 26 rows. The correct row count is the one that allows your fabric to wrap around your hand comfortably.
Beginner tip: Count your stitches every few rows instead of waiting until the rectangle is finished.
Common mistake to avoid: Working into the turning chain at the end of a row. This adds an unintended stitch and can make the fabric flare outward.
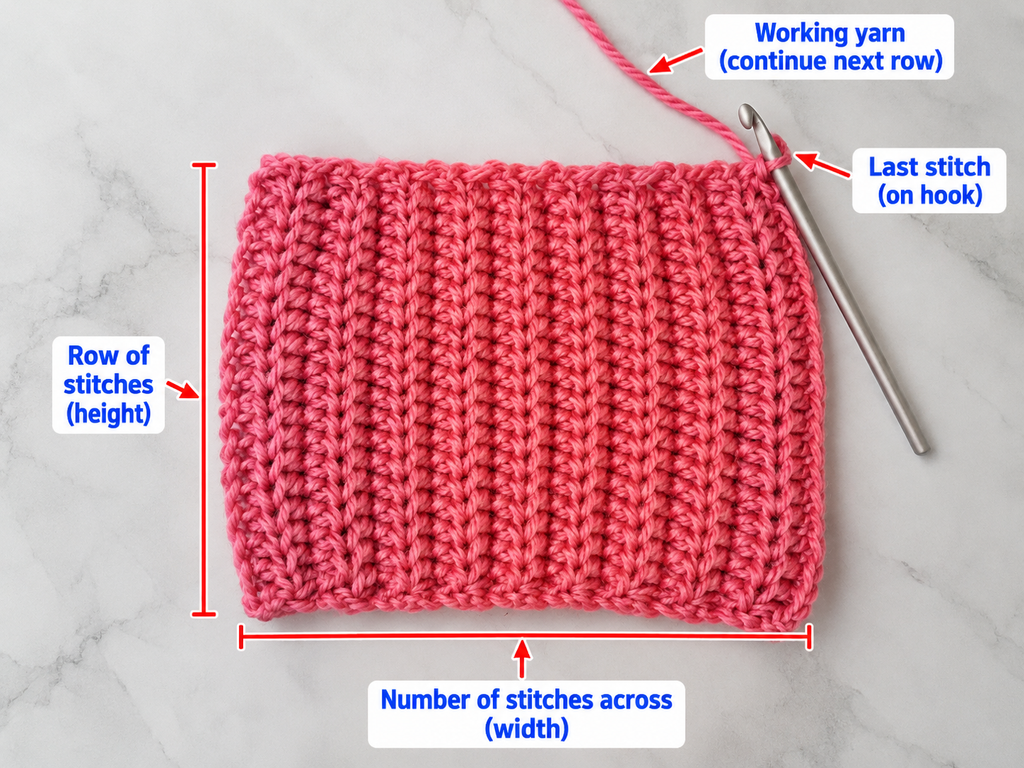
Step 5: Measure the rectangle and check the fit
Before you sew anything together, it’s time for a fit check.
Lay the rectangle flat on a table and make sure it has reasonably straight sides.
First, check its length. The 30-stitch dimension should reach from the intended wrist edge to the point where you want the glove to end below your knuckles.
If you’d prefer longer hand warmers that extend farther along your forearm, you should have started with more foundation chains. If you’re still early in the project, this is easy to change.
Next, check the width created by the accumulated rows.
Wrap the rectangle around your hand, with the ridges pointing from your wrist toward your fingers.
Bring the first and last rows together without overlapping them. The fabric should hug the hand gently, but you should still be able to move your fingers and thumb comfortably.
If the edges don’t meet, add more rows. If the fabric overlaps excessively, remove a few rows.
The fit should feel slightly snug rather than loose because ribbed fabric typically relaxes during wear.
Beginner tip: Try the rectangle around the widest part of your hand, not just your wrist.
Common mistake to avoid: Measuring the fabric only while it is lying flat. A rectangle that looks small may stretch comfortably, while one that appears large may become too loose.
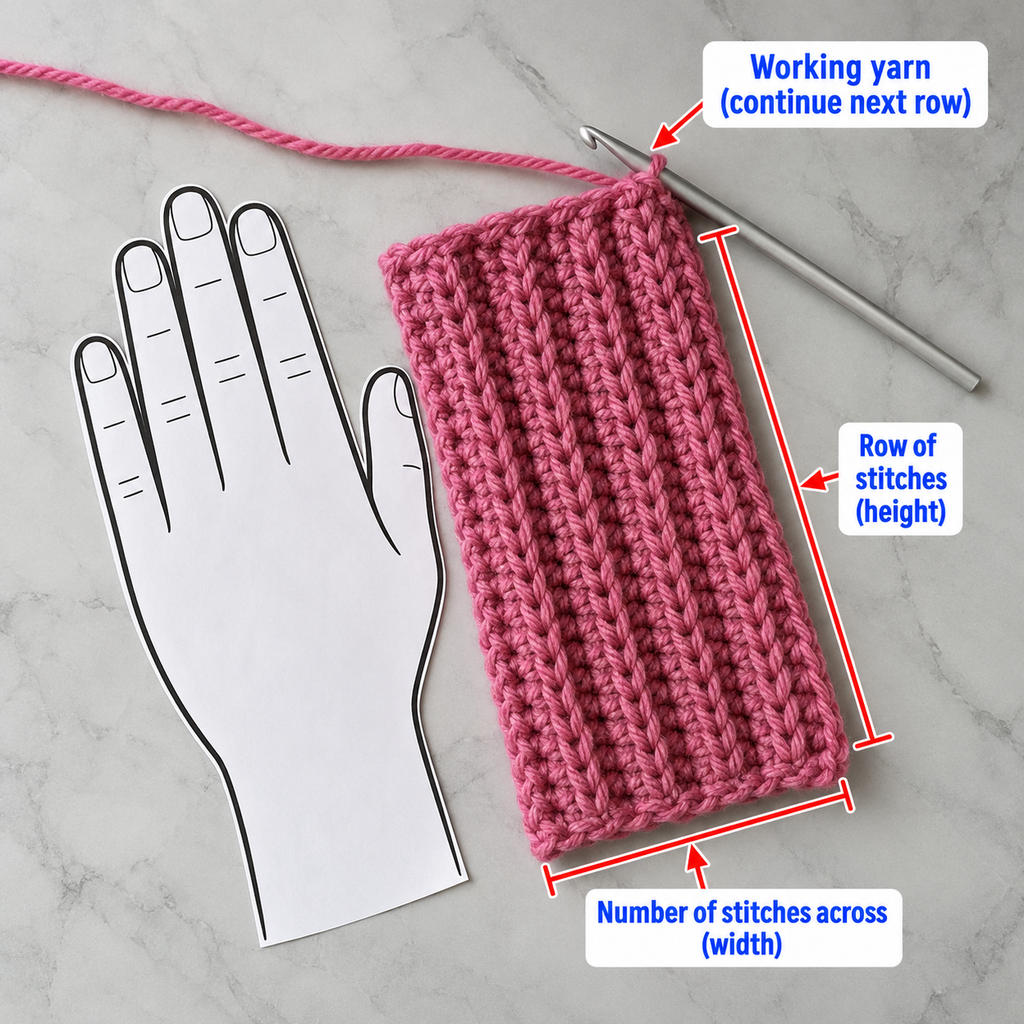
Step 6: Fold the rectangle into a glove shape
Once you’re happy with the size, you’re ready to turn the flat fabric into a wearable glove.
Fasten off the working yarn, leaving a tail approximately 20–24 inches long if you’d like to use it for joining. You can also use a separate piece of matching yarn for the seam.
Place the rectangle in front of you with its length running vertically.
The bottom will become the wrist opening. The top will sit near your knuckles.
Bring the first and last rows together so they meet along one vertical side.
If you’ve chosen a right side for your fabric, fold it so the wrong side faces outward while you sew. You’ll turn the glove right side out afterward.
Line up the bottom and top corners carefully. The two edges should meet evenly without twisting.
You now have a loose fabric tube with an open side seam.
Beginner tip: Use stitch markers to hold the two edges together while you work.
Common mistake to avoid: Joining the wrong edges. You’re joining the first and last rows, not joining the wrist and finger ends to one another.
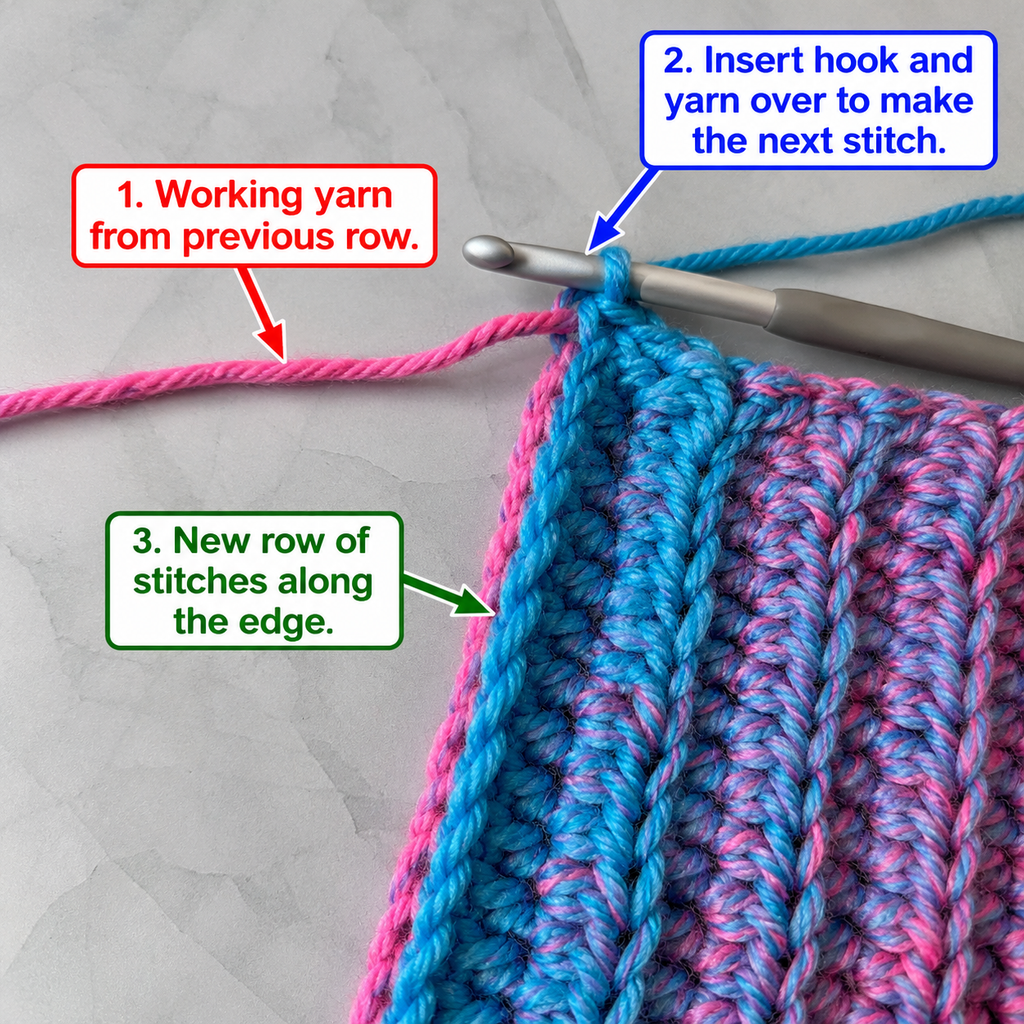
Step 7: Sew the lower wrist seam
Thread the long yarn tail onto a tapestry needle.
Beginning at the wrist edge, sew the aligned row edges together for approximately 3–3.5 inches, depending on where the base of your thumb sits.
You can use a simple whip stitch or a mattress-style stitch. For a beginner, either is fine as long as the seam is flat and flexible.
To make a mattress-style seam, catch corresponding loops or edge bars from one side, then the other, working upward a little at a time. Draw the yarn through gently so the two edges meet.
Avoid pulling so tightly that the fabric gathers.
Stop before reaching the thumb position.
At this point, don’t fasten off your entire project without checking where your thumb will go. Place the partly sewn glove around your hand and locate the base of your thumb.
If the seam ends below the natural thumb position, you’re ready for the next step.
Beginner tip: A flexible seam is more comfortable than a rigid, tightly pulled one.
Common mistake to avoid: Sewing too far before checking your thumb. It’s easier to adjust the seam now than after the whole glove is finished.
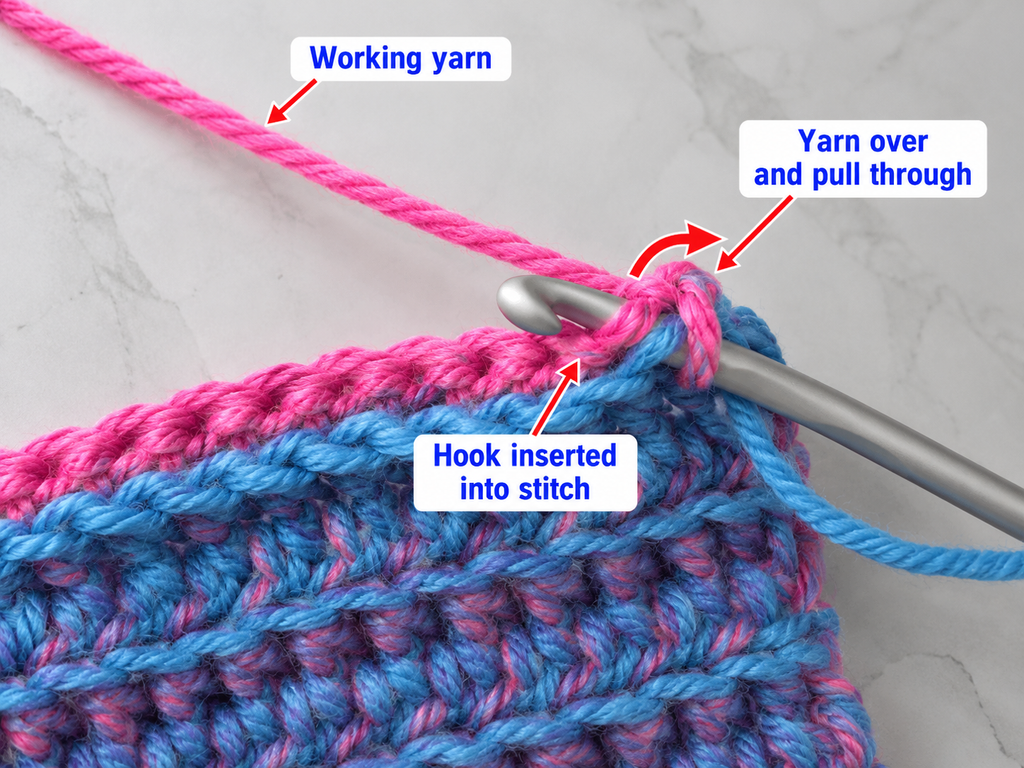
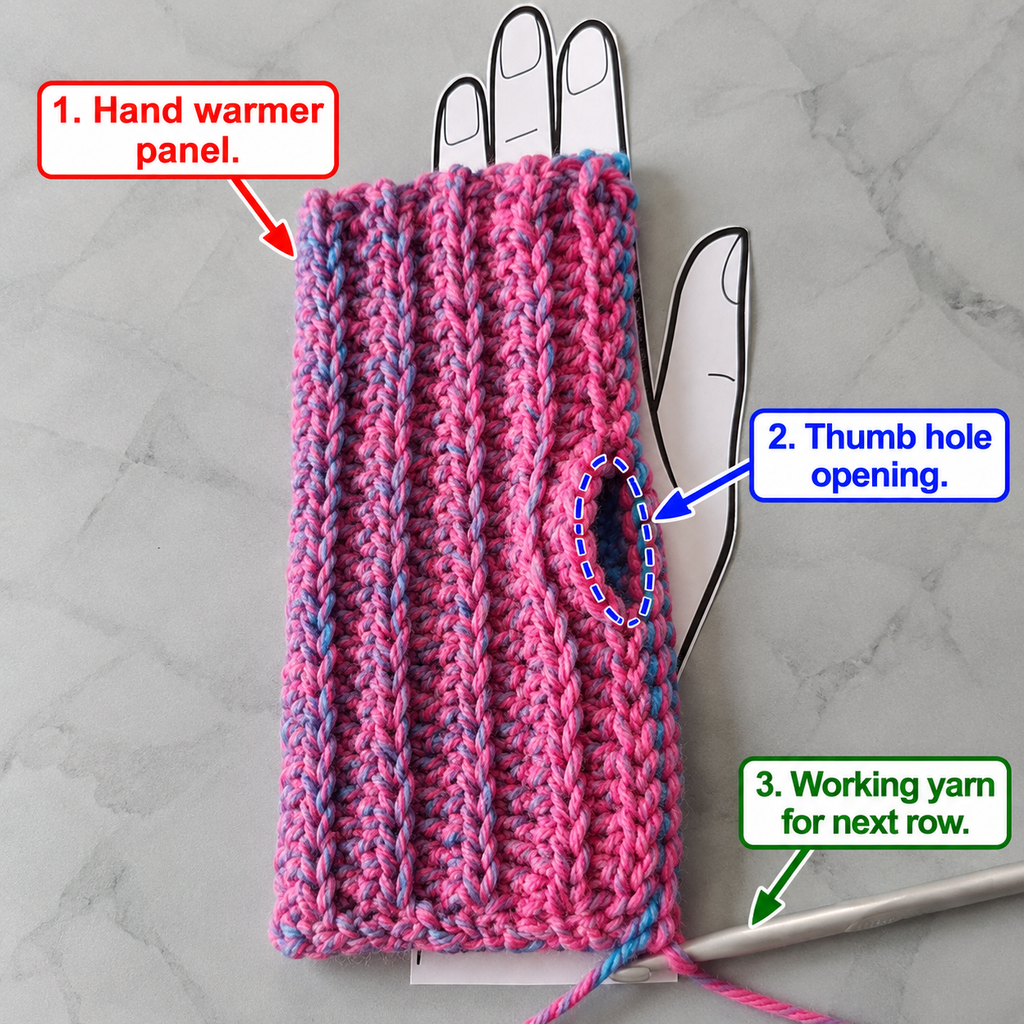
Step 8: Create the thumb opening
This is the step that turns a simple crochet tube into a fingerless glove.
Try on the partly joined rectangle and identify the position of your thumb.
Use two stitch markers to mark the area that needs to remain open.
For many adult hands, a thumb opening approximately 1.5–2 inches long is a useful starting point. However, comfort matters more than an exact measurement.
Remove the glove and secure the lower seam yarn.
Leave the marked section unsewn. Do not close the gap or stitch across it.
The opening should be large enough for your thumb to move through naturally without stretching the stitches excessively.
Remember that the thumb opening is located along the side seam, not in the center of the crocheted fabric.
If you’re unsure about the opening’s size, make it slightly larger at first. You can always close a few additional stitches later if necessary.
Beginner tip: Put your hand inside the glove before securing the seam completely. The thumb should come through the opening without needing to force the fabric.
Common mistake to avoid: Leaving the gap too close to the knuckle edge or too close to the wrist. This can make the glove bunch up or pull uncomfortably when you bend your thumb.
Step 9: Sew the upper finger-side seam
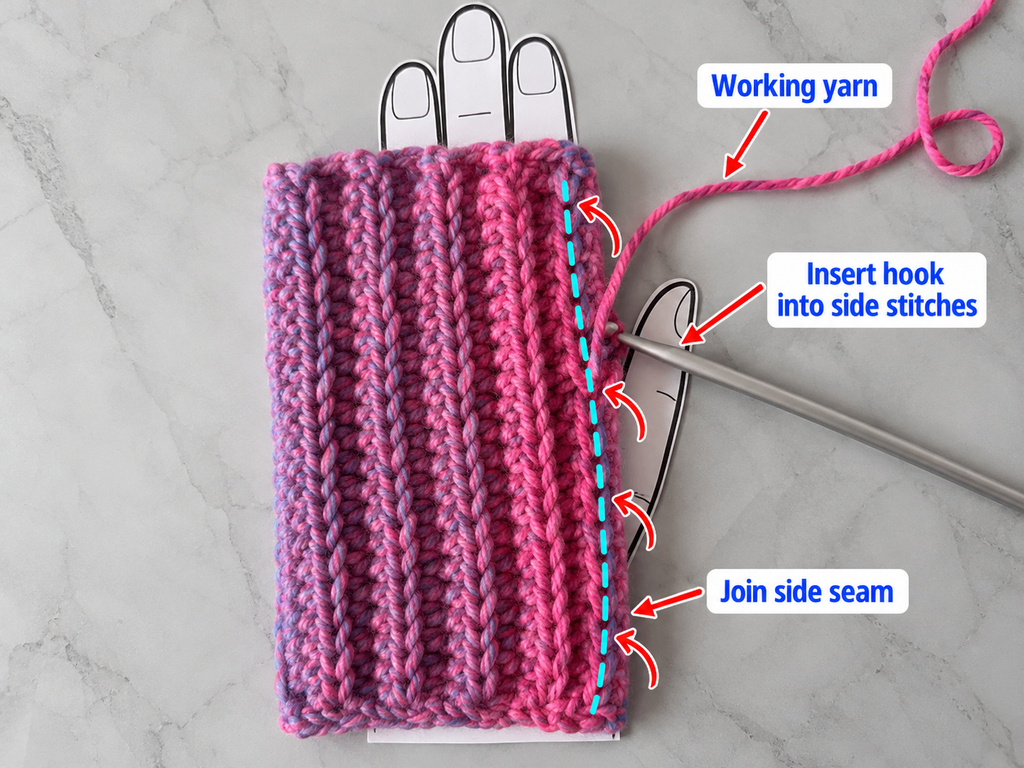
Now that you’ve marked the thumb opening, you’ll complete the remaining section of the glove’s side seam.
Using the same yarn color, start at the top edge near the knuckles and sew downward until you reach the upper marker of the thumb opening.
This is usually a shorter section than the wrist seam.
Secure the yarn carefully so the seam doesn’t unravel during use.
Check that you have three clear openings: the main wrist opening at the bottom, the finger opening at the top, and the thumb opening along the side.
Slip your hand into the glove again.
If the upper edge presses too tightly around your knuckles, consider adding rows to the rectangle on the next glove—or undoing the seam and adding them to this one.
Your fingers should be able to bend and spread comfortably.
Beginner tip: Leave the glove open enough to sit around the base of the fingers rather than stretching it over the finger joints.
Common mistake to avoid: Accidentally stitching the top opening closed while working toward the thumb gap.
Step 10: Make the second fingerless glove
Your first glove is finished structurally, but you’ll need a matching second piece.
Repeat Steps 1–9, using the same yarn, hook size, starting chain, stitch count, and number of rows.
Try to keep your tension as close as possible to the first glove.
Before sewing the second rectangle, place it next to the first. They should be approximately the same size.
One helpful feature of this simple tube-style design is that it can be worn on either hand. You don’t need to create a separate shaped thumb gusset.
You can position the seam along the thumb side of each hand and turn or orient the piece so the most attractive ribbed surface faces outward.
Try both pieces on together before weaving in all the ends.
Check the fit around the wrists and palms, and make sure the thumb openings sit comfortably.
Beginner tip: Record the final row count and thumb-gap measurement from your first glove so you can reproduce them.
Common mistake to avoid: Assuming the two gloves are identical simply because you’ve worked the same number of rows. Different tension can still affect the finished dimensions.
Pattern Notes and Stitch Counts
This is the condensed written pattern for crocheters who prefer to follow stitch instructions without reading all the explanations again.
Foundation: Ch 31.
Row 1: Sc in the second ch from hook and in each ch across. Ch 1, turn. (30 sts)
Row 2: Sc BLO in each st across. Ch 1, turn. (30 sts)
Rows 3–25: Repeat Row 2, maintaining 30 sts in each row.
Row 26: Sc BLO in each st across. (30 sts)
Check the rectangle’s fit. Add or remove rows if necessary.
Fasten off, leaving a long sewing tail.
Fold the rectangle so the first and last rows meet. Sew upward from the wrist to the thumb position. Leave approximately 1.5–2 inches unsewn for the thumb opening, then join the remaining upper section.
Repeat the full process for the second glove.
Turning-chain rule: The ch 1 at the end of the rows does not count as a stitch.
Right side / wrong side: Either side of the ribbed fabric can be displayed, but choose consistently for both gloves.
Repeat pattern: One sc BLO in each stitch across every subsequent row.
Stitch count: 30 stitches per row, regardless of the number of rows added to achieve your fit.
Common Beginner Mistakes and How to Fix Them
Even though this crochet fingerless gloves pattern is easy, a few small details can make a big difference to the finished fit.
1. Uneven rectangle edges
If your panel begins with 30 stitches but ends with 27 or 33, you’ve probably missed or added stitches at the edges.
The fix is to count at the end of every row and identify the last actual stitch before turning. Stitch markers can be helpful until the edge stitches become familiar.
2. Ribbing that looks flat
A flat-looking rectangle usually means you’ve been working under both stitch loops instead of the back loop.
To fix it, look closely at the V shapes along the top of the fabric. Work through the loop farther away from you after each turn.
A little variation in the texture is normal while you’re learning, but consistent loop placement produces a neater finish.
3. Gloves that are too tight
If the fabric feels tight around your palm, add more rows before joining. You can also experiment with a larger hook if your stitches are consistently firm.
Remember that adjusting the number of rows changes the circumference, while adjusting the starting chain changes the glove’s length.
4. Gloves that are too loose
If the rectangle overlaps significantly when wrapped around your palm, remove some rows.
You want a comfortable, flexible fit that stays in place without squeezing the hand.
5. Thumb opening in the wrong position
The opening should follow the natural position of your thumb.
If your thumb is being pulled sideways or the glove bunches near the palm, undo part of the seam and reposition the opening.
A small amount of resewing is much easier than living with uncomfortable gloves.
6. Bulky or puckered seams
A tight seam can make a stretchy crochet glove feel stiff.
Use matching yarn and secure the sides gently. Pull enough to join the fabric, but not enough to bunch the stitches.
7. Two gloves with different lengths
This usually happens when one foundation chain is tighter than the other or the crochet tension changes.
Lay your rectangles together before assembling the second glove. Compare their actual dimensions, not just the number of stitches.
How to Customize Your Crochet Fingerless Gloves
One of the nicest things about this pattern is how easily you can make it your own.
Change the yarn
Soft acrylic is convenient for everyday washable gloves. Wool is warm and naturally resilient, while wool blends combine different fiber characteristics.
Cotton can work for lightweight hand warmers, but many cotton yarns have less elastic recovery than wool. Keep that in mind when adjusting the fit.
If you change yarn weight, start with a new gauge swatch rather than assuming the original stitch count will still work.
Add color changes
For a simple two-color pair, make your foundation and a few rows in one shade, then change colors for the remaining rows.
You can also make each glove in a different coordinating color for a playful, handmade look.
If you prefer a subtle design, try cream, dusty rose, oatmeal, charcoal, or soft lavender.
Make longer wrist warmers
For a longer glove that reaches farther up your arm, increase the number of foundation chains.
Each additional chain adds one stitch to the row and increases the glove’s length.
Measure from your intended lower edge to your knuckles before deciding how many stitches to add.
Make smaller gloves
For smaller hands, reduce the number of rows until the rectangle wraps comfortably around the palm.
If a shorter glove is needed, reduce the foundation chain length as well.
For children’s sizes, fit carefully and avoid loose decorative elements that could catch or detach.
Add a decorative border
After sewing, you can work a simple round of single crochet around the finger and wrist openings.
Keep these border stitches relaxed so they don’t prevent the ribbed glove from stretching.
A contrasting edge in ivory or light brown can create a particularly pretty finish.
Try different textures
After mastering the basic single crochet version, you can experiment with back-loop half double crochet for a slightly different texture.
Because the stitches are taller, the final dimensions and stitch counts will change, so don’t treat that variation as a direct stitch-for-stitch substitution.
Turn them into handmade gifts
Crochet fingerless gloves make useful gifts for friends, family members, teachers, or fellow makers.
They pair beautifully with a matching crochet headband or scarf. Fold the finished pair together and tie it with a small strand of coordinating yarn for simple gift packaging.
Finishing Instructions
A few minutes of careful finishing can make your handmade fingerless gloves look much more polished.
Fasten off
Once all seams are secure, cut the working yarn, leaving a tail long enough to weave into the fabric.
Pull the tail through the final loop and gently tighten it.
Avoid cutting too close to the last stitch because this can make the yarn difficult to secure.
Weave in the ends
Turn your glove inside out.
Thread a remaining tail onto your yarn needle and weave it through several nearby stitches, following the structure of the fabric.
Change direction and weave back through a different path to help secure the yarn.
Trim the excess carefully without cutting any surrounding stitches.
Repeat for every remaining yarn tail.
Shape the gloves
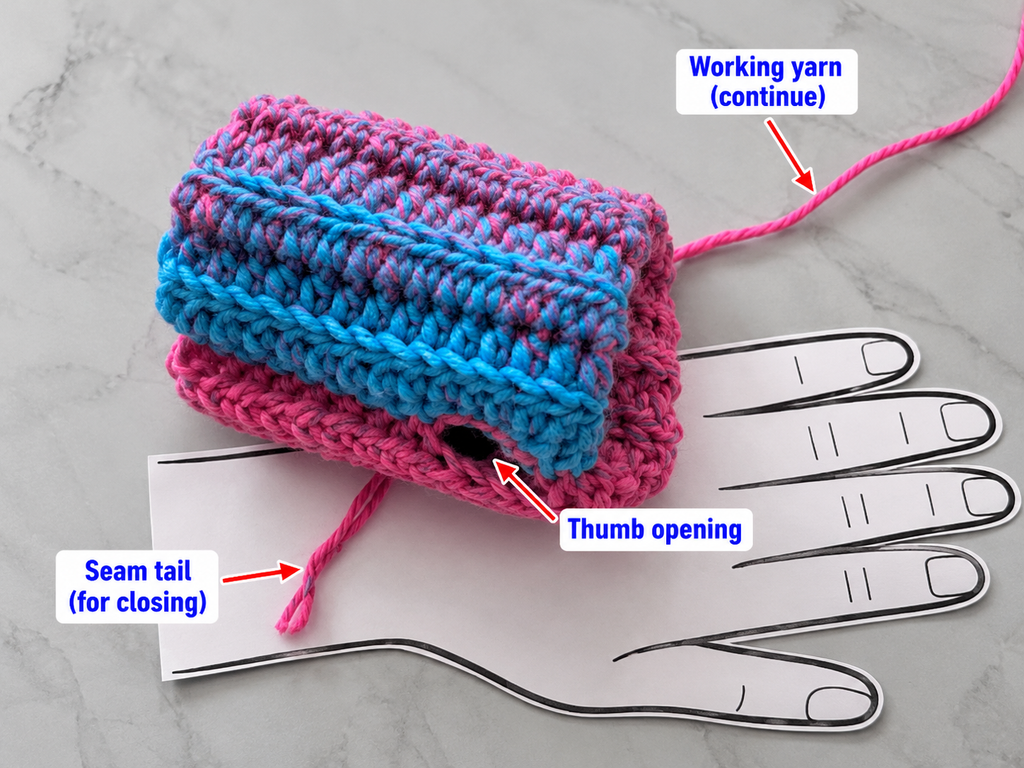
Turn both gloves right side out.
Gently stretch and smooth the fabric with your hands to encourage the ribbing to settle.
Make sure the seam lies flat and the thumb opening is not twisted.
Try both gloves on and check that the finger openings sit at a comfortable height.
If one glove is slightly longer than the other, compare the starting edges and gently reshape the fabric. Large differences usually need a stitch-count correction rather than stretching.
Blocking and washing
Blocking is optional for this project.
If your chosen yarn benefits from wet blocking, dampen the gloves gently and lay them flat on a towel. Shape them to the same dimensions and let them dry completely.
Avoid excessive stretching, which can make the finished gloves too large.
Always follow the yarn label’s washing instructions. Some wool yarns require hand washing, while many acrylic yarns are machine washable.
Test how the fabric responds to moisture or heat before using steam, especially with acrylic fibers.
Final fit check
Your finished gloves should feel gently snug around the wrist and palm.
The thumb opening should move with your hand, while the finger opening should remain comfortable when you make a loose fist.
If you can move naturally without pulling or pressure, your fingerless gloves are ready to wear.
Quick Printable-Style Pattern Summary
Easy Ribbed Fingerless Gloves
Copy
| Skill | Beginner |
| Yarn | 100–150 yards, worsted #4 |
| Hook | 5.0 mm |
| Foundation | Chain 31 |
| Row 1 | 30 sc |
| Rows 2–26 | 30 sc BLO per row |
| Adjustment | Add or remove rows for circumference |
| Thumb | Leave 1.5–2 inches unsewn |
| Finish | Join side sections, weave ends, repeat |
Working measurements are adjustable. Confirm the fit before closing each seam.
Frequently Asked Questions About Crochet Fingerless Gloves
1. Can beginners crochet fingerless gloves?
Yes. This rectangle-based pattern is suitable for beginners who know how to chain and make single crochet stitches. You’ll learn the back-loop-only variation, which creates the ribbed texture, and use basic sewing to finish the sides.
Unlike shaped gloves, you won’t need to work separate fingers or calculate increases for a thumb gusset.
2. How long does it take to crochet fingerless gloves?
Many beginners can complete a pair in approximately two to four hours, although the time varies with experience and yarn.
The first glove usually takes longer because you’ll be learning the construction. The second often goes more quickly because you’re repeating the same steps.
3. How much yarn do I need for crochet fingerless gloves?
For this design, plan on approximately 100–150 yards of worsted-weight yarn for an adult pair, with a little extra if you’re increasing the length or circumference.
The precise amount depends on yarn thickness, stitch tension, and finished dimensions.
4. Can I make crochet fingerless gloves without sewing?
Yes, there are no-sew fingerless glove patterns made in the round, as well as designs that use crocheted joins instead of a needle.
For this tutorial, a short sewn seam is used because it offers an approachable way to create and adjust the thumb opening.
5. How do I make fingerless gloves fit smaller or larger hands?
To change the circumference, add or remove rows from the rectangle.
To change the length from the wrist to the knuckles, increase or decrease the number of foundation chains.
Always try the fabric around your hand before joining because yarn elasticity affects sizing.
6. What is the best crochet stitch for fingerless gloves?
Back-loop-only single crochet is an excellent choice for a simple beginner pattern. It creates a textured fabric with some stretch and is easy to repeat.
Half double crochet ribbing, extended single crochet, and other textured stitches are also popular, but they require different gauge calculations.
7. Why is my crochet fingerless glove curling?
Slight curling can happen because of tight tension, uneven edges, or the natural behavior of the yarn.
Try relaxing your stitches, using a slightly larger hook, and confirming that the stitch count stays consistent.
Gentle blocking may help smooth some yarns, but it won’t correct a major stitch-count error.
Your Finished Crochet Fingerless Gloves
Conclusion
Once you’ve made your first pair, you’ll see just how versatile a simple crochet rectangle can be.
These easy crochet fingerless gloves give you a useful introduction to ribbing, fitting a wearable project, and creating an opening without complicated shaping.
You can keep the design simple, experiment with beautiful yarn colors, or add a decorative border to make the finished gloves your own.
If you enjoyed making them, save this free crochet fingerless gloves pattern for later. It’s a lovely little project to return to whenever you need a quick handmade gift.
And if you’re ready for another cozy accessory, try a matching crochet headband or an easy ribbed scarf using the same back-loop stitch.





