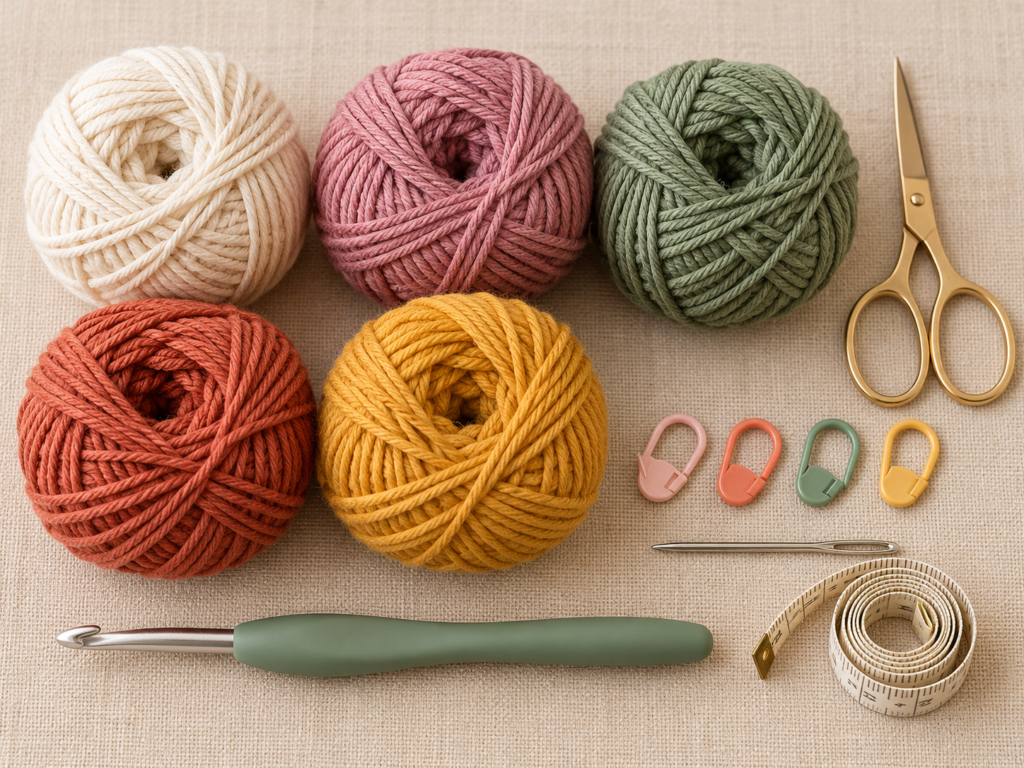
Do you have a basket full of leftover yarn from old crochet projects? Those little balls of cotton, half-used skeins and short lengths of yarn might not seem useful on their own, but together they can become something surprisingly practical.
This easy crochet scrap yarn bag pattern turns leftover yarn into a colorful shoulder bag using only basic crochet stitches. You won’t need complicated shaping, granny squares or advanced techniques. If you can make a chain and single crochet, you already have most of the skills needed for this project.
The best part is that you don’t have to plan every stripe perfectly. A few rounds of dusty rose, a little mustard yellow, a band of sage green and some cream yarn can work together beautifully. Every bag will look a little different, and that’s exactly what makes scrap yarn projects fun.
In this free step-by-step crochet tutorial, you’ll learn how to create a sturdy oval base, work the sides in continuous rounds, introduce new yarn colors, finish the opening and attach a comfortable crocheted shoulder strap.
The finished bag is useful for carrying everyday essentials, storing small crochet supplies or giving as a handmade gift. It is also a satisfying way to use the leftover yarn you have been saving for the right project.
What You’ll Learn
By the end of this tutorial, you’ll know how to:
- Choose and organize leftover yarn for a coordinated bag.
- Crochet a simple oval bag base from a foundation chain.
- Work single crochet stitches continuously in the round.
- Change colors neatly without leaving large knots.
- Keep the bag sides even while adding colorful stripes.
- Crochet and attach a sturdy shoulder strap.
- Weave in yarn ends and give your bag a clean, finished appearance.
You can follow the suggested color order or use whatever suitable scraps you already have.
Materials You’ll Need
This pattern is designed around DK-weight cotton yarn, which creates a flexible bag with a reasonably firm texture when worked using a smaller hook.
| Material | Recommendation |
|---|---|
| Yarn | Approximately 180–240 yards (165–220 m) of DK-weight cotton scraps |
| Main colors | Cream, dusty rose, muted sage, terracotta and mustard yellow |
| Contrast yarn | Additional dark sage cotton yarn for the border and strap |
| Crochet hook | 4.0 mm ergonomic hook |
| Yarn needle | Blunt tapestry needle |
| Scissors | Small sharp scissors |
| Stitch markers | 2–4 removable markers |
| Measuring tape | For checking bag height and strap length |
| Optional | Cotton fabric lining, matching sewing thread and needle |
The yarn requirement is an estimate, not a tested consumption measurement. Larger bags, taller bodies and longer straps will require additional yarn.
Can you use different yarn brands?
Yes. One of the advantages of a scrap yarn crochet bag is that you can combine yarn left over from several projects.
Try to keep the yarns similar in thickness and elasticity. A mixture of DK cotton brands generally works better than combining thin lace yarn with very bulky acrylic yarn.
If one scrap is slightly thinner, you may be able to hold it together with another compatible strand to achieve a similar thickness. Always make a small test section first.
For an everyday bag, cotton is useful because its stitch definition is clear and it generally has less elastic recovery than many acrylic yarns. However, it can still stretch under a heavy load.
Crochet Abbreviations Used
This pattern uses US crochet terminology.
| Abbreviation | Meaning |
|---|---|
| ch | Chain |
| sc | Single crochet |
| sl st | Slip stitch |
| st | Stitch |
| sts | Stitches |
| rnd | Round |
| rep | Repeat |
| yo | Yarn over |
| RS | Right side |
| WS | Wrong side |
A US single crochet is called a double crochet in UK terminology. If you normally follow UK patterns, remember this difference before starting.
Before You Start
Skill level and finished size
This is a beginner-friendly pattern with a simple construction method. The only potentially unfamiliar technique is crocheting around both sides of a starting chain to create an oval base.
The intended finished measurements are approximately:
- Width: 8–9 inches (20–23 cm).
- Height: 7–8 inches (18–20 cm).
- Base depth: approximately 1–1.5 inches (2.5–4 cm).
- Strap length: approximately 40–43 inches (102–109 cm), adjustable.
These measurements are targets, not dimensions verified from a completed sample. Actual size depends on the yarn, gauge and the number of rounds worked.
Gauge and tension
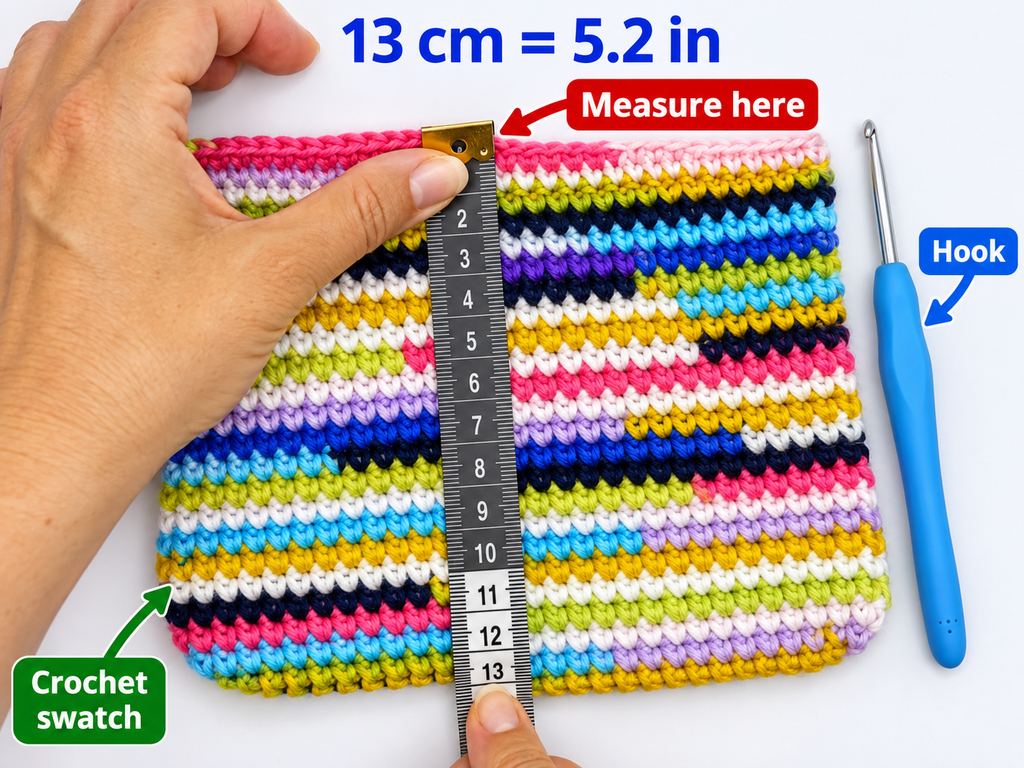
For this design, aim for approximately 17 single crochet stitches and 19 rounds over 4 inches (10 cm), using a 4.0 mm hook.
You do not have to match this gauge exactly, but consistent tension matters.
If your stitches are very loose, small items may slip through the fabric and the bag may stretch. If they are extremely tight, inserting the hook can become uncomfortable.
Crochet a small sample with your leftover yarn before beginning. Look for a firm yet flexible fabric.
How to count your stitches
Look at the top of your work. Every completed single crochet creates a small V-shaped stitch.
When counting, each V represents one stitch.
For the first foundation round, pay special attention to the stitches worked around the end of the chain. These are easy places to accidentally miss or add a stitch.
Use a stitch marker to indicate the beginning of each round.
Choosing your colors
Choose around five compatible colors, although fewer or more will also work.
For a balanced scrappy look, begin with one relatively neutral color for the base. Introduce contrasting colors around the sides, and reserve a stronger or darker color for the upper border and strap.
There is no need to make the stripes identical in width. A few narrow rows between wider color sections can give the bag a relaxed patchwork appearance.
If you want to prevent abrupt color changes, arrange your scraps in a loose sequence before starting.
Important beginner note
Work the main body in continuous spiral rounds. Do not turn your work or join every round unless specifically instructed.
Continuous rounds are easy to follow, but they can cause the beginning of each colored stripe to shift slightly as the rounds progress. This is normal.
You can keep all yarn changes near the back or side of the bag to make them less noticeable.
Step-by-Step Crochet Tutorial
Step 1: Make the Foundation Chain
Start with your chosen base color. Muted sage green works especially well as a foundation for the cream, terracotta and rose-colored sections added later.
Make a slip knot and place it on your 4.0 mm crochet hook.
Chain 31.
Keep the chain relaxed. It should lie fairly straight without pulling tightly around the hook.
Now locate the second chain from your hook. You will begin crocheting here.
Insert the hook into that chain, yarn over and pull through a loop. You should have two loops on your hook.
Yarn over once more and pull through both loops.
You have completed your first single crochet.
Continue along the chain, working one single crochet into each chain until you reach the last chain. You will work a special group of stitches there in the next step.
Beginner tip: Count the foundation chain carefully before working the first stitch. An incorrect number of chains can affect the base length.
Common mistake to avoid: Do not crochet into the very first chain closest to the hook. Begin in the second chain.

Step 2: Crochet Around the Foundation Chain
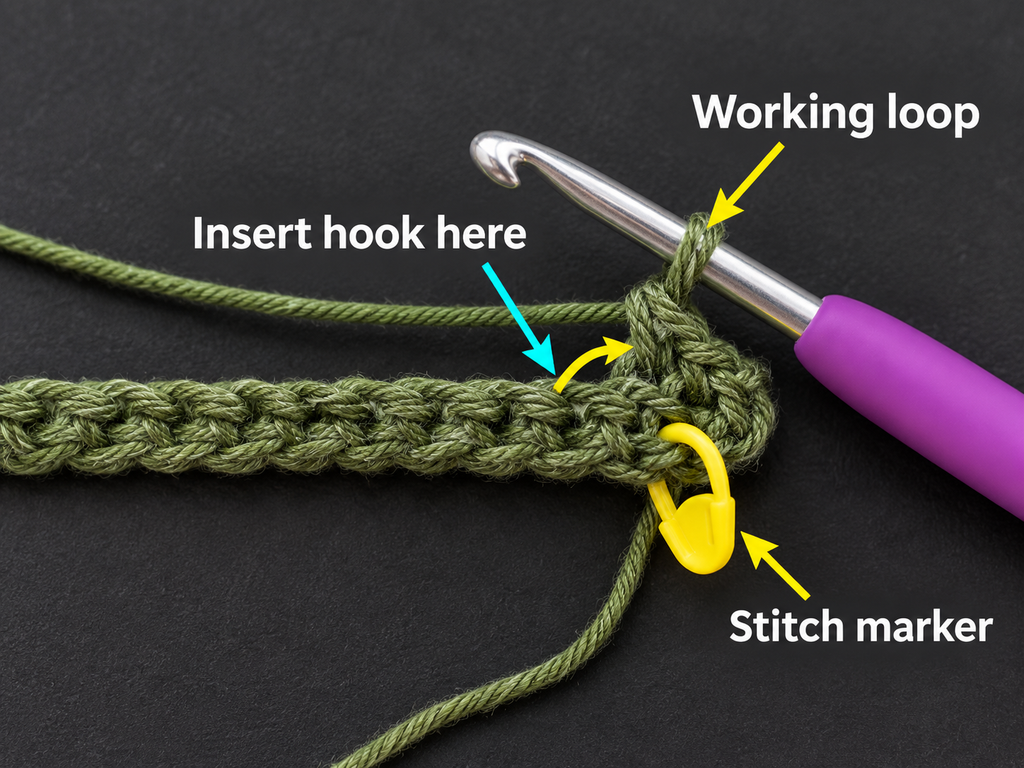
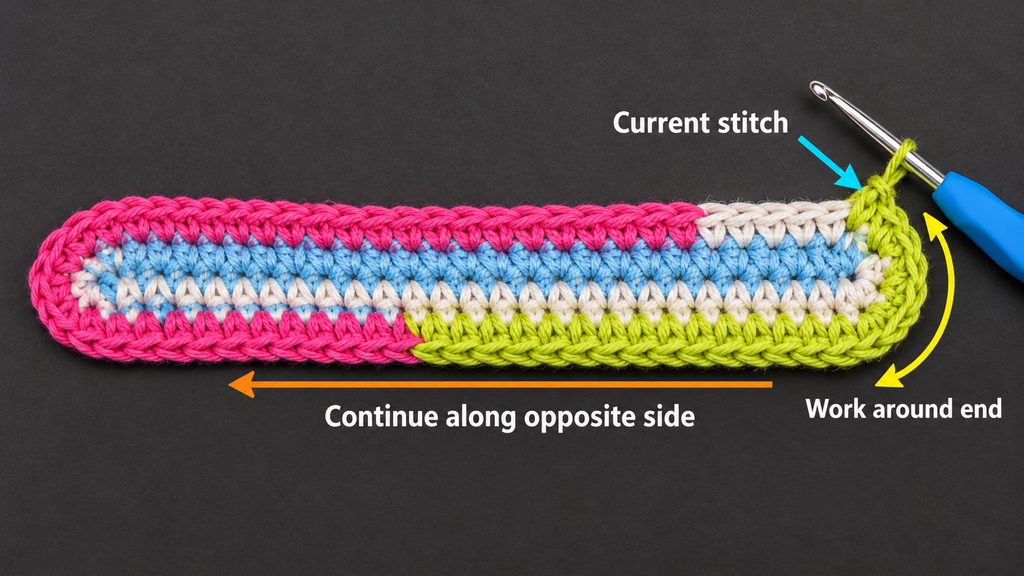
Instead of turning your work and crocheting back in ordinary rows, you will work around the entire chain to create the beginning of an oval.
This method gives the bag a seamless base and allows the sides to be crocheted directly upward.
For the first round:
- Work one single crochet into each chain from the second chain through the next 28 chains, stopping before the final chain.
- Work three single crochet stitches into the last chain.
- Rotate your work so that you can crochet along the opposite side of the starting chain.
- Work one single crochet into each of the next 28 available chains on the opposite side.
- Work two single crochet stitches into the remaining end chain, which already contains the first single crochet made at the beginning.
You should now have 62 single crochet stitches around your oval foundation.
The initial 29 stitches and three stitches at the far end, followed by 28 stitches on the opposite side and two additional stitches at the starting end, give a total of 62.
The stitches at each end help the foundation curve rather than creating sharp corners.
Place a stitch marker in the first stitch of the round so you can identify where the next round begins.
Beginner tip: Spread the foundation gently between your fingers. Make sure the starting chain is not twisted before you continue.
Common mistake to avoid: Do not skip the back side of the foundation chain. Both sides are necessary to make the oval.
Step 3: Strengthen the Oval Base
You now have the foundation shape of the bag.
For a small shoulder bag, the base does not need to be very wide. A narrow oval creates a compact bag that is suitable for lightweight everyday items.
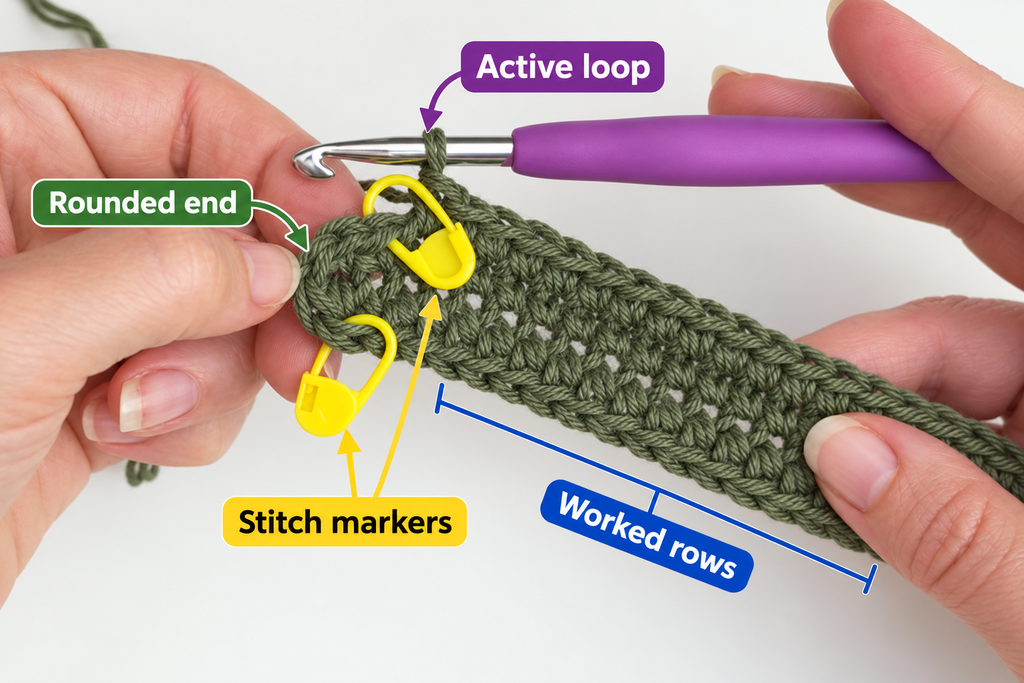
Continue with your base yarn and work one single crochet into every stitch around.
Round 2: Work 1 sc in each of the 62 stitches. (62 sc)
Because you are no longer increasing, the outer edge will begin to rise slightly. This is intentional. The first round after the foundation establishes the transition between the base and the side walls.
Do not worry if the oval does not lie completely flat at this point. The bag is beginning to take shape.
If your oval twists or puckers severely, check whether your starting chain was too tight or whether you accidentally missed stitches.
Lay the work on the tabletop and gently straighten it.
Beginner tip: Count all 62 stitches at the end of this round. Correcting a missed stitch now is much easier than after adding ten colorful rounds.
Common mistake to avoid: Do not add extra stitches at both ends after this point. The following rounds maintain the same stitch count.
Step 4: Begin Crocheting the Sides
Now the colorful part begins.
You can continue using muted sage for one or two more rounds, or introduce your next scrap color.
For this sample, the suggested sequence begins with sage and moves into cream, dusty rose, terracotta and mustard yellow.
Rounds 3–6: Work 1 sc in each stitch around. (62 sc per round)
Maintain the same stitch count throughout.
The fabric should begin to curve upward from the oval foundation, gradually forming a small pouch-like shape.
This happens because you are crocheting the same number of stitches in every round rather than increasing.
As the sides grow, occasionally insert your hand into the opening and gently shape the fabric outward.
There is no need to pull hard. You simply want to prevent the sides from folding inward while you work.
Try to maintain an even distance between each single crochet stitch.
Beginner tip: Keep the stitch marker at the start of each round and move it upward when you reach it.
Common mistake to avoid: Accidentally working two single crochet stitches into one stitch causes the sides to flare outward. If you notice that the bag is widening unexpectedly, count the stitches before continuing.
Step 5: Continue the Body With Single Crochet
The body of the bag uses the same simple stitch repeatedly.
This is what makes the pattern especially suitable for beginners. Once the foundation is finished, you can settle into a steady rhythm.
To make a single crochet stitch:
- Insert your hook beneath both top loops of the next stitch.
- Yarn over and pull up a loop.
- Yarn over again.
- Pull through both loops on your hook.
Repeat this around the entire bag.
Rounds 7–14: Work 1 sc in every stitch around. (62 sc per round)
Change colors whenever you want to begin a new stripe.
Try to keep the working yarn relaxed, particularly when using cotton. Pulling too tightly can make the fabric stiff and difficult to crochet into.
As you work, hold the bag by the base and allow the sides to hang naturally. You should begin to see the opening becoming more defined.
If your rows look slightly uneven, remember that small differences in tension are normal in handmade crochet.
The important thing is that your stitches remain secure and the overall shape is reasonably consistent.
Beginner tip: If you are unsure whether the hook should go through one loop or two, look for the V shape at the top of the stitch. Insert the hook under both strands.
Common mistake to avoid: Working into only the front or back loop by accident changes the texture and can produce a visible ridge. Use both loops throughout this pattern unless you intentionally choose a textured variation.
Step 6: Change Yarn Colors Without Bulky Knots
Changing colors is one of the most enjoyable parts of crocheting with scrap yarn.
You can decide the colors as you go, which makes every finished bag unique.
For a smooth transition, change yarn during the final pull-through of a single crochet stitch.
Begin the last stitch with your old yarn color.
Insert the hook into the next stitch, yarn over and pull up a loop. You should have two loops on the hook.
Instead of completing the stitch with the old color, place the new yarn over your hook and pull it through both loops.
The stitch is now completed with the new color ready for the following stitch.
Continue crocheting with the new yarn.
Leave tails of approximately 5–6 inches (13–15 cm) so that you can weave them in securely later.
Avoid making large knots on the outside of the bag, especially where the stripes change. Knots can make the surface uneven and may loosen with use.
Rounds 15–28: Continue working 1 sc in each of the 62 stitches, introducing new colors as desired.
A suggested stripe arrangement is:
| Rounds | Suggested Color |
|---|---|
| 3–6 | Cream |
| 7–10 | Dusty rose |
| 11–14 | Terracotta |
| 15–17 | Mustard yellow |
| 18–21 | Muted sage |
| 22–24 | Cream |
| 25–28 | Dusty rose |
This is only an example. Change more frequently if you have many small scraps, or create wider stripes if your leftovers are larger.
For a more random effect, arrange small balls of yarn in a basket and select the next color without looking.
Just make sure the yarns are reasonably compatible in thickness.
Beginner tip: Change colors at approximately the same location, preferably near the back of the bag. This keeps the transitions visually organized.
Common mistake to avoid: Do not cut the old color flush against the fabric. Leave enough yarn to secure it later.
Step 7: Crochet Until the Bag Reaches the Desired Height
By now, your bag should have a colorful striped appearance and enough depth to hold small belongings.
Continue working in the round.
Rounds 29–36: Work 1 sc into each of the 62 stitches around.
After round 36, stop and measure the bag from the bottom to the opening.
For this design, aim for a body height around 7–8 inches (18–20 cm). Depending on your gauge, you may need additional rounds.
If you want a taller bag, simply continue adding single crochet rounds until you reach your desired height.
If your bag already looks tall enough, you can stop earlier.
Remember that the upper edge will add a small amount of height.
To check the shape, place the bag on a flat surface and gently smooth the sides upward.
The upper opening should be approximately the same circumference as the lower body.
It does not need to stand upright without support. Crochet bags are naturally flexible, particularly when made with cotton.
Beginner tip: Always measure the actual fabric rather than relying solely on the round number. Yarn thickness and tension can change the final size considerably.
Common mistake to avoid: Do not stretch the bag aggressively while measuring. Measure its relaxed shape so that you know its true dimensions.
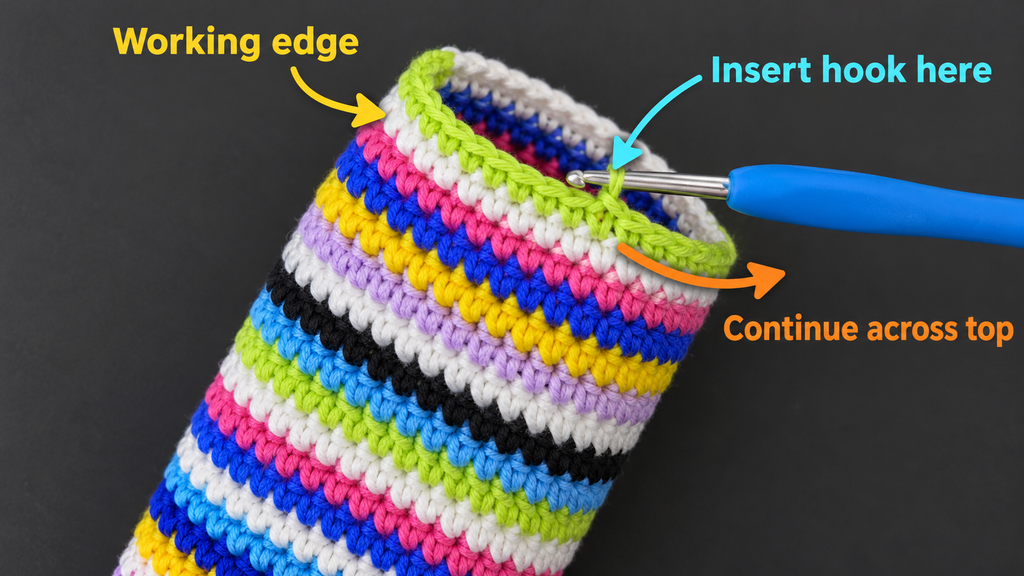
Step 8: Add a Neat and Strong Top Border
The upper opening receives more handling than most other parts of the bag.
Each time you reach inside, carry the bag or remove something, the top edge moves and stretches.
A simple border helps make it more stable.
For this tutorial, use dark sage green yarn to create a coordinated finish.
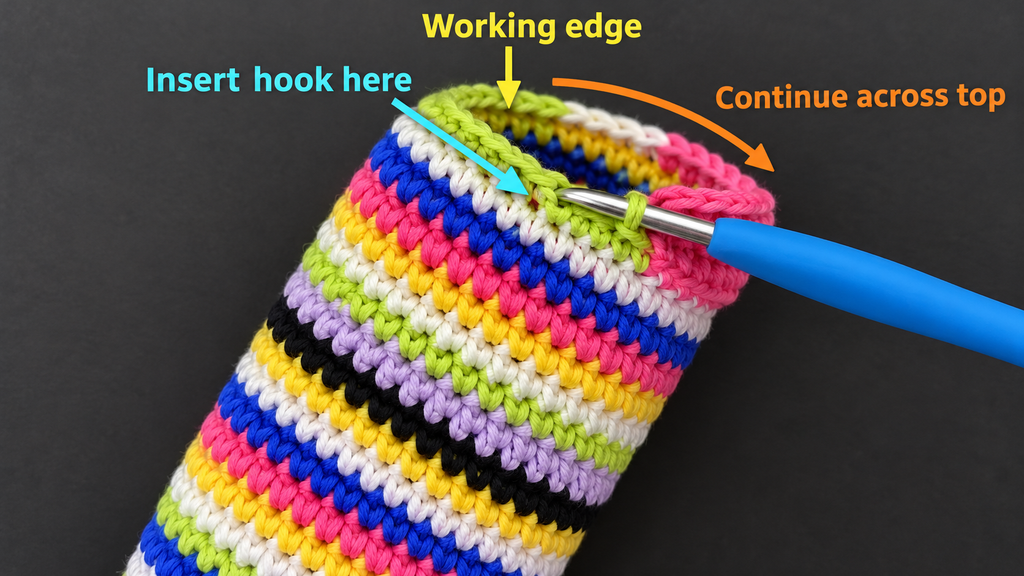
Join the new color near the back or side of the opening.
Border Round 1: Work 1 sc into each of the 62 stitches. (62 sc)
Border Round 2: Work 1 sc into each stitch again. (62 sc)
These two rounds create a firmer border.
After completing the final stitch, make one slip stitch into the next stitch to smooth the transition, then cut the yarn and fasten off.
Leave a tail long enough to weave in securely.
Do not pull the final loop too tightly. The border should feel firm but should not gather the opening.
If you want a thicker upper edge, you can add another single crochet round.
For a small bag, however, two rounds are usually a good starting point.
Beginner tip: Crochet the edging in one consistent color. A solid border gives the colorful body a more intentional appearance.
Common mistake to avoid: A tight upper border may make the opening narrower than the bag body. Relax your tension if this happens.
Step 9: Crochet and Attach the Shoulder Strap
A crocheted strap makes the bag feel complete and means you do not need to buy additional handles.
For this design, make one long strap in dark sage green.
The strap is worked separately in rows and sewn securely to opposite sides of the upper opening.
Crochet the strap
Chain 181.
This creates a long foundation suitable for a shoulder or crossbody-style strap, depending on your gauge and preferred fit.
Row 1: Work 1 sc in the second chain from the hook and in each remaining chain. (180 sc)
Rows 2–4: Ch 1, turn, work 1 sc in each stitch across. (180 sc)
After row 4, fasten off, leaving a long tail for attaching the strap.
The result should be a narrow crocheted band.
If the strap twists, lay it flat and smooth it gently before sewing.
You can make it wider by working additional rows, or shorter by reducing the initial chain count.
Measure the completed strap before attaching it. If the length is unsuitable, adjust it now rather than after sewing it in place.
Attach the strap
Turn the bag so that you can see its inside.
Flatten the bag gently, with the two long sides of the oval base aligned front and back. Identify the left and right side edges of the opening.
Position one strap end approximately 1–1.5 inches (2.5–4 cm) below the top border on the inside of one side.
Using a tapestry needle and matching yarn, stitch the strap firmly in place.
A small rectangle of sewing stitches, reinforced with diagonal stitches, helps spread the stress across the fabric.
Repeat at the opposite side.
Make sure the strap is not twisted before securing the second end.
Give the attachments several gentle test pulls to check that the stitching is secure.
Beginner tip: Mark both attachment points before sewing. This makes it easier to keep the strap balanced.
Common mistake to avoid: Do not attach the strap using only one or two loose stitches. The shoulder strap carries the weight of everything inside the bag and needs a secure connection.
Pattern Notes or Stitch Notes
Turning chain rules
The bag body is crocheted continuously in a spiral, so no turning chain is used for the body rounds.
When making the separate strap, chain one at the end of each row before turning.
This turning chain does not count as a stitch.
Stitch count
The main bag body has 62 single crochet stitches per round.
Keep this count unchanged from the first full round through the upper border.
If you discover 61 or 63 stitches, locate the mistake before continuing.
Repeat pattern
The body repeat is simple:
Work one single crochet into every stitch around.
There are no complex stitch multiples to remember.
Right side and wrong side
The bag is worked with its right side facing outward, while the spiral rounds build the walls.
When securing yarn ends, turn the bag inside out temporarily so you can weave the tails through stitches on the wrong side.
Color transitions
Because the main body is worked continuously, a new color may begin slightly higher than the previous stripe.
If you want perfectly level stripes, you can experiment with joining rounds at each color change. This changes the working method, so it is best treated as a separate variation rather than switching techniques midway without planning.
Size adjustments
The easiest size changes are to add or remove rounds for height.
For a wider bag, begin with a longer foundation chain and recalculate the stitch count. Maintain that new count for all body rounds.
For a deeper base, the oval requires additional increases distributed evenly at the rounded ends before you stop increasing. Do not simply add several plain rounds and expect the bottom to become wider and remain flat.
For a larger tote, you may also need a wider strap, a stronger upper edge and a lining.
Common Beginner Mistakes and How to Fix Them
1. The bag base is twisting
A twisted foundation chain can create an uneven base that never seems to sit properly.
Fix: Before completing the first round, flatten the chain and check that both sides lie in the correct orientation. If the foundation is badly twisted, unravel it and restart.
2. The bag sides are getting wider
This usually happens when you accidentally increase by working two stitches into one place.
Fix: Count the stitches around the opening. You should have 62. If you have more, find the extra stitches and correct them.
3. There are gaps between the stitches
Large gaps may indicate that the hook is too big for the yarn or that your tension is too loose.
Fix: Try a smaller hook or make a test sample using a firmer single crochet tension. Remember that crochet fabric has some natural openings, so a lining may still be useful for carrying small objects.
4. One yarn color looks thicker than the others
Scrap yarn often comes from different brands. Even yarns labeled with the same weight category can have noticeable differences in thickness.
Fix: Compare the yarns before using them together. Keep similar yarn weights for the body and use particularly thin leftovers for smaller decorative sections or a different project.
5. The yarn tails keep coming loose
Short tails or poorly secured color changes can work their way out during use.
Fix: Leave generous tails. Weave each one through several stitches on the wrong side, change direction and weave back through another section before trimming.
6. The bag is curling inward
This can happen when the working tension becomes tighter, particularly after switching to a different brand of cotton yarn.
Fix: Relax your tension and compare the current stitches with those below. If necessary, adjust the hook size while maintaining the original stitch count.
7. The strap stretches too much
A very long or loosely crocheted strap can become longer when the bag is filled.
Fix: Make the strap with firm stitches, check its length under gentle tension and consider adding a nonstretch fabric backing. Reinforce the sewn attachments.
8. The color changes look messy
Loose yarn tails and knots at random points can make an otherwise tidy bag look unfinished.
Fix: Change colors at a consistent location, avoid oversized knots and weave the ends neatly into the inside of the fabric.
How to Customize This Crochet Project
Try a different yarn palette
The original color combination is soft and earthy, but the same pattern works with many palettes.
For autumn, use burnt orange, mustard yellow, dark brown and cream.
For spring, try pale pink, lavender, mint green and light blue.
For a more modern look, combine black, white, beige and gray.
You can also use only two colors and alternate them in narrow stripes.
Make a mini scrap yarn bag
Use a shorter starting chain and fewer body rounds.
Keep the same basic oval-base technique, but calculate a new stitch count for the smaller foundation.
A mini version can be useful for holding hair accessories, a small notebook or crochet notions.
Make a larger everyday tote
Use a longer foundation chain and add more rounds until the body reaches your preferred height.
For a shopping tote, consider adding depth to the oval base with controlled increases.
Also reinforce the strap and use a fabric lining if the bag will carry heavier objects.
Add a contrasting border
Instead of dark sage, finish your upper edge in cream, black or a shade that appears only once in the body.
This ties the color palette together and helps the finished project look planned rather than random.
Add texture
Once you are comfortable with the basic pattern, experiment with different stitches.
You could use half double crochet for some body sections, or add occasional single crochet rounds worked in the back loop to create subtle ridges.
Remember that different stitch heights may affect the shape and density of the bag.
Add a lining
A simple cotton lining can make the bag more practical.
Cut fabric slightly larger than the interior measurements, allowing for seam allowances.
Sew it into a pouch, place it inside the crochet bag and hand-stitch the top edge neatly beneath the crocheted border.
The lining should fit naturally without pulling the outer fabric into an unusual shape.
Handmade gift ideas
This colorful bag makes a thoughtful gift for someone who loves small handmade accessories.
You could pair it with a matching crochet keychain, a small coin purse or a handmade cotton pouch.
For a gift, include a simple care note so the recipient knows how to clean and dry the bag safely.
Finishing Instructions
Once the strap is attached, take a few minutes to finish the bag carefully.
The last details can make a noticeable difference in how sturdy and polished the final project feels.
Fastening off
Check that every yarn color has been fastened off securely.
Cut the working yarn with enough length to weave into the fabric.
Pull the yarn tail through the final loop and tighten gently.
Weaving in the ends
Turn the bag inside out.
Thread a yarn tail onto the tapestry needle and pass it through the back of several nearby stitches.
Change direction and weave through another small section to help secure the tail.
Avoid pulling the yarn so tightly that the fabric gathers.
Repeat for each color change.
When all ends are secure, trim the excess yarn close to the fabric without cutting the actual stitches.
Shaping the bag
Turn the bag right side out.
Gently press the base into an oval shape with your hands.
Smooth the side walls upward and check that the upper border lies evenly.
If the bag looks a little uneven, you may lightly dampen it and reshape it while drying.
Avoid aggressive stretching, especially around the strap attachments.
Blocking
Blocking is optional.
If you choose to block the bag, lightly dampen the crochet fabric and arrange it in the desired shape.
Place a clean towel or suitable support inside if necessary to maintain the body shape while drying.
Allow it to dry completely before use.
Washing and caring for your crochet bag
Always check the care instructions for every yarn used.
When combining yarns with different care requirements, follow the most delicate instructions.
For mixed scraps with unknown care instructions, gentle hand washing in cool water is a cautious option.
Avoid wringing the bag tightly. Instead, gently squeeze away moisture with a towel and lay the bag flat to dry.
Do not hang a wet cotton bag by its strap, because the weight of the water can stretch the strap and upper opening.
Final inspection
Before using the bag, inspect the strap attachment points, any visible joins and the top edge.
Check that no yarn tails are coming loose.
Test the bag first with lightweight items. Crochet bags can stretch, and this pattern has not been load-tested for heavy groceries, laptops or similarly heavy belongings.
If you plan to use it frequently, a lining and a reinforced strap can help improve its durability.
Quick Printable-Style Summary
Crochet Scrap Yarn Shoulder Bag
Original beginner pattern · US terminologySkill level
BeginnerEstimated time
5–8 hoursYarn
DK cotton scrapsHook
4.0 mm
Bag construction
- Ch 31.
- First oval round: 62 sc around both sides of the starting chain.
- Round 2: 1 sc i
- n each st (62 sc).
- Rounds 3–36: Continue 1 sc in each st, changing colors as desired (62 sc per round).
- Border: Two rounds of 62 sc.
- Finish with a slip stitch and fasten off.
Shoulder strap
- Ch 181.
- Row 1: Sc in second ch and across (180 sc).
- Rows 2–4: Ch 1, turn, sc across (180 sc).
- Fasten off, measure and sew to opposite sides of the opening.
Finishing: Weave in all yarn ends, check attachments, shape and dry flat if damp. Copy Quick Pattern
Frequently Asked Questions
1. Can I crochet a scrap yarn bag as a complete beginner?
Yes. This pattern mainly uses chains and single crochet stitches, making it approachable for someone who has learned the basics.
The oval base may take a little practice, but once you understand how to crochet around a foundation chain, the remaining body is repetitive and straightforward.
If you are new to working in rounds, stitch markers will be especially helpful.
2. What is the best yarn for a crochet scrap yarn bag?
Cotton yarn in DK or light worsted weight is a practical choice.
Cotton shows stitch definition clearly and creates a pleasant handmade texture. However, it can stretch under weight, so tight stitches and a strong strap are important.
You can also use acrylic yarn, though its flexibility and stretch may differ.
For best results, use scraps of a similar thickness.
3. How much leftover yarn do I need?
For this small shoulder bag, approximately 180–240 yards of DK cotton is a reasonable starting estimate, including the strap.
Actual consumption depends on your gauge, bag dimensions and strap length.
If you only have very small scraps, use them for the stripes and reserve a larger matching leftover skein for the strap and border.
4. Can I make this crochet bag without changing colors?
Absolutely.
Although this project is designed for leftover yarn, it works just as well in one solid color.
A single-color version is particularly useful if you want to focus on learning the construction rather than managing yarn changes.
You can always add a colorful strap or contrasting border later.
5. How can I stop my crochet bag from stretching?
Use relatively firm stitches and avoid a hook that produces very open fabric.
Reinforce the strap attachments and consider adding a nonstretch lining or backing to the strap.
Do not overload the bag. Cotton crochet fabric naturally changes shape under prolonged weight.
6. Can I turn this into a crochet market bag?
Yes, but you will need to adjust the dimensions and structure.
Make the foundation longer, increase the base depth as appropriate, and work more body rounds.
For a market bag that will carry groceries, consider a more substantial strap and a reinforced interior. This small shoulder-bag version is primarily intended for lightweight personal items.
7. What can I do with very short pieces of scrap yarn?
Short scraps are useful for narrow stripes, small decorative details or coordinating crochet accessories.
For the main bag, it is usually easier to work with lengths that allow at least part of a round before another color change.
When using short yarn pieces, leave enough tail length to weave in each join securely. Avoid tying many bulky knots into the fabric.
Conclusion
A colorful crochet bag is one of those projects that makes you look at leftover yarn differently.
Instead of seeing a collection of tiny balls that are too small for a blanket or sweater, you begin to see stripes, textures and interesting color combinations waiting to become something useful.
This easy crochet scrap yarn bag pattern is designed to make that process simple. The stitches are beginner-friendly, the colors are flexible, and the finished project can be adjusted to suit your style.
Once you have made your first bag, try a different yarn palette or experiment with a larger version. You may find that your next favorite crochet project is already waiting in your scrap yarn basket.
Save this tutorial to your crochet Pinterest board so you can return to it the next time your leftover yarn collection starts growing.





