A black lace doily can change the feeling of an entire tabletop. Place one beneath a candleholder, a small vase, or a collection of vintage books, and an ordinary surface takes on a wonderfully gothic character.
The best part? You don’t need to be an expert at crochet lace to make one.
This crochet gothic doily pattern combines a simple circular center with open chain spaces, eight repeating sections, and tiny decorative picot points. The result is a delicate spiderweb-inspired crochet doily that looks intricate without requiring dozens of complicated stitches.
This tutorial walks you through every stage, from creating the center ring to blocking the finished lace. You’ll also learn how to count your stitches, keep your circle flat, avoid uneven loops, and customize the size and color of your project.
The original design uses smooth black cotton yarn, which gives the doily a dramatic but elegant finish. Burgundy, deep purple, dark gray, and antique ivory are also beautiful choices.
You can use your finished doily as gothic table decoration, seasonal Halloween decor, or a handmade accent for a vintage-inspired room.
What You’ll Learn
By the end of this tutorial, you’ll know how to:
- Crochet a small circular foundation using a magic ring.
- Make eight evenly spaced double crochet spokes.
- Create decorative lace openings using chain stitches.
- Follow consistent stitch counts in joined rounds.
- Build wider openwork without losing the circular shape.
- Finish an ornamental border with simple picot stitches.
- Weave in yarn ends and block delicate cotton lace.
- Customize the finished doily for different decor styles.
This is a good project for a confident beginner who already knows how to chain, single crochet, and double crochet. If those stitches are new to you, practice them on a small swatch before beginning.
Materials You’ll Need
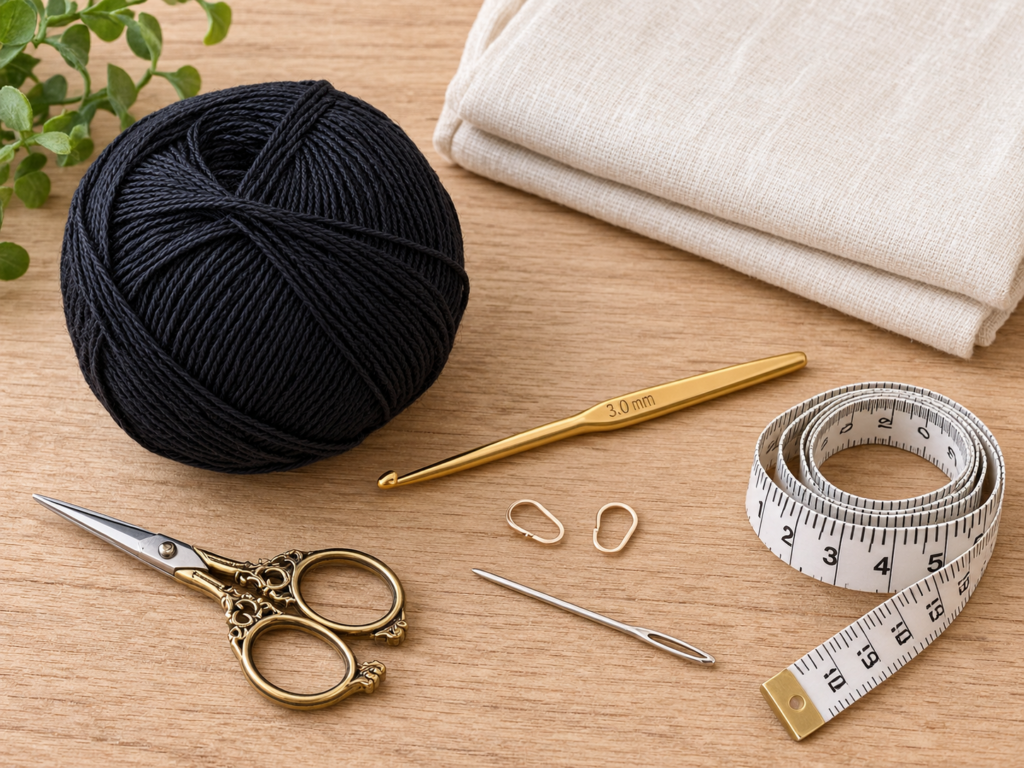
You don’t need many supplies for this pattern. Smooth cotton yarn and a correctly sized hook are the most important choices.
| Material | Recommendation |
|---|---|
| Yarn | Approximately 40–70 g of sport-weight cotton yarn, allowing extra for swatching |
| Yarn color | Charcoal black |
| Crochet hook | 3.0 mm |
| Scissors | Small sharp craft scissors |
| Yarn needle | Blunt-tip tapestry needle |
| Stitch markers | 1–2 removable markers |
| Measuring tape | For checking the finished diameter |
| Blocking supplies | Rustproof pins and a foam blocking mat |
| Optional | Spray bottle or clean towel for blocking |
Smooth cotton is useful for decorative crochet because its stitches remain well-defined. It also responds nicely to blocking, which helps open up the lace and improve the finished shape.
Avoid very fuzzy yarn for your first attempt. Dark yarn already makes individual stitches slightly more difficult to see, and a fuzzy texture can make counting more challenging.
If your workspace has limited lighting, use a bright lamp while crocheting black yarn.
Crochet Abbreviations Used
This tutorial uses US crochet terminology.
| Abbreviation | Meaning |
|---|---|
| ch | Chain |
| sc | Single crochet |
| dc | Double crochet |
| sl st | Slip stitch |
| st / sts | Stitch / stitches |
| sp | Space |
| rep | Repeat |
| picot | Small decorative point made with chains and a joining stitch |
| MR | Magic ring |
In UK terminology, the US single crochet is called a double crochet, and the US double crochet is called a treble crochet.
How to make the main stitches
Chain stitch (ch): Yarn over and pull the yarn through the loop already on your hook.
Single crochet (sc): Insert the hook into the indicated stitch or space, yarn over and pull up a loop, then yarn over and pull through both loops.
Double crochet (dc): Yarn over, insert your hook, yarn over and pull up a loop. Yarn over and pull through two loops, then yarn over and pull through the remaining two loops.
Slip stitch (sl st): Insert the hook into the indicated stitch, yarn over, and pull the yarn through both the stitch and the loop on your hook.
Three-chain picot: Chain three, then slip stitch into the first of those three chains to create a small pointed loop.
These are the only stitch techniques required for the original doily design.
Before You Start
A little preparation will make this lace project much easier.
Understanding the construction
The doily is worked from the center outward in joined rounds.
The first round forms eight small spokes. The second round introduces chain arches, and the following rounds use taller anchor stitches and progressively longer chains.
The final round adds a neat border decorated with eight small picot points.
The pattern has seven rounds in total.
Unlike a solid crochet circle, this design contains generous open spaces. That is intentional: the empty spaces create the spiderweb-inspired gothic appearance.
Gauge and tension
Exact gauge is less important for decorative doilies than for fitted garments.
However, your tension should remain consistent. If some chain spaces are loose while others are tight, the doily may become uneven.
For a beginner, the most important goal is to create arches of approximately equal length within each round.
Work a few practice chains before starting. Try holding the hook and working yarn comfortably without pulling the stitches tight.
How to count the pattern
Every round contains eight repeated sections.
Count the eight anchor points first, then check that every space between them contains the correct number of chains.
For example, in a round with seven-chain spaces, you should have eight separate chain-seven arches.
If you count nine arches, you have probably worked into an extra stitch or accidentally repeated one section.
How to avoid curling
The doily should form an open circular shape. It may look slightly soft or uneven before blocking, but it should not develop severe puckering.
If it pulls inward, check your chain counts and try slightly relaxing your tension.
If the edges look extremely loose, review whether you have accidentally added extra chains.
Blocking will improve the final presentation, but it cannot reliably correct a major counting error.
Working with black yarn
Black yarn is excellent for gothic decor, but it can be difficult to photograph and crochet.
A pale working surface provides contrast. Keep the yarn positioned beneath a lamp or natural window light, and pause to count after each round.
For your very first sample, you can practice the same design in light gray before making the final black version.
Step-by-Step Crochet Gothic Doily Tutorial
The following is an original seven-round pattern using eight repeated sections and a decorative picot edging.
Read through the complete instructions once before beginning. Because this is an open lace design, where you insert your hook matters just as much as the number of chains you make.
Step 1: Make the Magic Ring
Begin by leaving a yarn tail approximately 6 inches long.
Wrap the working yarn into an adjustable loop, keeping the yarn tail behind the loop.
Insert your 3.0 mm hook into the loop, yarn over, and pull up a loop.
Make one chain to secure the magic ring.
Do not pull the center closed yet. You need enough room to work the first round of double crochet stitches.
If you find the magic ring difficult, you can use an alternative foundation: chain four and join with a slip stitch to form a small ring.
The rest of the pattern can be worked into that center opening.
Beginner tip: Keep the starting loop large enough to see clearly. A cramped center makes it difficult to insert your hook.
Common mistake to avoid: Don’t tighten the ring before completing the first round.
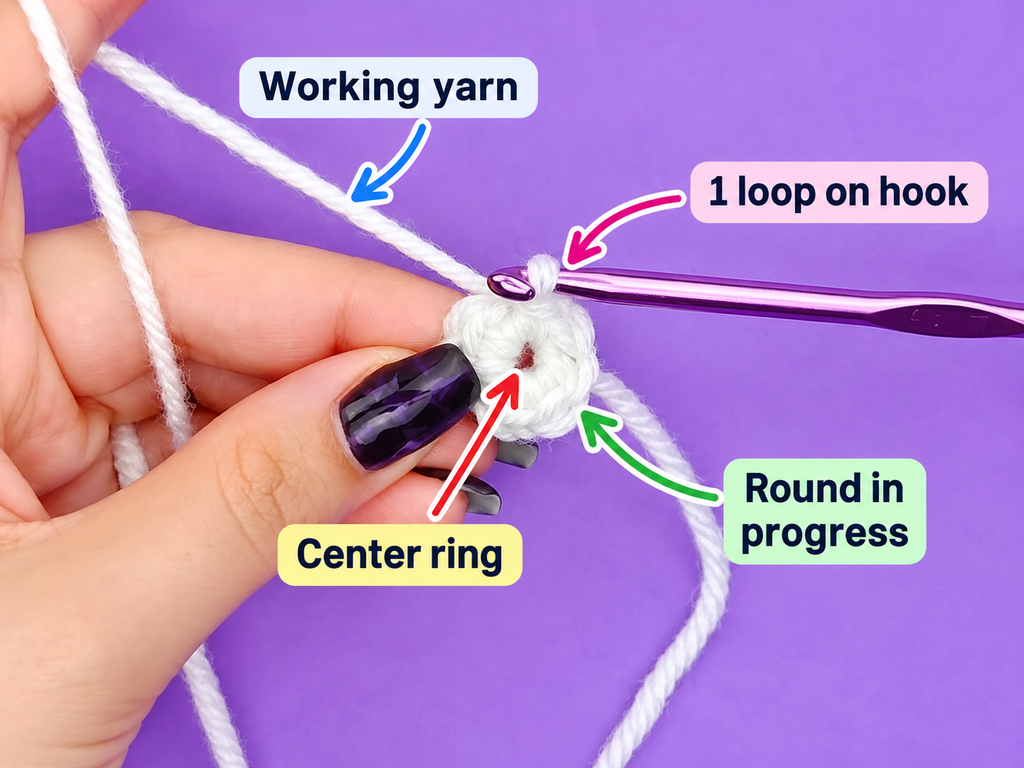
Step 2: Crochet Eight Spokes Around the Center — Round 1
Now you’ll build the central wheel of the doily.
These stitches are the foundation for all eight lace sections.
Round 1 instructions:
- Chain three. This counts as your first double crochet.
- Chain one.
- Work one double crochet into the magic ring.
- Chain one.
- Repeat the sequence of one double crochet followed by one chain until you have eight double-crochet spokes in total, counting the beginning chain three as the first spoke.
- Finish with the final chain one.
- Pull the magic ring tail gently to close the center.
- Slip stitch into the top of the beginning chain three.
Round 1 stitch count: Eight double-crochet spokes and eight chain-one spaces.
Your work should look like a tiny wheel. The short chains separate the eight spokes and create the gaps you’ll use in Round 2.
Count carefully before moving forward. If you have only seven spokes, the next rounds will not have enough repeating sections.
Beginner tip: Put a stitch marker into the top of the beginning chain three so you can recognize where the round ends.
Common mistake to avoid: Don’t count the chain-one gaps as additional double crochets. They are separate spaces.
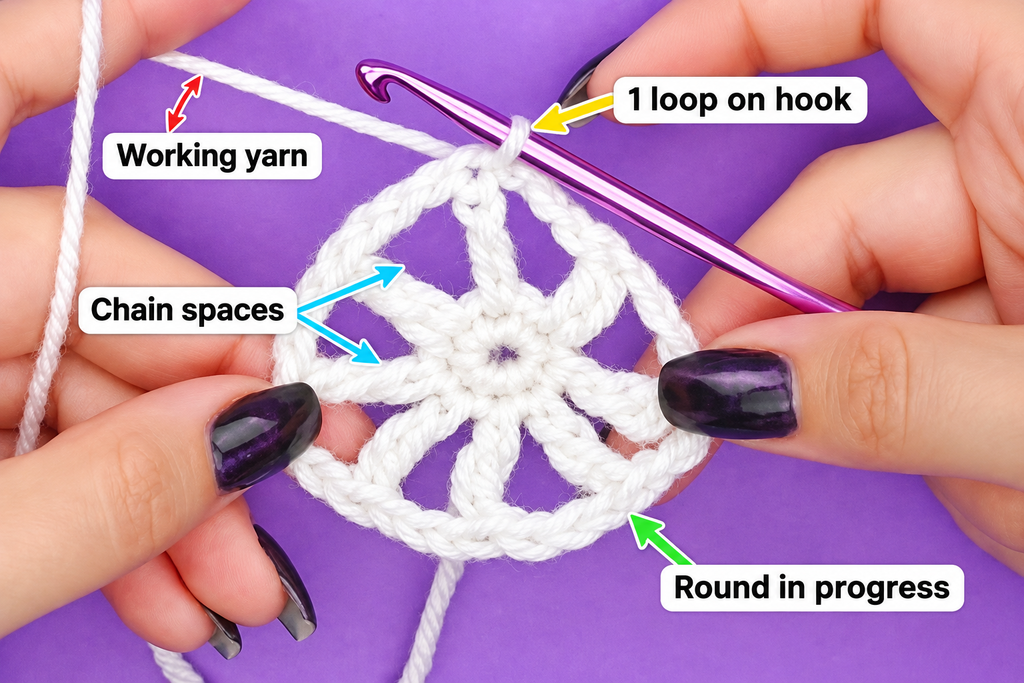
Step 3: Make the First Lace Arches — Round 2
This round changes the small crochet wheel into the beginning of a lace doily.
Instead of making solid stitches across every section, you will create open arches using chains.
Round 2 instructions:
- Slip stitch into the next chain-one space.
- Chain one. This does not count as a stitch.
- Work one single crochet into that same chain-one space.
- Chain four.
- Work one single crochet into the next chain-one space.
- Chain four again.
- Continue working one single crochet into each following chain-one space, followed by four chains.
- After working into all eight spaces, finish with the eighth chain-four arch.
- Slip stitch into the first single crochet to close the round.
Round 2 stitch count: Eight single crochet anchors and eight chain-four arches.
Your doily should now have a delicate circular ring of loops around its center.
Don’t worry if the arches look slightly irregular. They’re flexible and will become easier to position as you work additional rounds.
Beginner tip: Count each chain-four group as soon as you finish it. Four chains should be long enough to create a visible opening without turning into a large floppy loop.
Common mistake to avoid: Work the single crochet stitches into the chain-one spaces, not into the double crochet spokes from Round 1.
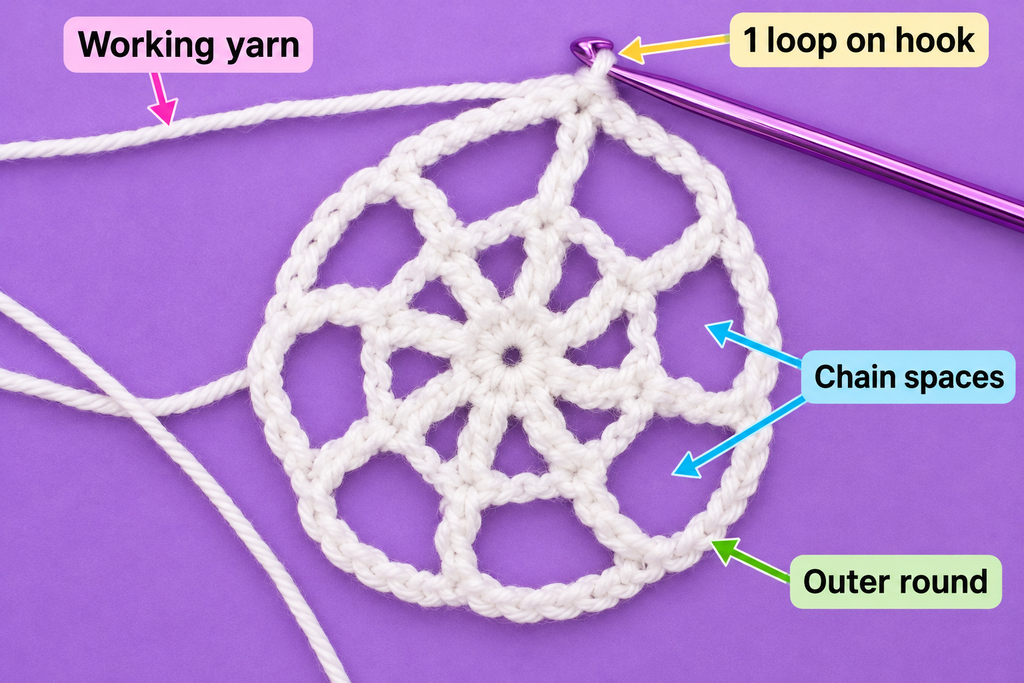
Step 4: Build the Tall Lace Framework — Round 3
Now you’ll replace the shorter single crochet anchors with double crochet stitches.
This adds height and creates a stronger lace framework for the remaining rounds.
Round 3 instructions:
- With the hook positioned at the first single crochet from Round 2, chain three. This counts as your first double crochet.
- Chain five.
- Work one double crochet into the next single crochet.
- Chain five.
- Repeat this sequence around, working one double crochet into each single crochet anchor and chaining five between each pair.
- After the eighth five-chain space, slip stitch into the top of the beginning chain three.
Round 3 stitch count: Eight double crochet stitches and eight chain-five spaces.
The double crochet stitches form extensions of your central spokes.
Pay close attention to the anchor positions. Each double crochet should sit above a single crochet from the previous round.
When finished, lay your doily flat and check the eight sections.
Beginner tip: Spread the chains gently with your fingers to see where each opening begins and ends.
Common mistake to avoid: Don’t work into the middle of a chain-four arch. For this round, insert the hook into the single crochet anchor stitches.
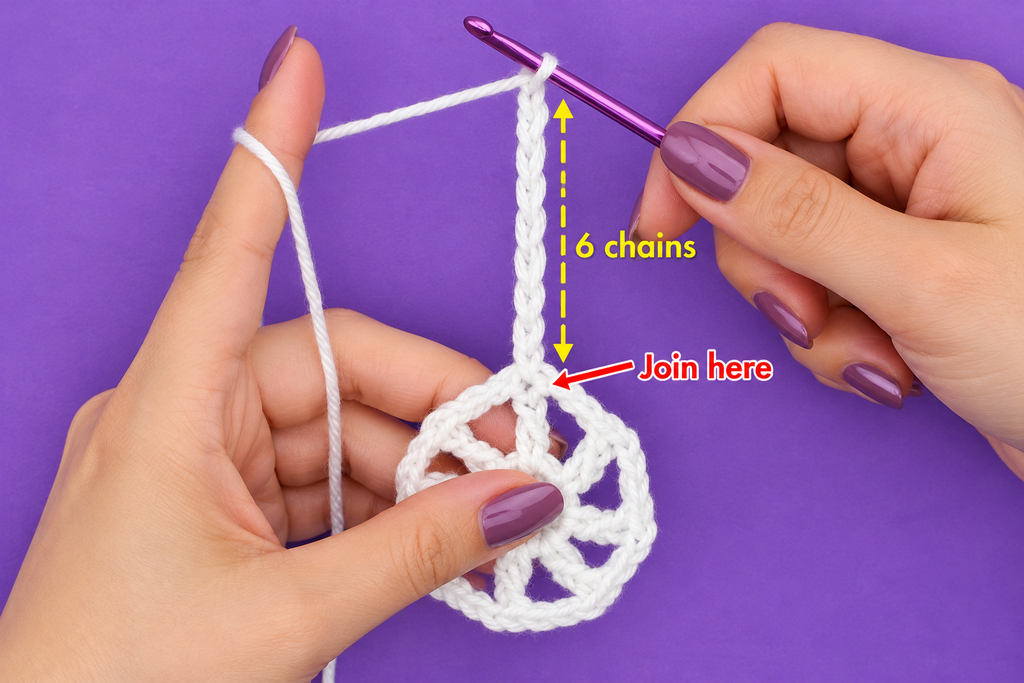
Step 5: Extend the Openwork — Round 4
In this round, the lace starts looking more like a spiderweb.
The chain spaces become longer, while the eight anchor positions remain unchanged.
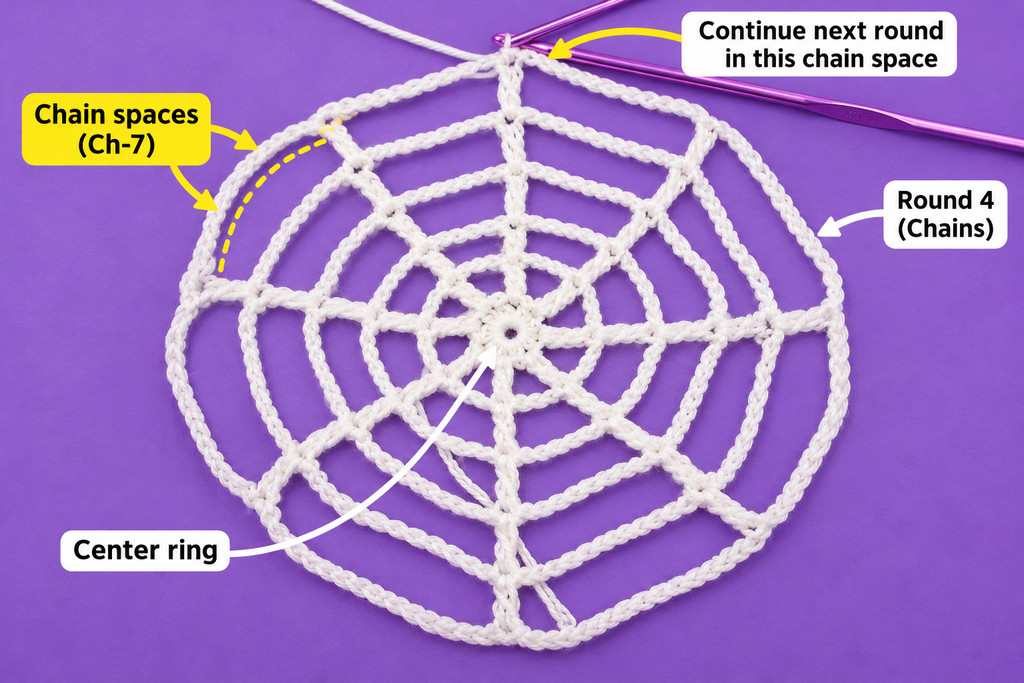
Round 4 instructions:
- Chain three at the beginning of the round. It counts as your first double crochet.
- Chain seven.
- Work one double crochet into the next double crochet from Round 3.
- Chain seven again.
- Repeat the double-crochet and chain-seven sequence around.
- After the eighth chain-seven arch, join to the top of the beginning chain three with a slip stitch.
Round 4 stitch count: Eight double crochet stitches and eight chain-seven spaces.
You should see four concentric rounds when looking at the project from above.
The spaces between the anchor stitches are now noticeably larger.
Because the arches contain more chain stitches, the doily may appear loose when you lift it off the table. This is normal for an open lace motif.
Beginner tip: Work slowly through the first two repeats. Once you’re comfortable with the seven-chain count, the rest of the round becomes repetitive.
Common mistake to avoid: Don’t insert your hook into the chain-five spaces. Continue working into the double crochet spokes.
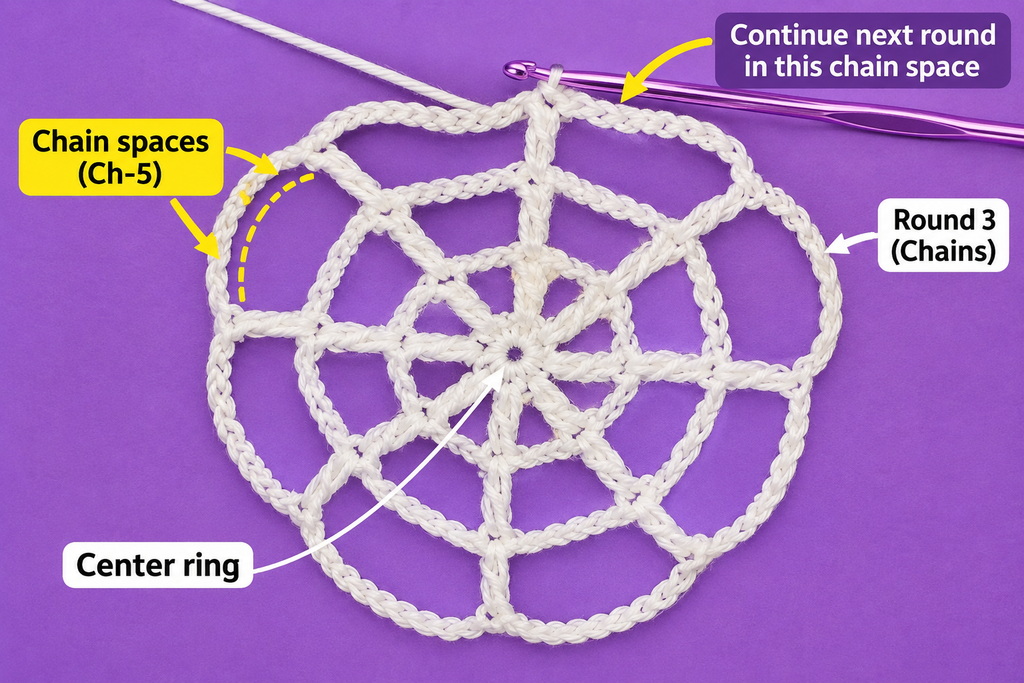
Step 6: Create Larger Spiderweb Openings — Round 5
The fifth round follows the same general movement as the previous round, making it a good opportunity to improve your chain tension.
This time, you’ll work nine chains between the double crochet spokes.
Round 5 instructions:
- Chain three to form the first double crochet.
- Chain nine.
- Work one double crochet into the next double crochet from Round 4.
- Chain nine.
- Repeat around, placing one double crochet into each following double crochet and chaining nine between them.
- Finish the eighth chain-nine space.
- Slip stitch into the top of the beginning chain three.
Round 5 stitch count: Eight double crochet stitches and eight chain-nine spaces.
Your doily should now have a clear openwork pattern.
Notice how the repeating chain arches create larger lace windows toward the outer edge. This is the feature that gives the project its spiderweb character.
For a dramatic gothic look, you want these openings to remain visible, so avoid pulling the chains too tightly.
If the outer arches are uneven, gently arrange them with your fingertips and inspect the stitch counts before beginning Round 6.
Beginner tip: If you tend to crochet tightly, loosen your grip on the working yarn slightly while making longer chains.
Common mistake to avoid: Do not increase the number of spokes. You are enlarging the chain spaces, not adding new double crochet anchors.
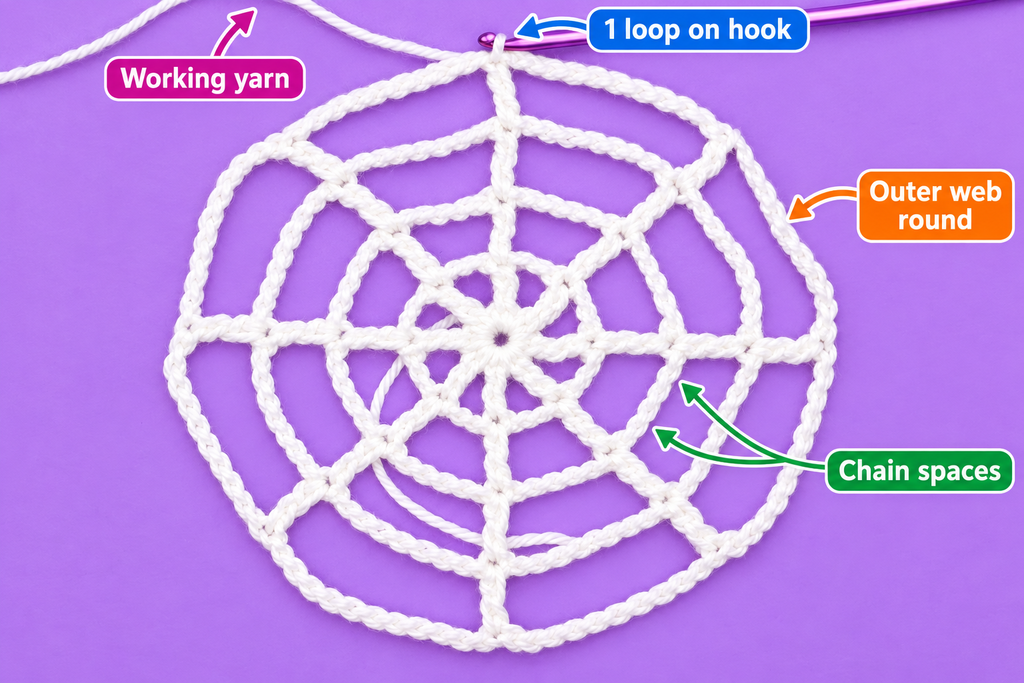
Step 7: Finish the Outer Lace Ring — Round 6
Round 6 creates the final large openwork ring before you add the decorative border.
This round uses eleven-chain arches.
Round 6 instructions:
- Chain three to begin the round.
- Chain eleven.
- Work one double crochet into the next double crochet from Round 5.
- Chain eleven.
- Repeat this sequence around all eight spoke positions.
- After the final chain-eleven arch, join with a slip stitch into the top of the beginning chain three.
Round 6 stitch count: Eight double crochet stitches and eight chain-eleven arches.
Lay the doily on a flat surface.
Check that all eight openings contain eleven chains and that each double crochet lines up with the spoke beneath it.
At this stage, the outer edge will still look unfinished. That’s exactly what you should expect.
The next round turns the open chain framework into a more defined ornamental doily.
Beginner tip: Before starting the border, check every large arch individually. This is the easiest moment to correct a missing chain.
Common mistake to avoid: Don’t mistake the beginning chain three for an extra ninth spoke. It replaces the first double crochet.
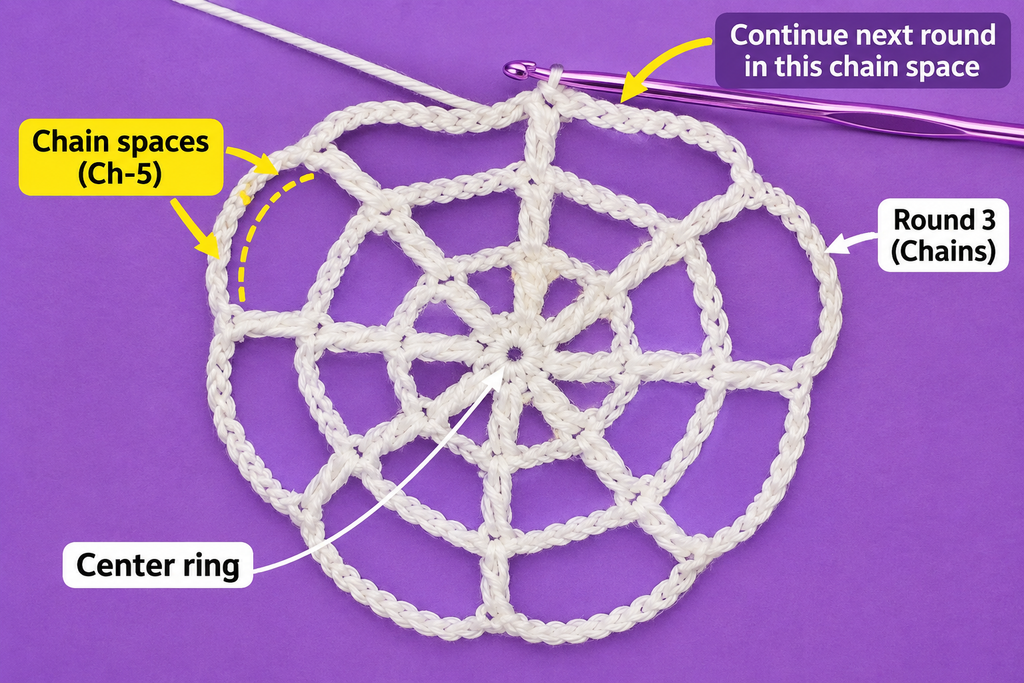
Step 8: Add the Decorative Picot Border — Round 7
This is the finishing round that gives the doily a more ornamental appearance.
Instead of leaving the chain arches completely open, you’ll work single crochets over each arch and add a tiny picot point near its center.
A picot is a small loop made from chains. It adds an attractive lace detail without requiring a difficult stitch.
Round 7 instructions
At the joined beginning double crochet from Round 6:
- Chain one. This does not count as a stitch.
- Work one single crochet into the same double crochet.
- Move to the next chain-eleven arch.
- Work six single crochets around that chain space.
- Chain three.
- Slip stitch into the first chain of those three chains. You’ve created one picot.
- Work five more single crochets into the same chain-eleven arch.
- Work one single crochet into the next double crochet spoke.
- Repeat Steps 3–8 for the remaining arches, working one picot per arch. On the final arch, omit the last single crochet into the first spoke because that spoke was already worked at the start of the round.
- Slip stitch into the first single crochet to join.
Round 7 stitch count: Eight single-crochet spoke anchors, 88 single crochets across the eight arches, and eight picots — 96 single crochets in total, excluding the picot chains and slip stitches.
The final result should have a continuous outer edge with eight small pointed decorations.
When working into a chain-eleven arch, insert your hook underneath the chain rather than trying to make a stitch into each individual chain.
This allows you to distribute the single crochets along the arch more comfortably.
Beginner tip: After finishing the first arch, stop and look at the shape. You should have six single crochets, one picot, and five single crochets inside that arch.
Common mistake to avoid: Don’t accidentally work the picot as an ordinary chain-three space. The slip stitch into the first picot chain is what closes the little point.
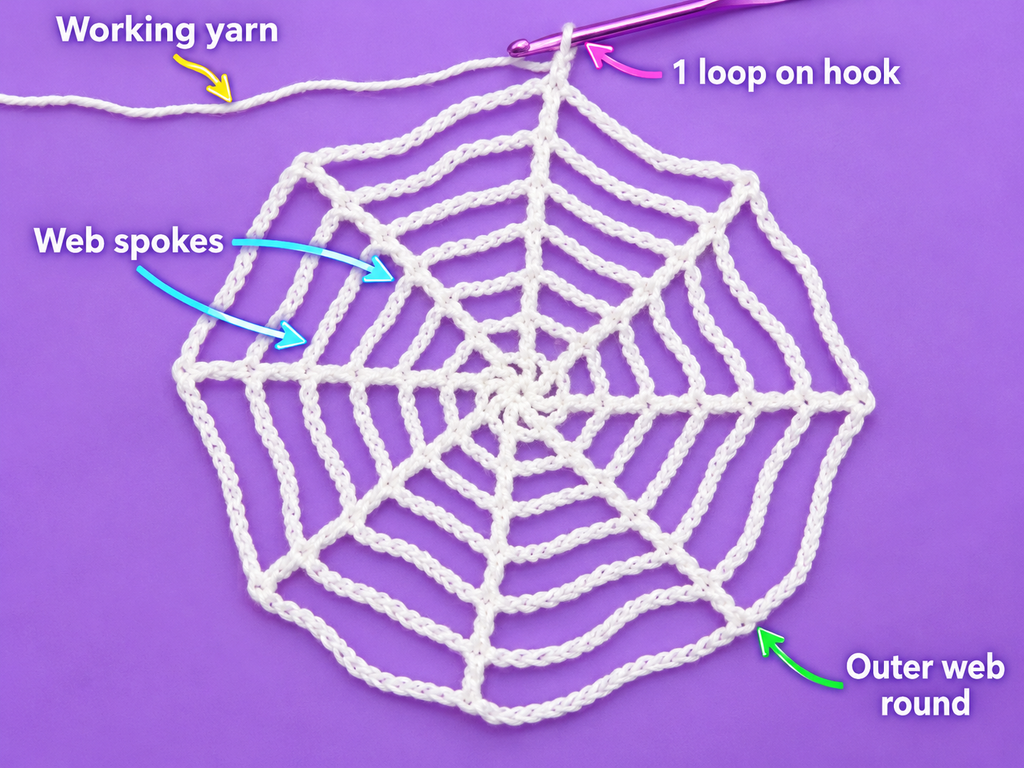
Once the edging is complete, the last round should frame the open lace without closing the spiderweb openings.
The finished shape may look a little uneven at first. Give it a gentle stretch with your fingers to distribute the arches and picots.
Blocking will provide the final adjustment.
Pattern Notes and Stitch Counts
This pattern is built around eight repeating sections. Keeping that number consistent is essential.
| Round | Anchor stitches | Chain spaces | Extra details |
|---|---|---|---|
| 1 | 8 dc | 8 × ch 1 | Center wheel |
| 2 | 8 sc | 8 × ch 4 | First lace arches |
| 3 | 8 dc | 8 × ch 5 | Tall lace framework |
| 4 | 8 dc | 8 × ch 7 | Expanding lace |
| 5 | 8 dc | 8 × ch 9 | Wider openings |
| 6 | 8 dc | 8 × ch 11 | Final openwork ring |
| 7 | 96 sc | 8 picots | Ornamental edge |
Turning chains and joining rounds
This project is worked in joined rounds, not turned rows.
Beginning in Round 3, the chain three counts as the first double crochet. Don’t place another double crochet into that same starting stitch.
Join each double crochet round into the top of the beginning chain three.
Rounds 2 and 7 begin with a chain one that does not count as a stitch.
Right side and wrong side
The front-facing side can be treated as the right side of the doily.
Since you don’t turn the work, the same side remains facing you throughout the project.
However, the finished piece can be displayed with either side facing upward, depending on which appearance you prefer.
Changing the doily size
For the most predictable result, adjust the yarn thickness and hook size rather than changing the number of rounds.
A finer thread and smaller hook will create a delicate miniature doily. A thicker cotton yarn and larger hook will create a more substantial decorative piece.
If you want to increase the diameter by adding rounds, you’ll need to adjust the chain lengths and border placement. That is a design modification rather than a guaranteed extension of this seven-round pattern.
Test your tension
This new pattern is intended as an original beginner design and has not been physically sample-crocheted in this response. The stated diameter and yarn quantity are estimates.
For publication, work a physical sample to confirm the finished size, border tension, and flatness. In particular, test whether eleven single crochets distributed along each outer arch produce the desired edge with your chosen cotton.
Common Beginner Mistakes and How to Fix Them
Even simple lace projects can become frustrating when one small counting mistake affects several rounds.
Here are the most common problems and how to handle them.
1. The center hole is too large
Why it happens: The magic ring wasn’t pulled tightly enough, or the tail loosened while you continued crocheting.
How to fix it: Gently pull the starting tail to tighten the center before weaving it in securely. If you used a chain-four foundation ring, a small fixed center opening is expected.
2. The doily has an extra spoke
Why it happens: You may have counted the beginning chain three as a regular stitch and added another double crochet beside it.
How to fix it: Count the spokes after Round 1. You need exactly eight. Correct the round before moving on.
3. The lace arches are different sizes
Why it happens: Some chains are tighter than others, or the chain count changes between repeats.
How to fix it: Count each arch as you work. Keep the working yarn moving smoothly through your fingers rather than pulling each chain firmly.
4. The doily curls upward
Why it happens: Your tension may be too tight, especially in the long chain sections or final border.
How to fix it: Recheck your chain counts. If they’re correct, try making a small sample with a slightly larger hook. Wet blocking may correct mild curling, but severe puckering usually requires changing tension or stitch placement.
5. The outer border looks crowded
Why it happens: Single crochets may be packed into one part of the chain arch instead of distributed evenly.
How to fix it: Slide the stitches gently along the arch. If necessary, undo one section and space the stitches more evenly. If the sample still refuses to lie flat, the edging tension needs adjustment.
6. The picots don’t look pointed
Why it happens: The slip stitch may be placed in the wrong chain, or the three-chain loop was pulled too tightly.
How to fix it: Form three even chains, then join into the first chain of that picot. Avoid tightening the point until it disappears.
7. Black yarn makes stitches difficult to see
Why it happens: Dark fibers absorb light, reducing contrast between individual stitches.
How to fix it: Work on a pale surface beneath bright natural or task lighting. Use a removable stitch marker at the start of each round and count more frequently.
How to Customize This Gothic Crochet Doily
The basic design works with more than one color or decorative theme.
Experiment with finer thread
Traditional lace-weight crochet thread can create a more intricate appearance.
If you enjoy working with small hooks, try size 10 cotton crochet thread paired with an appropriately sized steel hook.
The finished doily will be smaller and more delicate, and the project may take longer.
Add a contrast-color border
For a subtle two-color version, work Rounds 1–6 in black and change to deep burgundy before beginning the final edging.
Secure the color change carefully so the transition doesn’t become bulky.
Create a gothic centerpiece
Place the finished doily beneath a small vase, ceramic ornament, or battery-operated candle.
Avoid open flames directly over the crochet. Cotton is combustible, and decorative lace should be kept away from heat sources.
Make a matching set
Create three doilies with the same yarn and hook to decorate a long shelf or dresser.
You could also make separate versions in black, plum, and burgundy for a coordinated gothic color scheme.
Try different border textures
Once you’re comfortable with this pattern, practice a plain single-crochet border or a separate scalloped-edge swatch.
Changes to the final round may affect flatness and should be tested before incorporating them into your finished piece.
Finishing Instructions
Finishing is especially important for lace crochet.
A few careful minutes can make the difference between a loosely shaped crochet circle and a polished decorative doily.
Fasten off the yarn
After joining Round 7, cut the yarn, leaving approximately six inches for weaving.
Pull the remaining yarn through the loop on your hook and gently tighten.
You don’t need to make a bulky knot.
Weave in the ends
Thread your yarn tail through a blunt-tip tapestry needle.
Turn the doily over and carefully weave the tail underneath several nearby stitches.
Change direction once to help secure it, taking care not to distort the lace.
Trim any remaining excess yarn.
Repeat this process for the starting yarn tail at the center.
How to block your crochet doily
Blocking helps the lace sit evenly and makes the decorative points more visible.
- Check the yarn label to confirm it can be safely wet-blocked.
- Lightly dampen the finished doily with cool water.
- Press out excess moisture with a clean towel. Do not wring it.
- Lay the doily on a clean foam blocking mat.
- Arrange the eight radial sections so the doily looks symmetrical.
- Gently shape the picot points outward.
- Use rustproof pins around the edge where needed.
- Allow the doily to dry completely before removing the pins.
Do not stretch the lace aggressively. Gentle, even shaping is better than forcing a particular diameter.
For a tabletop decoration, aim for a flat result with the picots evenly spaced around the perimeter.
Washing and care
Because the project uses cotton yarn, gentle handwashing is generally the safest approach, provided the yarn label allows it.
Use cool water and mild detergent. Avoid twisting or rubbing the lace.
After washing, reshape the doily while damp and dry it flat.
Keep the finished piece away from open flames, hot candle bases, and surfaces that may snag the crochet threads.
Your Finished Gothic Crochet Doily
Once completely dry, your project should display eight radiating sections, concentric openwork, and a small decorative point around each outer arch.
The black cotton adds contrast against lighter surfaces, making the circular lace structure easier to appreciate.
A carefully blocked doily can look particularly beautiful on a pale wooden shelf, an antique-style dresser, or beneath a glass display piece.
Quick Printable-Style Pattern Summary
Easy Gothic Spiderweb Doily
Skill: Confident beginner
Time: 2–3 hours
Materials: Smooth cotton yarn, 3.0 mm hook, scissors, tapestry needle, stitch marker.
Starting method: Magic ring or chain-four ring.
| Round | Instructions summary |
|---|---|
| 1 | 8 dc spokes with ch 1 between |
| 2 | 8 sc anchors with ch 4 between |
| 3 | 8 dc anchors with ch 5 between |
| 4 | 8 dc anchors with ch 7 between |
| 5 | 8 dc anchors with ch 9 between |
| 6 | 8 dc anchors with ch 11 between |
| 7 | 11 sc per arch, 1 sc per spoke, 1 picot per arch |
Repeat: Maintain eight sections in every round.
Finishing: Fasten off, weave in ends, damp block, and dry flat. Copy printable pattern summary
Frequently Asked Questions
Is this crochet gothic doily pattern beginner-friendly?
Yes, it is suitable for a confident beginner. You’ll need basic knowledge of chains, single crochet, double crochet, and slip stitches.
The repeating structure is straightforward once you understand how the eight spoke positions work.
What yarn is best for a gothic crochet doily?
Smooth cotton is an excellent choice because it gives the stitches clear definition and is suitable for blocking.
Sport-weight cotton is easier for beginners to handle than extremely fine crochet thread.
Can I use crochet thread instead of yarn?
Yes. Finer cotton crochet thread will give the project a more traditional lace appearance.
Choose a hook that suits your thread and expect the finished measurements to change.
How do I keep my gothic doily flat?
Maintain the correct chain counts, work with consistent tension, and avoid pulling the lace arches too tightly.
Gentle wet blocking can help even out the final shape.
Can I make the doily without a magic ring?
Yes. Chain four and slip stitch into the first chain to form a small center ring, then work the first round into that opening.
The center may have a slightly larger hole.
Is this pattern only suitable for Halloween?
No. Black lace works beautifully with gothic, Victorian-inspired, dark academia, and vintage interior styles throughout the year.
You can also use burgundy, plum, charcoal gray, or cream for different effects.
Can I make a larger gothic doily?
Yes, changing to thicker cotton yarn and a suitable larger hook is the simplest option.
Adding extra openwork rounds is possible, but requires testing a revised stitch progression and border so the project remains flat.
Conclusion
A gothic doily doesn’t need a complicated stitch pattern to make a striking decoration.
With a small circular center, carefully counted lace arches, and a delicate picot border, you can create a handmade piece that feels both elegant and mysterious.
Take your time with the eight repeated sections, check your stitch counts after each round, and give the finished doily a gentle block.
Once you’ve completed your first black version, try making another in burgundy or antique ivory.
Save this crochet gothic doily pattern for your next handmade home-decor project, or pair it with a matching crochet spiderweb coaster for a coordinated set.





