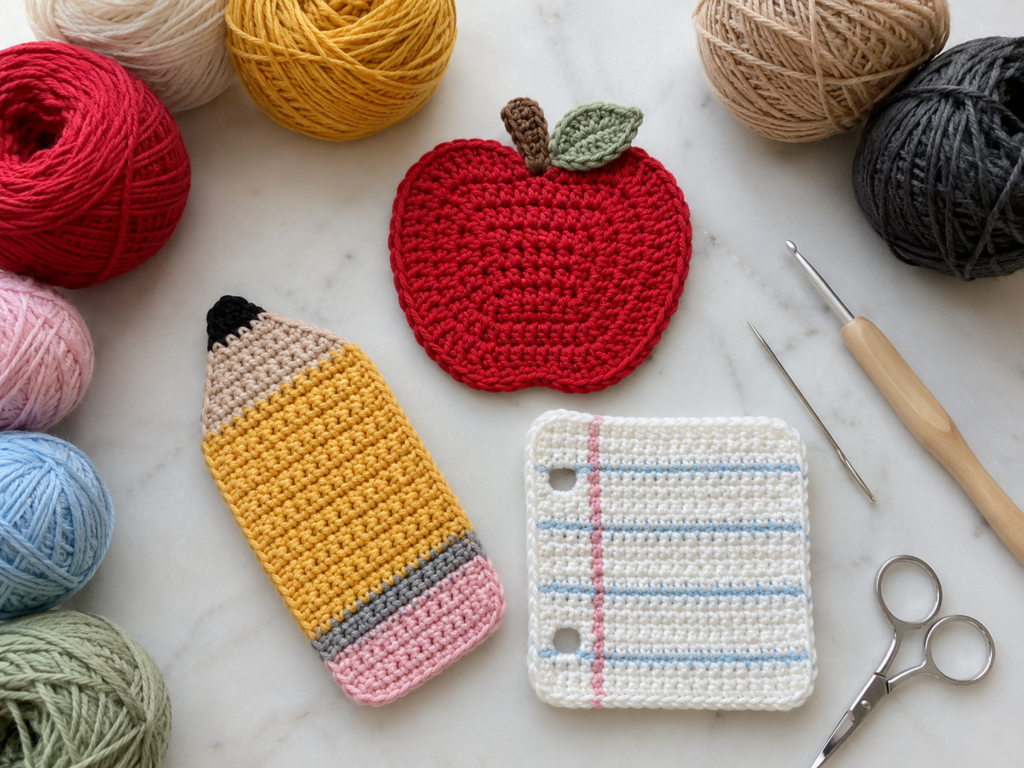
A handmade teacher gift does not need to be complicated to feel thoughtful. The best teacher gifts are usually practical, personal, and easy to keep on a desk without taking up too much space. That is exactly why this crochet teacher gift coaster set works so well.
In this beginner-friendly tutorial, you will make three flat crochet motifs: an apple coaster, a pencil coaster, and a notebook paper coaster. Together, they create a school-themed gift set that can be used as desk coasters, classroom decorations, bulletin-board accents, ornaments, or a small handmade Teacher Appreciation Week present.
This is a project-style tutorial. It uses simple flat crochet construction, basic rows, small color changes, surface details, and neat finishing. You do not need advanced shaping or complex amigurumi skills. The motifs are small enough to finish quickly, but detailed enough to feel like a real gift.
The reference source selected for the image flow is a single professional crochet article featuring the same school-themed gift concept: apple, pencil, and paper coasters. The source article describes these motifs as a beginner-friendly teacher gift or classroom decor project and shows process images for each motif.
What You’ll Learn
- How to crochet flat school-themed gift motifs.
- How to shape a simple apple coaster.
- How to add a single crochet border.
- How to crochet a small leaf and stem.
- How to change colors for a pencil coaster.
- How to make a notebook paper coaster from a rectangle.
- How to add surface slip-stitch lines.
- How to weave in ends neatly.
- How to package the finished set as a teacher gift.
Materials You’ll Need
For one three-piece teacher gift set:
- Medium-weight cotton or cotton-blend yarn in red.
- Medium-weight cotton or cotton-blend yarn in yellow.
- Small amount of pink yarn.
- Small amount of cream yarn.
- Small amount of black or charcoal yarn.
- Small amount of green yarn.
- Small amount of brown yarn.
- Small amount of white yarn.
- Small amount of sky-blue yarn.
- 4.0 mm / G-6 crochet hook.
- Tapestry needle.
- Scissors.
- Stitch markers, optional.
- Measuring tape, optional.
- Blocking mat and pins, optional.
- Gift tag, ribbon, or small kraft gift box, optional.
A 4.0 mm hook is commonly labeled G-6 in U.S. crochet hook sizing, according to the Craft Yarn Council hook-size chart.
Crochet Abbreviations Used
This tutorial uses U.S. crochet terminology.
- ch = chain
- sc = single crochet
- hdc = half double crochet
- dc = double crochet
- sl st = slip stitch
- st/sts = stitch/stitches
- rep = repeat
- inc = increase
- dec = decrease
- RS = right side
- WS = wrong side
The Craft Yarn Council lists these common abbreviations and notes that its abbreviation definitions reflect U.S. crochet terminology.
Before You Start
Gauge and tension
Exact gauge is not critical for these teacher gift coasters. What matters most is that your fabric is firm enough to sit flat on a desk.
Use a smaller hook if your stitches look loose and floppy. Use a larger hook if the fabric curls tightly or feels stiff.
How to count rows
Because these motifs are mostly worked in rows, count the horizontal ridges of stitches from bottom to top. Use stitch markers at the first and last stitch if you tend to lose edge stitches.
How to keep edges straight
Work the first and last stitch of every row carefully. Beginners often miss the last stitch because it leans slightly to the side.
How to choose colors
Classic school colors work best:
- Red for apple.
- Yellow for pencil body.
- Pink for eraser.
- Cream for wood.
- Black for pencil tip.
- White for paper.
- Blue for notebook lines.
- Green and brown for apple details.
For a softer modern version, use muted red, mustard, blush pink, ivory, sage, tan, and powder blue.
Step-by-Step Crochet Tutorial
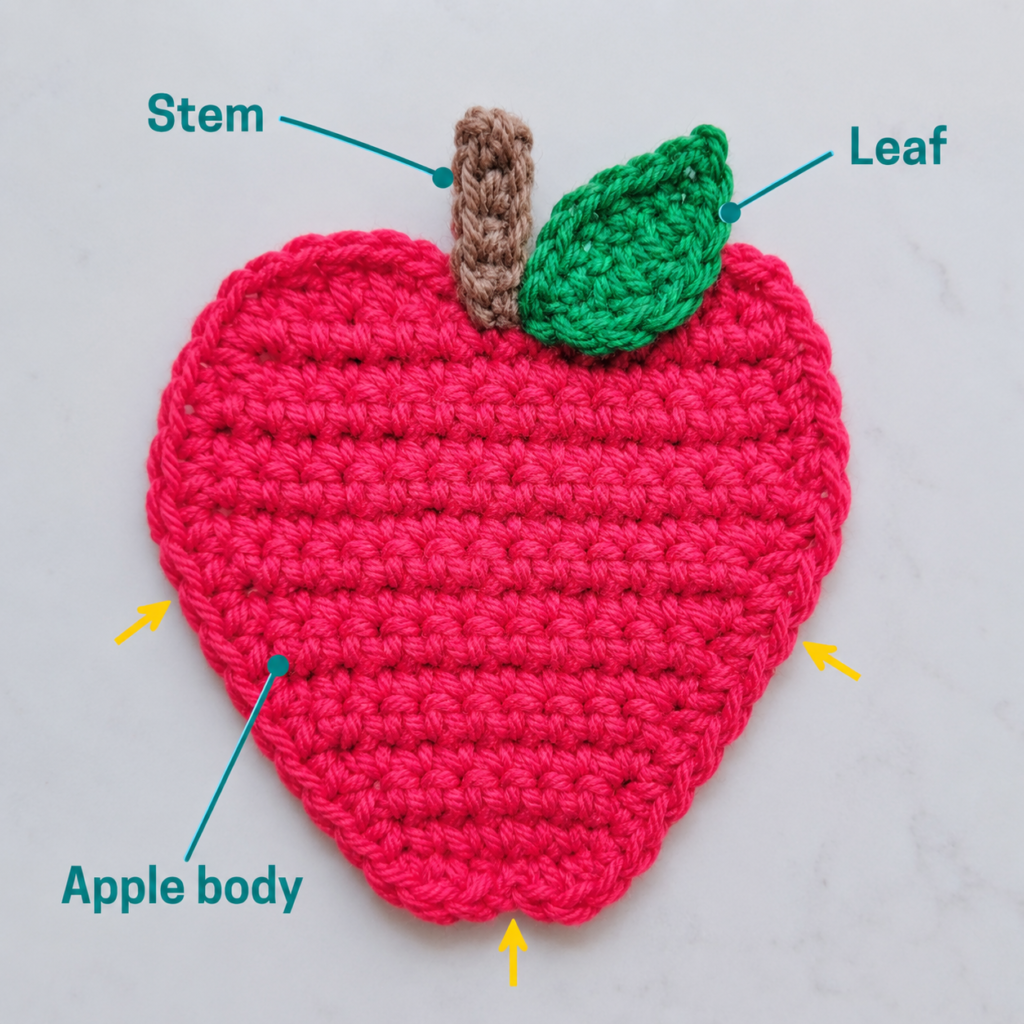
Step 1: Crochet the Apple Body
With red yarn, ch 8.
Row 1: Sc in the second ch from hook and across. Ch 1, turn.
Stitch count: 7
Row 2: 2 sc in first st, sc across to last st, 2 sc in last st. Ch 1, turn.
Stitch count: 9
Row 3: Sc across. Ch 1, turn.
Stitch count: 9
Row 4: 2 sc in first st, sc across to last st, 2 sc in last st. Ch 1, turn.
Stitch count: 11
Rows 5–8: Sc across. Ch 1, turn.
Stitch count: 11
Row 9: Sc2tog, sc across to last 2 sts, sc2tog. Ch 1, turn.
Stitch count: 9
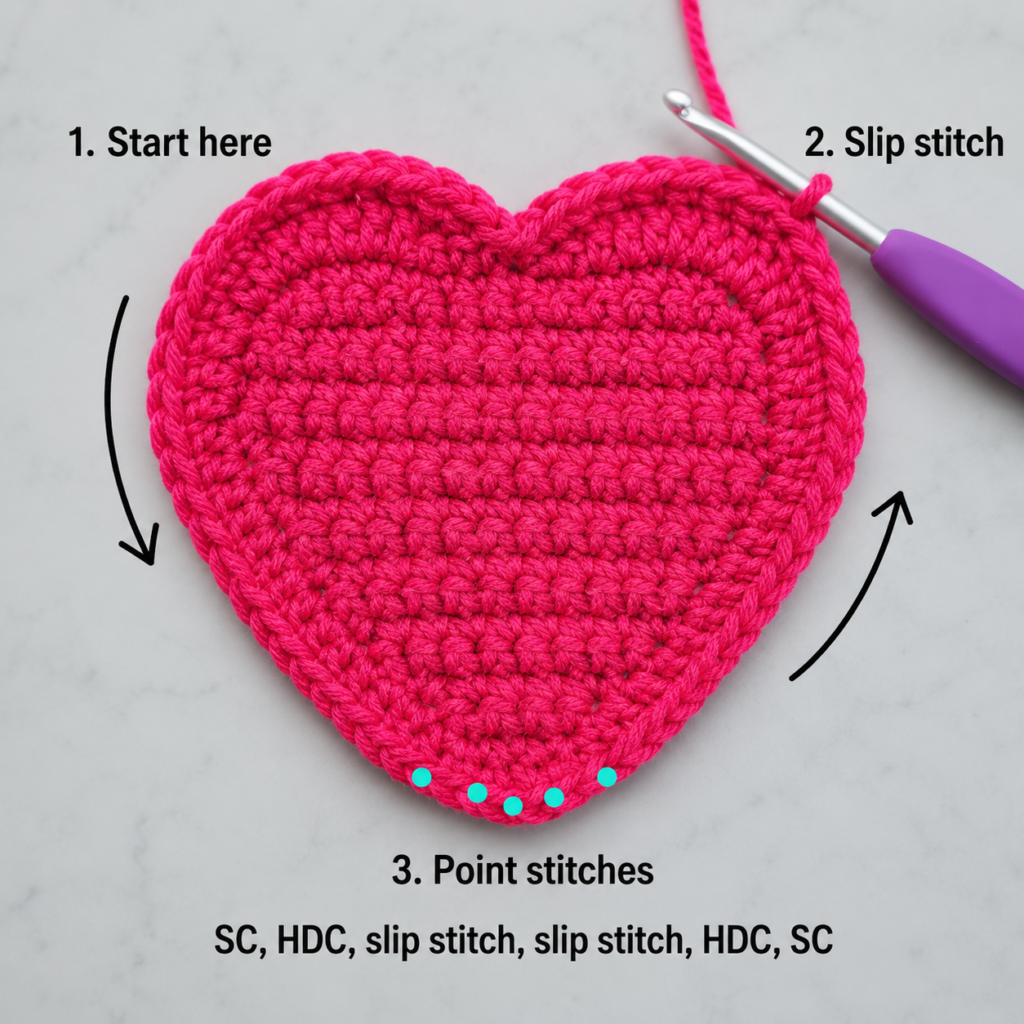
Row 10: Sc in first 3 sts, sl st in next st, sl st in next st, sc in remaining 4 sts. Fasten off.
This creates a flat apple shape with a slight top dip.
Beginner tip:
Lay the apple flat after Row 10. The shape may look slightly rough before the border, and that is normal.
Common mistake to avoid:
Do not pull the slip stitches too tightly at the top dip. Tight slip stitches can pinch the apple inward too much.
Step 2: Add the Apple Border
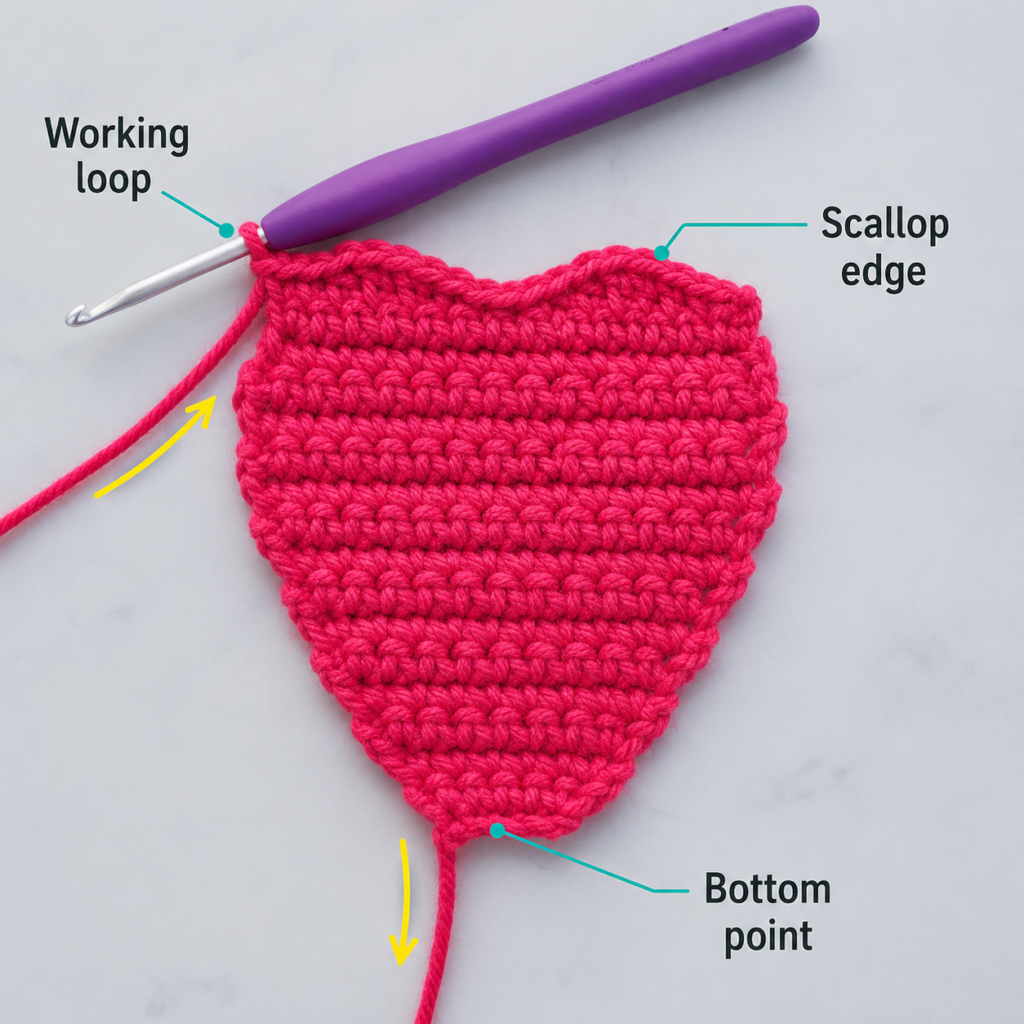
Join red yarn at the upper right side of the apple.
Work sc evenly around the apple edge.
At outer corners, place 2 sc in the same edge space if the fabric pulls inward.
At the top dip, use sl st or one tight sc to keep the indentation visible.
At the bottom center, use a small combination of sc, hdc, sl st, hdc, sc to soften the curve.
Join with a sl st to the first border stitch and fasten off.
Beginner tip:
Borders are more about even spacing than exact stitch count. Your goal is a smooth outline without ruffling.
Common mistake to avoid:
Too many border stitches create a wavy edge. Too few make the apple curl.
Step 3: Crochet the Apple Leaf
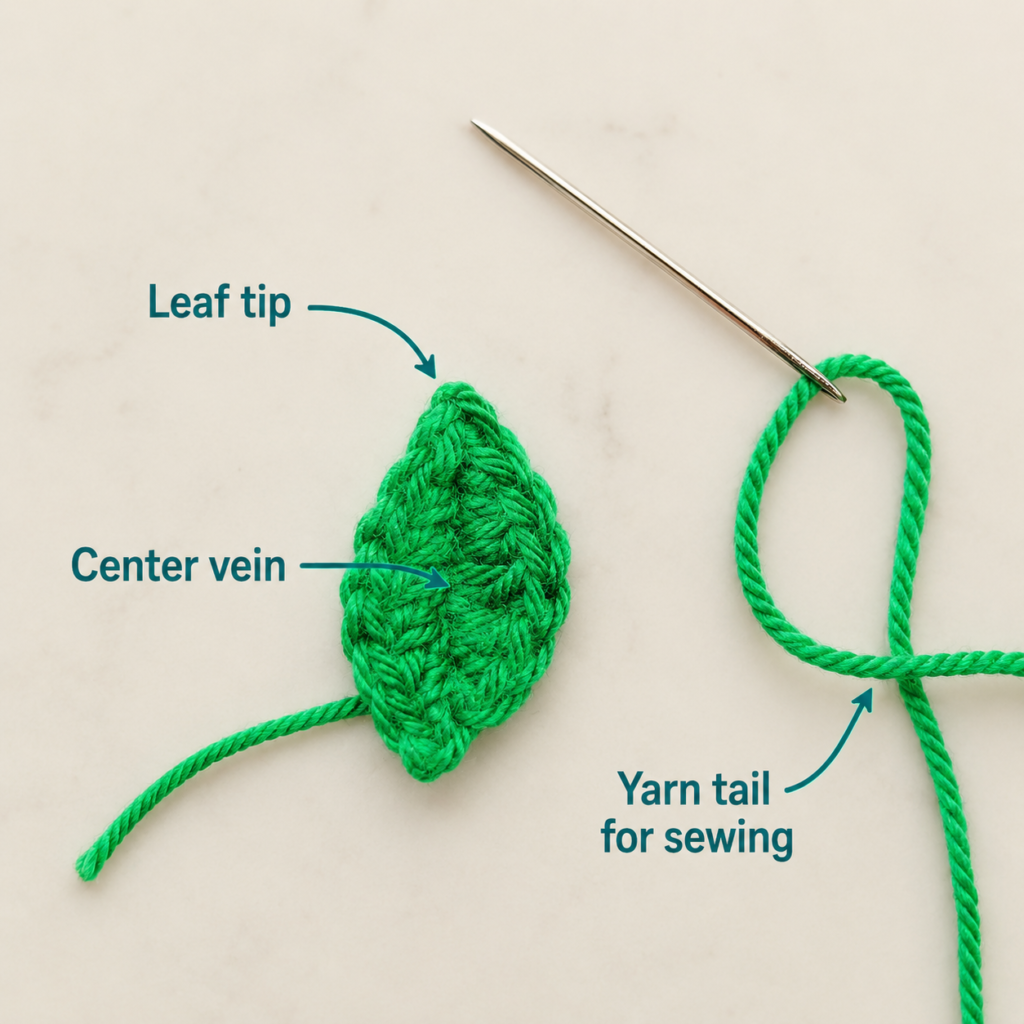
With green yarn, ch 7.
Starting in the second ch from hook:
Sc, hdc, dc, hdc, sc, sl st.
Ch 1.
Rotate to work along the opposite side of the chain.
Sl st, sc, hdc, dc, hdc, sc.
Join near the starting point and fasten off, leaving a long tail for sewing.
Beginner tip:
The leaf should be small. If it looks too large for the apple, remake it with a shorter starting chain.
Common mistake to avoid:
Do not work only down one side of the chain. A leaf needs both sides to create a fuller shape.
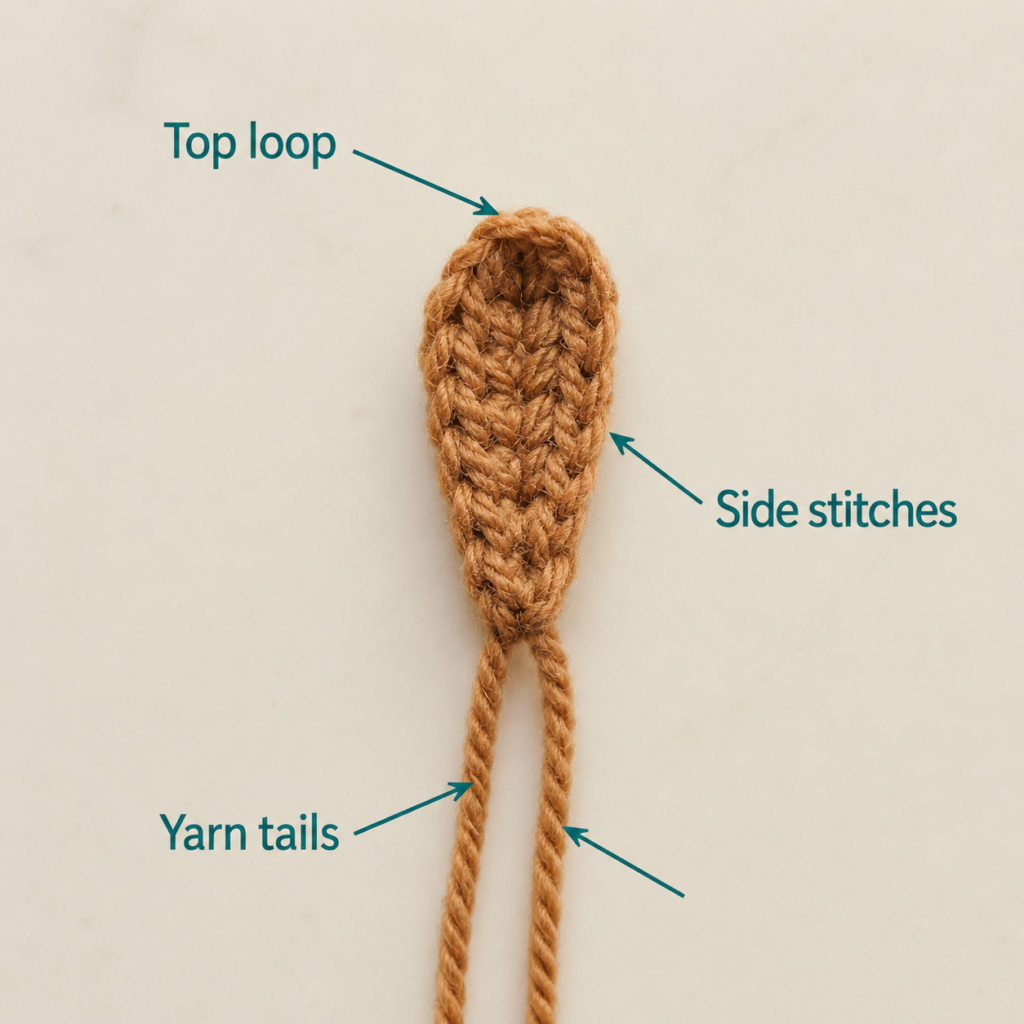
Step 4: Crochet the Apple Stem
With brown yarn, ch 6.
Starting in the second ch from hook:
Sl st in each ch across.
Fasten off, leaving a long sewing tail.
Beginner tip:
Keep the slip stitches loose enough that the stem does not twist tightly.
Common mistake to avoid:
Do not make the stem too long. A short stem looks better on a flat coaster.
Step 5: Assemble the Apple Coaster
Place the stem at the top center of the apple.
Use the brown yarn tail and tapestry needle to sew the base of the stem to the wrong side of the apple.
Position the green leaf slightly to one side of the stem.
Use the green yarn tail to sew the base of the leaf down. Leave the pointed end slightly loose for dimension.
Weave in all ends on the wrong side.
Beginner tip:
Before sewing, take a quick photo of your preferred layout. It helps you remember the angle of the leaf.
Common mistake to avoid:
Do not sew only through surface fuzz. Sew through actual stitches so the pieces stay secure.
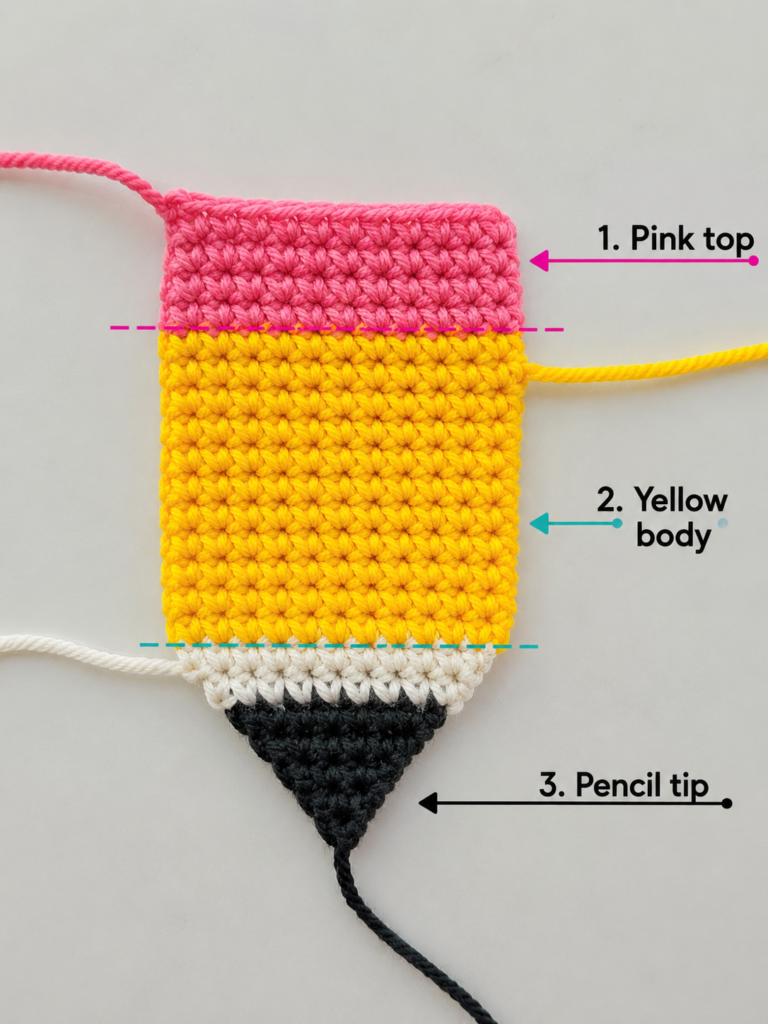
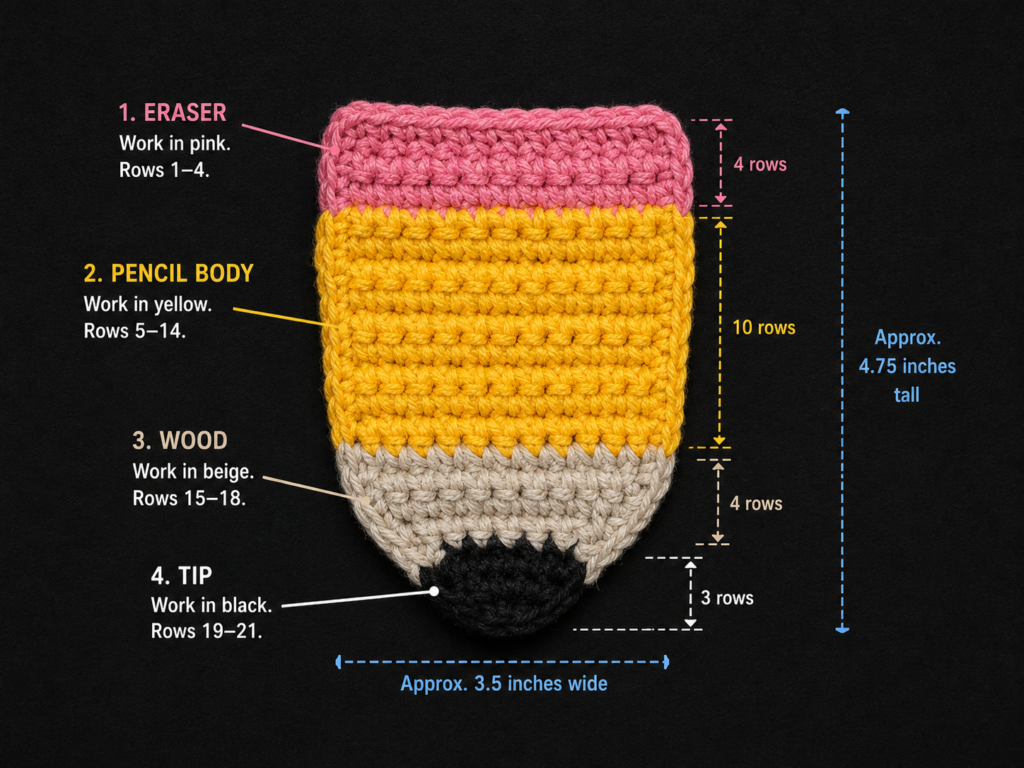
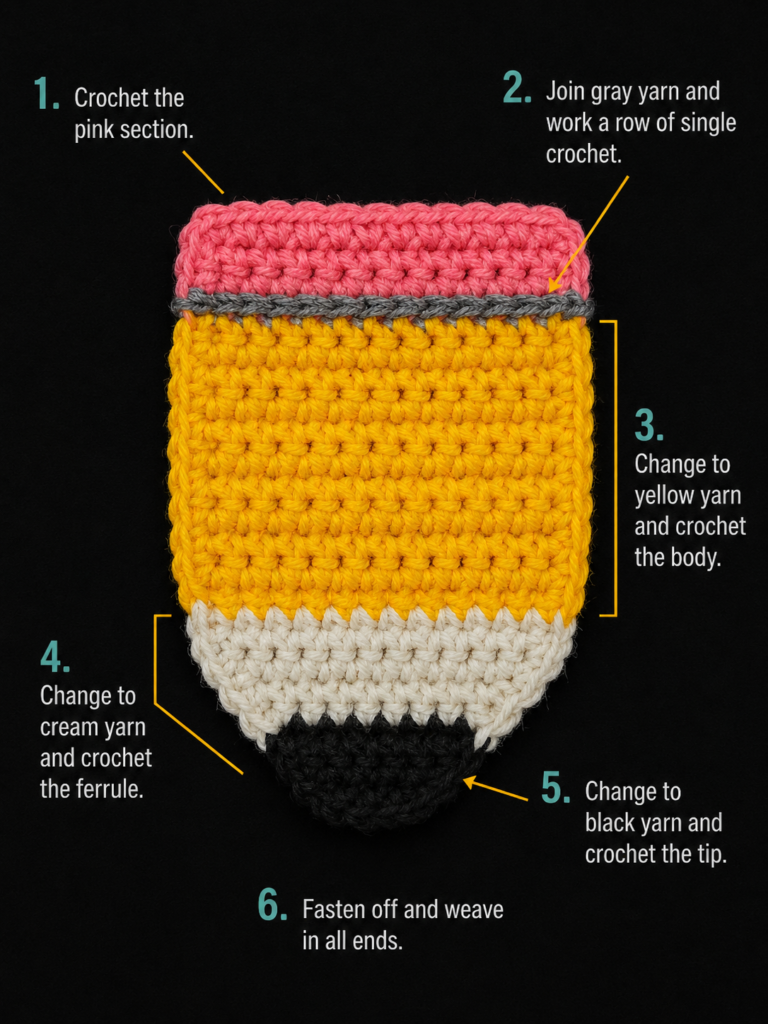
Step 6: Crochet the Pencil Body
The pencil is worked from the eraser downward.
With pink yarn, ch 14.
Rows 1–2: Sc across. Ch 1, turn.
Change to yellow at the end of Row 2.
Rows 3–10: Sc across. Ch 1, turn.
Change to cream at the end of Row 10.
Row 11: Sc across. Ch 1, turn.
Now shape the wooden point.
Row 12: Sc2tog, sc across to last 2 sts, sc2tog. Ch 1, turn.
Row 13: Sc2tog, sc across to last 2 sts, sc2tog. Ch 1, turn.
Row 14: Sc2tog, sc across to last 2 sts, sc2tog. Ch 1, turn.
Change to black.
Row 15: Sc across. Ch 1, turn.
Row 16: Sc2tog twice or decrease evenly to make the graphite point.
Fasten off.
Beginner tip:
When changing colors, finish the final pull-through of the last stitch with the new color.
Common mistake to avoid:
Do not cut all yarn tails too short. Leave enough tail length for weaving.
Step 7: Add the Pencil Border
Join yarn at one side of the pencil.
Work sc evenly around the pencil edge.
Use matching yarn colors where possible:
- Pink around the eraser.
- Yellow around the pencil body.
- Cream around the wooden point.
- Black around the tip.
At square corners, ch 1 or place 2 sc in the same corner space.
Join and fasten off.
Weave in the yarn tails.
Beginner tip:
A border hides uneven row edges and makes the pencil look more finished.
Common mistake to avoid:
Do not force too many stitches along the slanted cream area. It can make the pencil point flare outward.
Step 8: Add the Pencil Eraser Stripe
With gray yarn, make a slip knot on your hook.
Insert the hook through the front surface where the pink eraser meets the yellow pencil body.
Work surface slip stitches across that line.
Fasten off and weave in ends on the back.
Beginner tip:
Surface slip stitches should sit on top of the fabric. Do not pull them so tightly that they sink into the coaster.
Common mistake to avoid:
Do not stitch through both layers of yarn tails or woven ends on the back. Keep the surface line smooth.
Step 9: Crochet the Notebook Paper Base
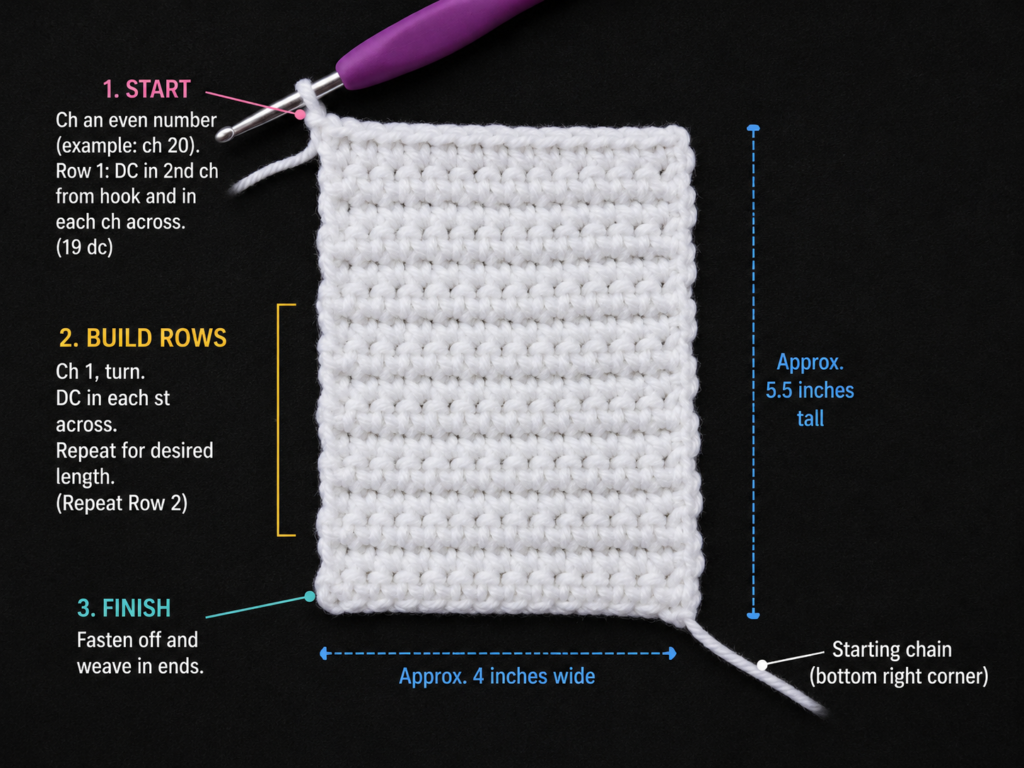
With white yarn, ch 15.
Rows 1–15: Sc across. Ch 1, turn.
Fasten off or continue directly into the border.
The rectangle should look like a small sheet of notebook paper.
Beginner tip:
Count your stitches every few rows. The paper coaster looks best when the sides stay straight.
Common mistake to avoid:
Do not skip the last stitch of each row. This makes the rectangle slowly shrink.
Step 10: Add the Paper Border
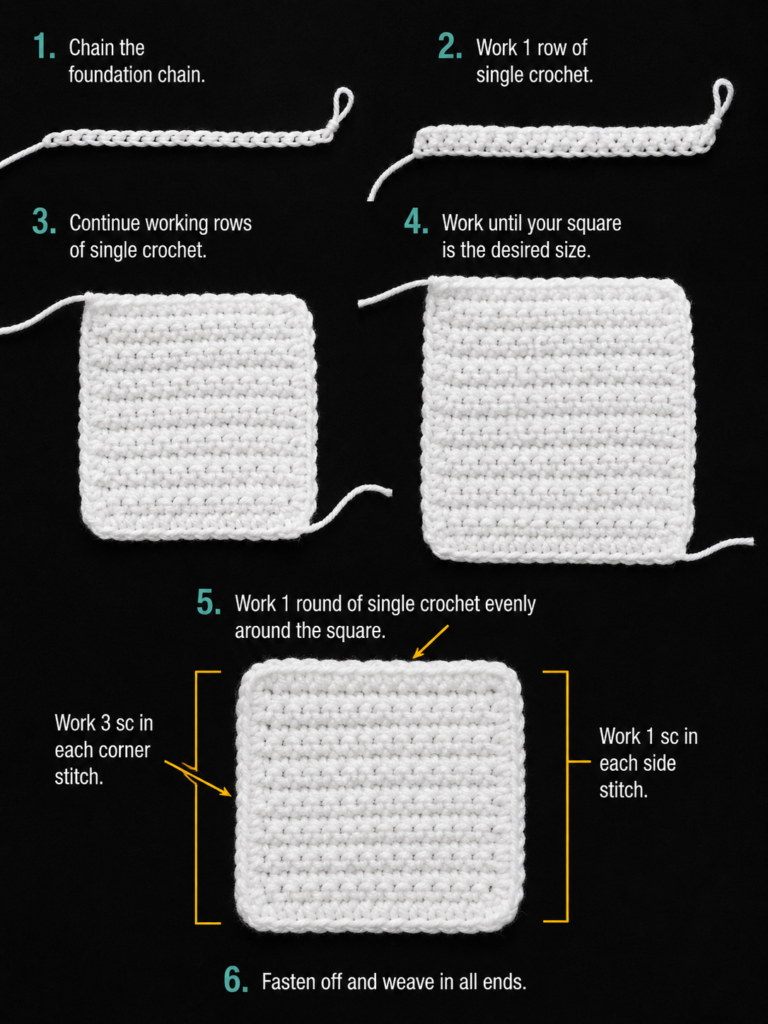
Work sc evenly around all four sides of the white rectangle.
At each corner, work 2 sc or ch 1 to help the corner sit flat.
Join with a sl st and fasten off.
Beginner tip:
A border helps hide slightly uneven row edges.
Common mistake to avoid:
Too many corner stitches can make the paper coaster wavy.
Step 11: Add Notebook Lines
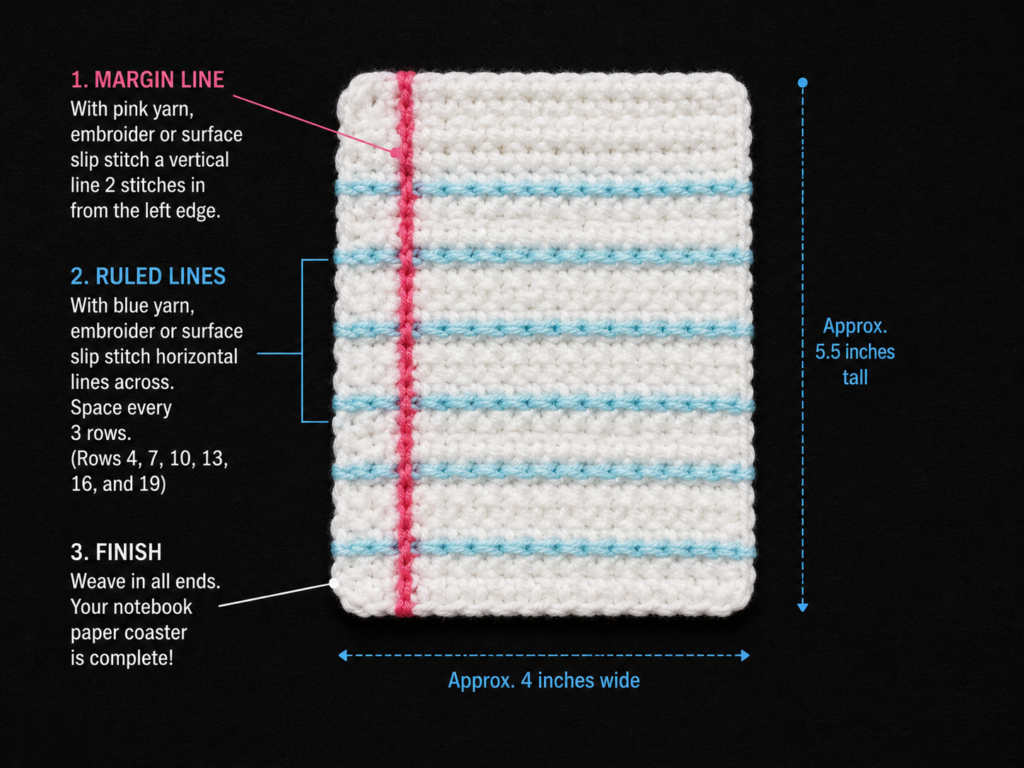
With blue yarn, surface slip stitch across the front of the white paper.
Make 4–5 horizontal blue lines.
Keep the lines evenly spaced.
With pink yarn, surface slip stitch one vertical margin line near the left side.
Fasten off and weave all ends into the wrong side.
Beginner tip:
Place removable stitch markers or pins where each line should begin and end before stitching.
Common mistake to avoid:
Do not pull surface slip stitches too tightly. Tight lines can make the paper curl.
Pattern Notes or Stitch Notes
The apple, pencil, and paper motifs are worked flat in rows.
The turning chain does not count as a stitch.
The right side is the side with the cleanest stitches and decorative surface details.
Use surface slip stitches for pencil and notebook details.
For coasters, cotton yarn is preferred because it creates a firmer, more washable fabric than very soft novelty yarn.
The original source article also uses basic crochet stitches and describes the motifs as worked in rows with borders and surface slip-stitch details.
Common Beginner Mistakes
1. Missing the last stitch of a row
Fix: Mark the first and last stitch of every row until you can recognize them easily.
2. Making the border too tight
Fix: Add a little more space between border stitches or use a slightly larger hook for the border.
3. Pulling surface slip stitches too tightly
Fix: Keep the working loop loose and let the line sit on top of the fabric.
4. Choosing fuzzy yarn
Fix: Use smooth cotton or acrylic yarn so the stitches remain visible.
5. Not weaving ends securely
Fix: Weave each tail in at least two directions on the wrong side before trimming.
6. Skipping blocking
Fix: Light blocking helps small flat motifs look more polished.
7. Packaging before the pieces dry
Fix: Allow blocked coasters to dry fully before adding a gift tag or wrapping.
How to Customize This Crochet Project
You can turn this basic set into several different crochet teacher gifts.
Make only the apple and attach it to a thank-you card.
Make three pencil coasters in different colors.
Turn the notebook paper into a small appliqué for a tote bag.
Add jute or cotton cord across the top and make classroom bunting.
Use school colors for the pencil eraser and paper margin.
Add a small handwritten gift tag that says “Thank you for helping me grow.”
Make a larger set with six coasters: two apples, two pencils, and two notebook papers.
Use thinner yarn and a smaller hook to make ornaments instead of coasters.
Use thicker yarn and a larger hook to make classroom wall decorations.
Finishing Instructions
Fasten off every color with a 5–6 inch yarn tail.
Weave the tail into the wrong side with a tapestry needle.
Do not trim the yarn immediately after one pass. Weave in one direction, change direction, then trim.
To block the coasters, lightly mist them with water, shape them flat, pin if needed, and allow them to dry completely.
For gift packaging, stack the three coasters neatly and tie them with cotton ribbon or jute. Add a small kraft tag or printable teacher appreciation note.
Washing note: follow the yarn label. Cotton coasters are usually easier to clean, but handmade pieces last longer with gentle washing and flat drying.
Quick Printable-Style Summary
Project: Crochet Teacher Gift Coaster Set
Skill level: Beginner to Easy
Motifs: Apple, pencil, notebook paper
Yarn: Medium-weight cotton or cotton-blend yarn
Hook: 4.0 mm / G-6
Stitches: Ch, sc, hdc, dc, sl st, inc, dec
Apple: Work a flat red apple shape in rows, add border, crochet leaf and stem, sew pieces on.
Pencil: Work flat rows with pink, yellow, cream, and black sections, add border, add gray surface slip-stitch stripe.
Notebook paper: Crochet a white rectangle, add border, add blue horizontal lines and pink margin line.
Finishing: Weave in ends, block flat, package as a teacher gift.
FAQ
Are crochet teacher gifts good for beginners?
Yes. Small flat projects like coasters, bookmarks, appliqués, and garlands are excellent beginner gifts because they use basic stitches and finish quickly.
What is the best crochet teacher gift to make quickly?
A small apple coaster or pencil coaster is faster than a blanket, tote, or amigurumi toy. It feels handmade but does not require a long project timeline.
Can I make this teacher gift set with acrylic yarn?
Yes. Acrylic yarn works, but cotton is usually better for coasters because it creates a firmer fabric and handles light use well.
Can these motifs become classroom decor?
Yes. Instead of using them as coasters, attach them to a long chain or jute cord and make classroom bunting.
Can I sell finished teacher gift coasters?
That depends on the terms of the pattern you are using. This article provides an original tutorial, but when using any external pattern, check the designer’s usage permissions.
How do I keep flat crochet coasters from curling?
Use even tension, avoid overly tight surface slip stitches, and block the finished pieces flat.
What should I include with a crochet teacher gift?
A small handwritten note makes the gift feel more personal. You can also pair the coasters with tea, coffee, pencils, sticky notes, or a classroom supply gift card.
Conclusion
Crochet teacher gifts are most useful when they are small, practical, and personal. This apple, pencil, and notebook paper coaster set gives you all three qualities in one beginner-friendly project.
The apple feels classic. The pencil makes the set instantly school-themed. The notebook paper adds a playful classroom detail. Together, they create a handmade gift that can sit on a teacher’s desk, decorate a classroom shelf, or become a reusable back-to-school display.
Start with one motif if you are short on time. Make the full set when you want a more complete gift. Either way, keep the stitches simple, the colors cheerful, and the finishing neat.





