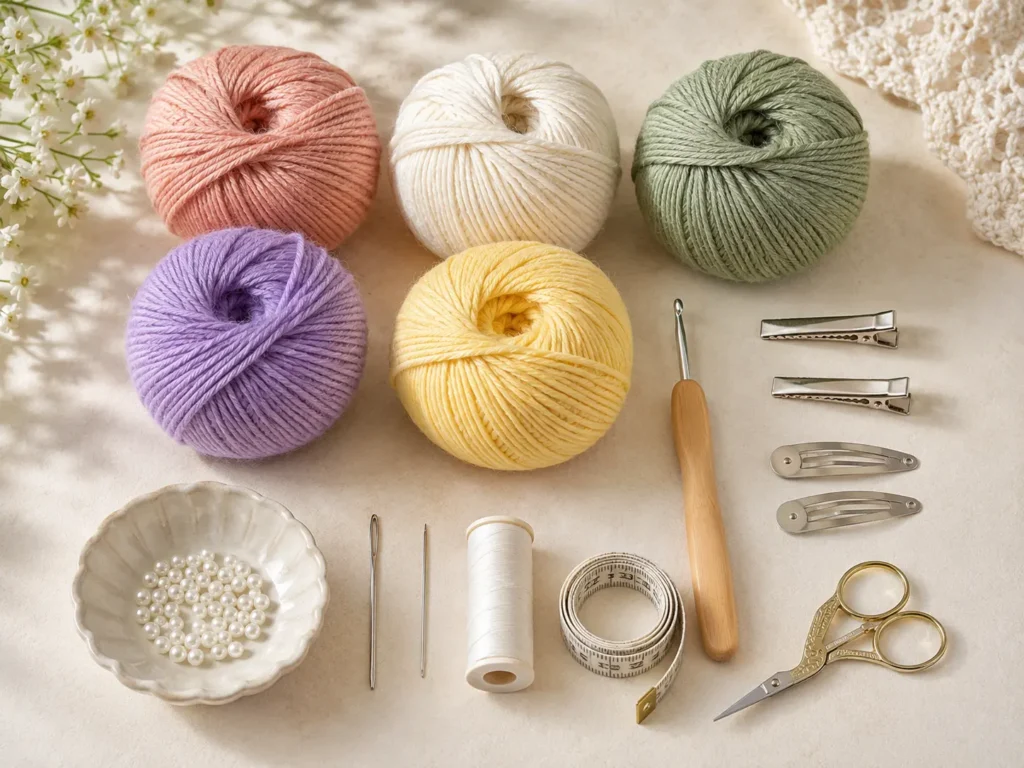
Crochet flower hair clips are the kind of tiny handmade project that makes you want to use every pretty scrap of yarn in your basket. They are quick, giftable, useful, and easy to personalize for babies, kids, teens, bridesmaids, craft fairs, or everyday accessories.
This beginner-friendly tutorial teaches you how to make two simple crochet flower hair clip styles:
- A flat daisy-style flower clip with six rounded petals.
- A mini rose clip made from a small crocheted strip that is rolled and sewn into shape.
You can make one style only, or create a matching set. The daisy-style flower is the easiest place to start because it is worked in the round. The rose is slightly more sculptural, but still beginner-friendly if you can chain, double crochet, and sew through layers.
The selected visual reference source is Grace and Yarn’s crochet hair clip tutorial, which includes both rose and layered flower hair clip examples, materials, stitch abbreviations, and finishing photos. The source uses crochet thread, a 2.75 mm hook, hair clips, sewing needle, scissors, and optional pearl beads.
This new tutorial is original. It uses a simplified stitch layout, new yarn choices, a different teaching structure, and a secure sewn attachment method suitable for beginners.
What You’ll Learn
- How to make a small crochet flower center.
- How to crochet rounded petals.
- How to keep a small flower flat.
- How to make a tiny rose strip.
- How to roll and sew a rose.
- How to weave in small yarn tails neatly.
- How to attach crochet flowers securely to alligator clips or snap clips.
- How to customize colors, sizes, centers, and clip types.
- How to avoid common beginner mistakes.
Materials You’ll Need
For one to two crochet flower hair clips:
- Sport-weight cotton yarn or size 10 crochet thread.
- 3.0 mm crochet hook for sport-weight cotton, or 2.75 mm hook for thicker crochet thread.
- Small alligator hair clips or snap clips.
- Tapestry needle.
- Sewing needle.
- Matching sewing thread or strong cotton yarn.
- Small scissors.
- Stitch marker, optional.
- Optional pearl bead or button for the flower center.
The Craft Yarn Council lists 2.75 mm as a C-2 crochet hook and 3.5 mm as E-4; a 3.0 mm hook sits between common listed U.S. hook sizes, so metric sizing is the most precise way to identify it.
For small hair accessories, cotton yarn or crochet thread works especially well because the stitches stay defined and the flowers do not become too floppy.
Safety note: If making clips for babies or children under 3, avoid pearl beads, buttons, or any small detachable center that could become a choking hazard. The selected reference source also warns against pearl beads for children under 3.
Finished Size
Using sport-weight cotton and a 3.0 mm hook:
- Daisy-style flower: approximately 1.75–2.25 inches wide.
- Mini rose: approximately 1.5–2 inches wide.
- Clip length: approximately 1.25–2 inches, depending on your chosen clip.
Using size 10 crochet thread and a 2.75 mm hook will make a smaller, daintier flower.
Crochet Abbreviations Used
This pattern uses U.S. crochet terminology.
- ch = chain
- sc = single crochet
- hdc = half double crochet
- dc = double crochet
- sl st = slip stitch
- st/sts = stitch/stitches
- rep = repeat
The Craft Yarn Council’s abbreviation list includes these basic crochet stitch abbreviations and identifies sl st as slip stitch, sc as single crochet, hdc as half double crochet, and dc as double crochet.
U.S./U.K. terminology note
This tutorial is written in U.S. crochet terms. A U.S. single crochet is not the same term in U.K. crochet instructions, so check terminology before following another pattern.
Before You Start
Gauge and tension
Gauge is not strict for this project. The more important goal is a flower that looks neat and feels secure on the clip.
For small flowers, keep your stitches even but not tight. If your stitches are too tight, the petals may curl inward and become difficult to shape. If your stitches are too loose, the flower may look floppy.
How to count stitches
For the daisy-style flower, the center begins with 6 single crochet stitches. Those 6 stitches become the base for 6 petals.
For the mini rose, the chain length controls how full the rose becomes.
How to choose colors
Try these combinations:
- Dusty peach petals + ivory center.
- Lavender rose + silver clip.
- White daisy + yellow center.
- Pink flower + green leaf accent.
- Cream flower + pearl-free yarn knot center.
- Rainbow set with one flower per color.
For a polished set, use one consistent center color and vary the petal colors.
Beginner note
Make the first clip with yarn you can see clearly. Very dark thread can make stitch placement harder.
Step-by-Step Crochet Tutorial
Step 1: Make the Daisy-Style Flower Center
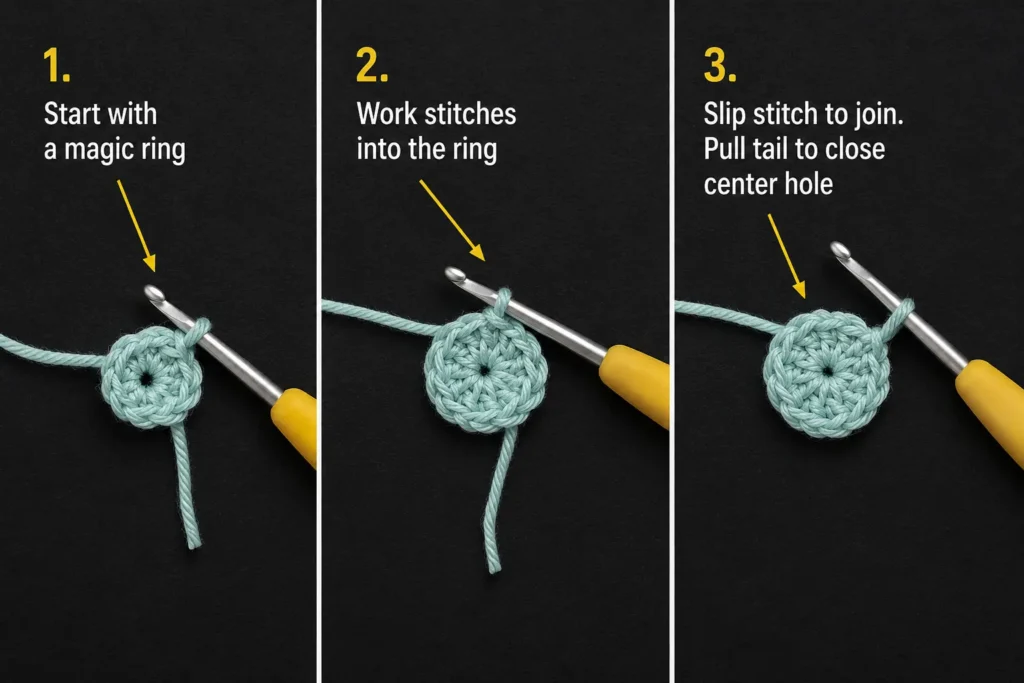
Start with your center color. In this sample, use soft ivory.
Make a magic ring.
Work:
Round 1: Ch 1, 6 sc into the magic ring. Pull the ring closed. Join with sl st to the first sc.
Do not fasten off if you want the center and petals to be the same color. Fasten off if you want contrasting petals.
For the sample, fasten off ivory and join dusty peach for the petals.
Beginner tip:
Pull the magic ring closed slowly. If you pull too hard too quickly, thinner yarn may snap or distort the center.
Common mistake to avoid:
Do not count the beginning chain as a stitch. You should have 6 actual single crochet stitches.
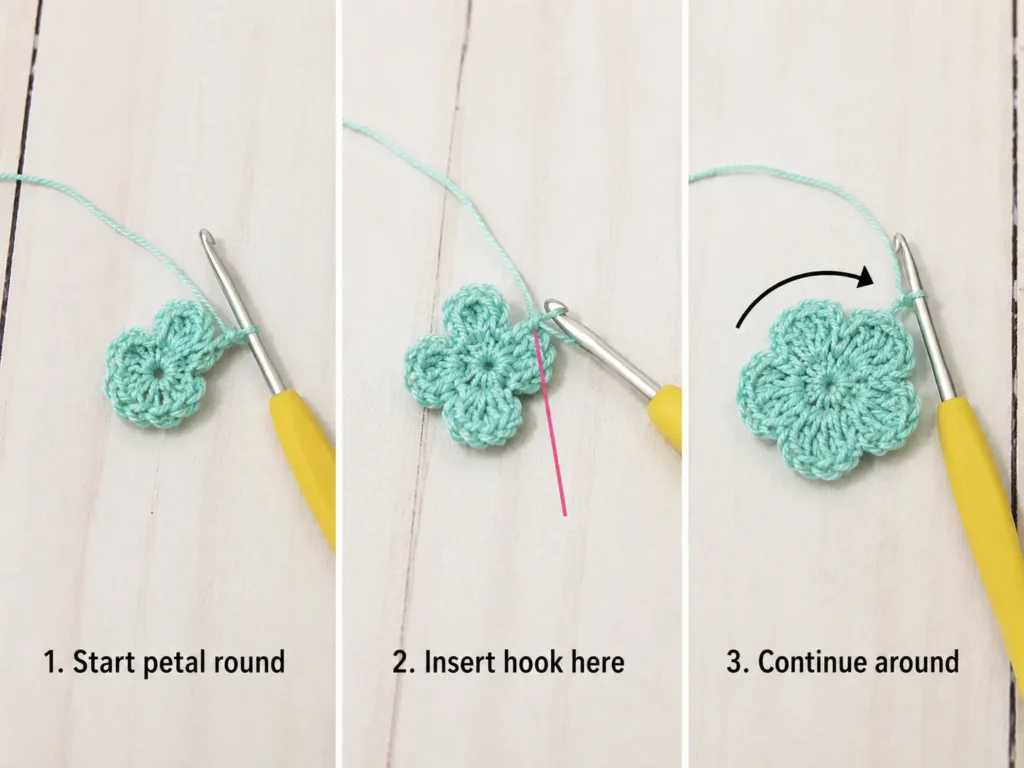
Step 2: Crochet the First Petal Round
Join the petal color in any stitch from the center round.
For each petal, work the following into the same stitch:
Sl st, ch 2, 2 hdc, ch 2, sl st.
Repeat this petal sequence in each of the 6 center stitches.
You will have 6 rounded petals.
Fasten off, leaving a 6-inch tail.
Beginner tip:
After each petal, pause and gently push the stitches outward with your fingers. This helps you see where the next center stitch begins.
Common mistake to avoid:
Do not accidentally work two petals into the same center stitch. Count each petal as you go.
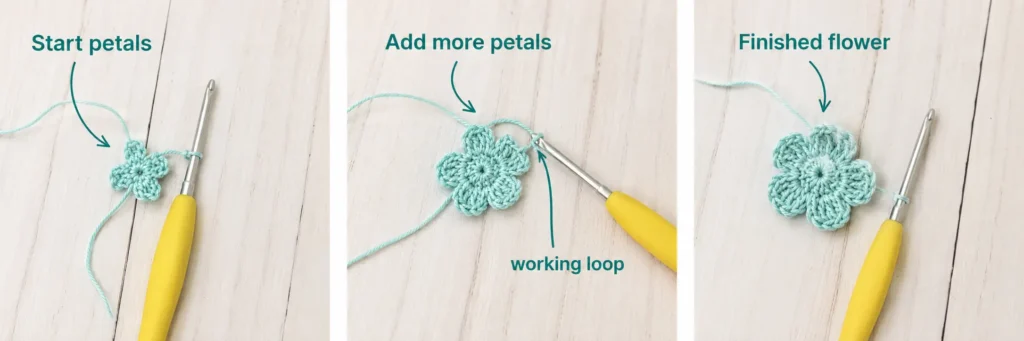
Step 3: Shape the Finished Daisy Flower
Lay the flower right side up.
Use your fingers to arrange the 6 petals evenly around the center.
If one petal looks smaller, gently tug it outward. If one petal looks too loose, smooth it back toward the center.
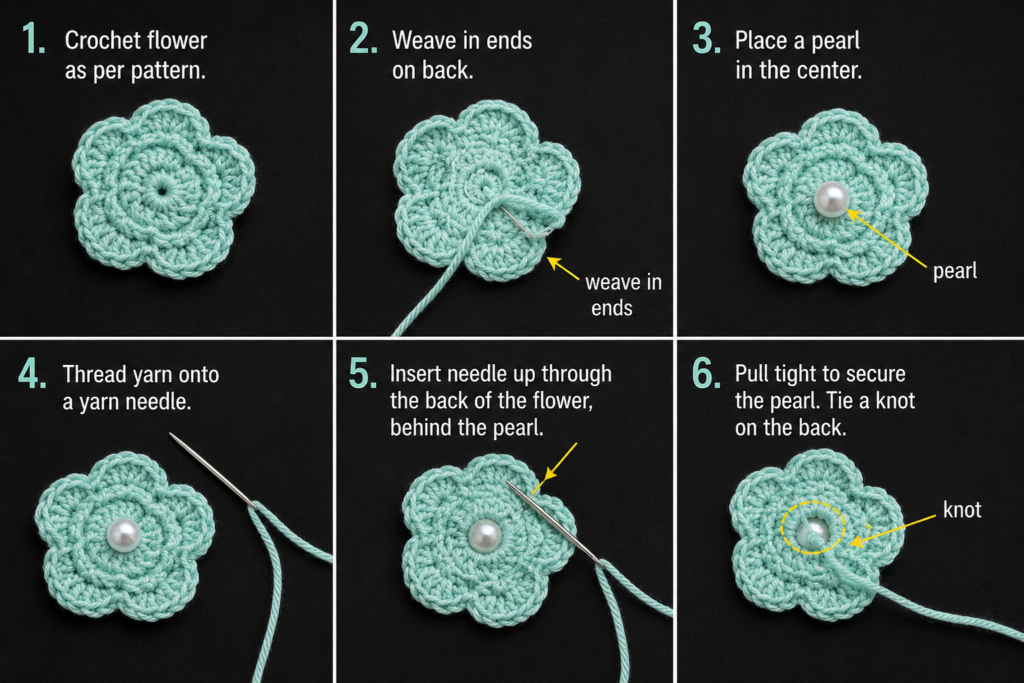
Turn the flower over and weave in the yarn tails on the wrong side.
Leave one long tail if you want to use yarn to sew the flower onto the clip.
Beginner tip:
Do not trim yarn tails until after the flower is attached to the clip. Long tails are useful for sewing.
Common mistake to avoid:
Do not pull the woven tails so tightly that the flower center puckers.
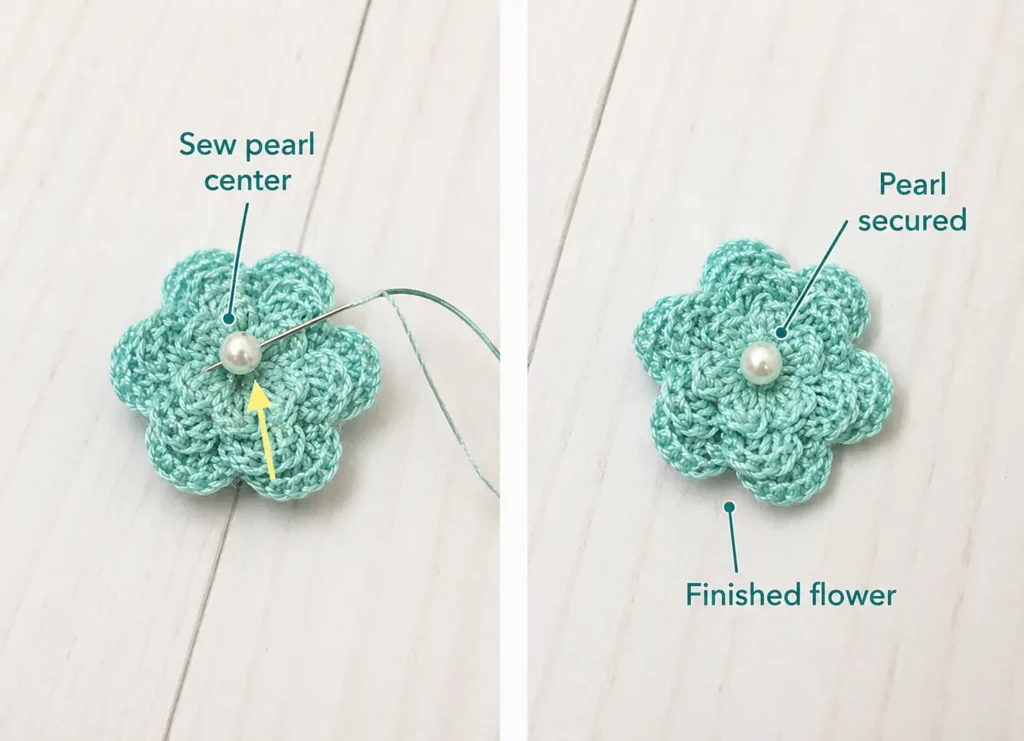
Step 4: Add a Safe Center Detail
For the most secure beginner option, use a yarn knot center instead of a loose bead.
Thread ivory yarn onto a tapestry needle.
Bring the needle up through the middle of the flower.
Make 2 or 3 small satin stitches across the center, or create one small French-knot-style yarn bump if you know that embroidery technique.
Secure the yarn on the wrong side.
For adult accessories, you may sew on a tiny pearl bead or button. For children under 3, use yarn embroidery only.
Beginner tip:
Keep the center detail small. A large bead or oversized knot can make the flower droop forward.
Common mistake to avoid:
Do not glue a bead onto a child’s hair clip and assume it is secure. Sewing is more stable, and for very young children, avoid small removable parts entirely.
Step 5: Make the Optional Mini Rose Clip
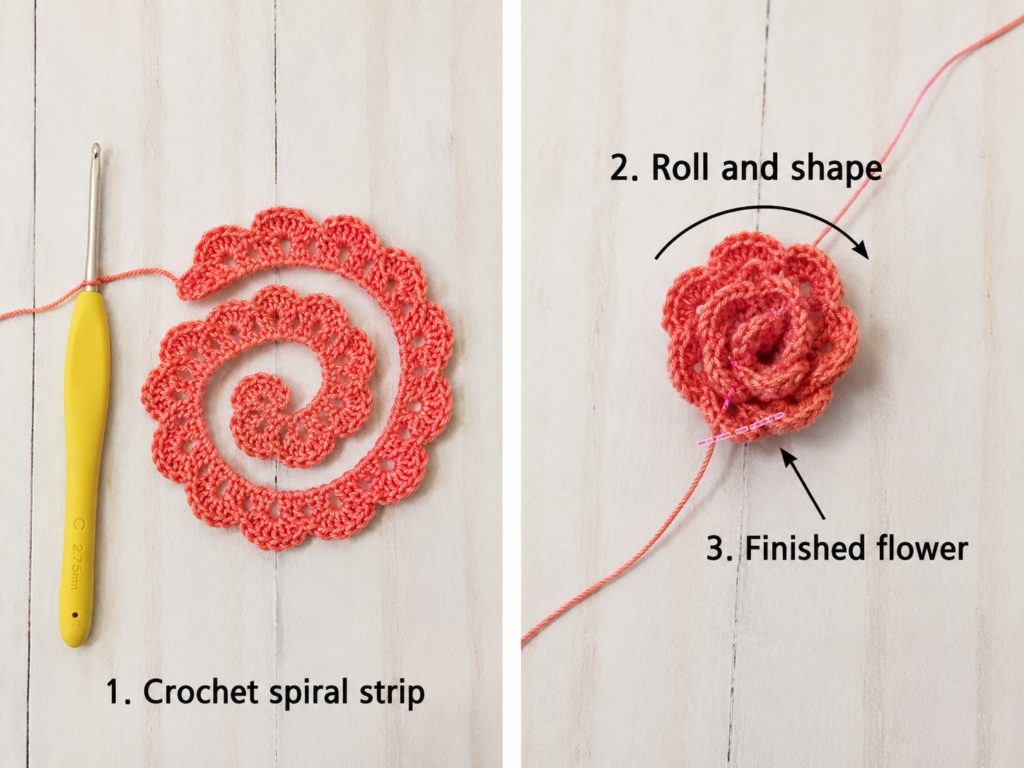
Now make the second style: a small rolled rose.
With dusty lavender yarn:
Ch 25.
Row 1: Work 1 sc in the second chain from the hook and in each chain across.
Row 2: Ch 2 and turn. Work 3 dc in the first stitch, sl st in the next stitch. Repeat across: 3 dc in next stitch, sl st in next stitch.
Fasten off, leaving a long tail for sewing.
Your strip should naturally curl. That curl helps the rose form.
Beginner tip:
If the strip does not curl at all, your stitches may be too loose. Try again with a slightly smaller hook.
Common mistake to avoid:
Do not stretch the strip flat before rolling. The natural curl creates the rose shape.
Step 6: Roll and Sew the Mini Rose
Start rolling from one short end.
Keep the bottom edge aligned while allowing the petal edge to open slightly.
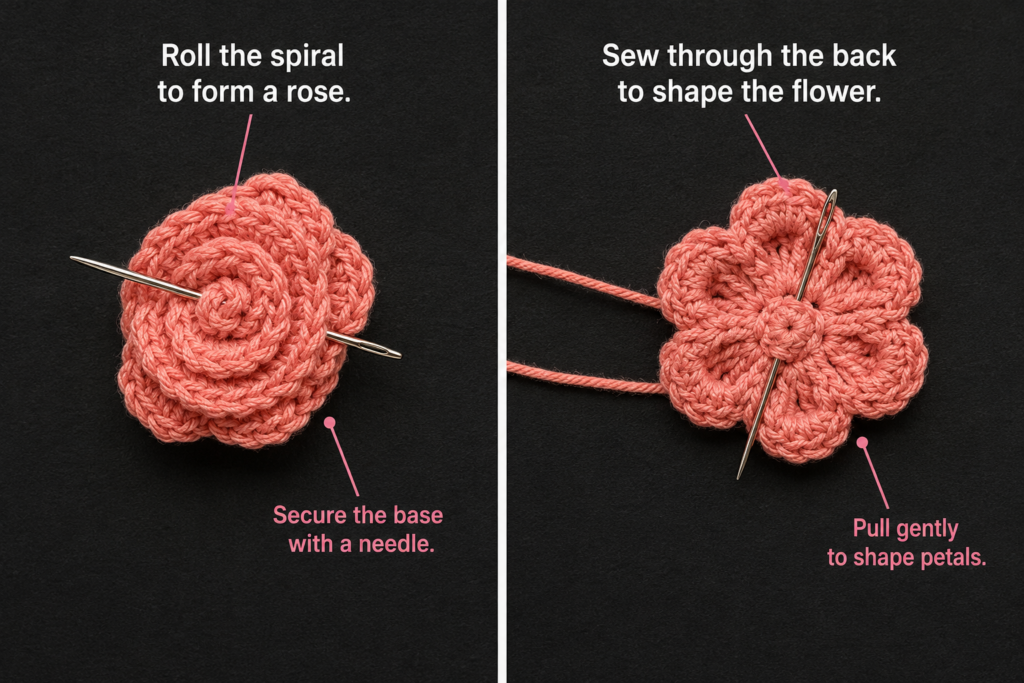
When the rose shape looks balanced, thread the long tail onto your tapestry needle.
Sew through the bottom layers several times.
Turn the rose slightly and sew across the base from another direction. This locks the spiral in place.
Do not sew through the top petal edge. The top should stay dimensional.
Beginner tip:
Hold the rose between your thumb and finger while sewing the base. Keep the bottom flat so it sits neatly on the clip.
Common mistake to avoid:
Do not roll the rose too tightly. A tight roll looks like a knot instead of a flower.
Step 7: Attach the Crochet Flower to the Hair Clip
Place your flower right side down.
Place the clip on the back of the flower.
For an alligator clip, open the clip and slide a small folded paper strip inside. This prevents accidentally sewing the clip shut.
Use strong sewing thread or a long yarn tail.
Sew through:
- The back of the flower.
- Around the top bar of the clip.
- Back through the flower base.
Repeat several times.
For a rose, sew through the flat base. For a daisy-style flower, sew through the center and a few petal-base stitches.
Tie off securely on the back.
Add a tiny amount of fabric glue only if needed, and let it dry completely before wearing.
Beginner tip:
Before sewing, check which direction the clip opens. Make a left-side and right-side clip if you want a matching pair.
Common mistake to avoid:
Do not attach the flower only at one point. A single attachment point may let the flower spin around on the clip.
Pattern Notes or Stitch Notes
Turning chain rules
For the daisy-style flower, the beginning chain does not count as a stitch.
For the rose strip, the turning chain also does not count as a stitch.
Stitch count
Daisy center: 6 sc.
Daisy petals: 6 petals total.
Rose chain: 25 chains for a small rose. Add more chains for a fuller rose.
Repeat pattern
Daisy petal repeat:
Sl st, ch 2, 2 hdc, ch 2, sl st in each center stitch.
Mini rose repeat:
3 dc in next stitch, sl st in next stitch across Row 2.
Right side and wrong side
The pretty petal side is the right side.
The side with tails, knots, and clip attachment is the wrong side.
Size adjustment notes
To make smaller flowers:
- Use crochet thread.
- Use a smaller hook.
- Use fewer chains for the rose.
To make larger flowers:
- Use DK cotton.
- Use a 3.5 mm hook.
- Add more chains to the rose strip.
- Use 3 hdc per daisy petal instead of 2 hdc.
The Craft Yarn Council notes that yarn-weight and hook-size standards are guidelines; actual results vary by yarn, hook, and individual tension.
Common Beginner Mistakes
1. The flower center will not close
The magic ring tail may not be pulled firmly enough, or the yarn may be too slippery.
Fix: Pull slowly and hold the stitches close together as you close the ring.
2. The petals look uneven
One or more petals may have extra stitches.
Fix: Count each petal repeat before moving to the next center stitch.
3. The flower curls too much
Your tension may be tight, or the hook may be too small.
Fix: Try a slightly larger hook or relax your chain stitches.
4. The rose looks like a tight knot
The strip was rolled too tightly.
Fix: Re-roll the strip more loosely and let the outer petals flare slightly.
5. The flower spins on the clip
The flower was attached at only one small point.
Fix: Sew through at least two or three secure points on the clip bar.
6. The bead feels loose
The bead was not sewn through enough times.
Fix: Remove it and resew with several passes, or replace it with yarn embroidery for better safety.
7. The clip gets sewn shut
The needle passed through both sides of the alligator clip.
Fix: Keep the clip open with folded paper while sewing.
How to Customize This Crochet Project
Yarn changes
Use crochet thread for dainty clips.
Use sport-weight cotton for beginner-friendly stitch visibility.
Use DK cotton for chunkier, playful clips.
Avoid bulky yarn unless you are making oversized statement clips.
Color changes
Try matching sets:
- Ivory and blush.
- Lavender and cream.
- Coral and sage.
- Yellow and white daisy.
- Red rose with green leaves.
- Blue and white flower pair.
- Neutral beige and soft brown.
Size changes
For smaller daisy clips, use thinner thread.
For bigger daisy clips, add 3 hdc in each petal instead of 2.
For fuller roses, start with ch 31 or ch 35 instead of ch 25.
Border options
Add a tiny contrasting slip-stitch border around daisy petals if you are comfortable working into small stitches.
For beginners, keep the first version plain.
Texture options
Try:
- Pearl-free yarn knot center.
- French knot embroidery.
- Tiny contrasting circle center.
- Two-layer flower.
- Rose with a small leaf.
- Daisy with alternating petal colors.
Gift ideas and use cases
These clips work well for:
- Birthday gifts.
- Baby shower favors, without beads for babies.
- Craft fair sets.
- Bridesmaid accessories.
- Photo shoot props.
- Easter baskets.
- Spring market items.
- Matching mother-and-child accessories.
- Crochet stash-busting projects.
Finishing Instructions
After attaching the flower to the clip:
- Check the front of the flower.
- Check the wrong side for loose tails.
- Weave in any remaining yarn ends.
- Trim tails close to the fabric.
- Open and close the clip several times.
- Tug gently on the flower to test attachment.
- If using fabric glue, let it dry completely before wearing.
Blocking is optional. For cotton flowers, you can gently shape petals with your fingers. If a flower needs flattening, lightly mist it, pin it into shape, and let it dry.
Do not soak metal clips unless you know they are rust-resistant.
Quick Printable-Style Summary
Project: Crochet Flower Hair Clips
Skill level: Beginner to Easy
Yarn: Sport-weight cotton or size 10 crochet thread
Hook: 3.0 mm for sport cotton or 2.75 mm for thread
Other materials: Hair clips, tapestry needle, sewing needle, scissors, optional bead for adult clips only
Daisy-Style Flower
Center: Magic ring, ch 1, 6 sc into ring, join.
Petals: In each center stitch: sl st, ch 2, 2 hdc, ch 2, sl st.
Finish: Fasten off, weave in ends, add safe yarn center detail.
Mini Rose
Foundation: Ch 25.
Row 1: Sc across.
Row 2: Ch 2, turn. Repeat: 3 dc in next stitch, sl st in next stitch.
Finish: Roll strip into rose and sew through base.
Attachment
Sew the finished flower securely to an alligator clip or snap clip.
Check clip movement before wearing.
FAQ
Are crochet flower hair clips good for beginners?
Yes. The daisy-style flower is especially beginner-friendly because it uses a small center and repeated petal stitches. The mini rose is also manageable once you are comfortable sewing through crochet layers.
What yarn is best for crochet flower hair clips?
Cotton yarn or crochet thread is best because it gives clear stitch definition and helps the flower hold its shape. Sport-weight cotton is easier for beginners than very fine thread.
Can I use hot glue instead of sewing?
You can use fabric glue or hot glue for adult accessories, but sewing is more secure and cleaner. For children’s clips, sew the flower firmly and avoid small detachable beads.
How do I make the flower smaller?
Use thinner yarn or crochet thread and a smaller hook. You can also reduce the rose chain length from 25 to 19 or 21 chains.
How do I stop the flower from flopping?
Use cotton yarn, a smaller hook, and secure the flower to the clip at multiple points. For larger flowers, sew a small felt circle to the back before attaching the clip.
Can I sell finished crochet flower hair clips?
Many free crochet patterns allow finished-item sales with credit, but terms vary by designer. Always check the specific source’s usage policy before selling items made from someone else’s pattern. For this original pattern, finished handmade clips may be sold in small quantities.
Are these clips safe for babies?
Use caution. Avoid beads, buttons, pearls, or any detachable small parts for babies and children under 3. Sew everything securely and inspect the clip before each use.
Conclusion
Crochet flower hair clips are small, fast, and satisfying. They are also one of the best beginner projects for learning how small crochet motifs turn into finished accessories.
Start with the daisy-style flower if you want the simplest version. It teaches you a magic ring, six stitches, repeated petals, and secure finishing. Then try the mini rose when you want something with more dimension.
Once you understand the basic construction, you can make matching sets in different colors, create seasonal clips, prepare craft fair inventory, or make handmade gifts from leftover yarn.





