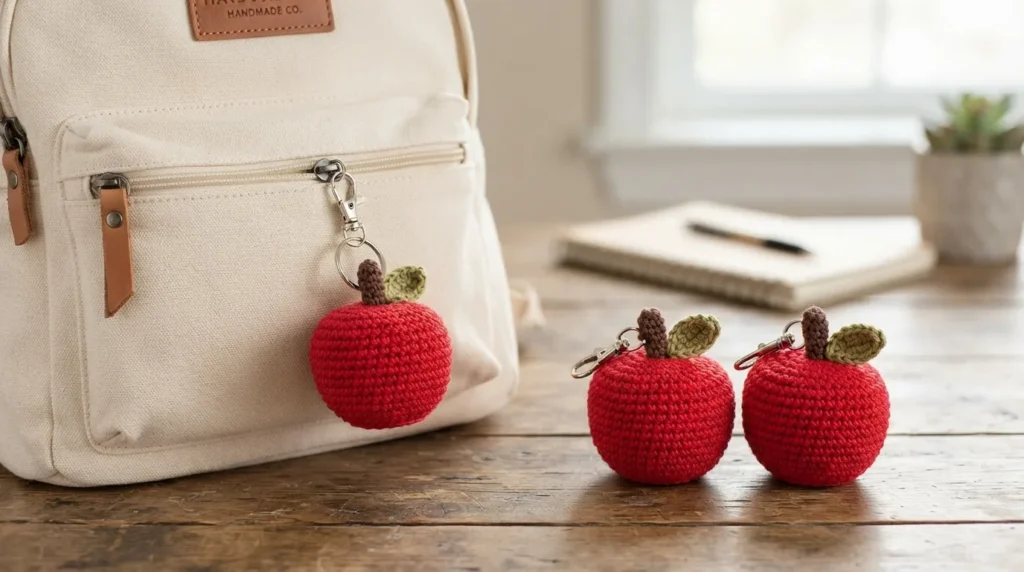
A crochet apple keychain is a tiny project with a lot of charm. It is quick, cute, useful, and perfect for teacher gifts, school bags, pencil pouches, lunch bags, craft fairs, and back-to-school crochet content. Because the apple is small, you do not need much yarn, and you can finish one in less time than a larger amigurumi toy.
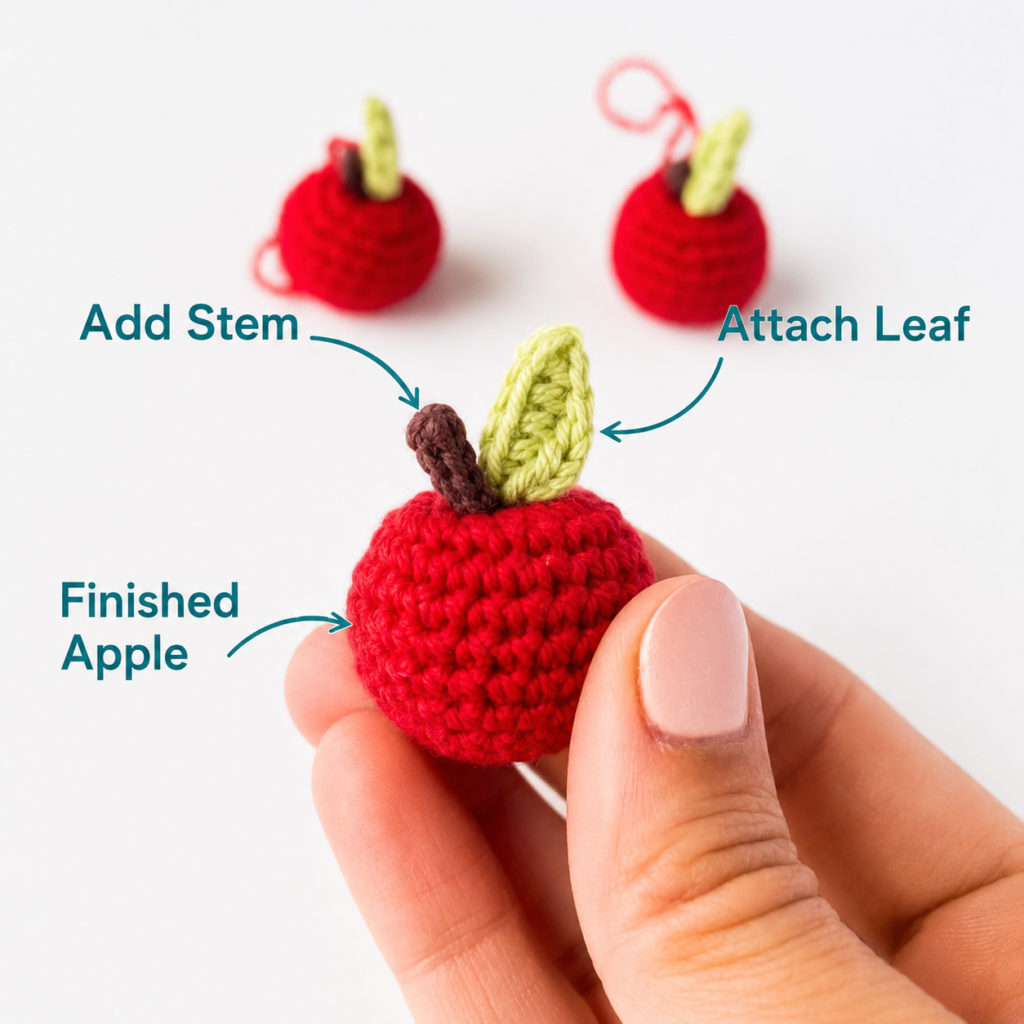
This tutorial teaches a beginner-friendly apple keychain made with a red stuffed apple body, a tiny brown stem, a green leaf, and a secure hanging loop or key ring. The selected reference source, Elendipity’s “Mini Apple Amigurumi,” explains that the apple is worked from top to bottom and that the leaf and stalk are made first so they can be attached partway through the apple body. This article uses that tutorial as a visual research source, but the wording, teaching flow, image prompts, and keychain-focused structure are original.
This project is best for beginners who already know how to chain, single crochet, slip stitch, and work in continuous rounds. You will also learn how to shape a small amigurumi apple, attach tiny details securely, and add a loop strong enough for a keychain.
What You’ll Learn
- How to choose yarn for a small crochet apple keychain.
- How to crochet a tiny stem.
- How to crochet a small leaf.
- How to start the red apple body.
- How to attach the stem and leaf securely.
- How to shape and stuff a mini amigurumi apple.
- How to close the apple neatly.
- How to pull the center tight for a realistic apple indent.
- How to add a hanging loop or key ring.
- How to customize the apple for gifts, bags, and school themes.
Materials You’ll Need
For a crisp apple keychain, cotton yarn works better than fuzzy yarn because it gives the tiny stitches clean definition. The reference source uses cotton yarn and gives different hook sizes for mini apple and keychain sizing: 2 mm for the mini apple version and 3.5 mm for the larger keychain version.
You will need:
- Red cotton yarn for the apple body.
- Green cotton yarn for the leaf.
- Brown cotton yarn for the stem.
- 2.0 mm–3.5 mm crochet hook, depending on desired size.
- Stitch marker.
- Polyester stuffing.
- Tapestry or darning needle.
- Small scissors.
- Silver split ring, lobster clasp, or key ring.
- Optional: small jump ring.
- Optional: pliers for opening keychain hardware.
Safety note: because this project includes small parts and keychain hardware, it is not suitable for babies or young children who may put items in their mouths.
Crochet Abbreviations Used
This tutorial uses US crochet terms. The Craft Yarn Council lists common US crochet abbreviations and also notes that some stitch names differ between US and UK terminology; for example, US single crochet corresponds to UK double crochet.
- ch = chain
- sc = single crochet
- hdc = half double crochet
- sl st = slip stitch
- st/sts = stitch/stitches
- rep = repeat
- BLO = back loop only
- FLO = front loop only
- inc = increase, usually 2 sc in the same stitch
- dec = decrease, usually working 2 stitches together
Before You Start
This project is a small amigurumi-style apple, so your tension matters. Firm stitches help keep the stuffing hidden. If your stitches are loose and you can see stuffing between them, try a smaller hook.
Gauge is not critical for a keychain, but yarn weight changes the final size. The Craft Yarn Council’s yarn weight system gives general hook-size ranges by yarn category, which is useful when substituting yarn. For a small backpack or pencil pouch charm, use cotton 8/4 or sport cotton. For a bigger keychain, use cotton 8/8 or DK cotton.
Before crocheting, decide whether you want:
- A soft yarn loop.
- A metal key ring.
- A lobster clasp.
- A split ring attached after finishing.
If the charm will be used daily on a backpack, a metal key ring is usually stronger than a yarn-only loop.

Step-by-Step Crochet Tutorial
Step 1: Crochet the Stem
Start with brown yarn. Chain a short length, then work slip stitches back across the chain to create a firm little stem. Leave long tails at both ends. These tails are important because they will help you attach the stem securely to the apple body later.
Your stem should be small and slightly flexible. If it is too long, the apple can look more like a cherry. If it is too short, it may disappear behind the leaf.
Beginner tip: Keep the stem stitches firm. A soft, loose stem may flop too much.
Common mistake to avoid: Do not cut the tails short. You need them for attaching and securing the stem inside the apple.

Step 2: Crochet the Leaf
With green yarn, chain a short foundation. Work along one side of the chain using small stitches near the tip and taller stitches near the center, then work back along the other side of the chain. This gives the leaf a natural pointed oval shape.
Leave both yarn tails long. You will use them to attach the leaf to the top of the apple. The Elendipity tutorial also makes the leaf separately before attaching it during the apple body stage.
Beginner tip: If the leaf twists, pinch it gently between your fingers and smooth it flat before sewing.
Common mistake to avoid: Do not overwork the leaf with too many stitches. A small apple needs a small leaf.

Step 3: Start the Apple Body
Switch to red yarn. Start with a magic ring and work single crochet stitches into the ring. Continue increasing for a few rounds until the top of the apple is wide enough.
This is the beginning of the apple body, but it will not look like an apple yet. At this point, it may look like a tiny red cup or rounded disk. That is normal.
Beginner tip: Pull the magic ring closed firmly, but do not break the yarn. Cotton can snap if pulled too hard.
Common mistake to avoid: Do not forget your stitch marker. In continuous rounds, the beginning of the round can become hard to see.

Step 4: Attach the Stem and Leaf to the Top
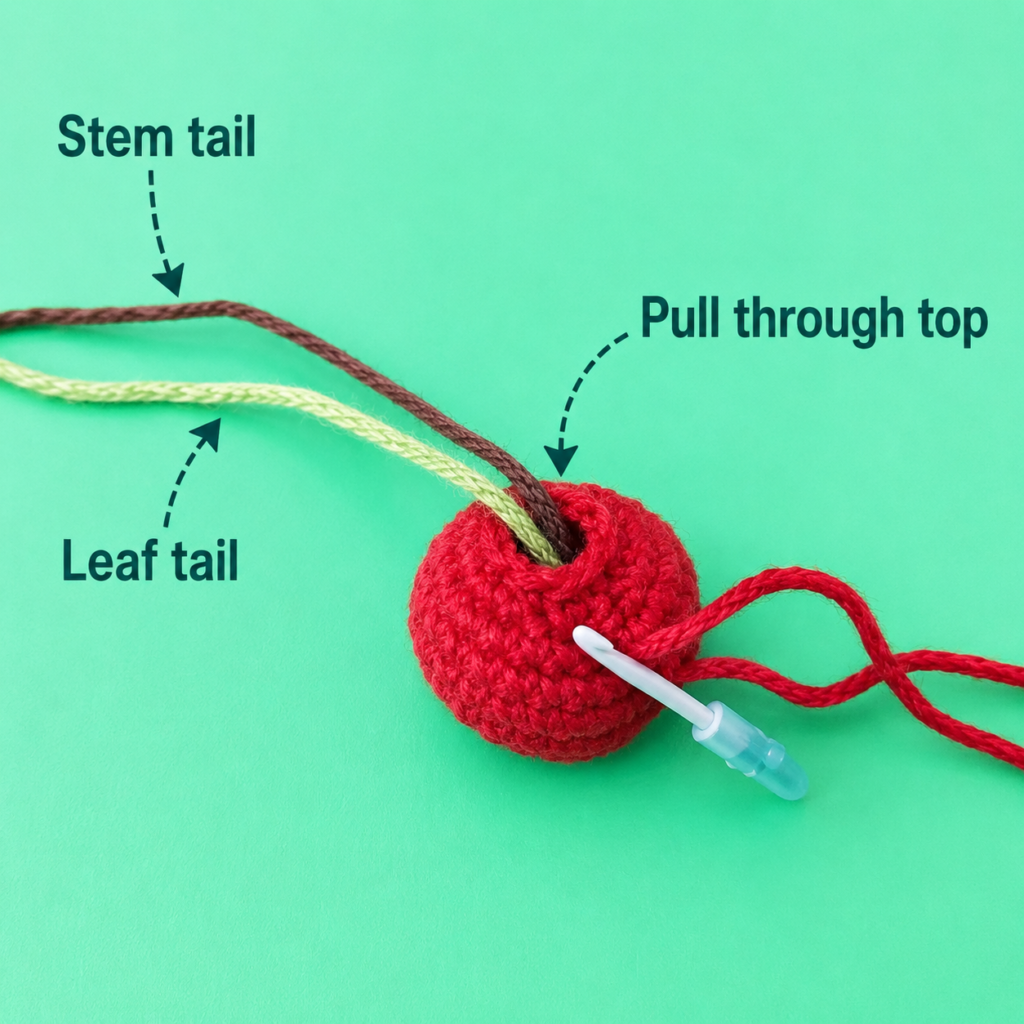
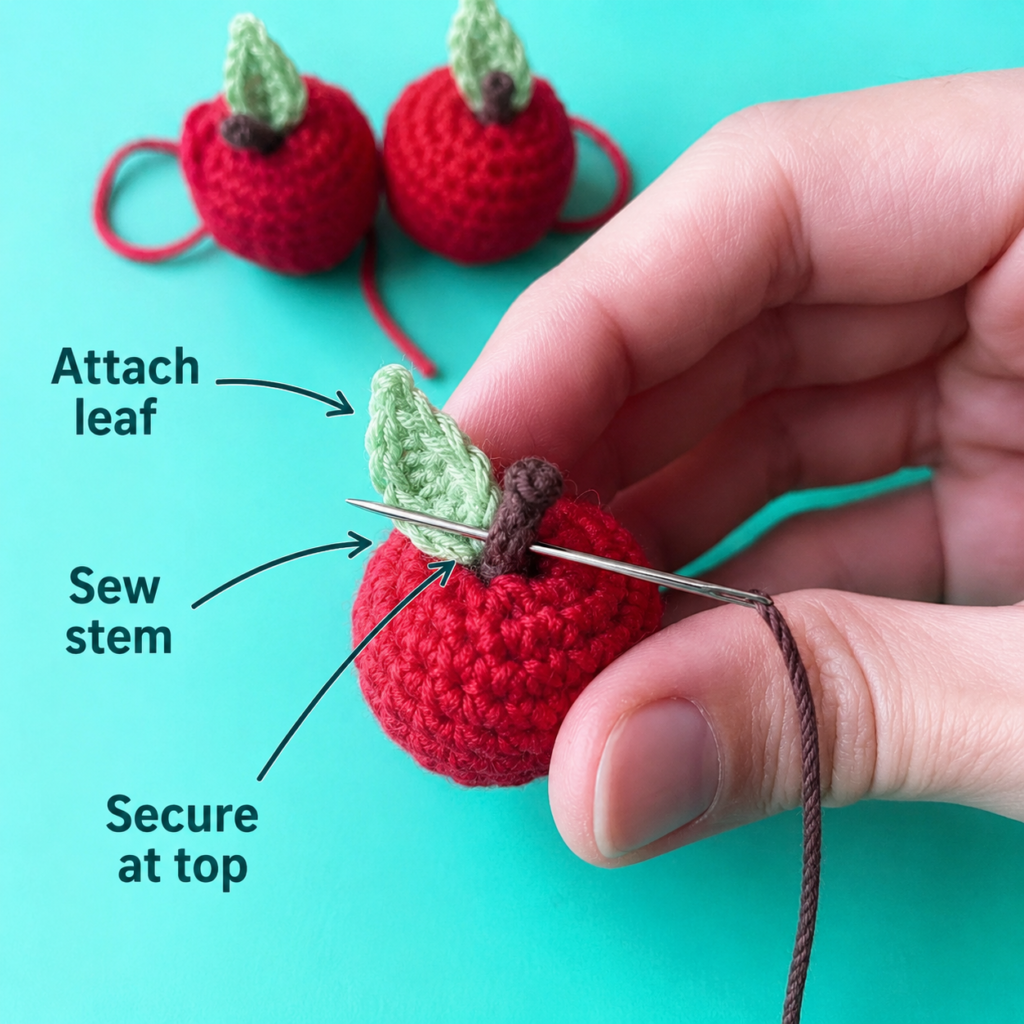
After the top of the apple body has enough stitches to hold its shape, insert the stem and leaf tails through the center of the magic ring area. Use a tapestry needle to pull the tails to the inside of the apple.
Place the stem slightly to one side of the leaf so both details are visible. The source tutorial inserts the threads of the stalk and leaf through the middle of the original magic circle, then secures them from the wrong side.
Beginner tip: Check the outside before knotting. Make sure the leaf faces the direction you like.
Common mistake to avoid: Do not attach the leaf and stem only to surface stitches. Pulling the tails through the center makes the join stronger.
Step 5: Secure the Tails Inside
Turn the apple body slightly so you can access the inside. Tie the matching yarn tails securely. Trim only the excess after the knot is tight. If you want extra strength for a backpack keychain, leave the trimmed ends slightly longer inside the apple instead of cutting too close.
Press the apple body back into shape after securing the details.
Beginner tip: A double knot inside the apple is fine because it will be hidden by stuffing.
Common mistake to avoid: Do not leave loose stem or leaf tails. A keychain gets handled often, so small details must be secure.
Step 6: Build the Round Apple Shape
Continue working single crochet rounds in red. Work even rounds to build the body height, then begin decreasing gradually to close the apple.
The apple should become round but slightly squat, not tall like a pear. Keep the top area a little softer because you will later pull the center inward to create the apple indent.
Beginner tip: Use invisible decreases if you know them. They make amigurumi shaping look neater.
Common mistake to avoid: Do not stuff too early. Wait until the apple is partly decreased, but still open enough to add stuffing easily.
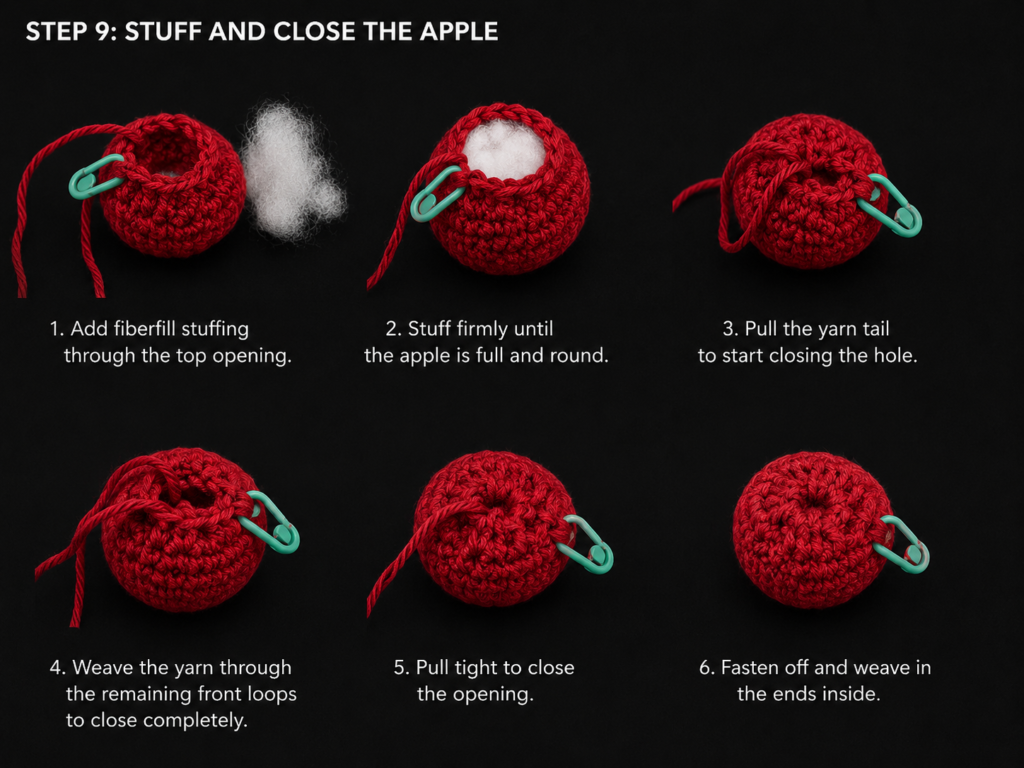
Step 7: Stuff and Close the Bottom
Add small pieces of stuffing little by little. The apple should feel full but not hard. If you overstuff it, the stitches may stretch and the shape may become round like a ball instead of apple-like.
After stuffing, close the bottom by working the final decreases. Cut a long red yarn tail. Thread the tail through a tapestry needle and pass it through the front loops of the remaining stitches. Pull gently to close the hole.
Beginner tip: Use less stuffing near the top center so the indent can pull inward.
Common mistake to avoid: Do not cut the closing tail short. You need it for shaping the apple.
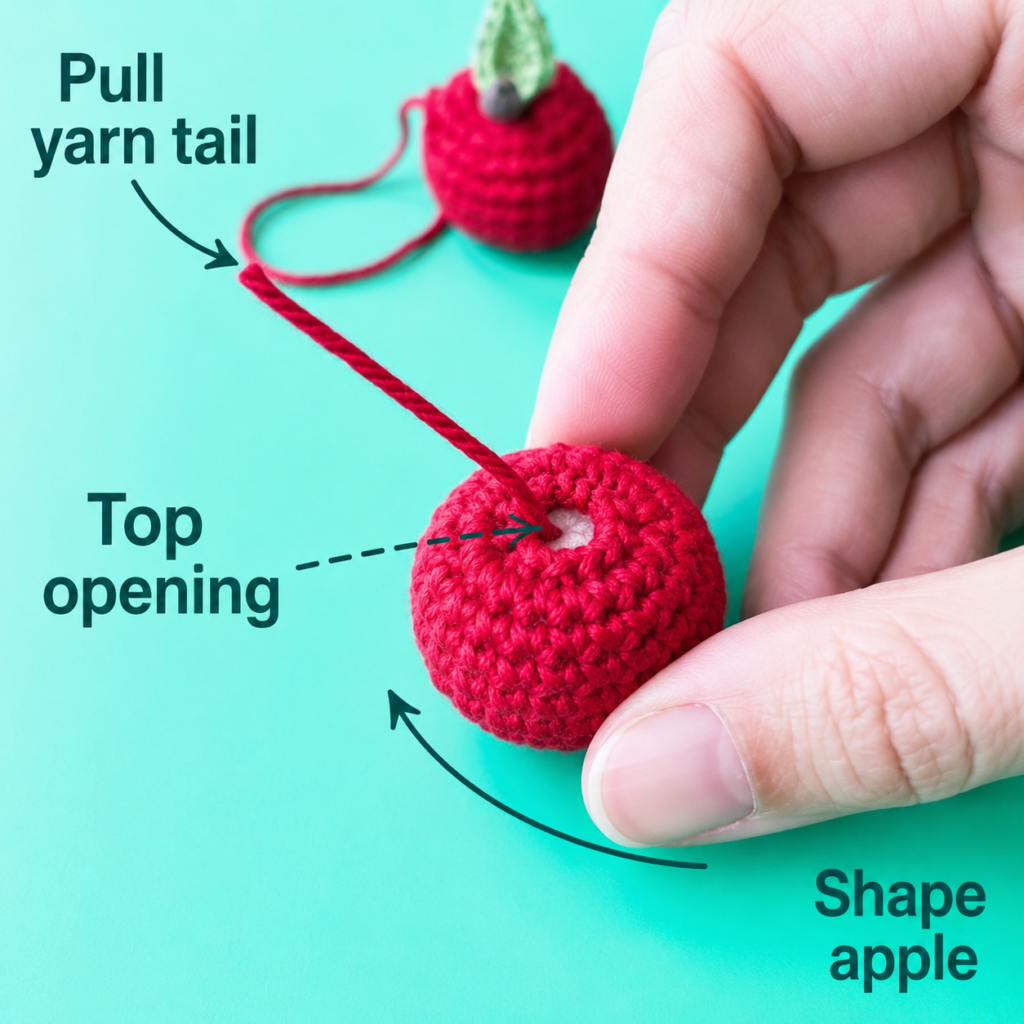
Step 8: Shape the Apple Indent
To make the apple look more realistic, use the long red tail to pull the bottom and top centers inward. Insert the needle from the bottom center through the apple and bring it out near the top center, close to the stem and leaf. Pull gently until the top dips inward. Then bring the needle back down and secure the shape.
This step changes the project from “red ball” to “apple.” Pull slowly. You can always tighten more, but pulling too hard can distort the stitches.
Beginner tip: Hold the apple between your fingers while pulling so you can control the shape.
Common mistake to avoid: Do not pull so tightly that the stem and leaf disappear inside the apple.
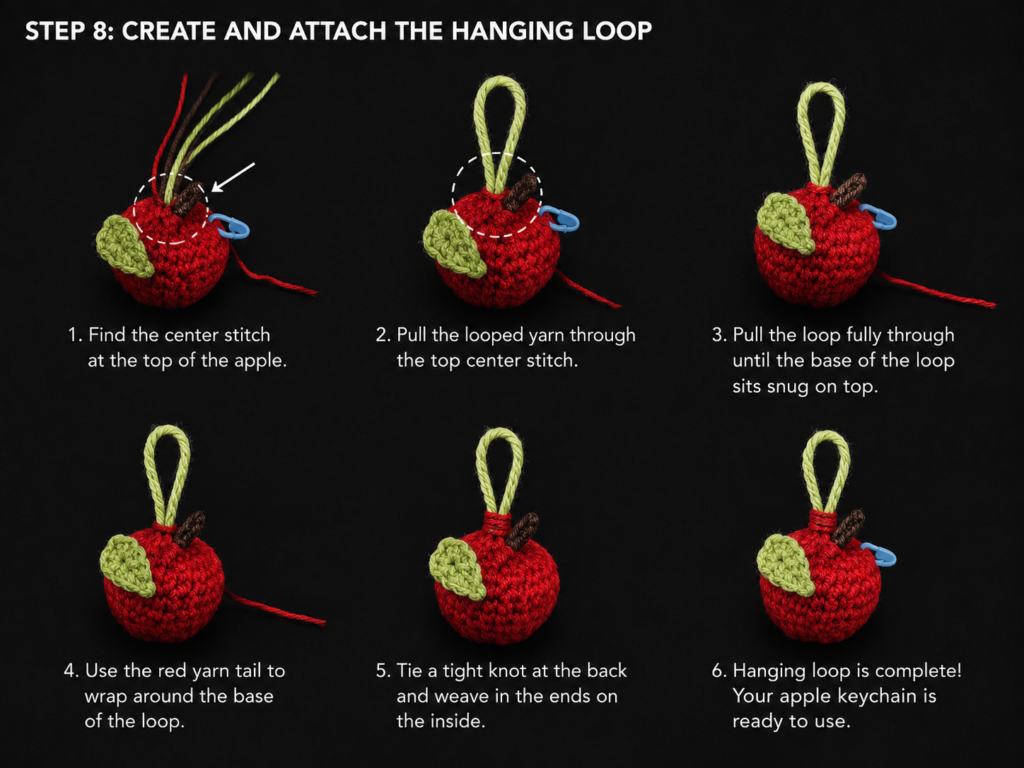
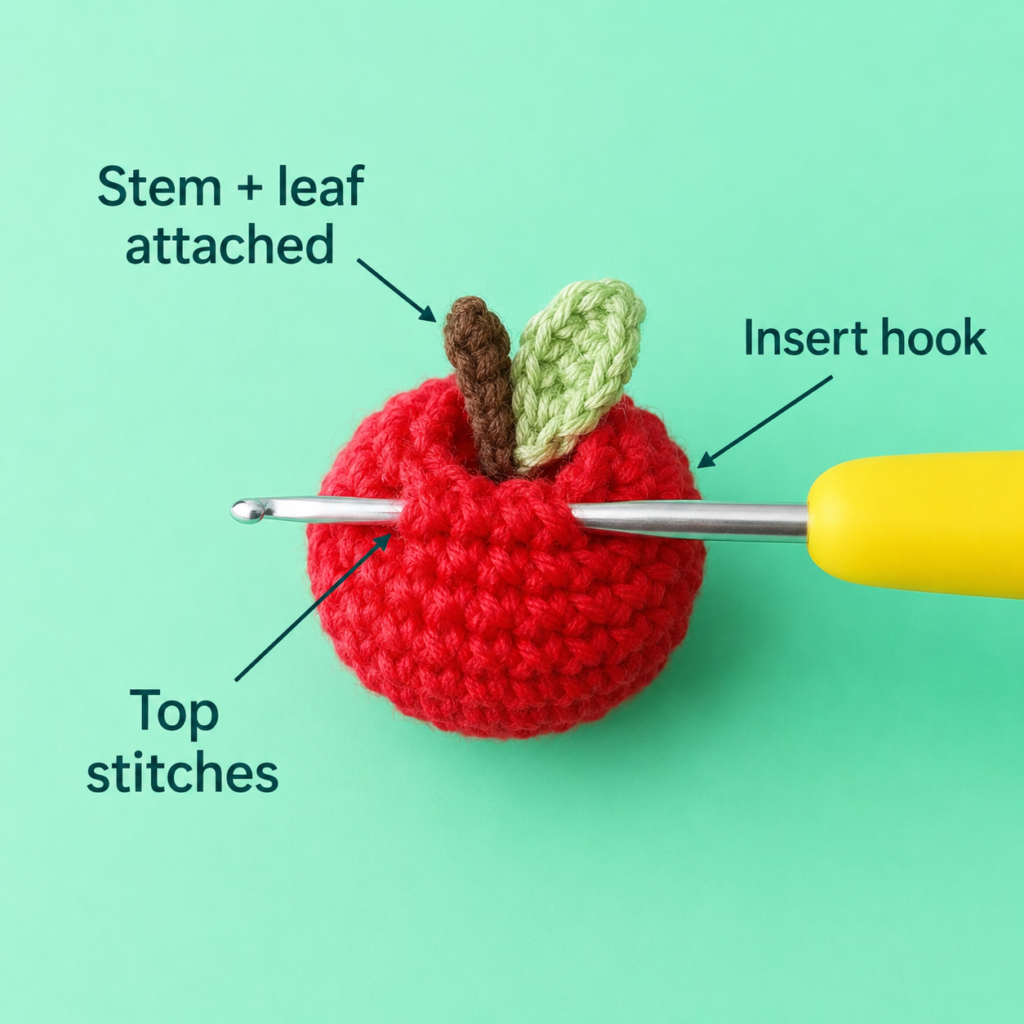
Step 9: Add the Hanging Loop or Key Ring
For a soft yarn loop, insert your hook between two rounds near the upper back of the apple. Pull up red yarn, chain a small loop, then secure it back into the apple with a slip stitch. Weave in the tails firmly.
For a stronger keychain, attach a metal split ring through the yarn loop or add a small jump ring through a firm stitch near the top. The reference tutorial shows a loop being added between rounds after the apple is finished.
Beginner tip: If this will hang from a backpack, test the loop by tugging gently before using it.
Common mistake to avoid: Do not attach the key ring to only one loose strand. It should be anchored through sturdy crochet fabric.
Pattern Notes or Stitch Notes
This project is worked in small amigurumi-style rounds. Use a stitch marker and move it up at the beginning of every round.
The apple body should be firm enough to hide stuffing. If stuffing shows between stitches, use a smaller hook or reduce stuffing slightly.
The stem and leaf should be made before the apple body is finished because they are easiest to secure while the apple is still open.
The closing tail is not just for closing. It also helps create the apple indent, so leave it long.
The hanging loop should be placed near the upper back or top center so the apple hangs upright.
Common Beginner Mistakes
- Using a hook that is too large: This can make holes in the apple body.
- Forgetting the stitch marker: Continuous rounds are easy to lose track of.
- Cutting stem and leaf tails too short: Long tails make attachment stronger.
- Overstuffing the apple: Too much stuffing can make the apple look like a ball.
- Pulling the indent too hard: This can hide the stem and leaf inside the apple.
- Weak keychain attachment: A backpack charm needs a secure loop or metal ring.
- Using unsafe small parts for toddlers: Key rings and small attachments are not baby-safe.
How to Customize This Crochet Project
You can make this apple keychain in many colors. Try classic red, green apple, golden yellow, blush pink, or caramel brown for a fall version.
For a teacher gift, attach the apple to a pencil pouch, bookmark, or small gift tag. For back-to-school, clip it to a backpack zipper or lunch bag.
For texture, embroider a tiny smile or add a simple highlight stitch in white yarn. Avoid safety eyes if the charm is for a young child; embroidered details are safer.
For size changes, use thinner yarn and a smaller hook for a tiny charm, or DK cotton and a larger hook for a bigger bag charm.
For hardware, choose a split ring, lobster clasp, swivel clasp, or simple yarn loop. A lobster clasp is easiest to move between bags.
Finishing Instructions
Weave all yarn ends inside the apple body. Check that the stem, leaf, loop, and key ring are secure. Trim any loose ends only after testing the charm gently.
Cotton amigurumi usually does not need heavy blocking, but you can smooth the leaf with your fingers. If the leaf curls too much, lightly dampen it, shape it flat, and let it dry. The Craft Yarn Council describes blocking as a way to help stitches settle and achieve the shape and drape you want.
Quick Printable-Style Summary
- Skill level: Beginner to easy
- Project type: Crochet apple keychain / amigurumi charm
- Yarn: Cotton yarn in red, green, and brown
- Hook: 2.0 mm–3.5 mm depending on charm size
- Main stitches: Chain, slip stitch, single crochet, half double crochet, increase, decrease
- Starting method: Magic ring for apple body; short chains for stem and leaf
- Construction: Make stem, make leaf, crochet apple body, attach details, stuff, close, shape indent, add loop/key ring
- Finishing: Weave ends, secure hardware, shape leaf, test loop strength
FAQ
Is this crochet apple keychain pattern good for beginners?
Yes. It is a small beginner-friendly amigurumi project, but it helps if you already know single crochet, increases, decreases, and how to work in continuous rounds.
What yarn should I use for a crochet apple keychain?
Cotton yarn is best because it gives clean stitch definition and helps the apple keep its shape. Use thinner cotton for a small charm and thicker cotton for a larger keychain.
Can I make this without a magic ring?
Yes. You can chain 2 and work the first round into the second chain from the hook, but a magic ring usually creates a cleaner top center.
How do I make the apple look more realistic?
Pull the closing tail through the apple from bottom to top to create an indent near the stem. This shaping step makes the apple look less like a plain ball.
Can I add a face?
Yes. Embroider the eyes and mouth with black or dark brown yarn before the apple is fully closed. Avoid small plastic eyes if the charm is for a young child.
How do I attach it to a backpack?
Add a sturdy yarn loop or metal split ring near the top of the apple. For daily backpack use, a metal lobster clasp or split ring is more durable.
Can I sell finished crochet apple keychains?
You can usually sell finished items made by you, but do not copy or redistribute another designer’s pattern text or images. Always check the usage rules of any pattern source you follow.
Conclusion
A crochet apple keychain pattern is a perfect small project for back-to-school season, teacher gifts, craft fairs, and quick handmade accessories. It uses simple amigurumi shaping, but the finished apple looks detailed because of the tiny stem, leaf, stuffed body, shaped indent, and secure hanging loop.
Once you make your first one, try a few color variations: red apples, green apples, yellow apples, or even pastel apples for cute bag charms.





