
Crochet micro shorts are one of those projects that look much more complicated than they really are. At first glance, turning a ball of yarn into something you can wear might feel like a big leap, especially if you’ve only crocheted scarves, blankets, or small accessories.
But here’s the encouraging part: you don’t need advanced crochet stitches to make your own pair.
In this beginner-friendly crochet micro shorts pattern, we’re making a comfortable ribbed waistband, working a simple body in the round, and dividing the bottom into two small leg openings. The design uses half double crochet stitches for a flexible, relatively dense fabric and a fitted silhouette.
You can make your shorts in one solid color, try gentle stripes, or experiment with bright festival-inspired combinations. You can also decide exactly how short or long to make the legs.
The most important part of this project isn’t memorizing complicated stitch repeats. It’s understanding how the pieces fit together and checking your measurements as you crochet.
This step-by-step tutorial walks you through that process, from your first foundation chain to the final woven-in yarn end.
What You’ll Learn
By the end of this crochet micro shorts tutorial, you’ll know how to:
- Crochet a stretchy waistband using back-loop half double crochet.
- Join your waistband into a continuous circle.
- Create a fitted crochet shorts body without complicated stitch patterns.
- Adjust the fabric around your hips.
- Use simple stitch markers to divide the shorts into two legs.
- Crochet a small crotch bridge for the leg openings.
- Finish both leg edges neatly.
- Adjust the inseam and overall rise to fit your preferred style.
Crochet Micro Shorts Pattern at a Glance
| Feature | Details |
|---|---|
| Project | Women’s crochet micro shorts |
| Construction | Top-down, ribbed waistband, round-worked body |
| Skill level | Adventurous beginner |
| Sizing | Made to measure |
| Inseam | Approximately 2–5 cm (0.8–2 in), adjustable |
| Yarn | Lightweight category 3 cotton blend |
| Hook | 4.5 mm, or size needed for gauge |
| Main stitch | Half double crochet |
| Color palette | Dusty sage and oatmeal cream |
| Seaming | Short waistband joining seam |
| Finishing | Simple single crochet leg edging |
This is an original made-to-measure construction guide. The stitch-count example is illustrative; individual sizing needs to be calculated from your swatch and checked on the body before finishing.
Materials You’ll Need
Choosing the right yarn makes a big difference when crocheting clothes. For micro shorts, look for something soft enough to wear against the skin, lightweight enough to drape naturally, and durable enough to handle regular movement.
Yarn: Category 3 DK cotton or a cotton blend with some elasticity. For the original visual design, choose dusty sage for the body and oatmeal cream for the waistband and stripes. A rough planning quantity is 250–450 yards for many adult sizes, but actual consumption varies considerably with fit, gauge, and coverage.
Crochet hook: 4.5 mm ergonomic hook for the body. A 4 mm hook may work for a firmer ribbed waistband if your fabric feels too loose.
Other supplies: Yarn needle, small scissors, at least four locking stitch markers, a flexible measuring tape, and a notebook for recording your stitch counts.
Optional extras include a short length of soft waistband elastic for extra security and a lightweight lining if you’re concerned about the opacity of your crochet fabric.
Crochet Abbreviations Used
This pattern uses US crochet terminology.
| Abbreviation | Meaning |
|---|---|
| ch | Chain |
| sc | Single crochet |
| hdc | Half double crochet |
| sl st | Slip stitch |
| st / sts | Stitch / stitches |
| BLO | Back loop only |
| inc | Increase: work 2 hdc in one stitch |
| rep | Repeat |
If you’re accustomed to UK terms, remember that US half double crochet corresponds to UK half treble crochet, while US single crochet corresponds to UK double crochet.
A quick reminder: How to make a half double crochet
Yarn over and insert your hook into the indicated stitch. Yarn over again and pull up a loop. You should now have three loops on the hook.
Yarn over once more, then pull through all three loops.
That’s one half double crochet.
For a back-loop-only half double crochet, insert your hook under only the rear loop of the stitch instead of both top loops. This creates a flexible ribbed texture.
Before You Start: Fit, Gauge, and Measurements
Clothing is less forgiving than a flat blanket. Two people can use the exact same yarn, hook, and written instructions and still get different results because their stitches are tighter or looser.
That’s why taking a few measurements before beginning is worthwhile.
Take four useful body measurements
Measure the circumference where you want the waistband to sit. Then measure the fullest part of your hips, including the seat.
Next, measure from your chosen waistband position down to the point where the shorts must comfortably pass underneath your crotch when you’re seated. Finally, decide how far you want each leg to extend below the crotch.
Micro shorts are intentionally short, but a short inseam and insufficient crotch depth are not the same thing. A comfortable rise needs enough room for sitting, bending, and walking.
Make a gauge swatch
With your chosen yarn and 4.5 mm hook, crochet a half double crochet swatch at least 15 cm (6 in) wide. Wash and dry it as you intend to care for the finished shorts, then count stitches across the center 10 cm (4 in).
For an example, suppose you measure:
- 15 hdc stitches across 10 cm.
- 12 hdc rows across 10 cm.
- 18 back-loop hdc rows across 10 cm when measured along the length of the relaxed ribbing strip.
These are example measurements, not verified gauge results for the finished design. Use your own washed and relaxed swatch.
If you want 94 cm of finished hip circumference and your body gauge is 1.5 stitches per cm, your target would be 141 stitches. Round that to an even number, such as 142, for an easier leg division.
Don’t force the garment to a standard size chart if your measurements suggest otherwise.
Understanding ease
Ease is the difference between your body measurement and the finished garment measurement.
A stretchy fitted garment may be slightly smaller than your body, while a garment made from firm cotton generally needs some room to move.
For a first attempt, it’s safer to avoid aggressive negative ease. Aim for your measured hip circumference or slightly more room unless your swatch has excellent stretch and recovery.
Step-by-Step Crochet Micro Shorts Tutorial
Step 1: Crochet the foundation chain for your waistband
We begin with the waistband because it determines how securely your shorts will sit.
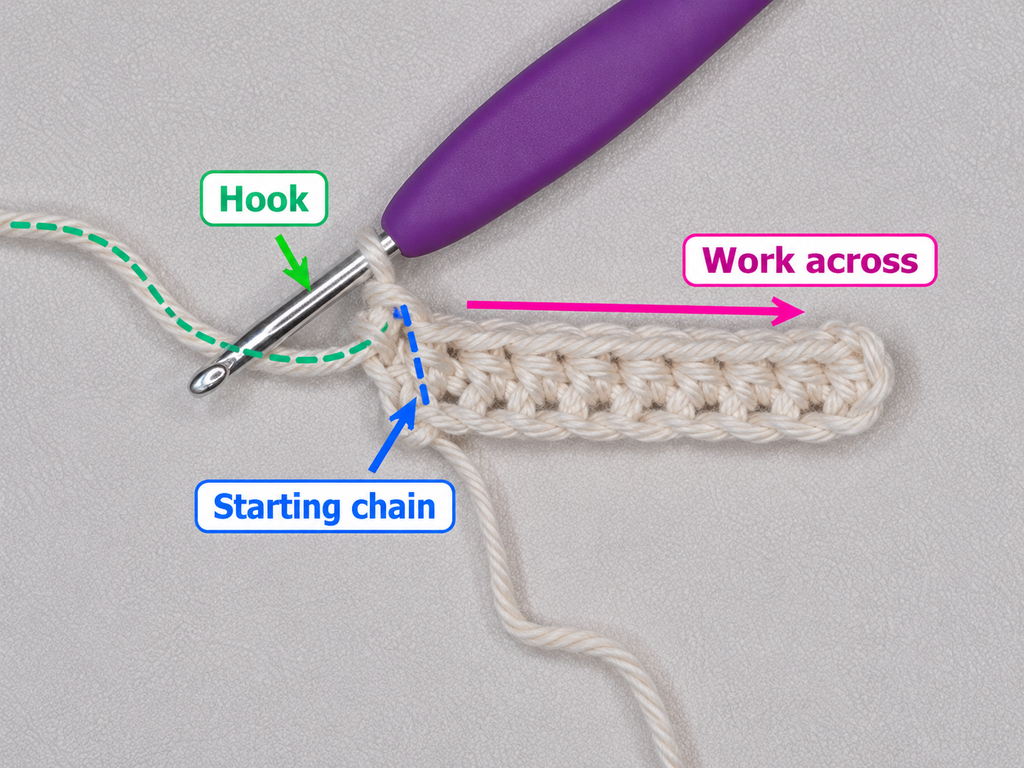
Using oatmeal-cream yarn, make a slip knot and chain 9. This gives a relatively narrow ribbed band. You can chain more if you prefer a wider waistband.
Work one half double crochet into the second chain from your hook, then continue making one half double crochet in every remaining chain.
You should have 8 half double crochet stitches.
The first row might curl or twist slightly in your hands, but that doesn’t mean you’ve made a mistake. The ribbed structure develops after several rows.
Beginner tip: Keep your foundation chain relaxed, but not excessively loose. The stitches should slide comfortably onto your hook.
Common mistake to avoid: Don’t count the turning chain as a stitch. This is one of the easiest ways to accidentally widen the waistband.
Step 2: Build the ribbed waistband
Now we’ll turn that small foundation row into a long stretchy strip.
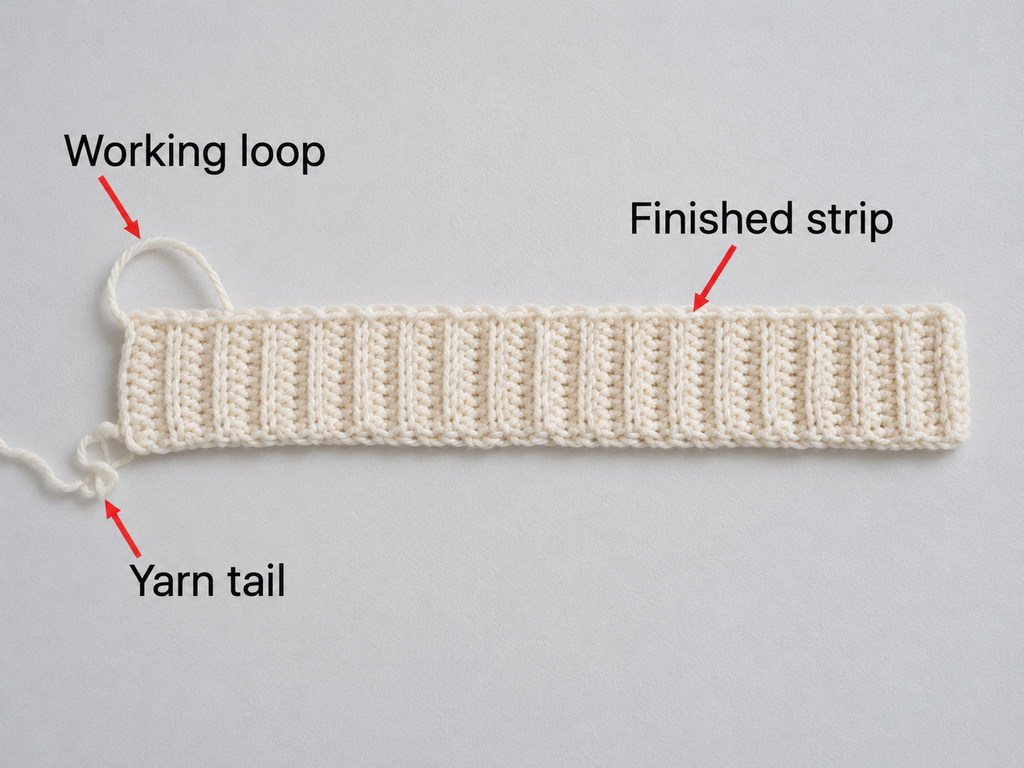
Row 2: Chain 1 and turn your work. Half double crochet in the back loop only of each of the 8 stitches.
Repeat Row 2 until your ribbed strip fits snugly around the point where you want the waistband to sit, without digging into your skin.
For example, someone with a 74 cm waist might find that a relaxed 70 cm ribbed strip stretches comfortably around their body. This is only an illustration: the correct length depends on how elastic your own ribbing feels.
The back-loop technique creates the raised ridges that make crochet ribbing flexible. As your strip grows, gently stretch it sideways to check its recovery.
Beginner tip: Count eight stitches every few rows so the edges remain straight.
Common mistake to avoid: If the band gradually narrows, you may be skipping the final stitch. If it widens, you may be crocheting into the turning chain.
Step 3: Join your waistband into a circle
Place the short ends of your finished ribbed strip together, being careful not to twist it.
Insert your hook through corresponding stitches on both ends and make slip stitches across the width of the strip. You can work the join on the inside so it feels smoother against your body.
After joining, you should have one continuous ribbed ring.
Before continuing, try it on again. If it feels too loose, undo the join and remove a few rows. If it’s too tight, add more rows.
This is much easier than correcting the fit after you’ve crocheted the entire body.
Beginner tip: Use a locking marker to identify the joining seam. It makes a helpful orientation point.
Common mistake to avoid: Check that the ring is not twisted before completing the join.

Step 4: Crochet the first round of the shorts body
Turn the ribbed ring so that you’re ready to crochet into the long edge of the waistband.
Change to dusty sage yarn.
The goal is to make a smooth transition from the vertical ribbing to the horizontal body fabric without creating large gaps or bunching.
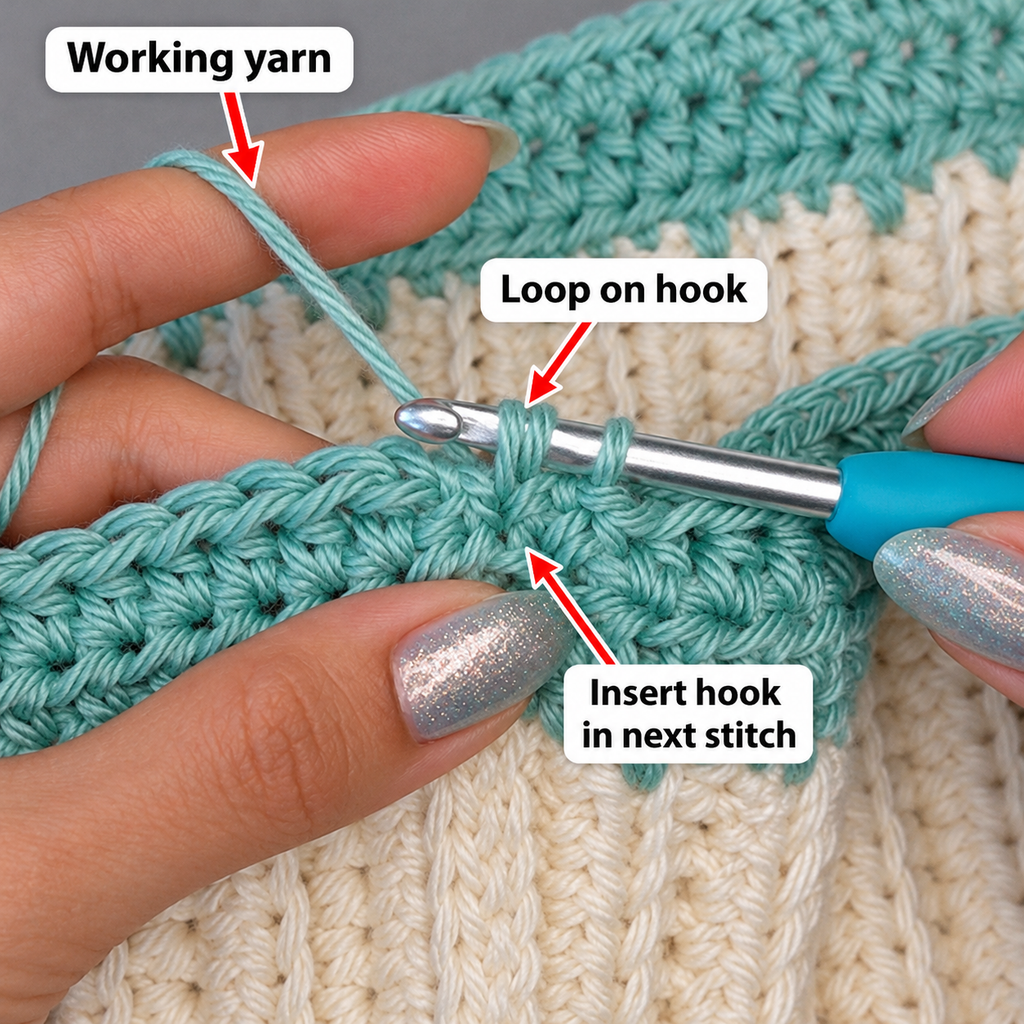
Work half double crochet stitches evenly around the long edge of the ribbing. As a starting approach, try placing approximately three hdc stitches for every two ribbing rows, adjusting the distribution if the edge waves or pulls inward.
Join the last stitch to the first stitch with a slip stitch.
Place a stitch marker in the first actual hdc stitch.
Count every stitch in this round and record that number. This is your initial body stitch count.
Beginner tip: Spread stitches evenly rather than concentrating several increases in one small area.
Common mistake to avoid: If the body edge ruffles, you’ve probably worked too many stitches along the ribbing. If it pulls tightly inward, you may need more.

Step 5: Build the body and shape it around your hips
Now we’re creating the main part of the shorts.
For each ordinary round, chain 1 (this does not count as a stitch), then make one half double crochet in each stitch around. Join with a slip stitch into the first actual hdc.
You can turn after each round if you prefer a balanced fabric texture. If you do, turn consistently throughout the body.
If the initial body stitch count is smaller than your calculated hip stitch count, increase gradually as you work downward.
For an increase round, calculate how many stitches you need to add, then spread the increases evenly around the circle. To add eight stitches, for example, work two hdc in eight evenly spaced existing stitches and one hdc in all the others.
Space shaping rounds apart with ordinary rounds. Check the fit frequently and stop increasing once you reach your required hip circumference.
For the striped look, introduce oatmeal cream for one or two rounds, then switch back to sage. Keep the sequence predictable, such as four sage rounds followed by two cream rounds.
Beginner tip: Write down each round and its final stitch count. Simple notes make symmetrical shaping much easier.
Common mistake to avoid: Don’t increase in exactly the same location in every shaping round. Stagger the increases to avoid noticeable bulges.
Step 6: Crochet to the correct crotch depth
Continue working half double crochet rounds after the hips have reached their desired circumference.
At this stage, you shouldn’t automatically increase in every round. Once the shorts fit comfortably around your hips, work even rounds to build the required rise.
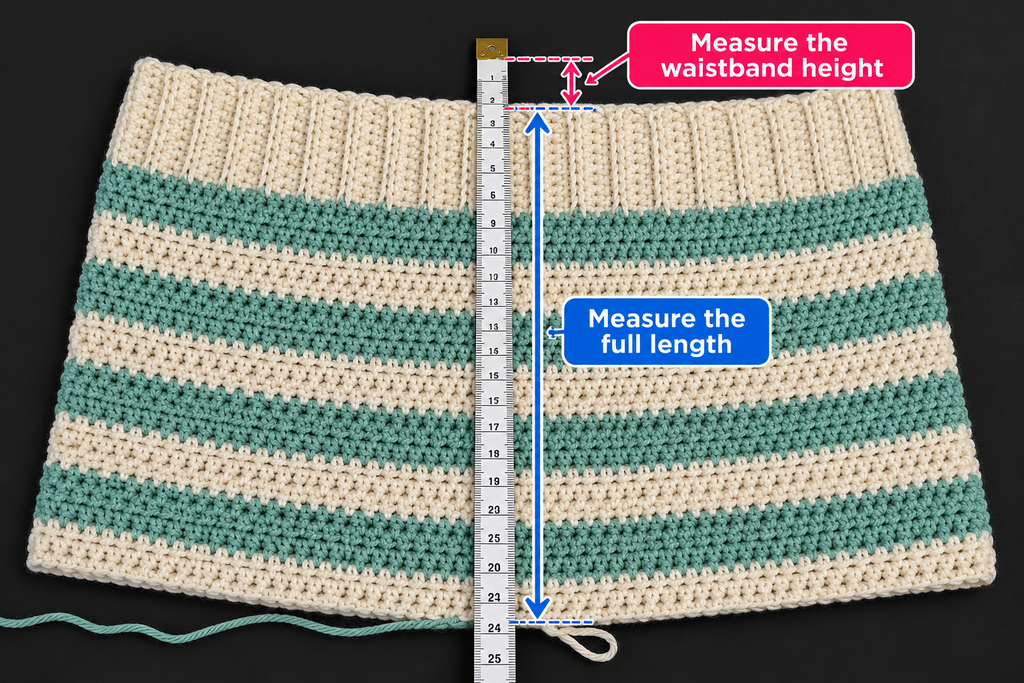
Place the unfinished tube against your body and check its length while standing and sitting. The lower edge should reach approximately the crotch level needed for the future leg division, with enough room to move comfortably.
Don’t rely on the front view alone. The back of the shorts may need more coverage because it passes over the seat.
If the back rises uncomfortably when you sit, add extra overall body rounds before dividing the legs. For a more advanced adjustment, carefully planned short-row shaping can add back rise, but it isn’t essential for this basic design.
Beginner tip: Use a flexible measuring tape along the side of the body from the waistband to the intended leg division.
Common mistake to avoid: Dividing the leg openings before the rise is deep enough creates shorts that pull upward, even when the waist circumference is correct.
Step 7: Mark the front and back leg division points
This is the stage that often makes first-time shorts makers nervous, but it’s manageable once you visualize what you’re doing.
Lay your crochet tube flat, with the waistband at the top. Position the beginning-of-round seam where you prefer it, ideally at the center back.
Count the stitches around the bottom edge. If you have an odd number, adjust by one stitch so you have an even total.
Divide that stitch count in half.
For example, if your body has 142 stitches, each half contains 71 stitches.
Place stitch markers in two opposite gaps between stitches: one centered at the front and one centered at the back. Each half of the circumference should contain exactly the same number of stitches.
Those markers identify the endpoints of the small crotch bridge you’ll make next.
Beginner tip: Arrange the tube as it would be worn before marking. It’s easier to see the front, back, and side positions when the garment is oriented correctly.
Common mistake to avoid: Don’t divide the number of rounds instead of the number of stitches. The leg split is determined by the stitches along the bottom circumference.
Step 8: Create the crotch bridge
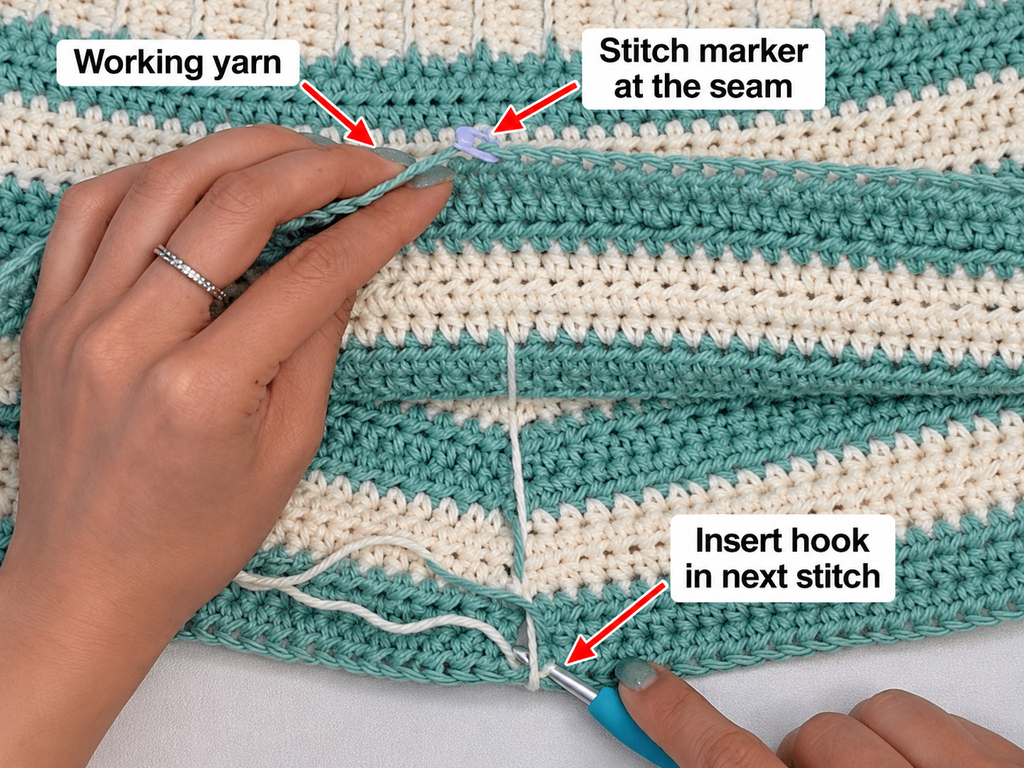
The crotch bridge is a short chain that connects the front and back of the shorts. It helps form two separate openings where the legs will go.
The exact length matters for comfort.
For the original made-to-measure variation, aim for a bridge approximately 3–5 cm (1.2–2 in) long, adjusting to your body and yarn gauge. For example, with 1.5 stitches per cm, eight chains measure approximately 5.3 cm if your chain gauge is similar. Measure the actual chain rather than relying only on the number.
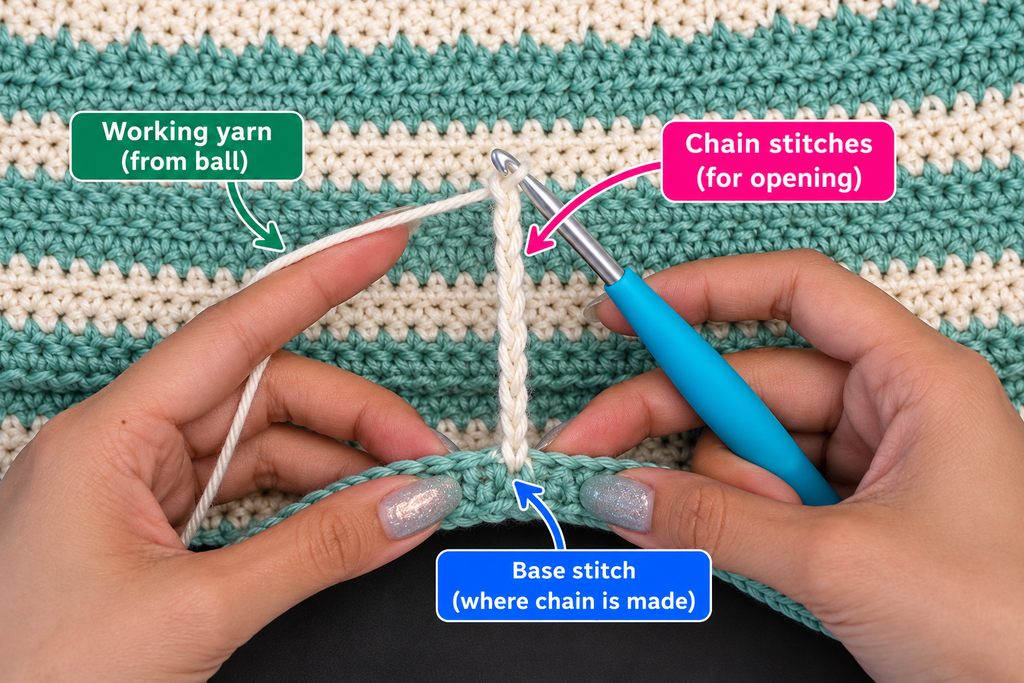
Attach your sage yarn at the back marked gap. Chain the number required for your bridge. Stretch the chain across the interior to the front marked gap, and secure it with a slip stitch into the adjacent front-edge stitch without twisting the chain.
Check that it spans the two marked locations and divides the lower opening into two sections.
At this point, the garment should have a clear figure-eight style division when viewed from underneath.
Before continuing, try the shorts on carefully to see whether the bridge is wide enough. A bridge that’s too short can cause uncomfortable pulling. One that’s unnecessarily long may make the leg openings loose around the inner thighs.
Beginner tip: Use a contrasting stitch marker temporarily to hold the chain in place while you check its position.
Common mistake to avoid: Don’t accidentally join the chain to a side point. It needs to connect the front and back crotch positions.
Step 9: Crochet the first leg opening
The first leg opening is formed by working along one half of the shorts body and the crotch bridge.
With your hook positioned at the front end of the bridge, chain 1 and work one hdc into each stitch around the first half of the body. When you reach the back, work one hdc into each chain along the bridge to complete the circuit.
Join to the first hdc with a slip stitch.
You should now have a continuous leg opening. Your approximate leg stitch count is half the body stitch count plus the number of bridge chains, allowing for any adjustments made at the join.
For example, a 142-stitch body divided into two 71-stitch halves with an eight-chain bridge would produce approximately 79 stitches around each leg opening.
Work one or more additional hdc rounds until the inseam reaches the length you want. For very short micro shorts, that might be only a couple of rounds. Longer shorts simply need more.
Check the fit while standing and sitting before fastening off.
Beginner tip: Mark the first stitch of every new round so you don’t accidentally add or skip stitches near the inner leg join.
Common mistake to avoid: Don’t crochet around both body halves after separating the legs. Each leg should use its own half of the lower body and one edge of the bridge.

Step 10: Crochet the second leg and match the lengths
Turn the shorts so the remaining leg opening is accessible.
Join your yarn at the inner leg edge, preferably where the join will be less noticeable. Chain 1, then work half double crochet stitches along the unworked second half of the body.
When you reach the crotch bridge, work into the unused loops on the opposite side of its foundation chain, then join to complete the round.
Make the same number of hdc rounds as you made for the first leg.
If the first leg has three rounds, the second should also have three. If you’re using stripes, keep the color order identical on both sides.
When you’ve finished, lay the shorts flat and compare the hem lengths. Measure from the crotch seam down each inseam rather than relying on visual judgment alone.
Beginner tip: Keep a short written record, such as “right leg: three sage rounds, one cream edging round.”
Common mistake to avoid: Adding an extra stitch near one end of the crotch bridge can make the second leg noticeably wider. Count the stitches before continuing.

Step 11: Add a neat edging to both leg openings
A simple single crochet edging gives each leg a clean, defined finish.
Attach your cream yarn at the inner edge of one leg. Chain 1, then work one single crochet into every stitch around the opening.
Join to the first single crochet with a slip stitch.
Repeat on the second leg.
If your hem flares outward, you may be working the stitches too loosely. Try a slightly smaller hook, but avoid making the edging so tight that it cuts into your leg when seated.
You can add another round if you want a more noticeable border, or finish after one round for a minimal look.
Beginner tip: Test the edging before cutting your yarn. A fitted hem should stretch comfortably with the leg.
Common mistake to avoid: Don’t sharply decrease the stitch count just to make the hem look fitted. That can restrict movement.
Step 12: Secure your waistband and weave in the ends
Before declaring your shorts finished, try them on and check the waistband.
If the waistband stays comfortably in place, you can leave it as it is.
If it stretches too much, add optional soft elastic on the inside. Measure the elastic comfortably around your waist without pulling it tight, join the ends securely, and stitch it discreetly along the interior waistband without stretching the crochet unevenly.
Use a blunt yarn needle to weave all loose yarn tails through several neighboring stitches on the wrong side. Change direction once or twice so they are less likely to work loose.
Inspect the two ends of the crotch bridge for any gaps. If necessary, close tiny openings with a few matching yarn stitches.
The finished shorts should sit comfortably at the waist, fit smoothly across the hips, and allow movement without pulling tightly at the crotch.
Pattern Notes and Stitch Counts
Here are the technical details worth reviewing before you work through the pattern a second time.
Turning chain: Chain 1 at the beginning of hdc rounds. It does not count as a stitch. The initial chain in the ribbing also does not count as a stitch.
Waistband: The example begins with 8 hdc stitches across the ribbed strip. Continue repeating back-loop hdc rows until the band fits your waist. The number of ribbing rows is determined by measurement, not a fixed clothing size.
Body stitch count: After picking up stitches, record your first round count. Increase evenly in selected rounds until your desired finished hip circumference is reached, then maintain that count while crocheting to the crotch depth.
Leg division: For an even body stitch count of N, each half contains N ÷ 2 stitches. If the crotch bridge contains B chains, each leg opening will have approximately N ÷ 2 + B stitches. Check the exact count around both finished openings because the joining points can affect the count.
Right side and wrong side: The ribbing will have a more prominent ridge orientation. Choose the side you prefer as the outside, and keep your joins and yarn ends toward the inside.
Color changes: For clean stripes, introduce the next yarn color on the final pull-through of the previous color’s last stitch. Keep joins near the back or inner leg area.
Repeat pattern: The waistband repeats one back-loop-only hdc row. The body repeats ordinary hdc rounds with shaping as needed. Each leg repeats ordinary hdc rounds to the selected inseam.
Common Beginner Mistakes and Easy Fixes
Even an uncomplicated shorts pattern can run into small problems. Most of them are fixable before the garment is finished.
1. The waistband feels too loose
This often happens when the ribbing was measured without accounting for stretch. Before starting the body, wrap the finished band around your waist and move around in it.
If it slips, remove several ribbing rows and rejoin it. If the body is already complete, carefully adding elastic may help.
2. One side of the shorts keeps getting wider
Accidentally adding stitches near the slip-stitch join can create a gradual widening effect.
Place a marker in the first actual stitch, skip the joining slip stitch, and count your body stitches after every round. Increase only when a shaping round calls for it.
3. The fabric is too see-through
Loose half double crochet stitches can leave noticeable spaces when the garment stretches.
Make a washed, stretched swatch before committing to the full project. Use a smaller hook if you can maintain comfortable drape, or add a lining. For streetwear, check opacity in natural light while bending and sitting.
4. The shorts ride up when walking
This can happen because the crotch depth is too short, the legs are too tight, or the fabric lacks sufficient stretch.
Check the rise before making the leg division. For improved coverage, add body length, a slightly longer inseam, or more room around the thigh.
5. The crotch bridge feels uncomfortable
The bridge may be too narrow or too wide for your measurements.
Undo the first leg round and adjust the number of bridge chains. It’s much easier to fix the bridge before both legs are completed.
6. The two legs don’t match
If the stitch counts or row counts are different, one leg may hang lower or fit more loosely.
Count both openings, compare the number of rounds, and make any corrections before weaving in ends.
7. The leg hems curl or pucker
A tight edging can cause puckering, while an overly loose edging can ripple.
Adjust hook size or tension and check that you’re maintaining a comfortable, even number of stitches around each opening.
How to Customize Your Crochet Micro Shorts
One of the best things about making your own crochet clothing is that you can change the details to suit your taste.
Try different yarn combinations
Cotton is a popular choice for summer crochet projects because it’s comfortable in warm weather and gives the stitches clear definition.
For close-fitting shorts, a cotton blend with a modest amount of stretch can be especially helpful. Pure cotton may grow or sag with wear, depending on how it’s spun and worked.
Avoid bulky yarn for a first micro-shorts project. It can create an unnecessarily thick garment and make the leg openings harder to shape smoothly.
Experiment with color and stripes
Dusty sage and cream create a soft, neutral look, but the pattern works equally well with bold combinations.
You might try terracotta with beige, navy with white, pastel pink with ivory, or a single solid color.
For a beginner, a solid color may make the process easier because you won’t have to track stripe changes. After finishing your first pair, experimenting with colors becomes much simpler.
Make your shorts longer
The easiest adjustment is to extend the leg openings.
Instead of finishing after a few leg rounds, continue crocheting evenly until you’ve reached the inseam you want.
For fuller coverage, you may also want additional rise and a slightly less fitted hip measurement.
Change the waistband height
Start with more foundation chains if you’d like a taller waistband.
For a narrower sporty waistband, use fewer chains. Just remember that the initial chain count determines the height of the ribbing, while the number of repeated rows determines its circumference.
Add a different border
A plain single crochet border is reliable and easy to maintain.
If you’d like a little decorative detail, consider an understated reverse single crochet edging or a contrasting-color trim. Avoid bulky decorative borders on very fitted leg openings because they can rub against the skin.
Make a matching crochet set
Pair the shorts with a simple crochet crop top or lightweight summer cardigan in coordinating colors.
A matching set can be a fun handmade wardrobe project, particularly if you’re already comfortable adjusting yarn shades and keeping gauge consistent.
Finishing Instructions
After fastening off each section, leave yarn tails long enough to weave securely into the fabric.
Turn your shorts inside out and weave the tails through the backs of several stitches. Avoid pulling so tightly that you gather or distort the fabric.
Gently straighten the waistband, side areas, and leg openings.
If your yarn care label permits it, wash the finished shorts using a gentle method and dry them flat, reshaping them while damp.
For blocking, use a clean towel or blocking mat and arrange the fabric according to your desired measurements. Don’t stretch the waistband or leg openings excessively.
Pay particular attention to the crotch bridge and the leg joins. Those areas should remain smooth and securely finished.
Finally, try on the shorts after they are completely dry. Different yarns can change slightly in size after washing, so this last fit check is worth doing.
For everyday wear, consider a soft lining or suitable underlayer, especially if the fabric becomes more open when stretched. Handmade crochet fabric is not automatically opaque.
Quick Printable-Style Crochet Micro Shorts Pattern Summary
Easy Crochet Micro Shorts — Quick Reference
Skill level: Adventurous beginner
Yarn: Lightweight category 3 cotton or cotton blend
Hook: 4.5 mm, adjusted for gauge
Stitches: ch, sc, hdc, sl st, BLO hdc
Starting method: Chain 9, make 8 hdc in the first row, then repeat BLO hdc rows to create a fitted ribbed waistband.
Waistband: Join the two short edges with slip stitches to make a circular band.
Body: Pick up hdc stitches around the long waistband edge, increase evenly as necessary to fit the hips, and work even rounds to the crotch depth.
Leg division: Mark opposite front/back stitch gaps, connect them with a short measured chain bridge, and work each leg opening independently.
Finishing: Crochet matching leg rounds, add single crochet edging, weave in ends, and gently wash or block according to the yarn care instructions.
Fit reminder: Calculate the body and leg stitch counts from your own gauge and measurements.
Frequently Asked Questions About Crochet Micro Shorts
Are crochet micro shorts suitable for beginners?
Yes, especially if you already know how to chain, half double crochet, and slip stitch. The waistband and body use simple stitches. The part that requires the most attention is dividing the leg openings and getting the rise and crotch bridge measurements right.
How much yarn do I need for crochet micro shorts?
For a lightweight adult pair, you might begin with approximately 250–450 yards, depending on your measurements, yarn weight, gauge, and chosen inseam. Larger sizes or longer shorts may require substantially more yarn. Make a swatch and purchase additional yarn from the same dye lot when possible.
What is the best yarn for crochet shorts?
Soft cotton and cotton blends are good choices. For very fitted shorts, a yarn with some elastic recovery is helpful because it allows the fabric to move without becoming permanently stretched out. Whatever yarn you choose, check its washed gauge, stretch, and opacity first.
Can I crochet shorts using only single crochet?
Yes. Single crochet makes a denser fabric, which can provide more coverage, but it may also feel firmer and take longer to complete. If switching from half double crochet to single crochet, recalculate the entire pattern using your new stitch and row gauge.
How do I make crochet micro shorts less revealing?
Add extra rounds to each leg, increase the crotch depth if needed, and consider using a tighter fabric or a soft lining. You can also make the body slightly roomier through the hips. Always check the fit while sitting, bending, and walking.
Do crochet micro shorts need elastic?
Not always. A well-fitted ribbed waistband may be enough, particularly if the yarn has good recovery. However, elastic can help prevent the waistband from stretching out during wear. Test the waistband before deciding whether to add it.
How long does it take to crochet micro shorts?
A confident beginner may complete a simple pair over several crafting sessions. Around 6–10 hours is a reasonable planning estimate for a small, straightforward version, but sizing, stitch gauge, color changes, and fitting adjustments can make the project take longer.
Conclusion
Making your own crochet micro shorts is a useful introduction to handmade garments because the construction is easy to understand once you’ve worked through the waistband, body, and leg division.
The biggest difference between shorts that simply look good on the table and shorts you’ll actually enjoy wearing is fit. Spend a little extra time checking the waist, hips, rise, and leg openings as you crochet.
For your first pair, keep the stitches simple and choose a yarn that’s comfortable to work with. After that, experiment with colors, stripe widths, leg lengths, and matching accessories.
Save this crochet micro shorts pattern for your next warm-weather project, and consider making a simple crochet top to create your own coordinated summer outfit.





