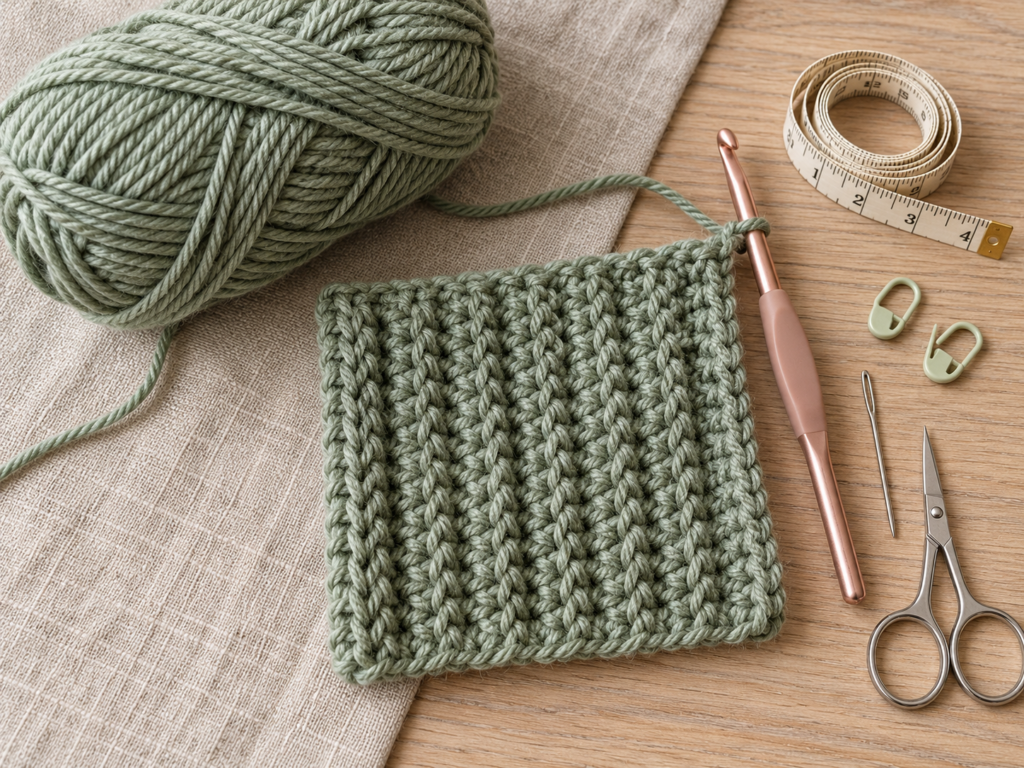
A handmade ear warmer is one of those little crochet projects that you’ll find yourself reaching for again and again. It keeps your ears cozy on chilly mornings, slips easily into a coat pocket, and doesn’t require nearly as much yarn or time as a full winter hat.
And this crochet ear warmer pattern has a lovely extra detail: a soft twist at the front that makes a simple rectangle look like something you might find in a handmade boutique.
The best part? You don’t need to learn any complicated stitches.
We’re going to make one long piece of ribbed crochet fabric using basic single crochet stitches. Then we’ll fold the ends together, sew a short seam, and turn the headband right-side out to reveal the twist.
If you can make a chain and work a single crochet stitch, you’re ready to try this project. And if you’re still learning those skills, the explanations and planned step-by-step photographs will help you understand exactly where your hook should go.
This free crochet ear warmer pattern is also easy to customize. You can make it narrower, wider, smaller, or larger simply by changing the measurements of your rectangle.
What You’ll Learn
By the end of this tutorial, you’ll know how to:
- Crochet a long foundation chain without making it too tight.
- Work a neat row of single crochet stitches.
- Make a ribbed texture using back-loop-only crochet.
- Keep the edges of a rectangle straight.
- Measure an ear warmer for a comfortable fit.
- Fold and sew a beautiful twist-front seam.
- Finish your headband neatly so it looks polished on both sides.
You will also learn how to adjust the pattern for different yarns and head sizes.
Materials You’ll Need
You don’t need a large collection of crochet supplies for this project. A few everyday tools and a small amount of soft yarn are enough.
Crochet Abbreviations Used
This pattern uses US crochet terminology.
| Abbreviation | Meaning |
|---|---|
| ch | Chain |
| sc | Single crochet |
| st / sts | Stitch / stitches |
| BLO | Back loop only |
| rep | Repeat |
If you’re used to UK crochet terms, remember that US single crochet is called UK double crochet. The technique is the same, but the names are different.
How to make a single crochet stitch
Insert your hook into the indicated stitch, yarn over and pull up a loop. You will now have two loops on your hook. Yarn over again and pull through both loops.
That’s one single crochet.
What does back loop only mean?
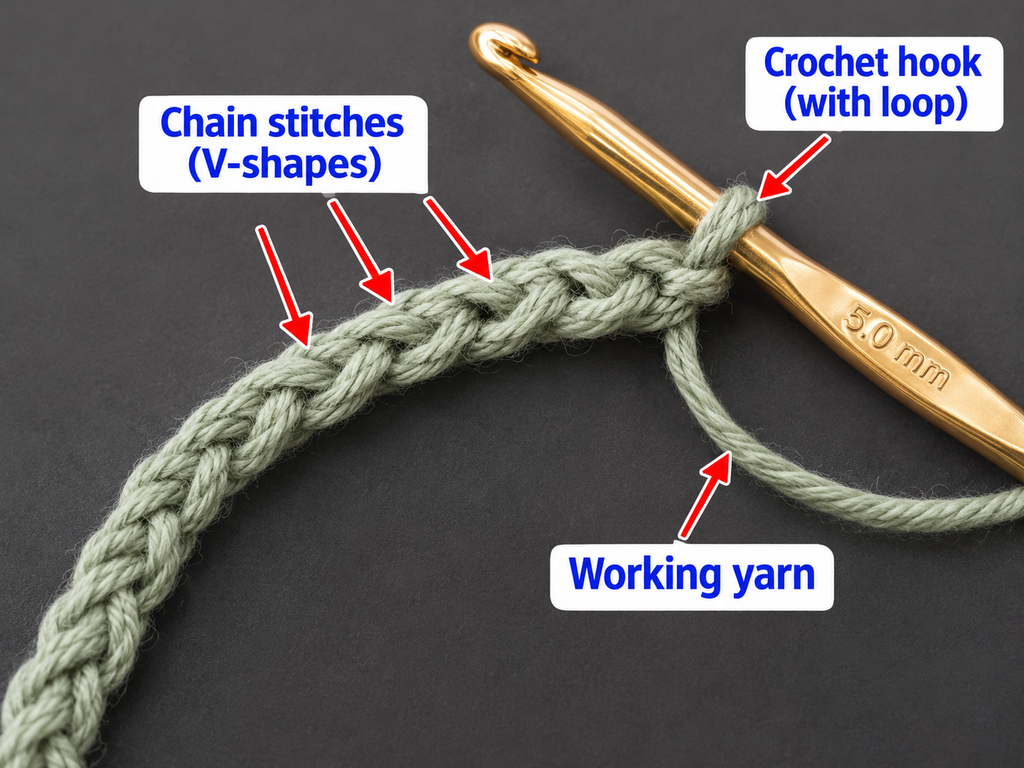
Look at the top of a normal crochet stitch. You’ll notice two strands that form a little V.
The strand closest to you is the front loop. The one farther away is the back loop.
When the instructions say to work in the back loop only, insert your hook under that far strand rather than under both strands.
Leaving the front loop unused produces the raised lines that give this ear warmer its ribbed texture.
Before You Start
Skill level and finished measurements
This is an easy beginner project. You work in straight rows and sew a small seam at the end.
For the adult sample, aim for a finished flat rectangle approximately 20 inches (51 cm) long and 3.5–4 inches (9–10 cm) wide before seaming. These are starting measurements, not a guaranteed universal fit.
The rectangle’s long measurement becomes the circumference of the completed ear warmer. Its short measurement becomes the width that covers your ears.
How to choose the right size
Measure around the head where the band will sit: across the forehead and over the ears.
Because crochet fabric stretches, the finished band may need to be slightly shorter than the actual head measurement. This is called negative ease.
Use this chart as a starting guide rather than an exact fitting guarantee.
| Size | Approx. head circumference | Starting band length |
|---|---|---|
| Toddler | 18–19 in | 17–18 in |
| Child | 19–20 in | 18–19 in |
| Teen / Small adult | 20–21 in | 19–20 in |
| Adult medium | 21–23 in | 20–21 in |
| Adult large | 23–24 in | 21.5–23 in |
The fabric’s stretch and the bulk of the twist seam affect the fit. Always check the band before sewing. For young children, ensure it is comfortable, not restrictive, and not worn while sleeping.
Gauge and tension
For a measurement-based project like this, matching a particular stitch count is less important than achieving the correct dimensions.
As a practice target, you might aim for approximately 15 single crochet stitches across 4 inches (10 cm), but your actual gauge may differ substantially.
If your fabric is stiff, try a slightly larger hook. If it feels loose and floppy, try a smaller hook or a yarn with more structure.
Remember that back-loop ribbing behaves differently from standard single crochet. Stretch your swatch gently in the same direction the ear warmer will stretch when worn.
How to count stitches
The foundation chain determines how many stitches will appear in each row.
Once you’ve finished your first row, count each V-shaped stitch along the upper edge. Make a note of the total.
You’ll maintain that same number throughout the band.
The turning chain at the beginning of each new row does not count as a stitch in this tutorial.
How to avoid curling and uneven edges
Don’t pull the foundation chain tightly. Work with comfortable yarn tension and make sure you’re not accidentally skipping the first or last stitch.
A little curling at the beginning can be normal, particularly with new yarn. If the fabric curls heavily or feels rigid, loosen your tension and check your hook size.
Step-by-Step Crochet Tutorial
Step 1: Make Your Foundation Chain
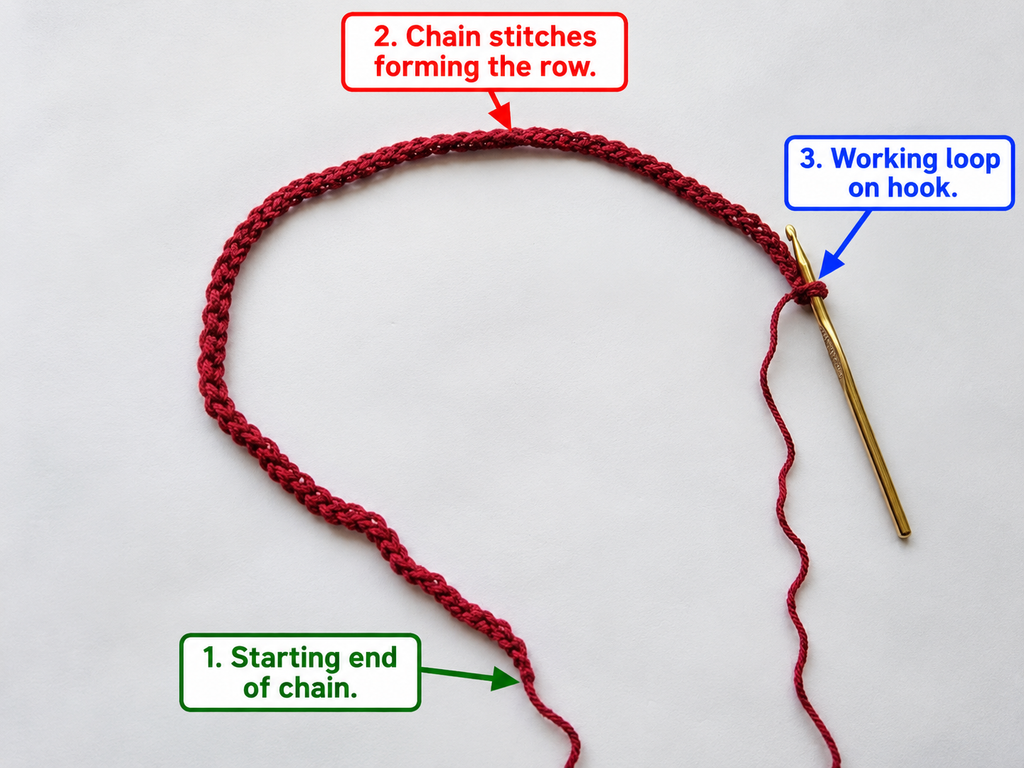
We’re starting with the length of the ear warmer, not its width. This means the foundation chain needs to be long enough to fit comfortably around your head once the piece is finished.
Make a slip knot and place it onto your 5 mm crochet hook.
Hold the working yarn in your non-dominant hand, keeping it gently tensioned.
To make a chain stitch, yarn over the hook and pull the yarn through the loop already on your hook.
Continue making chains until the chain measures close to your intended band length.
For a medium adult, begin with approximately 20 inches (51 cm). If you are uncertain, make a short practice chain and measure it to estimate how many chains you need.
Beginner tip: Keep the chain slightly loose. A tight foundation chain can prevent the bottom edge from stretching as much as the rest of the fabric.
Common mistake to avoid: Don’t measure a foundation chain while pulling it taut. Lay it gently on the table and measure its relaxed length.
Step 2: Crochet the First Row
Now we’ll turn that chain into a solid row of crochet fabric.
Insert your hook into the second chain from the hook.
Yarn over and pull up a loop. You should have two loops on your hook. Yarn over once more and pull through both loops.
You’ve made your first single crochet.
Continue working one single crochet into each remaining chain.
You can insert your hook under the top strand of the chain, or work into the back bump if you want a slightly neater foundation edge. Working into the back bump is optional.
When you reach the end, count your stitches. If you made 76 chains, for example, you’ll have 75 single crochet stitches because you began in the second chain from the hook.
There should be no increases or decreases.
Beginner tip: Place a stitch marker into the first stitch if you’re having trouble recognizing the row edges.
Common mistake to avoid: Don’t skip the last chain because it looks smaller than the others. Doing so makes the row shorter and creates an uneven edge.
Step 3: Create the First Ribbed Row
Turn your work so the opposite side faces you.
Chain one. This turning chain gives your hook room to begin the next row; it is not counted as a stitch.
Look at the top edge of the stitches you just made. You’ll see the familiar V shapes.
This time, instead of inserting your hook under both strands of the V, insert it only under the back strand.
Make a single crochet.
Continue working one single crochet in the back loop of every stitch across the row.
You’ll start seeing a small ridge on the fabric. That’s exactly what we want.
At the end of the row, count your stitches again to make sure the total hasn’t changed.
Beginner tip: Tilt the top edge of the fabric slightly toward you to make the back loops easier to see.
Common mistake to avoid: Don’t accidentally insert your hook between the stitch posts. Back-loop-only means under the back strand of the stitch’s top V.
Step 4: Check the size before fastening off
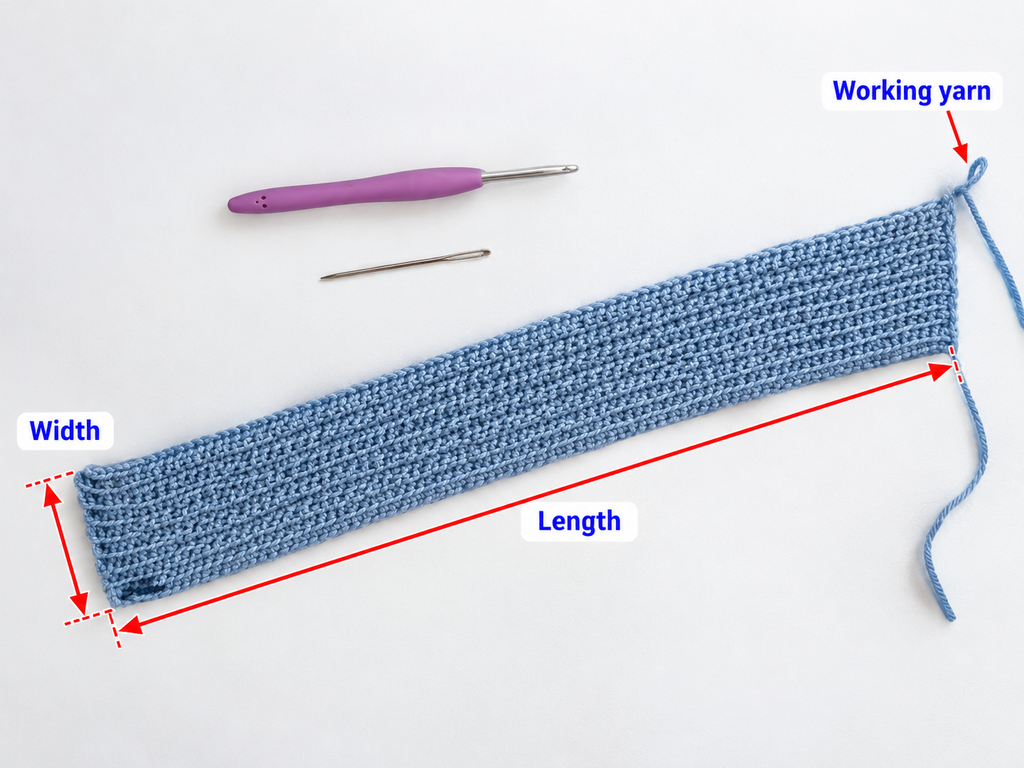
Before cutting your yarn, it’s worth spending a minute checking the fit.
The flat strip should be long enough to go around your head, allowing room for the twist seam.
Hold the two short ends together loosely. Place the band around your forehead and ears, keeping the temporary join at the front.
The fabric should feel gently snug.
If it pulls painfully against your forehead, the strip is too short. If the fabric has very little stretch and is too short, it’s usually easier to remake the foundation chain than to force the seam.
If the strip is noticeably loose, the fit will need adjusting before assembly. Because the long dimension was created by the foundation chain, changing the row count will not solve a circumference problem.
Once you’re satisfied with the length and depth, cut the yarn while leaving a generous tail of approximately 18–24 inches (45–60 cm) for sewing.
Pull the tail through your last stitch to fasten off securely.
Beginner tip: Always check the size before sewing. This is the easiest moment to make changes.
Common mistake to avoid: Don’t measure the fabric while pulling it to its maximum stretch. A comfortable ear warmer should stay in place without excessive tension.
Step 5: Bring the short ends together
Lay the crochet rectangle on a flat surface with your preferred outward-facing texture visible.
The two short ends are the edges that will become the twist.
Bring these ends together to form a loose circular shape.
Don’t twist the long body of the fabric as you bring the ends forward. The decorative twist will be made entirely by folding the short ends.
Position the ends beside one another, making sure the upper and lower long edges remain aligned.
Think of this as preparing two little folded flaps.
You’re not sewing yet. First, you need to arrange the layers into their correct order.
Beginner tip: Practice folding with a paper strip before trying it with crochet. It can help you understand the construction without fighting the yarn.
Common mistake to avoid: Avoid making a full 360-degree twist in the fabric itself. That creates an uncomfortable, twisted band rather than a neat gathered center.
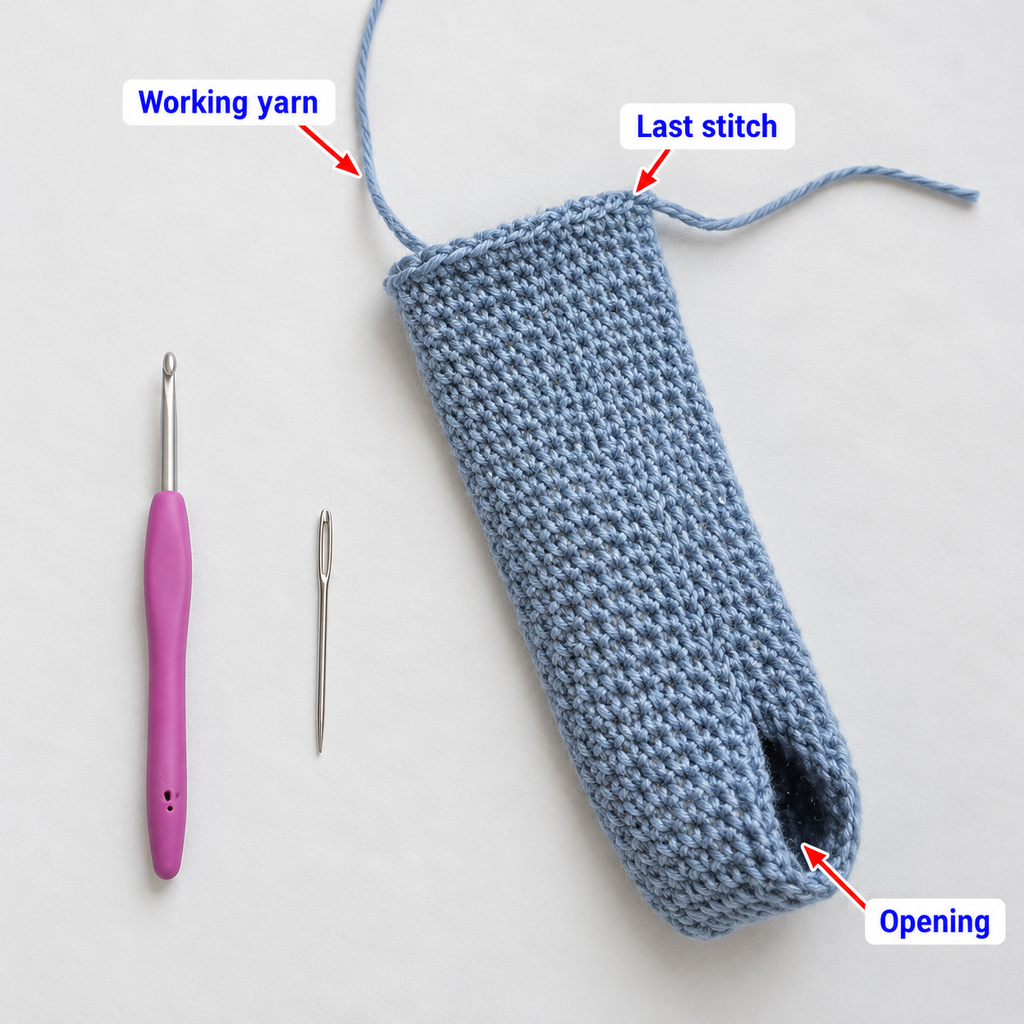
Step 6: Fold the ends into the twist shape
This is the most important construction step, but it becomes much easier once you see how the layers fit together.
Take one short end and fold it lengthwise so the upper and lower corners come toward one another, forming a U-shaped fold.
Do the same with the other short end.
You now have two folded short ends, each looking like a small open mouth.
Bring these folded ends together and interlock them.
The aim is to create four alternating layers.
Imagine one end is called A and the other is called B. Looking directly at the cut edges, the layers should alternate:
Four-layer seam, side viewSimple schematic showing alternating layers A–B–A–B. It illustrates layer order, not stitch placement.
When you look at the arrangement from the side, it resembles a loose letter S.
All four edges should be stacked together, ready to sew.
Take your time here. If the folds are uneven, gently separate the pieces and start again.
Beginner tip: Temporarily hold the layers with a locking stitch marker while you prepare the sewing needle.
Common mistake to avoid: Do not stack both layers of end A together followed by both layers of end B. The alternating arrangement is what produces the center twist.
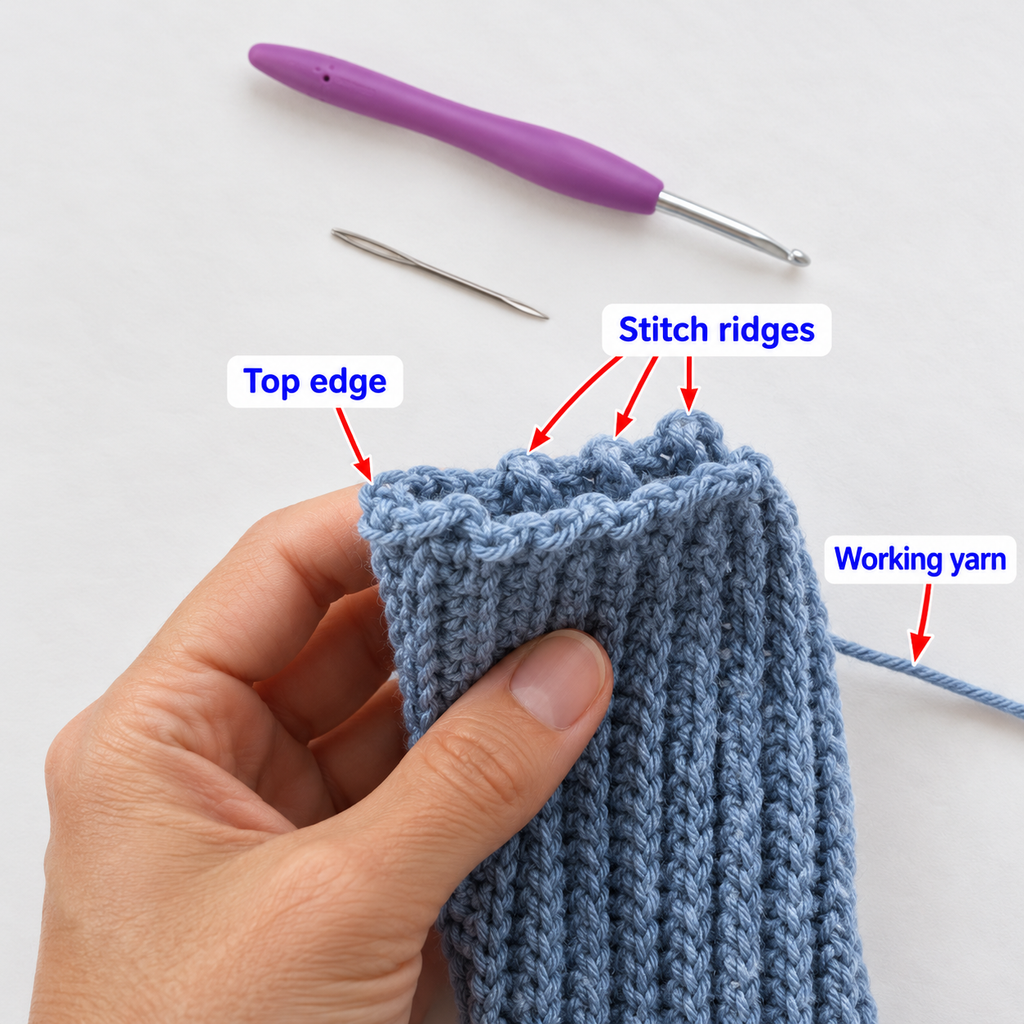
Step 7: Hold the folded layers securely
Once the four layers are correctly arranged, press them lightly between your fingers.
The short edges should line up as evenly as possible.
It’s normal for the folded fabric to look bulky at first. That extra fabric will become the gathered center when the headband is turned right side out.
Check the arrangement one more time.
Each folded end should be wrapped around part of the other end, with the layers alternating rather than sitting in two separate groups.
Move your stitch markers into position if you’re using them.
Thread the long yarn tail through a blunt tapestry needle.
If you accidentally cut the sewing tail too short, thread a separate length of matching yarn into the needle instead. You can weave in the additional ends afterward.
Beginner tip: Make a few temporary holding stitches if the fabric keeps slipping.
Common mistake to avoid: Avoid pulling the layers into a tiny, tight bundle before sewing. You need to see the edges clearly enough to catch all four layers.
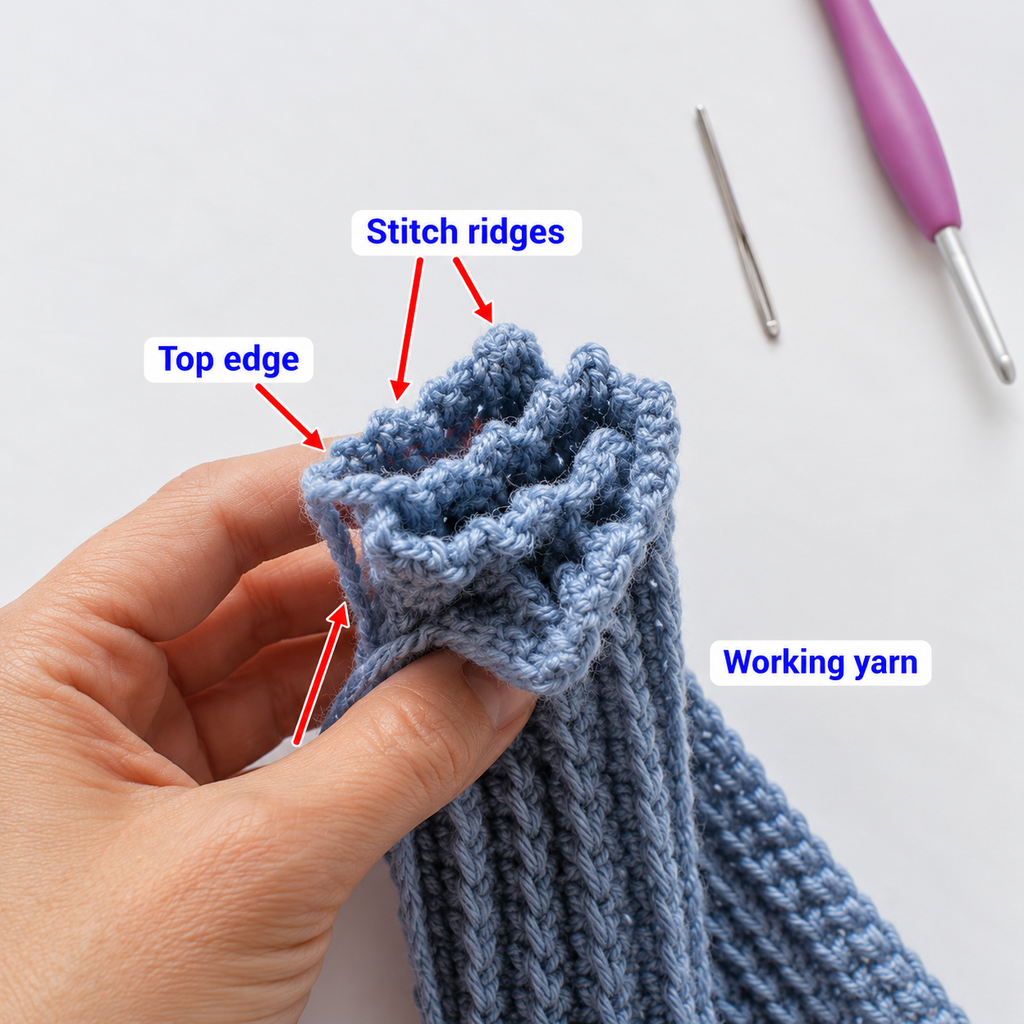
Step 8: Sew through all four layers
Now you’re ready to secure the twist permanently.
Hold the folded seam in one hand and your threaded tapestry needle in the other.
Beginning at one end of the stacked short edges, pass the needle through all four layers of crochet fabric.
Pull the yarn through, leaving the sewing yarn comfortably snug.
Continue sewing along the entire stacked short edge.
You can use a simple whip stitch. Pass the needle around the edge and through the four layers again at regular intervals.
Try to place stitches closely enough that the layers won’t separate when stretched.
Once you reach the opposite side, sew back in the other direction for additional security if needed.
Your goal is a strong seam, not a decorative one. The stitching will be hidden inside the twist.
Beginner tip: After every few stitches, inspect the underside to make sure your needle has caught every layer.
Common mistake to avoid: Sewing through only two or three layers can leave a loose opening in the finished twist. Make sure the needle passes through all four.
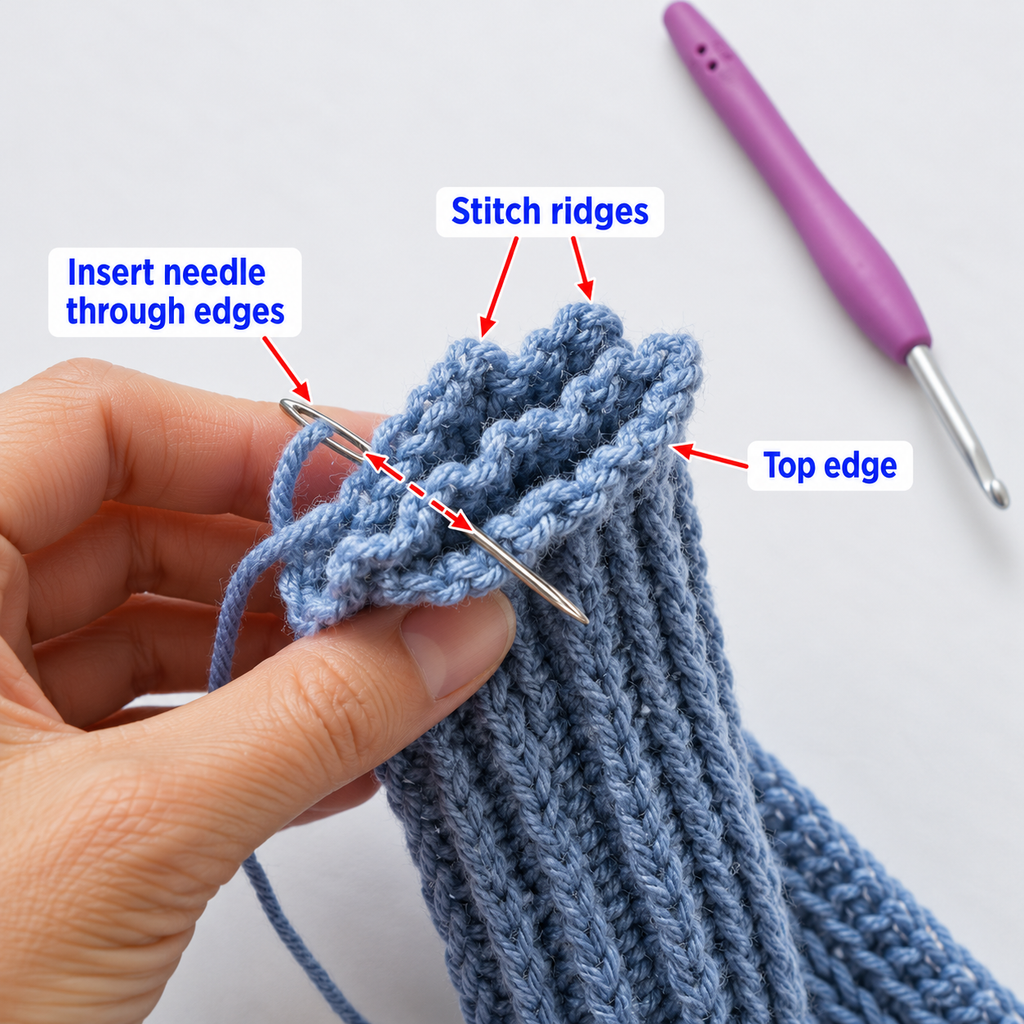
Step 9: Open the headband and reveal the twist
Once your seam is secure, carefully spread the fabric apart.
Turn the headband so the sewn seam sits inside the band.
The overlapping fabric will naturally gather at the center, forming the decorative twist.
Use your fingers to arrange the folds.
You can pull one side forward slightly or tuck a small section under the opposite fold to make the twist look more balanced.
The rest of the band should lie fairly flat.
Gently stretch the headband a few times to test your seam.
If the folds start separating, turn the band back inside out and add a few more securing stitches.
Beginner tip: A slightly asymmetrical twist is perfectly normal. Try shaping it with your fingers before deciding it needs more sewing.
Common mistake to avoid: Don’t cut the remaining yarn tail before you’ve checked that the seam is strong.
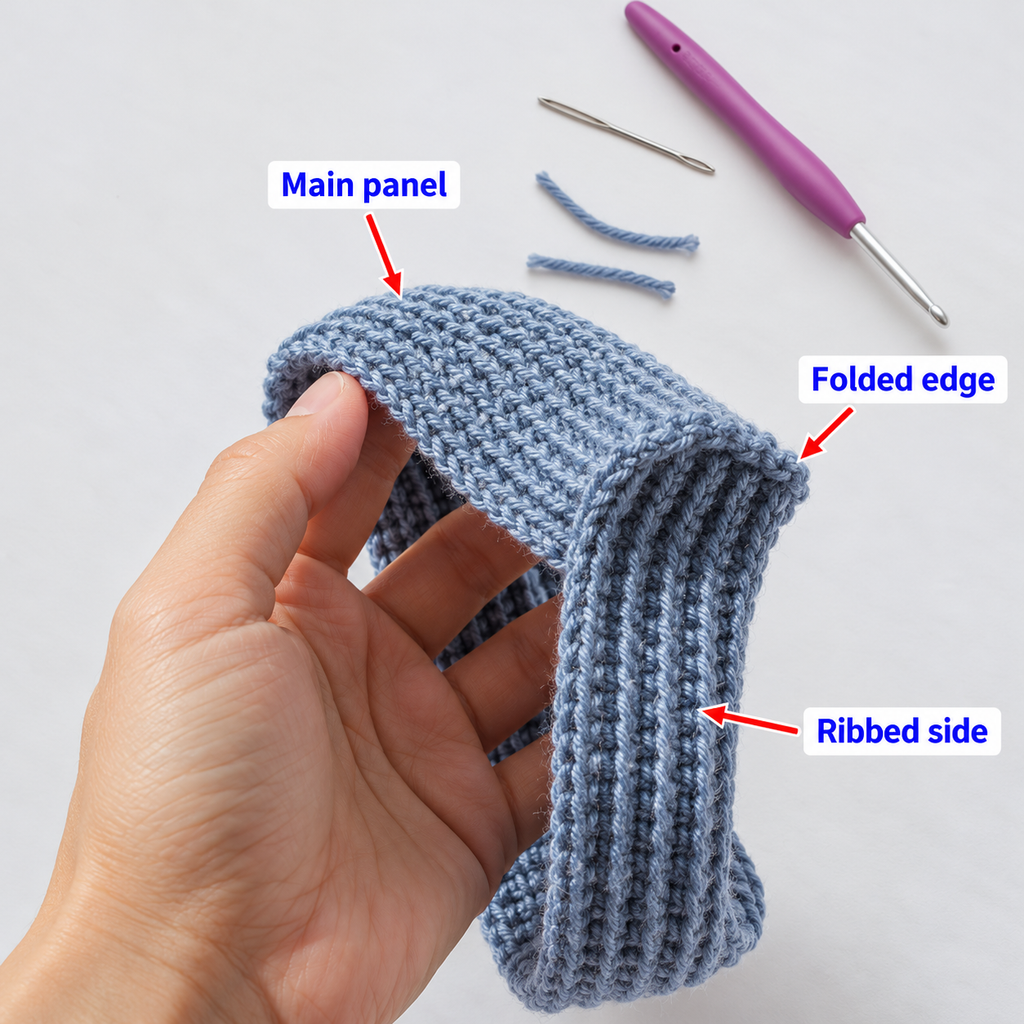
Step 10: Weave in the ends and try it on
Your ear warmer is almost finished!
Thread any remaining yarn tail through the tapestry needle.
On the inside of the headband, weave the needle under several nearby stitches. Change direction and weave back through a different path to help secure the tail.
Trim the excess yarn carefully.
Repeat for any remaining loose ends.
Try on the headband with the twist centered on your forehead.
Position the sides over your ears and the back of the band comfortably around your head.
The fit should be snug enough to stay in place but gentle enough that you could wear it for a long walk.
If it feels too tight, consider making the next one slightly longer or using a softer, stretchier yarn. If it slides backward, shorten the next band’s circumference.
Congratulations — you’ve made your own twisted crochet ear warmer!
Beginner tip: Keep notes about the starting chain, finished width, and fit. Those measurements make future gift projects much easier.
Common mistake to avoid: Don’t pull the twist flat when trying the headband on. Let the front gather naturally.
Pattern Notes and Stitch Notes
The complete stitch pattern is intentionally simple. Once you learn back-loop-only single crochet, you repeat the same action until the strip reaches the desired width.
Important turning-chain rule
The chain one at the beginning of each new row does not count as a stitch.
After turning, work your first single crochet into the actual first stitch of the previous row.
Stitch count
For the sample:
- Foundation: 73 chains.
- Row 1: 72 single crochet stitches.
- Every subsequent row: 72 back-loop-only single crochet stitches.
You should maintain the same stitch count until the end of the rectangle.
Stitch repeat
There is no special stitch multiple. You can adjust the number of starting chains to suit the desired band length.
Working flat versus in the round
This pattern is worked in rows, not joined rounds.
Do not join the beginning and end of each row with a slip stitch. Turning is essential for creating the flat rectangular fabric.
Right side and wrong side
The ribbed design is attractive on both sides.
Choose whichever side you like best as the outside before creating the twist, then turn the seam to the inside after sewing.
How to adjust the size
Measure your head circumference and aim for a comfortable amount of negative ease, based on your fabric’s actual stretch.
Because crochet tension differs from person to person, the number of chains used for one adult may not produce the same circumference for another.
If the starting chain is longer or shorter than needed, adjust it before continuing into the full strip.
For more width, simply add extra rows.
Common Beginner Mistakes and Easy Fixes
Even a straightforward crochet headband can present a few small challenges. Fortunately, most are easy to correct.
1. Your crochet rectangle gets narrower
This usually means you’re missing a stitch at the end of one or more rows.
Count the stitches after completing every row. Mark the first and last stitches if necessary.
If you’ve only lost a stitch or two in the last row, carefully undo the work to the point where the mistake occurred.
2. Your ribbing looks uneven
You may be working through both loops for some stitches and the back loop for others.
Check the top of each stitch before inserting the hook. Keep practicing until the movement becomes familiar.
3. Your starting edge is too tight
A tight foundation chain can make one edge of the headband less stretchy than the other.
Try making the starting chain with a slightly larger hook, then switch back to your chosen hook for the first row.
4. The headband is too loose
This usually means the rectangle is too long for the amount of stretch in the fabric.
Measure it against your head before sewing. For future versions, reduce the starting-chain length according to your gauge.
Do not solve a loose fit by simply pulling the sewn twist extremely tight. That will distort the front and may weaken the seam.
5. The twist doesn’t look like a twist
Check the arrangement of your four fabric layers.
The folded ends must alternate when stacked. If both layers from one end remain together, the desired shape may not form.
Undo the seam if necessary and refold the ends.
6. The seam has gaps
Your needle may have missed one or more layers.
Inspect the inside of the headband and reinforce any weak areas with additional stitches.
7. The fabric curls or feels stiff
Tension may be too tight for the chosen yarn.
Try a larger hook or relax your grip. For acrylic or wool-blend yarns, light blocking may also improve the finished shape, provided you follow the fiber’s care instructions.
How to Customize This Crochet Project
Once you’ve made your first ear warmer, it’s easy to adapt the basic construction into several different designs.
Try different yarn fibers
Soft acrylic is practical and widely available. Merino wool can be wonderfully warm, while a washable wool-acrylic blend offers comfort and easier care.
Cotton works too, but many cotton yarns have less elasticity and can feel heavier against the forehead. Consider a cotton blend if you want a warmer-weather accessory.
For particularly sensitive skin, choose a yarn that feels smooth against your neck or wrist before beginning.
Experiment with colors
A solid neutral shade will show off the twist beautifully.
Dusty sage, oatmeal, taupe, soft mauve, charcoal, and warm caramel are especially attractive for everyday winter accessories.
You can also create stripes by changing yarn colors at the beginning of selected rows.
Keep the color changes consistent so the headband looks intentional.
Change the width
Make a narrow headband by working fewer rows, or create a wider ear warmer by adding more rows.
A wider piece generally offers more ear coverage, which can be useful in cold weather.
For a child, measure their head and make the depth proportionate to their size.
Add a decorative edge
Once the rectangle is complete, consider adding a simple border before assembling the twist.
A row of single crochet along the long edges can give a more structured finish.
However, keep the border loose enough to preserve the band’s stretch.
Make matching accessories
Use the same yarn to crochet fingerless gloves, a small neck warmer, or a simple scarf.
Matching pieces make attractive handmade winter gift sets.
You could also create several headbands in different colors using the same measurements.
Gift ideas
A handmade ear warmer is a thoughtful gift for birthdays, winter holidays, and craft-loving friends.
If you’re making one for someone else, ask for their head circumference when possible. Adult sizes vary enough that one standard starting chain won’t fit everyone equally well.
Finishing Instructions
Once you’re satisfied with the shape, inspect the entire headband for loose threads, uneven loops, and unfinished areas.
The twisted seam should sit neatly on the inside. Any sewing yarn should be secured by weaving through several stitches rather than cutting it immediately at the seam.
For gentle shaping, lay the headband flat and arrange the ribbing with your fingers.
If your yarn’s care label allows it, you can lightly dampen the finished headband and let it dry naturally in its intended shape.
Avoid stretching the band far beyond its intended size during blocking.
Wool blends often benefit from gentle handwashing, while some acrylic yarns are machine washable. Always follow the instructions for the exact yarn you used.
After washing, reshape the ear warmer and dry it flat. Avoid hanging it while wet, since that can stretch the fabric.
A well-finished crochet headband should feel soft, maintain its shape, and stretch gently when worn.
Quick Printable-Style Crochet Ear Warmer Pattern Summary
Beginner Ribbed Crochet Ear Warmer
Skill level: Confident beginner
Materials: Approximately 70–110 yards of worsted-weight yarn, 5 mm hook, tapestry needle, scissors, measuring tape, optional stitch markers.
Stitches: Chain, single crochet, single crochet in back loop only.
Sample starting method: Chain 73.
Row 1: Single crochet in second chain from hook and every chain across. 72 stitches. Turn.
Row 2: Chain 1, single crochet in the back loop of every stitch across. 72 stitches. Turn.
Repeat: Continue Row 2 until the band measures approximately 4 inches (10 cm) deep or your desired width. Confirm length and fit using your own gauge.
Finishing: Fasten off with a long sewing tail. Fold the two short ends lengthwise and interlock them into four alternating layers. Sew through all four layers, turn right side out, and weave in the ends.
Finished shape: A ribbed crochet headband with a soft twisted front.
Copy pattern summary
Crochet Ear Warmer Pattern FAQ
1. What is the easiest crochet ear warmer pattern for beginners?
A flat rectangle made with single crochet is one of the simplest options. You can work back and forth without increases, decreases, or complicated shaping.
A twist-front design adds a decorative finish with a basic folded seam, making the result look more elaborate than the stitches themselves.
2. How much yarn do I need for a crochet ear warmer?
Many adult crochet ear warmers can be made with approximately 70–110 yards of medium-weight yarn, depending on size, stitch density, and yarn thickness.
Smaller headbands may use less yarn, while wider or more textured designs require more.
If you’re working with yarn leftovers, weigh the yarn before beginning to estimate whether you have enough for the project.
3. What crochet stitch is best for an ear warmer?
Single crochet worked in the back loop is a good beginner choice because it creates attractive ribbing without requiring difficult techniques.
Half double crochet and slip-stitch ribbing are also popular, but they produce different fabric thicknesses and amounts of stretch.
4. How wide should a crochet ear warmer be?
For adults, approximately 3.5–4.5 inches (9–11.5 cm) is a useful starting range.
The ideal depth depends on your head size, comfort preferences, and how much ear coverage you want.
5. Can I make this crochet ear warmer without sewing?
You can make a plain headband without a sewn twist by crocheting directly into a continuous ring or joining the ends using slip stitches.
However, the folded decorative twist in this particular construction requires a secure join through the overlapping layers.
6. Can I use bulky yarn instead of worsted-weight yarn?
Yes, but you’ll need to adjust the starting chain, hook size, and number of rows.
Bulky yarn produces a thicker and potentially warmer band. Make a small sample first to check whether the fabric feels comfortable around your forehead.
7. How do I stop my crochet headband from stretching out?
Use a yarn with reasonable elasticity, make sure your gauge is not too loose, and avoid excessively stretching the headband during blocking.
Wash it according to the yarn label and dry it flat. If you need a snug fit, measure carefully before joining the seam.
Conclusion
A simple ribbed rectangle might not look very exciting when you first start crocheting, but a few rows and one cleverly folded seam can transform it into an accessory you’ll want to wear.
This easy crochet ear warmer pattern is a useful way to practice stitch consistency, learn how to measure a wearable project, and become more confident with finishing techniques.
Try your first one in a single soft color, then experiment with wider bands, contrasting borders, or matching winter accessories.
Save this tutorial for your next cozy crochet session, or pair your new ear warmer with a beginner-friendly crochet scarf for a handmade winter gift.





