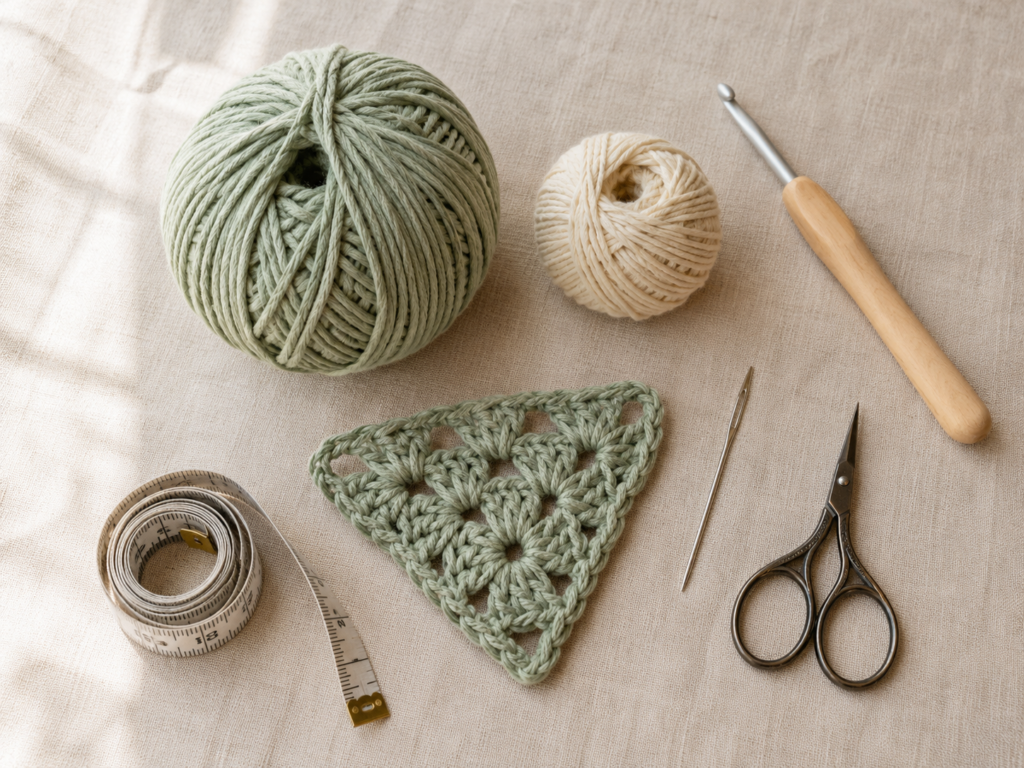
A crochet bandana is one of the best wearable projects for beginners who want something prettier than a practice square but still simple enough to finish quickly. It is small, portable, lightweight, and useful. You can wear it as a summer hair scarf, tie it over loose hair, use it as a cute kerchief, or make a softer version as a handmade gift.
This beginner crochet bandana pattern uses a granny-triangle construction. You start at the lower point, grow the triangle row by row, add a soft decorative edge, and finish with two tie straps along the straight front edge. The fabric has a breathable openwork texture, so it is comfortable for warm weather and does not feel heavy on the head.
The visual reference source chosen for this article is Marching North’s crochet bandana tutorial because it includes a clear granny-bandana flow: magic loop, early rows, granny clusters, scalloped edge, ties, and finished result. Its article explains that the project uses the granny stitch and includes a written pattern and video tutorial.
This article does not copy that pattern. Instead, it uses the same general tutorial logic as visual inspiration and builds a new original beginner version with different yarn, hook, row count, stitch counts, tie method, edging notes, sizing guidance, and image prompts.
What You’ll Learn
By the end of this tutorial, you will know how to:
- Start a crochet bandana from the lower point.
- Make a small granny triangle.
- Work double crochet clusters into chain spaces.
- Increase evenly at the center point.
- Keep both triangle sides balanced.
- Add a simple scalloped edge.
- Crochet tie straps directly onto the bandana.
- Work single crochet along the straight front edge.
- Weave in ends cleanly.
- Lightly block the finished scarf so it lies flatter.
- Customize the size for adults, teens, kids, or pets.
Materials You’ll Need
For one adult-size crochet bandana:
- DK or light worsted cotton yarn, approximately 130–170 yards.
- 4.0 mm / G-6 crochet hook for DK cotton.
- Scissors
- Tapestry needle
- Measuring tape
- Stitch marker, optional but helpful.
- Blocking mat and rustproof pins, optional.
- Optional contrast yarn for edging.
Cotton is a good choice because it is breathable, shows stitch definition clearly, and works well for summer accessories. Marching North also recommends cotton yarn for its bandana project and notes that acrylic yarn can stretch more than cotton.
The Craft Yarn Council’s yarn-weight system places DK/light worsted in the light yarn category, with hook recommendations that vary depending on exact yarn and gauge.
Crochet Abbreviations Used
This pattern uses standard U.S. crochet terms.
- ch = chain
- sc = single crochet
- dc = double crochet
- sl st = slip stitch
- st/sts = stitch/stitches
- sp = space
- rep = repeat
- RS = right side
- WS = wrong side
The Craft Yarn Council lists these common crochet abbreviations and also explains U.S./U.K. term differences, including that U.S. single crochet corresponds to U.K. double crochet and U.S. double crochet corresponds to U.K. treble crochet.
Before You Start
Skill level
This is a beginner-to-easy crochet accessory. You should already know how to make a chain and a double crochet, but the tutorial explains how the rows build.
Finished size
The sample bandana measures approximately:
- 17–18 inches across the straight front edge, not counting ties.
- 8–9 inches from front edge to lower point.
- 14–16 inch ties on each side.
This size fits many teens and adults. You can add or remove rows for different head sizes.
Gauge and tension
Gauge is flexible for this project.
A useful checkpoint:
4 granny clusters across = approximately 4 inches.
If your bandana feels stiff, go up half a hook size. If the fabric feels too loose and floppy, go down half a hook size.
US/UK terminology note
This tutorial uses U.S. terms. If you follow U.K. crochet terms, convert before starting.
How to keep the triangle straight
The bandana grows from the center point. Each row has:
- A beginning edge increase.
- Granny clusters across the side.
- A center point increase.
- Granny clusters across the second side.
- An ending edge increase.
If one side grows faster than the other, the bandana will lean.
Beginner note
Do not worry if the first three rows look small. The triangle shape becomes much clearer after Row 4 or Row 5.
Step-by-Step Crochet Tutorial
Step 1: Start the Triangle Point
Make a magic ring.
Ch 3. This counts as your first double crochet.
Into the ring, work:
2 dc, ch 2, 3 dc.
Pull the magic ring tail gently to close the center.
Turn your work.
You now have two small granny clusters separated by a chain-2 space. That chain-2 space is the lower point of the triangle.
Beginner tip:
Do not pull the magic ring completely tight until the first row is finished. It is easier to adjust the stitches while the ring still has a little space.
Common mistake to avoid:
Do not forget that the beginning ch 3 counts as one double crochet. If you add three more double crochets after the ch 3, the first side will have too many stitches.
Step 2: Work Row 2 and Begin Widening
Ch 3 and turn. This counts as your first double crochet.
Work 2 dc in the same first stitch.
In the center chain-2 space, work:
3 dc, ch 2, 3 dc.
In the top of the beginning ch-3 from the previous row, work:
3 dc.
Turn your work.
The triangle should now look wider, with the lower point clearly centered.
Beginner tip:
The center ch-2 space always receives two granny clusters separated by another ch-2. That is what keeps the point growing.
Common mistake to avoid:
Do not work the center point into a random gap. Look for the clear chain-2 space at the bottom point.
Step 3: Work Row 3 and Learn the Repeat Logic
Ch 3 and turn.
Work 2 dc in the same first stitch.
Work 3 dc in the next space.
In the center chain-2 space, work:
3 dc, ch 2, 3 dc.
Work 3 dc in the next space.
Work 3 dc in the top of the turning chain.
Turn.
At this point, you can see the pattern logic:
- Each side gains one more granny cluster per row.
- The center point stays centered.
- The first and last stitches form the straight front edge.
Beginner tip:
After each row, lay the triangle flat and check that both slanted sides look even.
Common mistake to avoid:
Do not make chain spaces between every cluster unless the row instruction calls for it. This version keeps the fabric simple and slightly denser for a wearable bandana.
Step 4: Repeat the Granny Triangle Rows
Continue growing the triangle with this repeat.
For each new row:
- Ch 3 and turn.
- Work 2 dc in the same first stitch.
- Work 3 dc in each space along the first side.
- In the center ch-2 space, work 3 dc, ch 2, 3 dc.
- Work 3 dc in each space along the second side.
- Work 3 dc in the top of the turning chain.
- Turn.
Continue until your triangle measures approximately 17–18 inches across the straight top edge.
For many DK cotton bandanas, this will be around 13–15 rows, but your exact row count may differ.
Marching North’s version gives a finished size of about 18 inches across, not counting ties, and about 10 inches long; this article’s original version targets a slightly softer DK-gauge fit.
Beginner tip:
Measure from upper corner to upper corner, not along the slanted edges.
Common mistake to avoid:
Do not keep adding rows just because the triangle looks pretty flat on the table. Try holding it against the head before adding the edging. The border will add width.
Step 5: Check the Bandana Size Before Edging
When the triangle body is close to the right size, stop and check the fit.
Hold the straight edge across the front hairline area or behind the head, depending on how you prefer to wear a bandana. The upper corners should reach close to the sides of the head before the ties begin.
For an adult size, aim for:
- 17–18 inches across before ties.
- 8–9 inches from straight edge to lower point.
- Enough width that the triangle covers the top or back of the hair comfortably.
For a child size, stop several rows earlier.
For a larger head scarf, add one extra row.
Beginner tip:
Cotton relaxes slightly after blocking and wearing, so avoid making the bandana dramatically oversized.
Common mistake to avoid:
Do not compare only the row count. Compare the actual measurement, because your tension may be different from someone else’s.
Step 6: Add a Simple Scalloped Edge
Keep the yarn attached.
You will now work along the two slanted sides only, not across the straight top edge yet.
Ch 1.
Along the first slanted edge:
- Sl st into the next available stitch or space.
- Work 5 dc into the next open space.
- Sl st into the center or next stable stitch between clusters.
- Repeat this shell pattern down to the bottom point.
At the bottom point, work 7 dc into the center point space to create a rounded shell.
Continue up the second slanted edge:
- Sl st into the next stable stitch or space.
- Work 5 dc into the next open space.
- Continue until you reach the upper corner.
The scalloped edge should look decorative but not overly ruffled.
Beginner tip:
If your shells look too crowded, use 4 dc instead of 5 dc for each shell.
Common mistake to avoid:
Do not force a shell into every tiny gap. Space the shells evenly so the edge lies flat.
Step 7: Crochet the First Tie
When you reach the first upper corner, do not fasten off.
Ch 70 for an adult tie.
For a child size, ch 55–60.
For extra-long ties, ch 80.
Starting in the second chain from the hook, slip stitch back along the chain until you return to the bandana corner.
Slip stitch into the same corner area to secure the tie.
This creates a firm cord that is stronger and neater than a plain chain.
Beginner tip:
Keep the chain relaxed. If the chain is too tight, slip stitching back into it will be frustrating.
Common mistake to avoid:
Do not twist the chain while slip stitching back. Keep it flat between your fingers.
Step 8: Work Across the Straight Front Edge
After the first tie is secured, work across the straight front edge.
Sc evenly across the front edge until you reach the opposite upper corner.
For this sample, aim for approximately 50–60 sc across the straight edge, depending on how many rows you made and how your stitches are spaced.
You do not need an exact number as long as the edge lies flat.
Work one single crochet into each logical edge space. Avoid bunching several stitches into one spot.
Beginner tip:
If the front edge pulls inward, you used too few single crochets. If it ripples, you used too many.
Common mistake to avoid:
Do not crochet only into the side of every row without checking flatness. Edge stitches often need small adjustments.
Step 9: Crochet the Second Tie and Fasten Off
At the second upper corner, ch the same number you used for the first tie.
For the sample:
Ch 70.
Starting in the second chain from the hook, sl st back along the chain.
When you return to the bandana, sl st into the corner to secure the tie.
Cut the yarn, leaving a 6-inch tail.
Pull the tail through the final loop to fasten off.
Beginner tip:
Count your second tie carefully so both ties are the same length.
Common mistake to avoid:
Do not fasten off before securing the second tie to the bandana corner.
Pattern Notes or Stitch Notes
Turning chain rules
In this pattern, the beginning ch 3 counts as one double crochet.
That means each row begins with ch 3, then additional double crochets are worked into the same starting stitch to build the edge increase.
The Craft Yarn Council notes that turning chains can count as stitches in double crochet rows, depending on the pattern instructions.
Granny cluster
A granny cluster in this tutorial means:
3 dc worked into the same space.
Center point
The center point is built with:
3 dc, ch 2, 3 dc
This keeps the lower tip of the bandana pointed and centered.
Row repeat
For each repeat row:
- Increase at the first stitch.
- Work clusters in spaces.
- Increase at the center point.
- Work clusters in spaces.
- Increase at the last stitch.
Right side and wrong side
Because this bandana is turned after every row, both sides are visible. Choose the side you prefer as the right side before weaving in ends.
Size adjustment notes
For a smaller bandana:
- Stop 2–3 rows earlier.
- Make shorter ties.
For a larger bandana:
- Add 1–2 rows.
- Add 10–15 chains to each tie.
For finer yarn:
- Expect more rows.
- Use a smaller hook.
- Measure frequently.
For worsted yarn:
- Expect fewer rows.
- Use a 5.0 mm hook.
- Watch for stiffness.
Common Beginner Mistakes
1. The triangle leans to one side
Cause: One side has more clusters than the other.
Fix: Count the spaces on each side before working the center point.
2. The center point looks rounded instead of pointed
Cause: The center chain space is too small or the stitches are worked too tightly.
Fix: Use ch 2 at the point and relax your tension.
3. The top edge is too tight
Cause: Too few single crochet stitches across the front edge.
Fix: Add a few more evenly spaced single crochets across the edge.
4. The scalloped border ripples
Cause: Too many shell stitches or too many double crochets per shell.
Fix: Reduce each shell from 5 dc to 4 dc, or skip slightly more space between shells.
5. The ties twist
Cause: The tie chain twisted before slip stitching back.
Fix: Lay the chain flat on the table before working slip stitches.
6. The bandana feels stiff
Cause: Hook too small, yarn too thick, or tight tension.
Fix: Use a larger hook or softer cotton yarn.
7. The bandana is too large
Cause: Too many rows or bulky yarn.
Fix: Remove one or two body rows before adding the border.
How to Customize This Crochet Project
Yarn changes
Cotton is the most practical choice for warm-weather bandanas. A cotton-bamboo blend can add drape. Acrylic can work, but it may stretch more and feel warmer.
Color changes
Try:
- Solid sage green.
- Cream with terracotta edging.
- Yellow with white scallops.
- Dusty blue with ivory ties.
- Striped rows.
- One contrast row near the edge.
- Variegated cotton yarn.
Size changes
For toddlers, make a smaller triangle and shorter ties.
For adults who prefer more coverage, add one extra repeat row.
For a dog bandana, reduce the triangle height and measure around the neck carefully.
Border options
Instead of scallops, try:
- Plain single crochet.
- Picot edge.
- Reverse single crochet.
- Small shell border.
- Contrast-color border.
Texture options
For a denser bandana, use solid double crochet rows.
For a lacier bandana, add chain-1 spaces between clusters.
For a vintage look, use cream cotton and a picot edge.
Gift ideas
A finished crochet bandana makes a strong handmade gift for:
- Summer birthdays.
- Craft-market inventory.
- Teen accessories.
- Festival outfits.
- Beachwear.
- Bridesmaid hair accessories.
- Matching mother-and-child sets.
Finishing Instructions
Fastening off
After the final slip stitch, cut the yarn with a 6-inch tail.
Pull the tail fully through the loop.
Tighten gently.
Weaving in ends
Use a tapestry needle.
Weave the tail through the back of several nearby stitches.
Change direction once and weave through a few more stitches.
Trim close to the fabric.
Do not cut tails too short before weaving; short tails can pop out after wearing.
Blocking
Blocking helps the triangle lie flatter and makes the scalloped edge look cleaner.
For cotton yarn:
- Lightly mist the bandana with water.
- Lay it flat on a towel or blocking mat.
- Shape the triangle evenly.
- Pin the lower point and upper corners.
- Smooth the scallops.
- Let it dry completely.
Washing and care
Follow your yarn label.
For most cotton crochet accessories, gentle hand washing and flat drying are safest.
Avoid hanging the bandana while wet because the ties may stretch.
Quick Printable-Style Summary
Skill level: Beginner to Easy
Finished size: Approximately 17–18 inches across, not including ties.
Yarn: DK or light worsted cotton.
Hook: 4.0 mm for DK cotton; adjust as needed.
Stitches: Chain, slip stitch, single crochet, double crochet.
Starting method: Magic ring.
Row 1: Ch 3, 2 dc, ch 2, 3 dc into ring.
Repeat: Grow the triangle with granny clusters along both sides and 3 dc, ch 2, 3 dc at the center point.
Body size: Work until the straight edge is about 17–18 inches across.
Border: Add a simple scalloped edge along the two slanted sides.
Ties: Chain 70 at each upper corner, slip stitch back along each chain.
Front edge: Single crochet evenly across the straight edge.
Finishing: Fasten off, weave in ends, lightly block.
FAQ
Is a crochet bandana pattern good for beginners?
Yes, especially a granny-triangle bandana. It uses simple stitches and grows in a predictable shape. The main skills are counting clusters, finding the center point, and keeping both sides even.
What yarn is best for a crochet bandana?
Cotton yarn is usually best because it is breathable and holds stitch definition well. DK cotton creates a softer drape, while worsted cotton makes a slightly sturdier bandana.
How many rows should a crochet bandana have?
It depends on yarn, hook size, and head size. For DK cotton, around 13–15 rows often works for an adult. Always measure the straight edge before adding the border.
Can I make this bandana without a magic ring?
Yes. Ch 4, join into a ring, then work the first row into that ring. The center may have a small hole, but it usually blends into the open granny texture.
Why is my crochet bandana curling?
Curling usually comes from tight tension, an incorrect center increase, or too few edge stitches. Try relaxing your tension, checking the center point, and blocking the finished bandana.
Can I make a crochet bandana for a child?
Yes. Stop several rows earlier and make shorter ties. Measure the width from one side of the head to the other before adding the border.
Can I sell finished crochet bandanas?
Usually you can sell finished handmade items from many free patterns, but always check the original designer’s terms before selling items directly based on a specific pattern. For this original tutorial, you may use the finished item concept commercially, but do not copy this article text or image prompts as your own.
Conclusion
This crochet bandana pattern is a practical next step after learning basic stitches. The granny-triangle structure is simple, but the finished result looks polished enough to wear, gift, photograph, or sell at craft markets.
The most important checkpoints are the first three rows, the center point, and the final size before edging. Once the triangle is the right width, the scalloped border and tie straps turn it into a complete wearable accessory.
Make the first version in one solid cotton yarn. After that, experiment with contrast borders, stripes, picot edging, or finer yarn for a more delicate summer head scarf.





